
Loading...
Loading...
Loading...
Loading...
Loading...
Loading...
Loading...
Loading...
Loading...
Loading...
Loading...
Loading...
Loading...
Loading...
Loading...
Loading...
Loading...
Loading...
Loading...
Loading...
Loading...
Loading...
Loading...
Loading...
Loading...
Loading...
Loading...
Loading...
Loading...
Loading...
Loading...
Loading...
Loading...
Loading...
Loading...
Loading...
Loading...
Loading...
Loading...
Loading...
Loading...
Loading...
Loading...
Loading...
Loading...
Loading...
Loading...
Loading...
Loading...
Loading...
Loading...
Loading...
Loading...
Loading...
Loading...
Loading...
Loading...
Loading...
Loading...
Loading...
Loading...
To run the migration-center Database and WebClient installers you need a 64-bit Java 8 or Java 11 installed and either the JAVA_HOME or JRE_HOME environment variables set.
Note that the JAVA_HOME and JRE_HOME variables should point to the root install folder of JDK or JRE and should not contain the \bin folder in the path.
fme AG Wolfenbütteler Straße 33 38102 Braunschweig Phone: +49 531 2 38 54-0 Mail: info(at)fme.de
Website: www.fme.de
Management board
Dirk Bode (Chairman), Daniel Pelke (Executive Board Member)
Supervisory board
Stefan H. Tarach (Chairman), Dr. Axel Krieger (Deputy), Dr. Markus Böhme
Registry Court: District court Brunswick
Register number: HRB 5422
Identification number according to § 27 a Sales Tax Act (UStG): DE 178236072
Our general terms and conditions apply to services provided by us. Our general terms and conditions are available at . They stipulate that German law applies and that, as far as permissible, the place of jurisdiction is Brunswick.
Reference is made to the European Online Dispute Resolution Platform (ODR platform) of the European Commission. This is available at .
fme AG does not participate in dispute resolution proceedings before a consumer arbitration board and we are not obliged to do so.
We are responsible for the content of our website in accordance with the provisions of general law, in particular Section 7 (1) of the German Telemedia Act (TMG). All content is created with due care and to the best of our knowledge and is for information purposes only. Insofar as we refer to third-party websites on our Internet pages by any means (e.g. hyperlinks), we are not responsible for the topicality, accuracy and completeness of the linked content, as this content is outside our control and we have no influence on its future design. If you consider any content to be in breach of applicable law or inappropriate, please let us know.
The legal information on this page as well as all questions and disputes in connection with the design of this website are subject to the law of the Federal Republic of Germany.
Our data protection information is available at .
The texts, images, photos, videos, graphics and Software, especially code and parts thereof, on our website are generally protected by copyright. Any unauthorized use (in particular the reproduction, editing or distribution) of this copyright-protected content is therefore prohibited without our consent (e.g. license) or an applicable exception or limitation. If you intend to use this content or parts thereof, please contact us in advance using the information provided above.
This online documentation describes how to use the migration-center software in order to migrate content from a source system into a target system (or into the same system in case of an in-place migration).
Please see the for a summary of new and changed features as well as known issues in the migration-center releases.
Also, please make sure that you have read before you install and use migration-center in order to achieve the best performance and results for your migration projects.
The supported source and target systems and their versions can be found in the page.
Migration-center is a modular system th at connects to the various source and target systems using different connectors. The source system connectors are called scanners and the target system ones are called importers. The capabilities and the configuration parameters of each connector are described in the corresponding manual.
You can find the explanations of the terms and concepts used in this manual in the .
WebClient component
Jobserver component
For additional tips and tricks, latest blog posts, FAQs, and helpful how-to articles, please visit our user forum.
In case you have technical questions or suggestions for improving migration-center, please send an email to our product support at [email protected].
Migration Set A migration set comprises a selection of objects (documents, folders) and set of rules for migrating these objects. A migration set represents the work unit of migration-center. Objects can be added or excluded based on various filtering criteria. Individual transformation rules, mapping lists and validations can be defined for a migration set. Transformation rules generate values for attributes, which are in turn validated by validation rules. Objects failing to pass either transformation or validation rules will be reported as errors, requiring the user to review and fix these errors before being allowed to import such objects.
Attribute A piece of metadata belonging to an object (e.g. name, author, creation date, etc.). Can also refer to the attribute’s value, depending on context.
Transformation Rules A set of rules used for editing, transforming and generating attribute values. A set of transformation rules is always unique to a migration set. A single transformation rules is comprised of one or several different steps, where each step calls exactly one transformation function. Transformation rules can be exported/imported to/from files or copied between migration sets containing the same type of objects.
Transformation Function Transformation functions compute attribute values for a transformation rule. Multiple transformation functions can be used in a single transformation rule.
Job Server The migration-center component listening to incoming job requests, and running jobs by executing the code behind the connectors referred by those jobs. Starting a scanner or importer which uses the Documentum connector will send a request to the Jobserver set for that scanner, and tell that Jobserver to execute the specified job with its parameters and the corresponding connector code.
Transformation The transformation process transforms a set of objects according to the set of rules to generate or extract.
Validation Validation checks the attribute values resulting from the Transformation step against the definitions of the object types these attributes are associated with. It checks to make sure the values meet basic properties such as data type, length, repeating or mandatory properties of the attributes they are associated with. Only if an object passes validation for every one of its attributes will it be allowed for import. Objects which do not pass validation are not permitted for import since they would fail anyway.
Mapping list A mapping list is a key-value pair used to match a value from the source data (the key) directly to the specified value.
AIP - Archival Information Package
AIU - Archival Information Unit
BLOB - Binary large object
DB - Database
CSV - Comma separated values
CLOB - Character large object
DCTM - Documentum
DFC - Documentum Foundation Classes
DMS - Document Management System
DSS - Data Submission Session
GB - Gigabyte
GHz - Gigahertz
IA - InfoArchive
JDBC - Java database connectivity
JRE - Java Runtime Environment
JVM - Java Virtual Machine
KB - Kilobyte
MB - Megabyte
MS - Microsoft
MHz - Megahertz
RAM - Random Access Memory
regex - Regular expression
SIP - Submission Information Package
SPx - Service Pack x
SQL - Structured Query Language
XML - Extensible Markup Language
XSD - File that contains a XML Schema Definition
XSL - File that contains Extensible Stylesheet Language Transformation rules
Open the WebClient URL address in the browser: https://<server-name>/mc-web-client/login
After the page loads, click on Manage connections and create a new database connection with all the needed details.
You can connect to your migration-center Database using the default credentials:
User: fmemc
Password: migration123
After the installation is complete, the Jobserver needs to be started before it can be used.
You can start or stop the service using the scripts in the Jobserver folder:
startService.bat for starting the service
stopService.bat for stopping the service
Or by opening the Windows Services window, selecting the Migration Center Job Server service and starting it.
Alternatively the server can be started in console mode using the runConsole.bat script.
The Linux Job Server can be started or stopped by running equivalent Linux scripts inside the “Jobserver/bin” folder
./startDaemon.sh for starting the daemon
./stopDaemon.sh for stopping the daemon
Instead of installing the Job Server as a service/daemon, you can run it in the terminal by executing the script ./runConsole.sh in the bin folder.
WebClient
NEW Debug a single Transformation Rule (#69005) (See section in WebClient User Guide)
NEW Transformation Rule Snippets (#63409) (See section in WebClient User Guide)
Fail object validation if required attributes have no rule associated to them (#69998)
Database
Can install Postgres DB with fmemc as non super user (#70138)
Cara Importer
Allow multiple internal object types to be mapped to a single cara type (#70968)
Allow using "object_id" when importing Object Reference attributes (#71143)
SharePoint Online Importer
Added support for scanning from SharePoint 2019 (#70152)
Tools
New Tool for migrating Oracle databases to Postgres (#67415) (Please contact [email protected] to get access to the tool)
WebClient
Status code 500 error on saving scheduler (#69745) (23.3 Hotfix available)
Empty CSV file is exported when many objects and file is too big (#69842)
Manually editing attributes will set empty string instead of no value for all empty attributes (#67026)
Installer
Database update throws error when DB does not contain Cara Adapter (#71506) Fixed in MC24.1-h1.zip
WebClient
Browser page out of memory when loading large source objects repeatedly (#70413)
This section describes how to uninstall the individual components of migration-center.
The migration-center WebClient can be uninstalled by running the unins000.exe uninstall wizard located in the WebClient installation folder.
It can also be uninstalled by using „Add or Remove Programs“ or “Programs and Features” item in the Control Panel (depending on the version of Windows used). You can find the WebClient listed under the name „migration-center WebClient <Version>“, it can be uninstalled by selecting the entry and clicking [Remove].
Uninstalling the migration-center database schema will delete all data within that schema. It is no longer possible to recover the information after that. Please back up the database schema before uninstalling it.
Make sure no connections with the user FMEMC exist, otherwise the scripts will fail to execute properly. Should this happen, the scripts can be re-run after closing all connections of the user.
An uninstall script is provided with the migration-center installation package. The drop_fmemc_schema.sql script can be found in .../database/oracle/util.
Run this script against the Oracle database instance using the SYS user. The FMEMC schema should be removed using the Oracle administration tool of your choice.
Two scripts are provided with the migration-center installation package to remove the PostgreSQL packages, the fmemc user and its schemas.
The scripts can be found in database/postgres/Install. Run these scripts against the PostgreSQL database instance using the Postgres user in this order:
drop_packages.sql
drop_user_fmemc.sql
The migration-center Server Components can be uninstalled by running the unins000.exe uninstall wizard located in the Jobserver installation folder. It can also be uninstalled by using “Add or Remove Programs” or “Program and Features” item in the Control Panel (depending on the version of Windows used). You can find the Server Components listed under the name “migration-center Server Components <Version>” and can be uninstalled by selecting the entry and clicking [Remove].
Uninstall links are also provided in the Start Menu program group created during installation. By default, this is Start-> (All) Programs-> fme AG-> migration-center Server Components <Version>.
The SharePoint connectors have an additional CSOM service which can be installed as an extra step not mentioned in this user guide. Please uninstall any CSOM services you might have before uninstalling the Jobserver
To uninstall the Job Server as a service/daemon, follow these steps:
Go to the “bin” folder inside “Jobserver” folder
Run the command ./uninstallDaemon.sh
Visual indication when object table columns are hidden (#70112)
Copy / duplicate Object Type (#69918)
Clear all entries of a mapping list (#69927)
Better naming of migset config XML export (#69036)
WebClient uses object column preferences saved in DB by Desktop Client (#69843)
Function with attribute that no longer exists does not change when setting first entry of new existing attribute list (#69713)
Object filtering fails on Postgres if value contains backslash "\" (#69575)
Status code 500 error on saving scheduler (#69745)
Error when filtering by static column in the source objects of a specific scan run (#70376)
Hiding mapping list columns hides only column headers and not values (#70720)
Object CSV export fails when Scanner or Migset has "," in name (#70717)
Database
getDataFromSQL throws error when used in multivalue rule (#70201)
Jobserver
Fixed database connection leak (#70667)
Alfresco
Alfresco adapter does not work with Alfresco version <6.0 with Java 8 (#70067)
Cara Importer
Cannot set Object Reference to object with status = "Hidden" (#70513)
Wrong audittrail_list values set when attribute names and values are cut off (#70806)
Remove "Latest" label checks when setting Latest Version Object Reference (#70478)
attribute_list/attribute_list_old with multiple values cuts off " at begining and end (#70944)
CSV / Excel Scanner
Scanning versions from very large CSV files takes too much time (#69828)
Database Scanner
Error when using uppercase SELECT or FROM in query file (#70505)
Exchange Scanner
Socket closed error when using multiple threads (#70047)
Scanning fails for all emails when using export as .msg (#70046)
SharePoint Online Scanner
Scanner does not work via Proxy with Authentication (#63007)
Veeva Importer
NullPointerException in Veeva Importer when Object has empty name__v (#70862)
Migset config XML export fails when migset name has "," (#71145)
Object View loading stops when downloading CSV (#71132)
Error when debugging new unsaved rule (#70370)
Migset ownership service does not release ownership if user times out (#69999)
Session can die without notice while working on migsets for long time (#70000)
Refreshing source objects after filtering value on column with upper case letters fails (#69629)
Save button reamins disable after deleting a rule with error (#69515)
Database Scanner
Scanning versions from Postgres with lowercase column names fails with unclear errors (#70726)
SharePoint Online Scanner
NullReferenceException when specified proxy is not valid/working (#70139)
Veeva Importer
bypassObjectValidationRules does not work for update objects (#70975)
To check the Java version used by the Web Client you can open the About section:
When you need to change the Java installation on a machine with the Jobserver and WebClient already installed, the services for each component must be configured to use the new java.
Set the JAVA_HOME (for JDK) or JRE_HOME (for JRE) to point to the new Java installation folder.
First ensure there are no running jobs on the Jobserver
Go to the Server Components folder (default is C:\Program Files (x86)\fme AG\migration-center Server Components x.xx) and run the following two scripts in order using Run as Administrator:
UninstallWinNTService.bat
InstallAsWinNTService.bat
Then ensure the server is started again with the appropriate credentials if needed.
Go to the C:\Program Files (x86)\fme AG\migration-center Web Client\bin folder and open the McWebClientw.exe file.
On the Java tab edit the Java Virtual Machine field to point to the jvm.dll file under your new Java install. In some java versions it's directly under bin\server\jvm.dll while in others it's under \jre\bin\server\jvm.dll. Here's an example on how the path should look:
C:\Program Files\Java\OpenJDK\jdk-8.402\jre\bin\server\jvm.dll
After setting this restart the WebClient service using the Windows Services window.
For the migration-center Jobserver to access network shares successfully, you need to configure which user is used for this. This is needed when using a network share in the parameter of any connector (i.e. exportLocation) or when working with objects that have the content saved on a network share.
There are two main ways of configuring this:
This method consists of configuring the Jobserver service to run with the local user account that you are are currently logged into your Windows session. Afterwards create the entry in the Credential Manager to the network share you wish to access.
Open the properties of the migration-center Job Server service and access the Log On tab. Select This account and enter the details of the user you are currently logged on to:
Then either try to access the network share in Windows Explorer and make sure to check Remember my credentials checkbox after entering the account details:
Or access the Credentials Manager directly and create a new entry for the network share with the account that has access to it.
This method consists of configuring the Jobserver service to run with a Active Directory / Domain user and configuring the network share with access for that user directly:
Mapped network drives are not visible to applications running as a Windows Service. Therefore avoid using them with migration-center.
Since in migration-center all the critical data and configuration is saved in the database, only backing up the migration-center database schema is needed.
Before starting the backup process ensure that there are no scanners, importers, transformation / validation jobs and no scheduled jobs running
To back up a database used by migration-center it is sufficient to back up only the data within the FMEMC schema. The easiest way to do this is with Oracle’s EXP. See screen shot below for the basic steps required to back up a schema. For more information consult the documentation provided by Oracle.
Starting with Oracle 11g release 2, the empty table might not be exported at all. This happens when the database parameter DEFERRED_SEGMENT_CREATION is set to TRUE. Initially this parameter is set to TRUE. To force exporting all tables from the FMEMC schema the following commands should be run connected as user FMEMC:
ALTER TABLE SCHEDULER_RUNS ALLOCATE EXTENT;
ALTER TABLE SCHEDULERS ALLOCATE EXTENT;
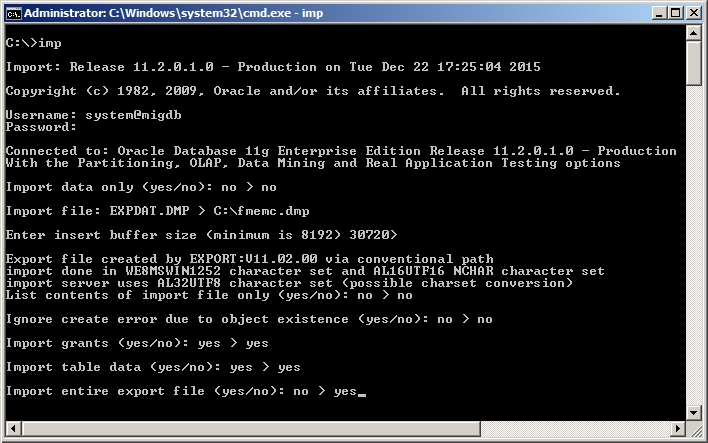
To restore the backup, follow the steps below:
If the database instance where the backup should be restored does not contain the FMEMC user, please create it first as it this describe in the .
Use Oracle’s “imp” utility for importing the dump file previously created by the “exp” utility. See screen shot below for the basic steps required to restore a database schema from a dump file. For more information consult the documentation provided by Oracle.
The same character sets in the Oracle Client should be used when exporting and importing the data.
Here is a list of all the versions supported by migration-center for all of our source and target systems:
WARNING|wrapper|24-01-31 16:29:16|YAJSW: yajsw-stable-12.13a
WARNING|wrapper|24-01-31 16:29:16|OS : Windows 10/10.0/amd64
WARNING|wrapper|24-01-31 16:29:16|JVM : Oracle Corporation/11.0.7/C:\Program Files\RedHat\java-11-openjdk-11.0.7-1/64This set of parameters is present in every adaptor.
Name*
Enter a unique name for this scanner
Adapter type*
Select the required connector from the list of available connectors
Location*
Select the Job Server location where this job should run. Job Servers are defined in the Jobserver window. If no Job Server was selected, migration-center will prompt the user to define a Job Server Location when saving the scanner.
Description
Enter a description for this scanner (optional)
Parameters marked with an asterisk (*) are mandatory.
All adaptors have the loggingLevel parameter which sets the verbosity of the run log.
The loggingLevel parameter can have one of 4 numerical values:
1 - logs only errors during scan
2 - is the default value reporting all warnings and errors
3 - logs all successfully performed operations in addition to any warnings or errors
4 - logs all events (for debugging only, use only if instructed by fme product support since it generates a very large amount of output. Do not use in production)
Microsoft Exchange
2010
Microsoft Outlook
2007, 2010
Microsoft SharePoint
2007, 2010, 2013, 2016, 2019, SharePoint Online
OpenText Content Server
9.7.1, 10.0, 10.5, 16.x, 20.4, 21.4, 22.4
Veeva Vault
Veeva Vault API 22.3
Target System
Supported Versions
Alfresco
3.4, 4.0, 4.1, 4.2, 5.0.2, 5.1, 5.2, 6.1.1, 6.2, 7.1, 7.2, 7.3.1
Documentum Server
5.3 – 7.3, 16.4, 16.7, 20.2, 20.4, 21.4, 22.4 (MC supports DFC 5.3 and higher)
Documentum D2
4.7, 16.5, 16.6, 20.2, 20.4, 21.4, 22.4
Documentum for Life Sciences
16.4, 16.6, 20.2, 20.4, 21.4
Generis Cara
5.3 - 5.9
Source System
Supported Versions
Alfresco
3.4, 4.0, 4.1, 4.2, 5.2, 6.1.1, 6.2, 7.1, 7.2, 7.3.1
Database
any SQL compliant database having a (compatible) JDBC adapter
Documentum Server
4i, 5.2.5 - 7.3, 16.4, 16.7, 20.2, 20.4, 21.4, 22.4 (MC supports DFC 5.3 and higher)
IBM Notes / Domino
6.x and above
When migrating from a source system in one timezone to a target system in a different timezone, migration-center converts the DateTime values deppending on some factors.
Note that the following connectors do not convert the date values on scan or import: OpenText Content Server connectors and the Database scanner.
DateTime values are converted when an object is scanned from source or imported into target based on the Timezone set on the Jobserver machine (Windows or Linux).
(the SharePoint scanner is a special case and has a dedicated section in this article)
The Source system is located in Portugal, West European Time zone WET (=UTC). The migration-center's job server is located in Germany, Central European Time zone CET (=UTC+1). The Target system is located in Finland, Eastern European Time zone EET (=UTC+2).
A Documentum scanner would convert the WET timezone into CET timezone and store the values in the MC database. (adds 1 hour) A Documentum importer would convert the CET values from the database into EET values before saving them in the target system. (adds 1 hour)
Different job servers are used for scanning and importing and they are located in different time zones. If this is the case, please ensure that all job servers used in that particular migration have the same time zone setting.
Either source or target system is OpenText Content Server or database. In this case, please set the job server's time zone to the time zone of the OpenText or database system.
Source and target systems are OpenText Content Server or database, i.e. migration from database to OTCS or from OTCS to OTCS. Unfortunately, this case is currently not supported by migration-center. Please contact our product support to discuss possible solutions for this case.
The SharePoint scanner consists of two parts: a WSP part that is installed on the SharePoint server and a Java part that is in the migration-center Jobserver.
The WSP part will read date time values with the time zone settings in SharePoint's regional settings, for example West European Time in the example above. Unfortunately, the Java part of the SharePoint scanner always expects date time values in UTC. Therefore the time zone on the job server must be set to Coordinated Universal Time (UTC). This will ensure that the scanner saves the correct date time values in the migration-center database.
The Outlook scanner can extract messages from an Outlook mailbox and use it as input into migration-center, from where it can be processed and migrated to other system supported by the various mc importers.
The Microsoft Outlook Scanner currently supports Microsoft Outlook 2007 and 2010 and uses the Moyosoft Java Outlook Connector API to access an Outlook mailbox and extract emails including attachments and properties.
The Outlook scanner does not work with Java 11. Please use Java 8 for the Jobserver that will run the scanner.
To create a new Outlook Scanner job, specify the respective adapter type in the Scanner Properties window – from the list of available connectors, “Outlook” must be selected. Once the adapter type has been selected, the Parameters list will be populated with the parameters specific to the selected adapter type, in this case the Outlook connector’s.
The Properties window of a scanner can be accessed by double-clicking a scanner in the list, or selecting the Properties button or entry from the toolbar or context menu.
The common adaptor parameters are described in .
The configuration parameters available for the Outlook Scanner are described below:
scanFolderPaths* Outlook folder paths to scan.
The syntax is \\<accountname>[\folder path]. The account name at least must be specified. Folders are optional (specifying nothing but an account name would scan the entire mailbox, including all subfolders). Multiple paths can be entered by separating them with the “|” character.
Example: \\user@domain\Inbox would scan the Inbox of user@domain (including subfolders)
excludeFolderPaths Outlook folder paths to exclude from scanning. Follows the same syntax as scanFolderPaths above.
Example: \\user@domain\Inbox\Personal would exclude user@domain’s personal mails stored in the Personal subfolder of the Inbox if used in conjunction with the above example for scanFolderPaths.
Parameters marked with an asterisk (*) are mandatory.
The Outlook scanner connects to a specified Outlook mail account and can extract messages from one (or multiple) folder(s) existing within that accounts mailbox. All subfolders of the specified folder(s) will automatically be processed as well; an option for excluding select subfolders from scanning is also available. See chapter below for more information about the features and configuration parameters available in the Outlook scanner.
In addition to the emails themselves, attachments and properties of the respective messages are also extracted. The messages and included attachments are stored as .msg files on disk, while the properties are written to the mc database, as is the standard with all migration-center scanners.
After a scan has completed, the newly scanned email messages and their properties are available for further processing in migration-center.
Upgrading an older installation of migration-center usually consists the following steps:
Uninstall existing Client and Jobserver installations
Install the new version of Client and Jobserver from the new installation package
Upgrade the migration-center Database by running the Database installer against the existing instance
Hyland OnBase
20.8.x
InfoArchive
4.0, 4.1, 4.2, 16.3, 16.4, 16.5, 16.7, 20.4
Microsoft SharePoint
2013, 2016, 2019, SharePoint Online, OneDrive for Business
OpenText Content Server
10.5, 16.x, 20.2, 20.4, 21.4, 22.4. 23.3
Veeva Vault
Veeva Vault API 22.3
ignoredAttributesList A comma separated list of Outlook properties to be ignored by the scanner.
At least Body,HTMLBody,RTFBody,PermissionTemplateGuid should be always excluded as these significantly increase the size of the information retrieved from Outlook but don’t provide any information useful for migration purposes in return
exportLocation* Folder path. The location where the exported object content should be temporary saved. It can be a local folder on the same machine with the Job Server or a shared folder on the network. This folder must exist prior to launching the scanner and must have write permissions. migration-center will not create this folder automatically. If the folder cannot be found an appropriate error will be raised and logged. This path must be accessible by both scanner and importer so if they are running on different machines, it should be a shared network folder.
loggingLevel* See: Common Parameters.
You do not need a new license key when upgrading an existing installation. The installer will not ask you for a license key.
Please stop any running jobs (scanners, importers, schedulers, transformations, validations) before starting the upgrade.
Before upgradig highly recommended to backup the existing data as described in the Backup and Restore section.
A previous version of the migration-center database can be upgraded to the current version. The installer will detect supported database versions eligible for the upgrade and offer to upgrade the database structure, migration data and stored procedures to the current version.
To start the process simply start the Database installer of the new version of migration-center.
Enter the credentials for connecting to the old migration-center database. If the detected version of the database component is supported for upgrade, the following screen will appear:
Please backup your migration-center Database before upgrading it.
Enter a location for saving the database installation/upgrade log file. In case of any errors this log file will be requested by our technical support staff.
After clicking Install the appropriate database scripts will be executed.
After the upgrade finishes you should see the Progress bar filled and the Finish button.
The migration-center database installer supports upgrading migration center databases starting with version 3.0.
The following conditions need to be fulfilled for the upgrade procedure to work (these are checked by the installer):
The old database’s version must be one of the following: 3.0.x, 3.0.1.985, 3.1.0.1517, 3.1.0.1549, 3.1.1.1732, 3.1.2.1894, 3.2.0.2378, 3.2.1.2512, 3.2.2.2584, 3.2.2.2688, 3.2.3.2808, 3.2.4.3124, 3.2.4.3187, 3.2.4.3214, 3.2.4.3355, 3.2.5.3609, 3.2.5.3768, 3.2.6.3899, 3.2.6.4131, 3.2.7.4348, 3.2.7.7701, 3.2.7.7831, 3.2.7.7919, 3.2.8.7977, 3.2.8.8184, 3.2.8.8235, 3.2.8.8315, 3.2.9.8452, 3.3.8573, 3.4.8700, 3.5.8952, 3.5.8952, 3.6.8970, 3.7.1219, 3.8.0125, 3.9.0513, 3.9.0606, 3.9.0614, 3.9.0606, 3.9.0704, 3.10.0823, 3.10.0905, 3.11.1002, 3.12.1219, 3.12.0226, 3.13.0403, 3.13.0416, 3.13.0508, 3.14.0630, 3.14.0807, 3.15.0930, 3.15.1023, 3.15.1218, 3.16.0331, 3.17.0630, 3.17.0810
Due to the new update feature released with migration-center 3.1.0, a new instance of an existing scanner may detect updates for objects scanned with previous versions even though the objects haven’t changed from the previous scan. This behavior always applies to virtual documents or documents that have dm_relations and occurs due to the information used by the new features in migration-center 3.1 not being available in the previous release. For this reason, a new scan will recreate this information on its first run.
Transformation rules created with a version older than 3.1.0 which use the system attribute r_folder_path might need to be reconfigured. This is because migration-center 3.1 now stores absolute folder paths instead of paths relative to “scanFolderPaths” as was the case with the previous versions.
Database upgrade from previous versions older than 3.1.2: as a result of the upgrade process increasing the default size for attribute fields to 4000 bytes (up from the previous 2000 bytes), Oracle’s internal data alignment structures may fragment. This can result in a performance drop of up to 20% when working with updated data (apparent when transforming / validating / resetting). A clean installation is not affected, neither is new data which is added to an updated database, because in these cases the new data will be properly aligned to the new 4000 byte sized fields as it is added to the database.
If the database contains Virtual Documents and objects that are part of scanned Dctm Relations (this does not apply to the FileSystem connector) some additional checks are done by the installer. In case any of these checks fail an error is raised by the installer. In this case stop the installation and contact our technical support at .
Due to changes and new functionalities implemented in migration-center version 3.2 that rely on additional information not present in older releases, the following points should be considered when updating a database to version 3.2 or later:
The concatenate function will only have 5 parameters for newly added transformation rules. Reason: the “Concatenate” transformation function has been extended to 5 parameters for version 3.2. Transformation rules using the “Concatenate” function and created with a previous version of migration-center will retain their original 3 parameters only.
The system rule “mc_content_location”, which allows the user to define or override the location where the objects’ content files are stored will be available for use only in migration sets created after the database has been upgraded to version 3.2 Reason: the “mc_content_location” system rule is new to migration-center version 3.2 and did not exist in previous versions
The Filesystem scanner won’t create the “dctm_obj_link” attribute anymore Reason: with version 3.2 of migration-center scanners and importers are no longer paired together. The “dctm_obj_link” attribute was created automatically by the Filesystem scanner in previous iterations because it was a Filesystem-Documentum connector. Since this no longer applies to the current Filesystem scanner which is just a generic scanner for filesystem objects and has no connection to any specific target system, it won’t create any attributes specific to particular target systems either. If objects scanned with a Filesystem scanner are intended to be migrated to a Documentum system, the “dctm_obj_link” rule must be created and populated with transformation rules in the same way as any other user-defined rule.
The Filesystem scanner won’t detect changes in a file’s metadata during subsequent scans for files which have been scanned prior to updating to version 3.2 Reason: detecting changes in a file’s external metadata (in addition to the file’s content) is a new feature of the Filesystem scanner in migration-center 3.2; previous versions of migration-center did not store the information which would be required by the current Filesystem scanner to detect such changes. A change to a file’s modification date would trigger the update mechanism though and would also enable full 3.2 functionality on subsequent scans.
A standard Azure Storage Endpoint includes the unique storage account name along with a fixed domain name. The format of a standard endpoint is:
https://<storage-account>.blob.core.windows.net
For more information about the Azure Endpoints see: https://learn.microsoft.com/en-us/azure/storage/blobs/storage-blob-query-endpoint-srp?tabs=dotnet
To generate the SAS Token follow the Azure documentation here: https://learn.microsoft.com/en-us/azure/ai-services/translator/document-translation/how-to-guides/create-sas-tokens?tabs=Containers
The Azure storage endpoint used to connect to Azure. See Prerequisites.
sasToken The SAS Token used to connect to Azure. See Prerequisites.
loggingLevel See .
cache_control The Azure document's cache control header. Used to manage the expiration of blob storage in Azure CDN. See: https://learn.microsoft.com/en-us/azure/cdn/cdn-manage-expiration-of-blob-content
containerName The name of the Azure container where the document will be imported
content_disposition The content disposition attribute of the Azure document. The Content-Disposition response header field conveys additional information about how to process the response payload. See: https://learn.microsoft.com/en-us/dotnet/api/azure.storage.blobs.models.blobproperties.contentdisposition?view=azure-dotnet
content_encoding The content encoding attribute of the Azure document.
content_language The content language attribute of the Azure document.
content_type The content type attribute of the Azure document. Sets the content file MIME Type.
fileName The file name of the document being imported.
folder_path The Azure folder path where the document will be created
mc_content_location The content location of document. If not set, the content will correspond with the source object content location
target_type The target type representing the AzureBlob document type.
You can set Azure Metadata attributes by adding attributes to the Object Type you will be using in the migset. The Object Type name is not relevant.
Any attribute present in the Object Type and associated in the migset will be set on your imported documents.
You can set Blob Index Tags by adding them to the Object Type and associating them in the migset, just like a regular Metadata attribute.
Source System Date
Date saved in MC database
Target System Date
12.06.2017 15:00:00 WET
12.06.2017 16:00:00 CET
12.06.2017 17:00:00 EET
11.06.2017 23:00:00 WET
12.06.2017 00:00:00 CET
12.06.2017 01:00:00 EET
Obtain your AWS account ID and your desired region (e.g. eu-central-1) and share it with FME (to [email protected]) to get access to the AMI for Migration Center.
Download the Terraform archive (MC2x.x-AWS-Terraform.zip) corresponding to your region from the fileexchange platform.
Install Terraform on your system by downloading the Terraform executable and setting the PATH environment variable. See:
Install AWS CLI. See:
Log into the the AWS CLI:
Get your user's Access key. IAM -> Users -> <user-name>-> Access Keys (If you don't have one create a new one for Command Line Interface (CLI))
Open a CMD and log in to your AWS account using the aws configure command:
Download and unzip the Migration Center Terraform Archive.
Open a CMD and navigate to the directory of the extracted archive.
Run Terraform commands: terraform init and terraform apply
Navigate to the EC2 Dashboard: EC2 -> Instances.
Select your instance.
Click the "CONNECT" button on the top bar and choose your desired connection method.
Default Username and Password
User: Administrator
Password: O9dz5o?&WgDCvp?(ur70G5T%nfk5SFGH
For security reasons please change the default password after login.
Run the InstallPostgreDataBase.bat file found inside the MC Database Install kit folder on the desktop.
When asked to connect to the Postgres database use the following information:
User: postgres
Password: The
The WebClient and the Jobserver will come preinstalled on your machine.
Open a web browser.
Access the Migration Center Webclient using the URL:
Set up a connection to the database. Select PostgreSQL for the type and use the values from steps 3 to 5 from the section above.
Log in using the fmemc user. (default password: migration123)
The Documentum NCC (No Content Copy) Scanner is a special variant of the regular Documentum Scanner. It offers the same features as regular Documentum Scanner with the difference that the content of the documents is not exported from Documentum during migration. The content files themselves can be attached to the migrated documents in the target repository by using one the following method:
copy files from the source storage to the target storage outside of migration-center
attach the source storage to the target repository so the content will be accessed from the original storage.
The scenario for such migrations usually involves migrations with very large numbers of documents (>>10.000.000), where extracting and transferring the content between the source and target systems would take too much time; thus the approach where only the metadata and content references are migrated is preferred. The actual content is then transferred independently using fast, low overhead file system level access directly in the SAN without having to pass through the API of the source system, migration-center, and then again through the target system’s API as would be the case during a standard Documentum migration. Since the references to the content files are preserved, simply dropping the actual content in place in the respective filestore(s) completes the migration and requires no additional tasks to be performed to link the content to the recently migrated objects. This approach is of course not universally applicable to any Documentum migration project, and needs to be considered and planned beforehand if intended to be used for a given migration.
The Documentum Scanner currently supports Documentum Content Server versions 6.5 to 20.2, including service packs.
For accessing a Documentum repository Documentum Foundation Classes 6.5 or newer is required. Any combinations of DFC versions and Content Server versions supported by EMC Documentum are also supported by migration-center’s Documentum Scanner, but it is recommended to use the DFC version matching the version of the Content Server being scanned. The DFC must be installed and configured on every machine where migration-center Server Components is deployed.
When scanning Documentum documents with the Documentum No Content Copy (NCC) scanner, content files are not exported to the file system anymore, nor are they being imported to the target system. Instead the scanner exports information about each dmr_content object from the source system and saves this as additional, internal information related to the document objects in the migration-center database. The is able to process the content related information and restore the references to the content files within the specified filestore(s) upon import. Copying, moving, or linking the folders containing the content files to the new filestore(s) of the target system is all that’s required to restore the connection between the migrated objects and their content files. Please consult the Documentum Content Server Administration Guide for your Content Server version to learn about filestores and their structure in order to understand how the content files are to be moved between source and target systems.
The Documentum specific features supported by Documentum NCC scanner are fully described in the section.

The D2 InPlace connector takes the objects processed in migration-center and imports them back in a Documentum or D2 repository. The D2 InPlace connector extends the Documentum InPlace connector and it works together only with Documentum scanner.
The D2 InPlace connector supports a limited amount of D2 features besides the ones already available in the Documentum InPlace connector such as applying auto-security functionality, auto-linking functionality, auto-naming functionality and validating the values against a property page. All these D2 features can be applied based on the owner user or the migration user.
The D2 InPlace currently supports the following D2 versions: 16.5, 16.6, 20.2, 20.4.
The OpenText InPlace importer takes the objects processed in migration-center and imports them back in an OpenText repository. OpenText InPlace importer works together only with OpenText scanner.
OpenText InPlace adaptor supports a limited amount of OpenText features, specifically changing documents categories and category attributes.
Set the default region to your desired one (e.g., eu-central-1).
Set the default output format (you can use json).
var.db_hostname: The hostname for your RDS Postgres database instance. The name must be unique across all DB instances owned by your AWS account in the current AWS Region. Your DB Hostname can only contain lowercase alphanumeric characters.
var.db_name: The name for your RDS Postgres database. Your DB Name can only contain lowercase alphanumeric characters.
var.deployment_size: The size of the deployment. Possible options: demo, small, medium, large
var.ec2_name: The name of the EC2 Instance.
var.password: Password for the RDS Postgres database admin user. Note that this may show up in logs and it will be stored in the state file.
var.region: AWS region where the infrastructure will be created (eg. eu-central-1)
Once the command finishes it will display your rds_endpoint. Please save this!
Host: The value of your rds_endpoint without the port. Example: For rds_endpoint: http://test.testid.eu-north-1.rds.amazonaws.com:5432 Host: http://test.testid.eu-north-1.rds.amazonaws.com
Port: 5432
Database Name: The var.db_name variable previously set.
Follow the steps as described in the Install Guide for the rest of the installation.

The supported D2 Content Server versions are 20.2, 20.4, including service packs. Any combinations of DFC versions and Content Server versions supported by Opentext Documentum are also supported by migration-center’s D2 InPlace Importer, but it is recommended to use the DFC version matching the version of the Content Server targeted for import. The DFC must be installed and configured on every machine where migration-center Server Components is deployed.
The D2 inPlace connector supports all the regular DCTM based features supported by the DCTM inPlace connector. Please refer to the Documentum inPlace Adapter user guide for details.
To create a new connector, select "D2InPlace" in the adapter Type drop down of the importer. After this, the list below will be filled with the specific D2InPlace parameters.
The Properties window of an importer can be accessed by double-clicking an importer in the list, by selecting the Properties button from the toolbar or from the context menu.
The common adaptor parameters are described in Common Parameters.
The configuration parameters available for the Alfresco importer are described below:
username* Username for connecting to the target repository. A user account with super user privileges must be used to support the full D2/Documentum functionality offered by migration-center.
password* The user’s password.
repository* Name of the target repository. The target repository must be accessible from the machine where the selected Job Server is running.
moveContentOnly Flag indicating if the metadata will not be updated but only the content should be moved. This will save some processing in case there is no need to update any metadata.
autoCreateFolders This option will be used for letting the importer automatically create any missing folders that are part of “dctm_obj_link” or “r_folder_path”. Use this option to have migration-center re-create a folder structure at the target repository during import. If the target repository already has a fixed/predefined folder structure and creating new folders is not desired, deselect this option
defaultFolderType The Documentum folder type name used when automatically creating the missing object links. If left empty, dm_folder will be used as default type.
moveRenditionContent Flag indicating if renditions will be moved to the new storage. If checked, all renditions and primary content are moved otherwise only the primary content is moved.
moveCheckoutContent Flag indicating if checkout documents will be moved to new storage. If not checked, the importer will throw an error if a document is checked out.
removeOriginalContent Flag indicating if the content will be removed from the original storage. If checked, the content is removed from the original storage, otherwise the content remains there.
moveContentLogFile The file path on the content server where the log related to move content operations will be saved. The folder must exist on the content server. If it does not exist, the log will not be created at all. A value must be set when move content feature is activated by the setting of attribute “a_storage_type”.
applyD2Autonaming Enable or disable D2’s auto-naming rules on import. See for more details.
applyD2Autolinking Enable or disable D2’s auto-linking rules on import. See for more details.
applyD2AutoSecurity Enable or disable D2’s auto-security rules on import. See for more details.
applyD2RulesByOwner Apply D2 rules based on the current document’s owner, rather than the user configured to run the import process. See for more details.
numberOfThreads The number threads that will be used for importing objects. Maximum allowed is 20.
loggingLevel* See .
Parameters marked with an asterisk (*) are mandatory.
Set custom metadata
Import document revisions
Delta migration (only for metadata)
The importer cannot use a service account since that's not supported by Unity API
An additional OnBase license might be required, because migration-center uses Unity API to ingest the data
Windows Authentication should be disabled in the OnBase Application server, because the importer uses OnBase Authentication
Click on the New Importer button to build a new OnBase Importer job and pick "OnBase" from the list of connectors. Once the adapter type has been selected, the Parameters list will be populated with the parameters specific to the selected adapter type, in this case OnBase.
The common adaptor parameters are described in Common Parameters.
The configuration parameters available for the OnBase importer are described below:
username* OnBase username. It must be a valid Hyland OnBase account. Service accounts are not supported.
password* The user's password.
serverUrl* The OnBase server URL. Example: http://example/AppServer/Service.asmx
datasource* The data set (repository) where the content should be imported.
numberOfThreads* The number of threads that the importer will use to import the documents.
loggingLevel* See .
Parameters marked with an asterisk (*) are mandatory.
Documents are part of the application data model in OnBase. They are usually represented by a document type, content, file_format, and some specific keywords.
OnBase Importer allows importing documents records from any supported source system to OnBase. For that, a migset of type “<Source>toOnBase(document)” must be created. Ex: Importing documents from Documentum requires migsets of type "DctmtoOnBase(document)”.
file_format* The OnBase file format corresponding to the established content. Example: Text Report Format
mc_content_location Optional rule for importing the content from another location than the one exported by the scanner. If not set, the source objects content_location will be used.
target_type* The name of the OnBase document type corresponding to a migration-center internal object type that is used in the association. Example: OnBase Document
revision_comment Sets the specific revision comment (Description).
document_date Sets the Document Date.
Rules marked with an asterisk (*) are mandatory.
A mapping list may be used to set the file format with ease and intuition.
Revisions are part of the application data model in OnBase. Compared to other platforms, OnBase uses “Revisions” that are similar to the very popular concept of versions. The OnBase platform also has “Versions” but uses it in a different way: Versions are “stamped Revisions” which can have a version description.
OnBase Importer allows importing revisions records from any supported source system to Hyland OnBase. For that, a migset of type “<Source>toOnBase(document)” must be created. Ex: Importing revision from CSV requires migsets of type "CsvExceltoOnBase(document)”.
The user needs at least one version tree to be scanned to import revisions. Each scanned version is equivalent to a revision in OnBase.
In the example bellow we have mapped level_in_version_tree to the revision description using the optional revision comment system rule to easily describe the revision correlation of Onbase.
Objects that have changed in the source system since the last scan are scanned as update objects. Whether an object in a migration set is an update or not can be seen by checking the value of the Is_update column – if it’s 1, the current object is an update to a previously scanned object (the base object). An updated object cannot be imported unless its base object has been imported previously.
Currently, update objects are processed by OnBase importer with the following limitations:
Only the keywords are updated for the documents and revisions.
New keywords for existing objects can be set by using delta migration.
The keywords for a document and its revisions are shared, so when updating keywords for a document or revision, all the documents will be updated.
3.17 version of OnBase Importer can only update the keywords of the existing documents or revisions.
OpenText InPlace is compatible with the version 10.5, 16.0, 16.4 and 20.2 of OpenText Content Server.
It does requires Content Web Services to be installed on the Content Server. In case of setting classifications to the imported files or folders the Classification Webservice must be installed on the Content Server. For supporting Record Management Classifications the Record Management Webservice is required.
To create a new OpenText InPlace Importer job specify the respective adapter type in the importer’s Properties window – from the list of available connectors, “OpenText InPlace” must be selected. Once the adapter type has been selected, the Parameters list will be populated with the parameters specific to the selected adapter type, in this case, OpenText InPlace.
The Properties window of an importer can be accessed by double-clicking an importer in the list, by selecting the Properties button from the toolbar or from the context menu.
The common adaptor parameters are described in Common Parameters.
The configuration parameters available for the OTCS InPlace importer are described below:
username* User name for connecting to the target repository. A user account with super user privileges must be used to support the full OpenText functionality offered by migration-center.
password* The user’s password.
authenticationMode* The OpenText Content Server authentication mode. Valid values are: CWS for regular Content Server authentication RCS for authentication of OpenText Runtime and Core Services RCSCAP for authentication via Common Authentication Protocol over Runtime and Core Services Note: If this version of OpenText Content Server Import Adaptor is used together with together with “Extended ECM for SAP Solutions”, then ‘authenticationmode’ has to be set to “RCS”, since OpenText Content Server together with “Extended ECM for SAP Solutions” is deployed under “Runtime and Core Services”. For details of the individual authentication mechanisms and scenarios provided by OpenText, see appropriate documentation at OpenText KnowledgeCenter.
webserviceURL* The URL to the Authentication service of the “les-services”: Ex: http://server:port/les-services/services/Authentication
rootFolder* The id of node under the documents will be imported. Ex. 2000
overwriteExistingCategories When checked the attributes of the existing category will be overwritten with the specified values. If not checked, the existing categories will be deleted before the specified categories will be added.
numberOfThreads The number threads that will be used for importing objects. Maximum allowed is 20.
loggingLevel* See .
Parameters marked with an asterisk (*) are mandatory.
OpenText InPlace importer allows assigning categories to the imported documents and folders. A category is handled internally by migration center client as target object type and therefore the categories has to be defined in the migration-center client in the object types window ( <Manage> <Object types> ).
Since multiple categories with the same name can exist in an OpenText repository the category name must be always followed by its internal id. Ex: BankCustomer-44632.
The sets defined in the OpenText categories are supported by migration-center. The set attributes will be defined within the corresponding object type using the pattern <Set Name>#<Attribute Name>. The importer will recognize the attributes containing the separator “#” to be attributes belonging to the named Set and it will import them accordingly.
Only the categories specified in the system rules “target_type” will be assigned to the imported objects.
For setting the category attributes the rules must be associated with the category attributes in the migration set’s |Associations| tab.
Since version 3.2.9 table key lookup attributes are supported in the categories. This attributes should be defined in migration-center in the same way the other attributes for categories are defined. Supported type of table key lookup attributes are Varchar, Number and Date. The only limitation is that Date type attributes should be of type String in the migration-center Object types.
If the importer parameter overwriteExistingCategories is checked, only the specified category and category attributes associated in the migset will be updated when importing, leaving the rest of the categories the same as they were before the import.
If left unchecked, the categories and category attributes associated in the migset will be updated but any unspecified category in the migset will be removed from the document.
A content migration with migration-center always involves a source system, a target system, and of course the migration-center itself.
This section provides information about the requirements for using migration-center in a content migration project.
For best results and performance it is recommended that every component will be installed on a different system. Hence, the system requirements for each component are listed separately.
The required capacities depend on the number of documents to be processed. The values given below are minimal requirements for a system processing about 1.000.000 documents. Please see the Sizing Guide for more details.
The Documentum NCC (No Content Copy) Importer is a special variant of the regular Documentum Importer. It offers the same features as regular Documentum Importer with the difference that the content of the documents is not imported to Documentum during migration. The content files themselves can be attached to the migrated documents in the target repository by using one the following methods:
copy files from the source storage to the target storage outside of migration-center
attach the source storage to the target repository so the content will be access from the original storage.
Delta migration for the multi-page content does not work properly when a new page is added to the primary content (#55739)
Documentum NCC adapter does not work when migration-center is running on a Postgres database.
The Documentum Scanner currently supports Documentum Content Server versions 6.5 to 20.2, including service packs.
For accessing a Documentum repository Documentum Foundation Classes 6.5 or newer is required. Any combinations of DFC versions and Content Server versions supported by EMC Documentum are also supported by migration-center’s Documentum Scanner, but it is recommended to use the DFC version matching the version of the Content Server being scanned. The DFC must be installed and configured on every machine where migration-center Server Components is deployed.
When documents to be migrated are located in a Content Addressable Storage (CAS) like Centera or ECS some additional steps for deployment and configurations are required.
Create the centera.config file in the folder .\lib\mc-dctm-adaptor. The file must contain the following line: PEA_CONFIG = cas.ecstestdrive.com?path=C:/centera/ecs_testdrive.pea Note: Set the storage IP or machine name and the local path to the PEA file.
Copy Centera SDK jar files in .\lib\mc-dctm-adaptor folder
Copy Centera SDK dlls in folder that is set in the path variable. Ex: C:\Program Files\Documentum\Shared
Documentum NCC importer works in combination with . The scanner does not export the content from the source repository but it exports the dmr_content objects associated with the documents and stores them in migration center database as relations of type "ContentRelation". The importer will use the information in the exported dmr_content for creating the corresponding dmr_content in the target repository in such such a way that it points to the content in the original filestore.
Documentum NCC importer supports all the features of the standard but the system rules related to the content behave differently as is described below. Also the some dm_document attributes are now mandatory.
Primary content attribute
a_content_type It must be set with the format of the content in the target repository. Leave it empty for the documents that don't have a content.
a_storage_type It must be set with the name of the storage in the target repository where the document will imported. The target storage must be storage that points to filestore where the document was located in the source repository. Leave it empty for the documents that don't have a content.
Rendition system attribute
dctm_obj_rendition It has to be set with the r_object_id of the dmr_content objects scanned from source repository. The required values are provided in the source attribute with the same name.
dctm_obj_rendition_format For every value in dctm_obj_rendition, a rendition format must be specified in this rule. The formats specified in this attribute must be valid formats in the target repository.
dctm_obj_rendition_modifier Specify a page modifier to be set for the rendition. Any string can be set (must conform to Documentum’s page_modifier attribute, as that’s where the value would end up) Leave empty if you don’t want to set any page modifiers for renditions. If not set, the importer will not set any page modifier
All renditions scanned from the source repository must be imported in the target repository. If dctm_obj_rendition will be set with fewer or more values than the renditions scanned from the source repository the object will fail to import.
In addition to standard parameters inherited from some specific parameters are provided in the Documentum NCC importer.
maxSizeEmbeddedFileKB Content Addressable Storage (CAS) allows small content to be saved embedded. Set the max size of the content that can be stored embedded. Max allowed values is 100 (KB). If If 0 is set, no embedded content is saved.
tempStorageName The name of the temporary storage where a dummy content will be created during the migration. For creating dmr_content objects the importer needs to create a temporary dummy content (files of 0 KB) that will be stored in the storage specified in this parameter. This storage should be deleted after the migration is done.
This kind of migration requires some settings to be done on the target repositories at the end of the migration.
As it was described above, the importer creates temporary content during migration. This content is not required to be kept after the migration and therefore the storage set in the parameter "tempStorageName" can be deleted from the target repository.
This section applies only when content is located in a file storage. In case of using a Content Addressable Storage updating data ticked sequence is not applicable.
After documents are imported to your new Documentum there will be a mismatch of the data ticket offset between your new Documentum file store and the Documentum Content Server Cache. The Documentum NCC importer is delivered with a tool fixing this offset. You can find this tool in your Server Components Installations folder under "\Tools\mc-fix-data-ticket-sequence". Running this start.bat-file opens a graphical user interface with a dialog to select the repository, which contains imported documents, and provide credentials to connect to it. After a successful login the tool lists available Documentum file stores that may require an action to fix the data sequence. If the value “offset” of a file store is less than 0 your action is required to update the data ticket sequence of this file store. The column “action” informs you to take action as well. If you want to update the data ticket sequence of a file store, you must select the file store and press the button “Update data ticket sequence” at the bottom of the tool. After a successful update of the data ticket sequence you have to restart your repository via the Documentum Server Manager.
All standard transformation functions provided with migration-center are described below. Full context-sensitive information is also available in the WebClient when inserting or editing any transformation function.
Computes a new date by adding Years, Months and Days to a valid source date. The Database’s Datetime pattern must be followed by the input value. Negative integer parameters are accepted.
Example: CalculateNewDate('01.01.2001 12:32:05', 1,2,3) returns '04.03.2002 12:32:05'
The Filesystem Importer can save objects from migration-center to the file system. It can also write metadata for those objects into either separate or a unified XML file. The folder structure (if any) can also be created in the filesystem during import. The filesystem can be either local filesystem or a share accessible via a UNC path.
It adds or substract a number to another number. Decimal and negative numbers are allowed. If a provide value cannot be converted to a number then an error is reported during the transformation.
Ex: CalculateNewNumber(10, 5.2) returns 15.2
CalculateNewNumber(1000, -100) returns 900
Concatenate() concatenates up to three strings values into one and returns it as a single value Concatenate('AAA',' and ','BBB') returns "AAA and BBB".
IMPORTANT: The function returns only the first 4000 bytes of the resulted string since this is the maximum length allowed for an attribute value.
Converts a given date from one timezone to another. The accepted timezones are the ones provided by Oracle, so you can see them with the following query:
SELECT DISTINCT tzname FROM v$timezone_names;
Counts the number of values of a repeating attribute. If null or no values provided it returns 0.
Map one or multiple source attributes with the data extracted from an external table. The external table must be located on the migration-center database in any schema that is accessible by FMEMC user.
The user FMEMC must have "select" permission on that table. The query must return a single column and must have at least one parameter and maximum 3 that will be replaced at runtime with the values of the parameter1, parameter2 and parameter3.
The parameter name in the query is any string the start with : (colon). The number of parameters in the query must match the number of parameters set in the function.
If the query returns multiple values the following behavior applies:
if the rule is single value only the first value returned by the query will be taken in consideration by the transformation engine.
if the rule is multivalue then all values returned by the query will be taken in consideration by the transformation engine. Nevertheless, to prevent loading millions of values in the database because of a wrong query, the number of values that can be returned by this function are limited to 10,000.
Example:
select user_id from mcextra.users_data where username = :username
Important Note: Since the SQL query is executed for each object in the migset, you should ensure that it is executed fast, i.e. the columns used in the where condition should be indexed.
GetDateFromString() extracts a date type expression from any string if it matches the date expression specified by the user.
Use this function to extract non-standard or partial dates from source attributes like a filename.
Example: GetDateFromString('filename 2007-Dec 14. 16:11','YYYY-
MON DD. HH24:MI') will identify and extract the non-standard date format contained within the input string
It is used to get the value of an internal attribute of the source objects. An internal attribute is a fix column, in the source objects view that is used internally by migration-center for different purposes. The available internal attributes that can be used with this function are: Id, Is_update, Content_location, Content_hash, Id_in_source_system, Parent_version_object_id, Level_in_version_tree, Scanned_date
The name of the internal attributes are not case sensitive.
If other internal attribute name is provided an error is reported during the transformation.
It can understand strings representing paths and can extract specific levels from that path. The path separator character, the path level to start from and the path level up to which the function should extract the subpath can be specified as input parameters. The function will also strip leading and ending path separators from the result.
Example: GetPathLevel('/this/is/the/folder/structure','/','2','4') will parse the input string looking for "/" as the path separator, and return path levels 2-4, i.e. "is/the/folder"
It returns the values of another rule that was marked as a Snippet Rules. By using GetSnippetRuleValue, users can avoid duplicating the same steps across multiple rules.
If the specified rule does not exists within the migset, the step will fail.
It is not allowed to use a snippet rule inside another snippet rule.
It is used to migrate attributes where the attribute's value is not supposed to be changed or to generate and set user defined values which are not present in the source data and cannot or have not been generated by other transformation functions. The GetValue() function always returns the exact same value it gets as input without altering it in any way. Examples: GetValue('user') outputs the string value "user" for all objects to which the current rule applies GetValue(filename[1]) outputs the value of the source attribute filename for all objects to which the current rule applies. For each object, the value will vary according to the actual value from that objects' source attribute named filename.
It gets the value at specific index from a multi-value attribute. Index counting starts with 1. If the provided index is out of range the function returns null.
Example: GetValuesAt('a,b,c', 2) reruns 'b' and GetValuesAt('a,b,c', 4) returns null.
Get the first index number of a given value for a multi-value attribute. If no value was found 0 is returned.
The parameter "ExactMatch" specifies if exact match will be used for comparing the values. Use '1' or 'T' for exact match and '0' or 'F' for "contains" search. In any case the search is case sensitive.
Example: GetValueIndex('abc,def,ghi', 'de', 'F') returns 0
GetValueIndex('abc,def,ghi', 'de', 'T') returns 2
GetValueIndex('abc,def,ghi', 'DE', 'T') returns 0
GetValueIndex('a,b,c,b','b' ', 'F') returns 2
If() evaluates a logical condition and returns different outputs depending on whether the condition is found to be true or false.
A previous transformation step from the current rule, a source attribute or a user specified string are all valid arguments for both input and output values as well as for the logical condition.
The If() function can correctly evaluate conditions based on various types of data such as strings, numbers, dates, null values, etc. and offers a number of predefined conditional operators.
Calculates the length of the string using Unicode characters.
The Ltrim function removes characters from the left of the given Source String, with all the leftmost characters that appear in the Characters to trim removed. The function begins scanning the Source String value from its first character and removes all characters that appear in the Characters to trim until reaching a character that is not in the trim expression and then returns the result. If second parameter is empty the leading spaces will be removed, i.e. Ltrim('babcde','ab') will remove the first 3 characters so the result will be 'cde'".
MapValue() considers the input value a key, looks for a row with a matching key in a specified mapping list and returns the value corresponding to that key if a suitable match is found. Keys with no match can be reported as transformations errors (optional).
A mapping list must be defined before using a MapValue function. Mapping lists can be defined either on the Mapping lists tab in the Transformation Rules window of a migration set (case in which they would be available only to that particular migration set), or as a global mapping list (available to all migration sets) from the Manage menu in the main application window. Use the MapValue() function to define direct mappings of source attribute values to target attribute values based on simple key-value lists.
MultiColumnMapValue() considers the input value a key, looks for a row with a matching key in a specified mapping list, and returns the value corresponding to that key if a match is found. Keys with no match will be assigned a null value, or they can be reported as transformations errors instead, forcing the user to take action with regard to such values. A mapping list must be defined before using a MultiColumnMapValue function. Mapping lists can be defined either on the Mapping lists tab in the Transformation Rules window of a migration set (case in which they would be available only to that particular migration set), or as a global mapping list (available to all migration sets) from the Manage menu in the main application window. Use the MultiColumnMapValue() functions to define direct mappings of source attribute values to target attribute values based on simple key-value lists.
Remove duplicates from a multivalue attribute. To use this function in a rule, the rule must be a multi-value rule. If the input values are a,b,b,c,a the result will be a,b,c.
MultiValue_ReplaceNulls() can replace null values in a multi-value attribute with another, user defined value. The function can also remove null values from a multi-value attribute if no replacement string is defined. To use this function in a rule, the rule must be a multi-value rule. Examples: MultiValue_ReplaceNulls(multi_value_input[all],'default') will replace all null values from the multi-value source attribute named "multi_value_input" with "default" MultiValue_ReplaceNulls(multi_value_input[all],'') will remove all null values from the multi-value source_attribute named "multi_value_input", thereby reducing the total number of values for the multi-value attribute.
Provided for removing duplicates from a given string.
Example:
RemoveDuplicates('DE|RO|IT|DE|P','|') will remove duplicates form the first string by using the delimiter ‘|’ so it will return "DE|RO|IT|P.
The function can be used in combination with RepeatingToSingleValue and SingleToRepeatingValues for removing duplicated values from a repeating source attribute.
Example:
#1 RepeatingToSingleValue (countries[all], ‘|’)
#2 RemoveDuplicates(#1, ‘|’)
#3 SingleToRepeatingValues(#2,’|’)
RepeatingToSingleValue() concatenates all values of the source string value into one single string.
Optional parameters include the delimiter to be used (can be zero, one or multiple characters), the range of values which should be concatenated and a replacement string to be used in place of any NULL values the source may contain.
It is recommended to use a multi-value (repeating) attribute or previous step as source for this function
Example:
SingleToRepeatingValues(keywords[all],'|') will return value1|value2|value3.
SingleToRepeatingValues(keywords[all],'|', 2, 3) will return value2|value3.
IMPORTANT: The function returns only the first 4000 bytes of the resulted string since this is the maximum length allowed for an attribute value.
ReplaceStringRegex() Replaces the parts of the input value that match the regular expression specified by the user with a user defined value Example: ReplaceStringRegex('AAAAA-CX-9234-BBBBB','\w{2}-\d{4}','AB-0000') will parse the input string looking for a match; according to the regex this would be a sequence of 2 letters followed by a dash and four numbers. Since the input does contain a matching part, it will be replaced with "AB-0000", and the final output of the function will be "AAAAA-AB-0000-BBBBB"
The Rtrim function removes characters from the right of the given Source String, with all the rightmost characters that appear in the Characters to trim removed. The function begins scanning the Source String value from its last character and removes all characters that appear in the Characters to trim until reaching a character that is not in the trim expression and then returns the result. If second parameter is empty the trailing spaces will be removed, i.e. Rtrim('cdebab','ab') will remove the last 3 characters so the result will be 'cde'.
SingleToRepeatingValues() separates a string value based on a user specified separator character and returns all resulting values as a multi-value result Use this function to transform a string of comma separated values into a multi-value attribute with multiple individual values. To use this function in a rule, the rule must be a multi-value rule Example: SingleToRepeatingValues(comma_separated[all],',') will parse the source attribute named "comma_separated" looking for commas (","), strip the commas and create a multi-value list from the resulting values.
SplitStringRegex() is an advanced function for splitting up a string value by specifying the separator as a regular expression rather than a single character (the regex can represent a single character as well). Depending on the number of matches for the specified separator, multiple substrings can result from the function; which one of the resulting substrings the function should return can also be specified by the user.
Example: SplitStringRegex('one-(two)-three','(-\()|(\)-)','2') will split the string into substrings based on the separators described by the regex and return the second substring which is "two"
SubstringRegex() is an advanced transformation function for extracting a substring from the input value. A regular expression can be used to extract a complex substring from the input string, such as a particular name, a formatted number sequence, a custom date expression, an email address, etc. SubstringRegex('0123abc 4567 ',' \d{4} ') will return " 4567 " according to the regex defining the substring.
Substring() returns part of the input string. Which part of the string should be returned can be specified as a number of characters starting from a given index within the input string.
Example: Substring('teststring','3','5') returns 5 characters starting with the 3rd character, which is "ststr"
Sysdate() outputs the current system date as a value. Use this function to track the date when a document underwent transformation in migration-center. This function does not have any properties.
ToUpperCase() transforms all characters from the input string value to uppercase characters
ToLowercase() transforms all characters from the input string value to lowercase characters
dctm_obj_rendition_page Specify the page number of every rendition in rule dctm_obj_rendition. If not set, the page number 0 will be set for all renditions
dctm_obj_rendition_storage Specify a valid Documentum filestore for every rendition set in the rule dctm_obj_rendition. It must have the same number of values as dcmt_obj_rendition attribute.
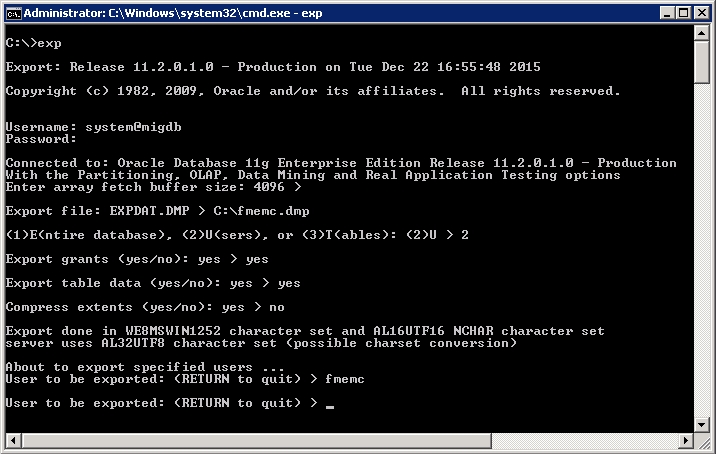
Character set: AL32UTF8 Necessary database components: Oracle XML DB
Operating system
All OS supported by Oracle
Oracle/OpenJDK JRE 8, Oracle/OpenJDK JRE 11
32 or 64 bit
Chrome or Edge
Category
Requirements
RAM
4 GB - 8 GB of memory for migration-center database instance
Hard disk storage space
Depends on the number of documents to migrate roughly 2GB for every 100.000 documents.
CPU
2-4 cores, min. 2.5 GHz (corresponding to the requirements of the Oracle database)
Oracle version
11g Release 2, 12c Release 1, 12c Release 2, 18c, 19c, 21c
Oracle Editions
Standard Edition One, Standard Edition, Enterprise Edition, Express Edition Note: Express Edition is fully supported but not recommended in production because of its limitations.
Category
Requirements
RAM
4 GB - 8 GB of memory for the PostgreSQL server
Hard disk storage space
Depends on the number of documents to migrate roughly 2GB for every 100.000 documents
CPU
4 cores
PostgreSQL version
15.4
Operating system
All OS supported by PostgreSQL
Category
Requirements
RAM
By default, the Job Server is configured to use 1 GB of memory. This will be enough in most of the cases. In some special cases (multiple big scanner/importer batches) it can be configured to use more RAM.
Hard disk storage space (logs)
1GB + storage space for log files (~50 MB for 100,000 files)
Hard disk storage space (objects scanned from source system)
Variable. Refers to temporary storage space required for scanned objects. Can be allocated on a different machine in LAN.
CPU
2-4 Cores, min. 2.5 GHz
Operating system
Windows Server 2012, 2016, 2019, 2022 Windows 10
Linux
Category
Requirements
RAM
4 GB (for the WebClient)
Hard disk storage space
200 MB
CPU
min 1 core
Operating system
Windows Server 2016, 2019, 2022
Windows 10
Java runtime
Oracle/OpenJDK JRE 8 64-bits
Oracle/OpenJDK JRE 11 64-bits
Category
Requirements
RAM
8 GB (1 GB for MC client)
Hard disk storage space
10 MB
CPU
min 1 core
Operating system
Windows Server 2012, 2016, 2019
Windows 10
Database software
32 bit client of Oracle 11g Release 2 (or above)
or 32 bit Oracle Instant Client for 11g Release 2 (or above)
Oracle instance
Java runtime
Browser
To create a new Filesystem Importer job, specify the respective adapter type in the Importer Properties window – from the list of available connectors “Filesystem” must be selected. Once the adapter type has been selected, the Parameters list will be populated with the parameters specific to the selected adapter type.
The Properties window of an importer can be accessed by double-clicking an importer in the list, or selecting the Properties button/menu item from the toolbar/context menu.
A detailed description is always displayed at the bottom of the window for a selected parameter.
The common adaptor parameters are described in Common Parameters.
The configuration parameters available for the Filesystem importer are described below:
xsltPath The path to the XSL file used for transformation of the meta-data (leave empty for default metadata XML output)
unifiedMetadataPath The path and filename where the unified metadata file should be saved; the parent folder must exist, otherwise the import will stop with an error Leave empty to create individual XML metadata files for each object
unifiedMetadataRootNodes The list of XML root nodes to be inserted in the unified meta-data file which will contain the document and folder metadata nodes; the default value is “root”, which will create a … element. Multiple values are also supported, separated by “;”, e.g. “root;metadata”, which would create a … structure in the XML file for storing the object’s metadata.
moveFiles Flag for moving content files. Unchecked - the content files will be just copied Checked - the content files will be moved (copied and then deleted from original location) Default: false
loggingLevel*
See .
Parameters marked with an asterisk (*) are mandatory.
Documents targeted at the filesystem will have to be added to a migration set first. This migration set must be configured to accept objects of type <source object type>ToFilesystem(document).
Create a new migration set and set the <source object type>ToFilesystem(document).object type in the Type drop-down. This is set in the –Migration Set Properties- window which appears when creating a new migration set. The type of object can no longer be changed after a migration set has been created.
content_target_file_path Sets the full path, including filename and extension, where the current document should be saved on import. Use the available transformation methods to build a string representing a valid file system path. If not set, the source content will be ignored by the importer. Example: d:\Migration\Files\My Documents\Report for 12-11.xls
rendition_source_file_paths Sets the full path, including filename and extension, where a “rendition” file for the current document is located. Use the available transformation methods to build a string representing a valid file system path. Example: \server\share\Source Data\Renditions\Report for 12-11.pdf This is a multi-value rule, allowing multiple paths to be specified if more than one rendition exists (PDF, plain text, and XML for example)
rendition_target_file_paths Sets the full path, including filename and extension, where a “rendition” file for the current document should be saved to. Typically this would be somewhere near the main document, but any valid path is acceptable. Use the available transformation methods to build a string representing a valid file system path. Example: d:\Migration\Files\My Documents\Renditions\Report for 12-11.pdf This is a multi-value rule, allowing multiple paths to be specified if more than one rendition exists (PDF, plain text, and XML for example)
metadata_file_path The path to the individual metadata file that will be generated for current object.
created_date Sets the “Created” date attribute in the filesystem.
modified_date Sets the “Modified” date attribute in the filesystem.
file_owner Sets the “Owner” attribute in the filesystem. The user e.g. “domain\user” or “jdoe” must either exist in the computer ‘users’ or in the LDAP-directory.
Since the Filesystem doesn’t use different object types for files, the Filesystem Importer doesn’t need this information either. But due to migration-center’s workflow an association with at least one object type needs to exist in order to validate and prepare objects in a migration set for import.
To work around this, any existing migration-center object type definition can be used with the Filesystem Importer. A good practice would be to create a new object type definition containing the attribute values used with the Filesystem Importer, and to use this object type definition for association and validation.
In addition to the actual content files, metadata files containing the objects attributes can be created when outputting files from migration-center. These files use a simple XML schema and usually should be placed next to the objects they are related to. It is also possible to collect metadata for all objects imported in a given run to a single metadata file, rather than separate files.
Starting with version 3.2.6 the way of creating objects metadata has become more flexible. The following options are available:
Generate the metadata for each object to an individual xml file. The name and the location of the individual metadata file is now configurable through the system rule “metadata_file_path”. If left empty no individual metadata files will be generated.
Generate the metadata of the imported objects in a single xml file. The name and the location of the unified metadata file will be set in the importer parameter “unifiedMetadataPath”. In this case the system rule “metadata_file_path” must be empty.
Generate the metadata for each object to an individual xml file and create also the unified metadata file. The individual metadata file will be set through the system rule “metadata_file_path” and the unified metadata through the importer parameter “unifiedMetadataPath”
Import only the content of files without generating any metadata file. In this case the system rule “metadata_file_path” and the importer parameter “unifiedMetadataPath” should be left empty.
A sample metadata file’s XML structure is illustrated below. The sample content could belong to the report.pdf.fme file mentioned above. In this case the report.pdf file has 4 attributes, each attribute being defined as a name-value pair. There are five lines because one of the attributes is a multi-value attribute. Multi-value attributes are represented by repeating the attribute element with the same name, but different value attribute (i.e. the keywords attribute is listed twice, but with different values)
To generate metadata files in a different format than the one above, an XSL template can be used to transform the above XML into another output. To use this functionality a corresponding XSL file needs to be build and its location specified in the importer’s parameters. This way it is possible to obtain XML files in a format that could be processed further by other software if needed. The specified XSL template will apply to both metadata files: individual and unified.
For a unified metadata file it is also possible to specify the name of the root node (through an importer parameter) that will be used to enclose the individual objects’ <contentattributes> nodes.
Filesystem attributes like created, modified and owner can not only be set in the metadata file but they are also set on the created content file in the operating system. Any source attribute can be used and mapped to one of these attributes in the migset system rules.
Even though the filesystem does not explicitly support “renditions”, i.e. representations of the same file in different formats, the Filesystem importer can work with multiple files which represent different formats of the same content. The Filesystem Importer does not and cannot generate these files – “Renditions” would typically come from an external source such as PDF representations of editable Office file formats or technical drawings created using one of the many PDF generation applications available, or renditions extracted by a migration-center scanner from a system which supports such a feature. If files intended to be used as renditions exist, the Filesystem Importer can be configured to get these files from their current location and move them to the import location together with the migrated documents. The “renditions” can then be renamed for example in order to match the name of the main document they relate to; any other transformation is of course also possible. “Renditions” are an optional feature and can be managed through dedicated system rules during the migration. See for more.
The source data imported with the Filesystem Importer can originate from various content management systems which typically also support multiple versions of the same object.
The Filesystem Importer does not support outputting versioned objects to the filesystem (multiple versions of the same document for example).
This is due to the filesystem’s design which does not support versioning an object, nor creating multiple files in the same folder with the same name. If versions need to be imported using the Filesystem Importer the version information should be appended to the filename attribute to generate unique filenames. This way there will be no conflicting names and the importer will be able to write all files correctly to the location specified by the user.
The source data imported with the Filesystem Importer can originate from various content management systems which can support multiple links for the same object, i.e. one and the same object being accessible in multiple locations.
The Filesystem Importer does not support creating multiple links for objects in the filesystem (the same folder linked to multiple different parent folders for example). If the object to be imported with the Filesystem Importer has had multiple links originally, only the first link will be preserved and used by the Filesystem Importer for creating the respective object. This may put some objects in unexpected locations, depending on how the objects were linked or arranged originally.
Using scanner configuration parameters and/or transformation rules it should be possible to filter out any unneeded links, leaving only the required links to be used by the Filesystem Importer.
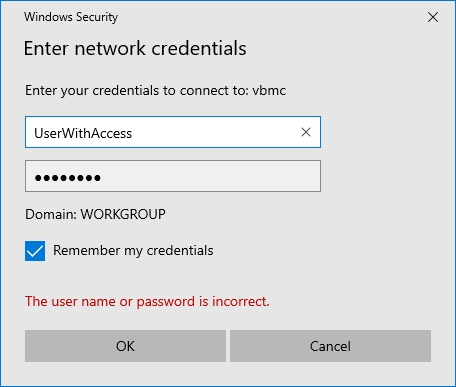
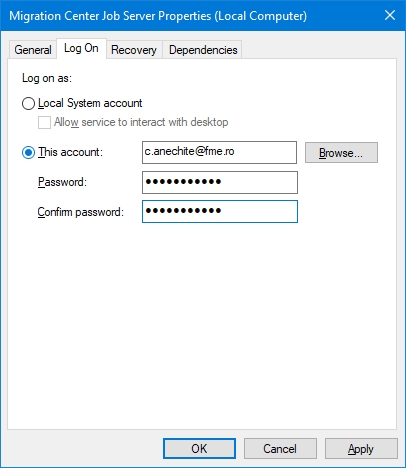
Migration-center uses an Oracle database to store information about documents, migration sets, users, jobs, settings and others.
This guide describes the process of creating an Oracle 19c (v19.3.0.0.0) database instance on Microsoft Windows. Even though the description is very detailed, the installing administrator is expected to have a good degree of experience in configuring databases.
Open the Database Configuration Assistant from the Oracle program group in the Start menu. The assistant will guide you through the creation steps.
Select the Create Database option and click Next.
It is recommended to go with the Advanced configuration.
For the purpose of most installations Oracle Singla Instance Database and General Purpose is sufficient.
Define the database name here. The name must be unique, meaning that there should not be another database with this name on the network. The SID is the name of a database instance and can differ – if desired - from the global database name. In order to make an easy identification of the database possible, a descriptive name should be selected, for instance „migration“.
You can either create it as a Container DB with a Pluggable DB inside or not, depending on preference.
For use with migration-center the “File System” option is sufficient. For more information on the “ASM” method, please refer to the Oracle documentation.
This step describes the database's archiving and recovery modes. The default settings are fine here.
If a default listener is not already configured, you can select one here or choose to create a new one:
This step contains several tabs on which the configuration options for the new database must be specified.
The memory values of the database need to be specified here. For migration-center, user-defined settings are required. Please review the Database chapter the for the recommended amount of memory allocated to the database instance.
For most projects Automatic Memory Management is a good option.
At this point the block sizes and maximum number of user processes are defined. The default block size and maximum number of processes can be applied.
The Unicode character set AL32UTF8 must be selected here. This character set will ensure that all special characters of any language will be correctly saved in the database.
The option Dedicated Server Mode connection type is appropriate for migration-center.
Sample Schemas are not needed so leave the option unchecked.
To manage the database, Oracle Enterprise Manager is recommended. In Oracle 19c, databases can be managed centrally using the Grid Control or locally using the Database Control. Since the choice of database management has no influence on the operability of migration-center, this can be configured according to personal preferences or company policies. For the purposes of this guide the local Database Control will not be selected here. E-mail notification and backup can be configured separately at a later time, if necessary.
Now the passwords for the Oracle system accounts SYS, SYSTEM and PDBADMIN must be entered and confirmed. These accounts with their passwords are needed for the installation of the migration-center database schema.
These accounts/passwords grant full rights for the new Oracle database and should therefore be chosen and safeguarded carefully. The allocation of different passwords is recommended.
Optionally a script can be generated which contains all the settings for the creation of this database. With this script, the setup can be repeated later if necessary. Moreover this script can be used as documentation for the settings used.
The assistant shows a summary of the previous settings. This summary can be stored for documentation purposes in an RSP file.
Clicking on Finish will start the database creation process. This process can take some time.
The Oracle database Configuration Assistant generates the following tablespaces (we assume that unused tablespace is marked to be deleted):
INDX
SYSTEM
TEMP
TOOLS
Oracle components:
Oracle Database
Oracle XML DB
Oracle Net Listener
Oracle Call Interface
General options:
Oracle JVM
Enterprise Manager Repository (optional)
Initialization parameters:
Dependent on server
Character sets:
Database character set (AL32UTF8)
Data files:
Use standard parameters
Control files:
Use standard parameters
Redo log groups:
Use standard parameters
The Microsoft Exchange Scanner is a new connector available since migration-center 3.2.6. The Exchange scanner can extract messages (emails) from Exchange mailboxes and use it as input into migration-center, from where it can be processed and migrated to other systems supported by the various mc importers.
The Microsoft Exchange Scanner currently supports Microsoft Exchange 2010 and the Exchange 365. It uses the Independentsoft JWebServices for Exchange Java API to access an Exchange mailbox and extract emails including attachments and properties.
To scan the online version of Exchange (Outlook 365), you need to generate an App-Only Client ID and Client Secret. Here are the steps:
Log into . If you don't have an account there yet, create it. You also have to set up a tenant that represents your company
If you administer more than one tenant, use Directories + subscriptions filter to select the tenant for whom to register an application
In ⇒ expand the left menu ⇒ select Azure Active Directory ⇒ select App registrations ⇒ click + New registration
Now that you have the application (client) ID (from step 5) and client secret (from step 8), you can use them in the scanner configuration to successfully connect to the Outlook 365.
Set the username to the inbox you want to scan.
Set the clientId to the one you generated.
Set the clientSecret to the one for that client id.
Set the exchangeServer to outlook.office365.com.
Check the useHttps parameter.
Now just set your desired scanFolders path stating with \Inbox and of course the exportLocation and run your scanner.
The Exchange scanner connects to the Exchange Server with a specified Exchange mail account and can extract messages from one (or multiple) folder(s) within the current user’s or other user’s mailboxes. The account used to connect to exchange must have delegate access permission to the other accounts from which mails will be scanned.
For Exchange 365, the scanner connets using a Client ID and Client Secret with access to all the emails on teh server, therefore delegate access is not needed. But the specific email that needs to be scanned must be entered on the
All subfolders of the specified folder(s) will automatically be processed as well; an option for excluding select subfolders from scanning is also available. See chapter below for more information about the features and configuration parameters available in the Exchange scanner.
In addition to the emails themselves, attachments and properties of the respective messages are also extracted. The messages and included attachments are stored as .eml files on disk, while the properties are written to the mc database, as is the standard with all migration-center scanners.
After a scan has completed, the newly scanned email messages and their properties are available for further processing in migration-center.
To create a new Exchange Scanner job, specify the respective adapter type in the Scanner Properties window – from the list of available connectors, “Exchange” must be selected. Once the adapter type has been selected, the Parameters list will be populated with the parameters specific to the selected adapter type, in this case the Exchange connector's parameters.
The Properties window of a scanner can be accessed by double-clicking a scanner in the list, or selecting the Properties button or entry from the toolbar or context menu.
The common adaptor parameters are described in .
The configuration parameters available for the Exchange Scanner are described below:
username* The username that will be used to connect to the Exchange server. This user should have delegate access to all accounts that will be scanned.
password* The password that will be used to connect to the exchange server. Do not set if you're connecting to Outlook 365.
clientId Client ID used to connect to the Exchange 365 Server.
Parameters marked with an asterisk (*) are mandatory.
The Alfresco Scanner allows extracting object such as document, folders and lists and saves this data to migration-center for further processing. The key features of Alfresco Scanner are:
Extract documents, folders, custom lists and list items
Extract content, metadata
Extract documents versions
The following versions of Alfresco are supported (on Windows or Linux): 4.0, 4.1, 4.2, 5.2, 6.1.1, 6.2.0, 7.1, 7.2, 7.3.1.
Last version content is missing online edits when cm:autoVersion was false and then it's switched to true before scanning (#55983)
The Alfresco connectors are not included in the standard migration-center Jobserver but it is delivered packaged as Alfresco Module Package (.amp) which has to be installed in the Alfresco Repository Server. This amp file contains an entire Jobserver that will run under the Alfresco's Tomcat, and contains only the Alfresco connectors in it. For using other connectors please install the regular Server Components as it is described in the and use that one.
The installation kit contains two AMP files, one for Java 11 and one for Java 8. Use the corect one deppending on the java the Tomcat the Alfresco Server is running on.
To use the Alfresco Scanner, your scanner configuration must use the Alfresco Server as a Jobserver, with port 9701 by default.
The first step of the installation is to copy mc-alfresco-adaptor-<version>.amp file in the “amps-folder” of the alfresco installation.
The last step is to finish the installation by installing the mc-alfresco-adaptor-<version>.amp file as described in the Alfresco documentation:
Before doing this, please backup your original alfresco.war and share.war files to ensure that you can uninstall the migration-center Jobserver after successful migration. This is the only way at the moment as long the Module Management Tool of Alfresco does not support to remove a module from an existing WAR-file.
The Alfresco-Server should be stopped when applying the amp-files. Please notice that Alfresco provides files for installing the amp files, e.g.:
C:\Alfresco\apply_amps.bat (Windows)
/opt/alfresco/commands/apply_amps.sh (Linux)
The Alfresco Scanner can be uninstalled by following steps:
Stop the Alfresco Server.
Restore the original alfresco.war and share.war which have been backed up before Alfresco Scanner installation
Remove the file mc-alfresco-adaptor-<version>.amp from the “amps-folder”
To create a new Alfresco Scanner, create a new scanner and select Alfresco from the Adapter Type drop-down. Once the adapter type has been selected, the Parameters list will be populated with the parameters specific to the selected adapter type. Mandatory parameters are marked with an *.
The Properties of an existing scanner can be accessed after creating the scanner by double-clicking the scanner in the list, or selecting the Properties button/menu item from the toolbar/context menu. A description is always displayed at the bottom of the window for the selected parameter.
Multiple scanners can be created for scanning different locations, provided each scanner has a unique name.
The common adaptor parameters are described in .
The configuration parameters available for the Alfresco Scanner are described below:
username*
User name for connecting to the source repository. A user account with admin privileges must be used to support the full Alfresco functionality offered by migration-center.
Example: Alfresco.corporate.domain\spadmin
password*
Password of the user specified above
Parameters marked with an asterisk (*) are mandatory.
The CSV & Excel Scanner is one of the source connectors available in migration-center starting with version 3.9. It scans data from CSV and MS Excel files and creates corresponding objects in the migration-center database. If the scanned data also contains links to content files, the CSV & Excel scanner can link those files to the created objects as well.
<?xml version="1.0" encoding="UTF-8"?>
<contentattributes>
<attribute name="keywords" value="Benchmark" />
<attribute name="keywords" value="Technical" />
<attribute name="reference_period" value="26.11.2001" />
<attribute name="reference_period_from" value="26.11.2001" />
<attribute name="reference_period_to" value="01.01.2100" />
</contentattributes>scanLocations
The entry point(s) in the Alfresco repository where the scan starts.
Multiple values can be entered by separating them with the “|” character.
Needs to follow the Alfresco Repository folder structure, ex:
/Sites/SomeSite/documentLibrary/Folder/AnotherFolder
/Sites/SomeSite/dataLists/02496772-2e2b-4e5b-a966-6a725fae727a
Valid scan locations: an entire site, a specific library, a specific folder in a library, a specific data list.
If one location is invalid the scanner will report an appropriate error to the user so it will not start.
contentLocation*
Folder path. The location where the exported object content should be temporary saved. It can be a local folder on the same machine with the Job Server or a shared folder on the network. This folder must exist prior to launching the scanner. The Jobserver must have write permissions for the folder. This path must be accessible by both scanner and importer so if they are running on different machines, it should be a shared folder.
exportLatestVersions
This parameter specifies how many versions from every version tree will be exported starting from the latest version to the older versions. If it is empty, not a valid number, 0 or negative or greater than the latest "n" versions, all versions will be exported.
exportContent
Setting this parameter to true will extract the actual content of the documents during the scan and save it in the contentLocation specified earlier.
This setting should always be checked in a production environment.
dissolveGroups
Setting this parameter to true will cause every group permission to be scanned as the separate users that make up the group
excludeAttributes
List of attributes to be excluded from scanning. Multiple values can be entered by separating them with the “|” character.
loggingLevel*
See Common Parameters.
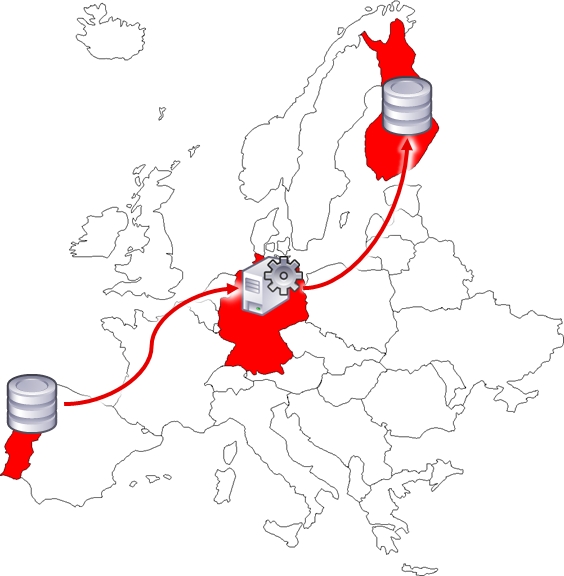
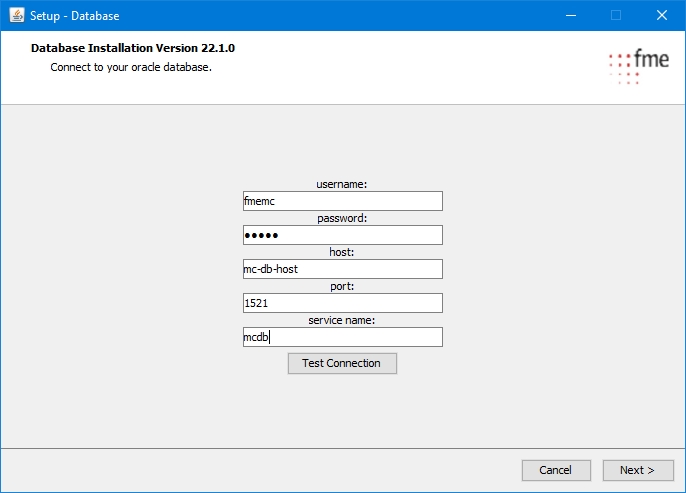
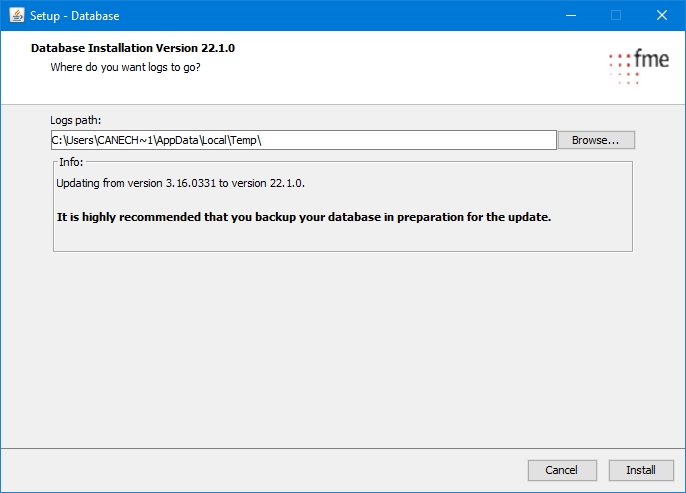

UNDOTBS
USERS
Name your application, choose which kind of accounts are going to use it and click Register
You successfully registered your application and you can view its associated IDs. Some of them will be needed later to obtain an OAuth 2.0 token
In the left menu, select Certificates & secrets ⇒ click + New client secret
Provide some description for this secret, choose expiration period, and click Add
Immediately copy and save the newly created client secret's Value (not Secret ID). You will not be able to view the Value later anymore
In the left menu, select API permissions ⇒ click + Add a permission
Click Application permissions ⇒ check full_access_as_app ⇒ click Add permissions.
Note: Mail.Read, Mail.ReadWrite, Mail.Send permissions are not suitable for EWS
The newly-added full_access_as_app permission has to be approved by your organization's administrator. Ask them to grant consent to your application by clicking Grant admin consent for [organization]
clientSecret Client Secret used to connect to the Exchange 365 Server.
exchangeServer* The host name or IP address of the exchange server.
Use outlook.office365.com for online version.
domain The domain against which the user will be authenticated. Leave empty for authentication against exchange server domain.
useHttps Specify if the connection between Job Server and Exchange server will be established over a secure SSL channel.
scanFolders* Exchange folder paths to scan.
The syntax is \\<accountname>[\folder path] or \folderPath. If only the account is given (ex: \\[email protected]) then the scan location will be considered to be the "Top of Information Store" folder of the user. If no account is specified, the path is considered to be in the account specified in the “username” property. Multiple paths can be entered by separating them with the “|” character.
Example:
\\user\Inbox would scan the Inbox of user (including subfolders)
\Inbox\sales is equivalent to \\“username”\Inbox\sales
excludeFolders Exchange folder paths to exclude from scanning. Follows the same syntax as scanFolderPaths above.
Example:
\\user\Inbox\Personal would exclude user’s personal mails stored in the Personal subfolder of the Inbox if used in conjunction with the above example for scanFolderPaths.
ignoredAttributesList A comma separated list of Exchange properties to be ignored by the scanner.
At least Body, HTMLBody, RTFBody, PermissionTemplateGuid should be always excluded as these significantly increase the size of the information retrieved from Exchange but don’t provide any information useful for migration purposes in return.
exportLocation* Folder path. The location where the exported object content should be temporary saved. It can be a local folder on the same machine with the Job Server or a shared folder on the network. This folder must exist prior to launching the scanner. The Jobserver must have write permissions for the folder. This path must be accessible by both scanner and importer so if they are running on different machines, it should be a shared folder.
exportMailAsMsg Boolean. If true, the emails will be exported as .msg files, otherwise they will be exported as .eml files.
numberOfThreads* Number. The number of concurrent threads that will be used for scanning the emails from the configured locations.
loggingLevel* See: Common Parameters.
When scanning Excel files the “Write Attributes” permission is required otherwise the scanner will throw an “Access is denied” error.
When attempting to scan Excel files with a large number of rows and/or columns the UI might freeze until the following error is thrown:
ERROR executing job: Error was: java.lang.OutOfMemoryError: GC overhead limit exceeded
This is a limitation of the Apache POI API, and the recommendation is to convert the excel file into a CSV file.
To create a new CSV & Excel Scanner job click on the New Scanner button and select “CSV/Excel” from the adapter type dropdown list. Once the adapter type has been selected, the parameters list will be populated with the CSV & Excel Scanner parameters.
The Properties window of a scanner can be accessed by double-clicking the scanner in the list or selecting the Properties button or entry from the toolbar or context menu.
The common adaptor parameters are described in Common Parameters.
The configuration parameters available for the CSV & Excel Scanner are described below:
filePath*
The full path to the CSV or MS Excel file to scan.
Since the job will be executed on the job server machine, you must provide a valid relative to that machine or a UNC path.
sourceIdColumn*
The name of the column in the CSV or Excel file that contains the source ID of the object.
Note that the values in this column must be unique.
contentPathColumn
The name of the column in the CSV or Excel file that contains the path to the corresponding content file of the object.
versionIdentifierColumn
The name of the column in the CSV or Excel file that identifies all objects that belong to a specific version tree.
Mandatory when scanning versions.
versionLevelColumn
The name of the column in the CSV or Excel file that specifies the position of an object in the version tree.
Mandatory when scanning versions.
scanUpdates
Flag indicating if the modified objects will be scanned as updated objects or will be ignored. See
enrichMetadataForScannerRun
The run number of the scan run that you want to enrich.
Mandatory when using .
enrichMetadataPrefix
Optional prefix for the columns that will be added to the objects when running in enrichment mode.
multivalueFields
The names of the columns that will have multi-values separated by a delimiter.
multivalueDelimiter
The delimiter will be used to separate the values of multi-value columns.
loggingLevel*
See .
Parameters marked with an asterisk (*) are mandatory.
The CSV & Excel scanner supports two operation modes: normal and enhancement mode. In normal mode, you can scan objects from a CSV or Excel file and those objects are saved in the corresponding scan run as new, distinct objects in the MC database. In enhancement mode, you can scan data from a CSV or Excel file that is added to an existing scan run, i.e. it enhances an existing scan run with additional data.
In normal operation mode, you can scan objects without content, objects with content, and objects with versions from a CSV or Excel file.
In order to scan objects without content, you just specify the path to the CSV or Excel file and the name of the column that contains the unique source ID of the objects. For example:
The screenshot below shows an excerpt of CSV file you would like to scan.
You would then enter the path to the CSV file in the “filePath” parameter and enter “id” as value in the “sourceIdColumn” parameter (because the column named “id” contains the unique IDs of the objects in the CSV file).
If your source file contained a column with a file path, as seen in the next screenshot, you can enter that column name (“profile_picture” in the example) in the “contentPathColumn” in order to scan that content file along with the metadata of the object.
In order to scan objects with versions, your source file needs to contain two additional columns: one column that identifies all objects that belong to a specific version tree (“versionIdentifierColumn”) and another column that specifies the position of an object in the version tree (“versionLevelColumn”).
Starting with version 3.16, the scanner allows adding new versions to an existing version tree (scanned in a previous run) just by setting the specific root id.
Note: If the last version was updated, the new scanned versions will be related to the updated object.
In the example below, the source file contains metadata of documents that consist of several versions each. Each document has a “title” and a “document_id”. Each version has a “version_id” and a “content_file”. The combination of “document_id” and “version_id” must be unique. Since the content file path is unique for each version in this example, you could use that column as “sourceIdColumn”.
A valid configuration to scan the example source file could look like this:
There are many document management applications, which reference data in third-party-systems. If you want, for example, to archive documents from such an application, it might be useful to store that referenced data also in the archive records, in order to have independent, self-contained archive records. To achieve this, you could (1) scan your document management system with the appropriate scanner, (2) export the data from the third-party-system into a CSV file, and (3) enhance the scan run from step (1) with the data from the CSV file using the CSV & Excel scanner in enhancement mode.
The source file for an enhancement mode scan needs a column that stores the source ID of the corresponding object, i.e. the object that will be enhanced with the data in the source file, in the specified scan run.
For example, the following table shows an excerpt of an existing scan run. The source ID of the objects is stored in the column “Id_in_source_system”. In this case, the ID is the full path of the files that were scanned by the scan run.
The source CSV or Excel file for the enhancement scan should contain all the data that you would like to add to the previously scanned objects and a column with the source ID of the corresponding object, as shown in the following table:
In order to run the scanner in enhancement mode, you need to enter a valid scan run ID in the parameter “enrichMetadataForScanRun”. You can find that ID in the -History- view of a scanner:
The “sourceIdColumn” parameter should contain the name of the column with the source ID. That would be “source_id” in the example above.
You can provide an optional prefix for the columns that will be added to the scan run in the “enrichMetadataPrefix” parameter. This is helpful in the case when your source file contains columns with names that already exist in the specified scan run.
Of course you can enhance a certain scan run several times with different source files.
The scanner allows splitting values from one or multiple columns in multiple distinct values based on a delimiter.
For example, in this particular case, if you want to split the values of columns Record_Series and Classification, all you need to do is to add the column names in the multivalueFields parameter and set the "|" delimiter in multivalueDelimiter parameter:
If the delimiter between the values will not correspond with the one that was insered in the multivalueDelimiter attribute, the cell value will be no longer considered a multi-value so it will be stored as single-value.
Limitations
The user cannot set as input for multivalueFields the value from fields sourceIdColumn, versionIdentifierColumn, or versionLevelColumn because those are single-value fields.
If the parameter multivalueFields is set then parameter multivalueDelimiter must be set as well.
Starting with 3.16 of migration-center, the CSV/Excel scanner is able to scan existing objects as updates.
When the scanUpdates parameter is checked, the scanner compares the attribute values of the previously scanned object with the ones in CSV/Excel. If they are not exactly the same then the object will be scanned as an update. If they are the same, the object is ignored and an info message will be added in the report log.
When the scanUpdates parameter is not checked, the modified objects will be ignored and an info message will be logged.
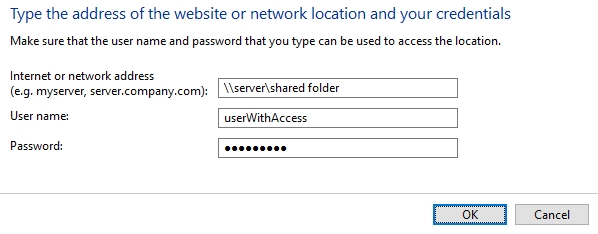
The Alfresco Importer takes care of importing the documents and folders processed in migration-center into a target Alfresco repository.
The following versions of Alfresco are supported (on Windows or Linux): 4.0, 4.1, 4.2, 5.2, 6.1.1, 6.2.0, 7.1, 7.2, 7.3.1.
The Alfresco connectors are not included in the standard migration-center Jobserver but it is delivered packaged as Alfresco Module Package (.amp) which has to be installed in the Alfresco Repository Server. This amp file contains an entire Jobserver that will run under the Alfresco's Tomcat, and contains only the Alfresco connectors in it. For using other connectors please install the regular Server Components as it is described in the and use that one.
The installation kit contains two AMP files, one for Java 11 and one for Java 8. Use the corect one deppending on the java the Tomcat the Alfresco Server is running on.
To use the Alfresco Importer, your importer configuration must use the Alfresco Server as a Jobserver, with port 9701 by default.
The first step of the installation is to copy mc-alfresco-adaptor-<Version>.amp file in the “amps-folder” of the Alfresco installation.
The last step is to finish the installation by installing the mc-alfresco-adaptor-<version>.amp file as described in the Alfresco documentation:
Before doing this, please backup your original alfresco.war and share.war files to ensure that you can uninstall the migration-center Job Server after successful migration. This is the only way at the moment as long the Module Management Tool of Alfresco does not support to remove a module from an existing WAR-file.
The Alfresco-Server should be stopped when applying the amp-files. Please notice that Alfresco provides files for installing the amp files, e.g.:
C:\Alfresco\apply_amps.bat (Windows)
/opt/alfresco/commands/apply_amps.sh (Linux)
The Alfresco can be uninstalled by following steps:
Stop the Alfresco Server.
Restore the original alfresco.war and share.war which have been backed up before Alfresco importer installation
Remove the file mc-alfresco-adaptor-<Version>.amp from the “amps-folder”
To create a new Alfresco Importer job, specify the respective adapter type in the properties window – from the list of available connectors “Alfresco” must be selected. Once the adapter type has been selected, the parameters list will be populated with the parameters specific to the selected adapter type, in this case the Alfresco connector’s parameters.
The properties window of an importer can be accessed by double-clicking an importer in the list or selecting the Properties button or entry from the toolbar or context menu.
The common adaptor parameters are described in .
The configuration parameters available for the Alfresco importer are described below:
username* User name for connecting to the target repository.
A user account with admin privileges must be used to support the full Alfresco functionality offered by migration-center.
password* The user’s password.
importLocation
The path inside the target repository where objects are to be imported. It must be a valid Alfresco path and have to start below the “company_home”-node inside the spacesStore.
Parameters marked with an asterisk (*) are mandatory.
folderpath Each object in Alfresco must be created under a parent object (parent-child-association). This parent object must be a Alfresco folder or a subtype of the Alfresco folder object (cm:folder).
For defining the parent object for an object which should be imported into Alfresco, use the system attribute folder.
Currently, only one folder path is supported and the starting point for imports is the company_home-node of the Spaces store. Only imports below this path are currently possible.
The format of the value must be a valid child node path (without using prefixes for the namespace). Example: If the importLocation of the Importer Module (see section 5.2) is set to /Sites/demosite and the folderpath value is set to /documentLibrary/Alfresco Demo
The object will be created under the documentLibrary of the demosite
Full path is: /Sites/demosite/documentlibrary/Alfresco Demo
folderpath Same as .
permissions Same as .
types / aspects Same as .
Compared to migrating documents and having the folder structure auto-created by the importer, migrating folder objects allows you to set detailed metadata on the folders themselves (such as permissions or aspects).
This approach involves migrating the folder structure first and then migrating the documents in that structure with the autoCreateFolders parameter unchecked.
In order to execute a folder-only migration the following steps should be performed to configure the migration process accordingly:
With the scanner you need to export folders as distinct migration-center objects. Only some scanners support this so please read the specific scanner userguide for details.
Creater a migset of type <SourceType>ToAlfresco(folder) and add the scan run containin gthe folder objects.
In the transformation rules use cm:folder for the base type and ensure to recreate the parentFolder structure in a consistent way.
The parentFolder system rule needs to also contain the current folder name in its path. “name” and “folder” are key attributes for folders in Alfresco. Example: For a folder called current folder that resides in the following structure /Root/folderOne/ the parentFolder system rule when migrating this folder needs to be /Root/folderOne/current folder
The autoCreateFolders options is not used for the folder migsets. However the parameters will still be used if document migsets are imported together with the folder migset.
To import major/minor versions in Alfresco, you need to set the cm:versionable aspect with the cm:versionLabel attribute.
If the version label ends with “.0”, a major version is created, otherwise a minor version is created. The actual version label numbers are determined automatically by Alfresco.
If you do not set the cm:versionLabel in the aspect association, the importer will create all versions as major.
If you do not assign the cm:versionable aspect in the system rule types / aspects, the importer assigns it automatically when importing the second version.
Version Comments can be assigned by setting the versionComments attribute.
Note that the first version of a version tree cannot have a comment, since it was not checked in, but created.

Migration-center has 3 main components: Database component, WebClient and Jobserver component.
The Database stores all the migration-center configurations and all scanned and imported objects with their source and target metadata.
The WebClient is a web based UI where you can manage all the scanner, importer and migset configurations and you can trigger scan, import or transformation jobs. The WebClient can be installed on a machine in your network and then accessed from multiple other machines through a web browser (see for supported browsers).
The present document offers a detailed description of migration-center requirements specifically related to the Oracle database management system it uses as the backend.
The contains a full description of the system requirements and installation steps for all migration-center components and should be consulted first. This document does not substitute the Installation Guide, but completes it with information that might be of importance for Oracle database administrators, such as the various packages, privileges and other Oracle specific features required and/or used by migration-center.
“/sites/demosite/documentLibrary/” for import into the document library of a share site with internal name demosite
“/demofolder” for import a folder with name demofolder below the company home folder.
This path will be appended in front of each folder value (for documents and folders) before creating parent-child association for this object if both the importLocation parameter and the folder attribute values are set.
If the attributes mentioned previously already contain a full path, the importLocation parameter does not need to be filled.
Examples:
importLocation = ”sites/demosite/documentLibrary/” and folder for documents “/test” = complete path “/sites/demosite/documentLibrary/test”
autoCreateFolders This option will be used for letting the importer automatically create any missing folders (spaces) that are part of the folderpath for any object (folder or documents).
Use this option to have migration-center re-create a folder structure at the target repository during import. If the target repository already has a fixed/predefined folder structure and creating new folders is not desired, deselect this option.
defaultFolderType Specifies the default folder type when creating folders using the autoCreateFolders option described above. If the parameter is empty, “cm:folder” will be used by default.
Examples for valid values:
“cm:folder” for standard folder type
“fme:folder” for your own folder type
loggingLevel* See Common Parameters.
mc_content_location This rule offers the possibility to overwrite the location of the objects content.
Leave empty in case the scanned content_location should be used. Example: Initial content location: \\server\data\alfresco\testdocument.txt Set a new location in order to access it from a linux mount of the above share: /server/data/alfresco/testdocument.txt
permissions In Alfresco each object (document or folder) can have several permissions where as one permissions consists of an Authority (person or group) which have a certain right (a certain role like Consumer or a certain right like Read). The access status (Allow/Deny) allows to define if the authority has the permission or not.
User and groups can be configured via Alfresco Explorer or Alfresco Share (Admin functions). Roles can be defined via permissions.xml (look at the Alfresco wiki to find more information).
To configure permissions for an object, use the system attribute permissions.
It can be multivalue and each value must have the following format:
AUTHORITY###PERMISSION### ACCESSSTATUS (ALLOWED|DENIED)
### is used as separator.
You can leave the last part of the value, so the default access status will be ALLOWED.
You can configure the permissions for all object types (folder and documents). Example: ROLE_ADMINISTRATOR###READ
each user in the administrator role will get read permission on the object for which this permission is set
GROUP_EVERYONE###CONSUMER###ALLOWED
Each user of the system (because each user is in the group everyone) will have the permissions of the consumer role.
types / aspects Alfresco as an ECM-System provides built-in object types which can be used for documents and folders. It is also possible to define your own custom types.
Alfresco also provides the functionality to attach and detach aspects on nodes. Additionally, Alfresco has built-in aspects like a “cm:titled” or “cm:author” aspect. More information is provided here: http://wiki.alfresco.com/wiki/Aspect
To configure the object type and aspects for the object to be imported, use the systemattribute types / aspects.
The attribute is multi-value, so it is possible to define exactly one object type and zero, one or more aspects for one object to be imported.
Please note that any custom object type can be used which are derived from cm:content or cm:folder.
Important: The first value in this attribute must be the content type. Example: cm:content
cm:auditable
cm:titled
The object imported will be of type cm:content (alfresco standard document type) and will get the aspects cm:auditable and cm:titled.


The Jobserver component receives the scan or import configuration from the Client and connects to source/target systems to extract/import objects, processes metadata into/from the Database and the content into/from the file system staging area. Multiple Jobservers can be installed.
This is just a quick overview of the installation process. For specific details please see System Requirements and Installation Guide.
The main migration-center components can be installed either on the same machine or on separate machines, by using the installers.
Starting with version 22.1.0 the Database installer no longer requires Oracle Client. The installer will connect to the database using JDBC.
The Jobserver installer can be run on a windows machine, but to actually start the Jobserver you need Java 8 or 11 installed. The Linux Jobserver does not have an installer, it has scripts to install the service.
The WebClient installer can be run on a Windows machine as well. It will deliver a customized Tomcat that is installed as a windows service.
The WebClient connects as follows:
- to the Browser via port 443 - to the Database using connection via information provided by the user (port 1521 by default) - to the Jobserver via port 9700 by default
The Jobserver connects as follows: - to the Database via JDBC connection on the same Oracle port as the Client - to each source or target system differently based on the system itself
When using the Scheduler feature the job will be triggered by the Database instance itself from the Database machine by sending a socket signal to the Jobserver via the defined port (9700 by default).
The general process of performing migrations with migration-center is done in several steps:
The Analyze phase involves configuring a Scanner to connect to a Source System, that will extract the metadata and save it as objects in the migration-center database, and export the content to a defined Filesystem location, which acts as a staging area.
The Organize phase involves assigning Scan Runs into Migration Sets, or migsets for short.
The next 3 phases, Transform, Validate and Correct, work together and involve creating Transformation Rules by which your Source Metadata is Transformed into Target Metadata. The metadata is assigned to Target Type definitions, which can be defined in advance. And based on those definitions the metadata is Validated. If the resulting target metadata is not the desired one, you can reset the objects and repeat the process by correcting or adding transformation rules.
The Import phase, is the last step, and involves creating an Importer, which will connect to the Target System, assigning a migset with Validated Objects to it and starting the import run. You can monitor the progress in the importer run history or directly in the migsets view.
All the migration phases can be done in parallel for different batches of documents that are migrated.
When you first access the link to the WebClient you will see a login window.
The default login user is fmemc and the default password is migration123.
If this is a fresh installation your Connection dropdown will be empty. You will need to configure a new connection to your Database.
This is done by going to the Manage Connections view and clicking Add Connection.
Here you will set a Connection Name and the Database Type, Host, Port and Service Name(database name) for the database you will be using. Click Create to create the connection and be able to use it when signing in.
Before you are able to run a scanner you first need to define a Jobserver by going to the Job Servers tab of the Configuration page.
Click the Add Job Server button and enter the Name, Location (hostname) of the machine where the Jobserver component is installed, and the Port (default is 9700). An optional description can also be added.
Avoid using localhost or 127.0.0.1 for the Jobserver location. That will cause issues when using the scheduler feature.
Open the Scanners page and click the Add Scanner button:
Fill in the Name of this scanner, select a type and select a Jobserver where you want this scan to run.
After you have filled at least the mandatory parameters of the scanner configuration you can save it by clicking on Save.
You can run it by clicking Save & Run in the toolbar, or by going back to the list of scanners and clicking on Start Scan Job in the Right Click context menu.
Clicking on History allows you to see a list of all Scan Runs performed by the this scanner configuration.
Clicking on Source Objects shows you the objects grid for this scanner or scan run.
Open the Migration Sets page and click the Add MigSet button.
Enter a name for this migset and select the Migration Path from the Type dropdown.
In the same view, under Available you will see the scan runs corresponding to your chosen migration-path. Select which scan runs you want to include in this migset by double clicking them or by using the down arrow button.
To actually get the objects locked in this migset you need to click on the Select Objects button
As an optional step before clicking on the Select Objects button, there are 2 filtering options:
Simple Filtering, where you can exclude objects based on their values:
Advanced Filtering, where you can create rules by which to select the objects:
With the Migset you have just created selected, click on the Transformation from the toolbar.
The Rules section in the top left corner lists the Transformation Rules created so far in this migset. You can create a new one using the New button. In the middle there's the Rule Properties section where you can specify the rule Name and if it should return multi-value results.
The Transformation methods section contains a dropdown of all the Functions that you can use inside your transformation rule. These functions take Source Attributes and static values to generate a new value as a Target Attribute. Multiple functions can be linked together by processing the result of a Previous Step:
As you can imagine this is the main strength of migration-center as it allows you to create very complex rules to ensure you get the required results in your Target System.
On the bottom left corner we have the Rules for system attributes. These function the same as the regular transformation rules, except they have a fixed name and therefore serve a specific purpose during the import. Please refer to the user guide of the Importer you are using for details on what each system rule does.
On the Associations tab of the Transformation view you can associate the previously defined Transformation rules to a Target Attribute of an object type.
The Types dropdown shows you a list of all Object Type Definitions in migration-center and you can select which ones are to be used in this migset. In the screenshot above we have selected opentext_document and opentext_rm_classification.
Clicking through the list of selected types will show, on the right side, the current associations between Rules and Target attributes.
Rules that were not associated to any target attribute will NOT be migrated during the import
To mange the available object types in migration-center go to Configure -> Object Types
This will open Object Types view where you can create new Types and either manually adding each of the type's attributes or importing them from a CSV file. More details are in the Client User Guide.
After you have finished writing the necessary transformation rules you can save the migset, and trigger Transformation on the migset. This will also apply Validation.
Transformation will apply the rules in the migset on each object individually and will generate the target objects. The objects will move to the Transformed state.
Validation will compare the generated values against the object type definition restrictions to ensure the values fit. If successful the objects will move to the Validated state.
After doing the transformation, the Target Objects can be viewed in the Transformed Objects view.
If any issue occurred during transformation or validation, the objects will move to the Error state and can be checked in the Error Objects view.
Here is a diagram with all the states the Objects in migration-center can go through:
Open the Importers page and click the Add Importer button:
The Importers section is very similar to the Scanners one so we will only cover the differences.
After setting all necessary parameters for your import to function correctly you must go to the Selection tab which will allow you to select one or more migsets for import. After that you can save the importer and run it.
You can monitor the status of the import either in the the Jobs view, in the importer History or in the Migsets view. Each view will show the progress of the migration in varying levels of detail, with the migsets one showing the most details of the objects being imported.
When the import has finished you can see the status changed to Finished and all the objects marked as Imported. If any errors or warnings occurred you can view them either in the Error Objects view of the migset or by opening the import run log from the history of the importer.
You can automate the migration process from Scan to Import by using the Scheduler feature. This is very useful in setting up a continuous migration of active systems where the users are still modifying and creating documents.
How it works: You create a scheduled job and select existing valid scanner, migset and importer configurations. If the Scheduler is set to active and depending on what interval settings are set, the scheduler will automatically perform the following actions: - Start the scanner - Create a copy of your migset and assign the scanned objects to it - Run Transformation and Validation - Assign the migset to the importer - Start the importer - (optional) send an email report if configured
Create a new Scheduler and enter the Name and Description.
Here, you can also select your Scanner, Migset and Importer.
Next, on the Frequency tab, you have all the options to configure when your scheduled job will trigger and when it will stop triggering. Here you can also configure the email reporting feature.
You can click Save to save the Scheduler and it will start at the scheduled time.
If you open the History tab you can see the list of all runs of the scheduler along with some information about the status of each run.
The mapping lists are a simple and very powerful feature of migration-center. They can be used for a wide variety of scenarios.
A mapping list is just a collection of key - value pairs. A mapping list can also contain multiple values for one key. You can create one globally using the Configure -> Mapping List menu. This will make the mapping list available for use in any migset.
Or you can also create it directly in a migset for use only in that migset.
To use your created mapping list you must use the mapValue() function inside a migset's transformation rules.
The value to be transformed is matched with the values in the Key column of the mapping list. If a value is found then the function returns the equivalent value from the Value column. If the value cannot be matched or the source value is null, the function will trigger a Transformation error on the object or return an empty value (depending if Report missing values is set to 1 or 0).
This document is targeted specifically at Oracle database administrators about to deploy migration-center in corporate environments where databases need to adhere to strict internal guidelines and policies, and where the default database installation procedure used by migration-center may need to be reviewed first, or possibly adapted to meet specific requirements before deploying the solution.
The migration-center database stores all information generated during a migration project. This includes job configurations, object metadata, transformation rules, status and history information, etc.
2-4GB of RAM should be assigned to the Oracle database instance (not the entire Oracle server) where the migration-center schema will be deployed. The Oracle specific memory allocation settings can be left at their defaults.
For storage requirements and sizing of Oracle datafiles see section Oracle Tablespaces below.
There is no differentiation between physical or virtual hardware in terms of requirements; faster physical hosts may be required to compensate for losses in I/O performance or latency if running the database server on virtual machines.
Oracle RDBMS version: 11g R2 - 19c Architecture: both 32bit or 64bit are supported Edition: Standard Edition One, Standard Edition, Enterprise Edition Oracle Express Edition (Oracle XE) is also supported but not recommended in production because of its limitations!
Ideally a separate Oracle database instance should be designated for use by migration-center alone, rather than an instance shared with other database applications. This would help performance and related troubleshooting if necessary as there wouldn’t be multiple applications and thus multiple potential problem sources to investigate. From a purely technical perspective sharing a database instance with other database applications poses no problems.
The operating system the Oracle Server is running on is of no relevance to migration-center, as all communication with the database happens at a higher level, independently of the underlying OS or hardware architecture. All operating systems officially supported by the Oracle versions mentioned above are also supported by migration-center.
Please consult the appropriate Oracle documents for more information on operating systems supported by Oracle databases.
The migration-center database schema can be deployed on any Oracle database instance meeting the requirements and setting described in the migration-center Installation Guide
The schema is named FMEMC. The schema name is fixed cannot be changed; as a consequence it is also not possible to have more than one schema installed on the same database instance.
The schema is home to all database objects created and used by migration-center, such as tables, stored procedures, Java code, etc. As part of the schema the user FMEMC is created and granted access to all necessary packages, objects and privileges (also see section Oracle Privileges). For storing data and indices two tablespaces are also created for use by FMEMC (also see section Oracle Tablespaces).
The tablespace meant for storing user data is called FMEMC_DATA and will store information such as job configurations, object metadata, transformation rules, status and history information, etc.
A separate tablespace called FMEMC_INDEX is used for storing indices of indexed fields
Much like the schema name, the tablespace names are fixed and cannot be changed.
By default each of the two tablespaces mentioned above store information in 2 data files
The data files are set to autoextend by default
The data files can be customized in terms of count, size, storage location, and whether autoextend is allowed or not. With the autoextend option disabled the free space within the data files needs to be monitored and extended accordingly during the migration process to prevent the tables from filling up and stalling the migration process.
The above must be changed in the installation scripts and cannot be set through the regular setup program’s GUI.
The primary factor for sizing the Oracle data files is the number of objects planned to be migrated using the respective database instance, as well as the number of attributes stored per object, and the length of the respective attribute values; these factors can (and do) of course vary from case to case.
For more comprehensive information on typical migration project sizes (from small to very large) and the requirements in terms of storage space resulting from there, as well as general recommendations for sizing the database in preparation of an upcoming migration project please consult the Sizing Guide.
This chapter details the privileges required by migration-center for accessing the Oracle packages and various functionalities it needs to work properly. By default these privileges are granted to the FMEMC user during installation. After database installation has completed successfully, it is possible to log in with the user FMEMC and connect to the migration-center database in order to start using the solution.
The regular installation process using the setup program with GUI requires logging on as SYS. Since this might not be possible in some environments, there is the alternative of customizing the critical part of the setup and having an administrator execute the appropriate scripts.
This would generally involve having an administrator customize and runs the scripts for creating the user FMEMC, tablespaces, data files, etc., and then run the rest of the setup by running the setup program using the previously created user FMEMC for connecting to the database instead of SYS. In this case the below permissions must be granted to user FMEMC in order for the setup program to determine whether migration-center tablespaces and/or data files already exist on the instance where the database is supposed to be installed.
GRANT SELECT ON SYS.DBA_DATA_FILES TO FMEMC;
GRANT SELECT ON SYS.DBA_TABLESPACES TO FMEMC;
Encrypting passwords saved by migration-center
Read current database configuration from view v$instance (host name and database instance name)
Execute core migration-center job-based functionalities such as transformation, validation, or scheduled migration as native Oracle Jobs
migration-center Transformation Engine (process migration-center data by applying transformation rules and altering object metadata)
GRANT CONNECT, RESOURCE TO FMEMC;
GRANT CREATE JOB TO FMEMC;
GRANT SELECT ON SYS.V_$INSTANCE TO FMEMC;
GRANT CREATE VIEW TO FMEMC;
GRANT SYS.DBMS_LOCK TO FMEMC;
GRANT SYS.UTL_RAW TO FMEMC;
GRANT SYS.UTL_ENCODE TO FMEMC;
GRANT SYS.DBMS_OBFUSCATION_TOOLKIT;
Start scheduled migration jobs at the specified time using Oracle’s built-in scheduler
GRANT SYS.DBMS_SCHEDULER TO FMEMC;
Establish network communication from scheduler to Job Server over TCP
GRANT SYS.UTL_TCP TO FMEMC;
Allow the scheduler to send notification emails to configured users about outcome of scheduled migration jobs
GRANT SYS.UTL_SMTP TO FMEMC;
As mentioned above, parts of the installation process can be controlled via installation scripts. These can be used for preparing the database manually by an administrator and finally running the regular setup program connected with the migration-center user FMEMC instead of SYS which may not be allowed to be used.
The script files used during setup are located in the Database\util folder of the migration-center installation package. These files can be used to adapt the setup procedure to some degree to specific requirements of the customer’s environment. The individual files and their role in the migration-center database installation process are described in the table below.
Script file name (located in Database\util)
Description
Executable
Editable
create_tablespaces_custom_location.sql
Tablespace and data file creation and configuration script
Y
Y
create_tablespaces_default_location.sql
Tablespace and data file creation and configuration script using database instance’s default location for data files
Y
Y
create_user_fmemc.sql
Decide whether to use a custom or the default location for the data files. Pick create_tablespaces_custom_location.sql or create_tablespaces_default_location.sql accordingly.
Review/adapt the selected tablespace creation script
Execute the tablespace creation script
Review/adapt the user creation script (do not change user name!)
Execute the user creation script
Run the migration-center database installation program (Database\InstallDataBase.exe) and proceed as described in the installation guide.
Exception to the Installation Guide: log in as the previously created user FMEMC instead of user SYS!
Verify the database installation log after installation
Log on to migration-center using the migration-center Client and verify basic functionalities
Use the drop_fmemc_schema script to drop the entire schema in case of an unsuccessful installation, or if the schema needs to be removed for other reasons. WARNING! This will delete all migration center data from the database instance! Make sure the schema has been backed up before dropping a schema that already contains user data created by migration-center.
The present document offers a guideline for sizing and configuring migration-center components in different migration scenarios. Due to the complexity of the migration projects, enterprise environments and applications migration-center interacts with, this guide does not provide exhaustive information, but it offers best practice configurations accumulated in more than 100 migration projects.
The Installation Guide and Database Administrator’s Guide contain a full description of the system requirements and installation steps for all migration-center components and should be consulted first. This document does not substitute the documents mentioned above but completes it with information that might be of importance for getting the best migration-center performance.
This document is targeted specifically to the technical persons that are responsible with installation and configuration of migration-center components.
This chapter describes the configurations and sizing guidelines that apply to any kind of migration project.
The following hardware and software resources are required by MC client in any of the migration scenarios described in the next chapters.
The migration-center database stores all information generated during a migration project. This includes job configurations, object metadata, transformation rules, status and history information, etc.
Sizing and configuration tips
No special hardware or software requirements
All MC components can be run on the same machine
Deployment overview
For such a small migration projects, where up to 500,000 objects need to be migrated, there are no special hardware or software requirements. Basically, all three MC components can be run on a single desktop computer or on an adequately sized virtual machine. In this case the machine should have enough physical memory for OS, Oracle server, MC components and other applications that may run on that machine. The recommended processor is a dual or quad core having a clock rate of minimum 2.2 GHz.
Oracle instance
Standard database installation can be followed (as it is described in “migration-center installation guide”)
RAM: 4 GB of total memory for the instance.
Use “Automatic memory management”. This can be chosen when creating the Oracle instance.
Sizing and configuration tips
Dedicated Oracle Server machine
Two MC Job Servers for a better scalability
Deployment overview
It is recommended to use a dedicated machine for the Oracle instance needed by MC.
For a better scalability of scanning and importing jobs or when migration timeframe is short, it’s recommended to deploy the Server Components (Job Server) on two machines. In this way you may run multiple scanner and importers in parallel speeding up the entire migration process. The performance of scanners and importers is dependent by the Source and Target System so if one of those systems performs slowly, the migration process can be speeded up by running multiple scanners and importers in parallel. If necessary, the number of deployed Jobservers can be extended.
Oracle instance
The host should not necessarily be a server machine. A well sized desktop machine would be enough.
CPU: Quad Core, min. 2.5 GHz
8 GB of memory allocated for the instance
Use “Automatic memory management” in order for the instance to tune its target memory size, redistributing memory as needed between the system global area (SGA) and the instance program global area (instance PGA). If that is not possible, the recommendation is to allocate as much as possible for SGA memory (especially for buffer cache) and keep PGA memory in the range of 200 MB.
Sizing and configuration tips
Dedicated Oracle Instance running on a Server machine.
Three or more MC Job Servers for a better scalability
Deployment overview
It is recommended to use a dedicated Oracle Instance running on server hardware.
For a better scalability of scanning and importing jobs three or more instances of Server Components (Job Server) need to be deployed. The performance of scanners and importers is dependent by the Source and Target System so if one of those systems performs slowly, the migration process can be speeded up by running multiple scanners and importers in parallel. If necessary, the number of deployed Job Servers can be extended.
Oracle instance
A dedicated server machine is required. It is recommended to use a dedicated Oracle instance for running only Migration Center but no other applications.
CPU: 4-8 Cores, min. 2.5 GHz
16-32 GB of memory allocated for the instance
Use “Automatic memory management” in order for the instance to tune its target memory size, redistributing memory as needed between the system global area (SGA) and the instance program global area (instance PGA). If that is not possible the recommendation is to allocate as much as possible for SGA memory (especially for buffer cache) and keep PGA memory in the range of 400 MB.
Sizing and configuration tips
Multiple Dedicated Oracle Instances running on a Server machine or use an instance on a high-performance Oracle cluster
Four or more Job Servers.
A file server or a storage server used for temporary storing the content.
Deployment overview
The deployment for the migration of a very large number of objects should be planned carefully. In this case it is recommended to use multiple MC databases. In most cases it is not advised to migrate more than 10 million objects with a single Oracle instance even if the hardware is sized accordingly. There are several reasons for using multiple database instances:
The data from different sources is not mixed up in a single instance helping the user to handle easier the errors that appear during migration
The transformations and validations will be better scaled on multiple database instances
Facilitate the work of multiple migration teams
A dedicated file/storage server should be shared by all Job Servers for storing and accessing the content during migration. This will help the migration in the way that set of objects scanned with any scanner can be imported with any importer.
Oracle instance
Several dedicated server machines are required. For each machine it is recommended to use a dedicated Oracle instance for running only Migration Center but no other applications.
CPU: 4-8 Cores, min. 3.0 GHz
Minimum 16 GB of memory allocated for each instance.
Use “Automatic memory management” in order for the instance to tune its target memory size, redistributing memory as needed between the system global area (SGA) and the instance program global area (instance PGA). If that is not possible the recommendation is to allocate as much as possible for SGA memory (especially for buffer cache) and keep PGA memory in the range of 600 MB.
The Amazon Comprehend Enrich Scanner is one of the source connectors available in migration-center starting with version 3.17. It is a special connector which enhances the objects scanned by another source connectors with some data computing using the Amazon Comprehend.
The supported Comprehend classifiers: Dominant Language Classifier, Entities Classifier and Custom Classifier.
The scanner will extract text in enrich mode even if the scanner was run in simulation mode before.
The entities and language classifiers can be run in the same scan run, but the entities classifier will not take into consideration the language extracted by the dominant language classifier. The attribute generated by the language classifier can be used by the entities classifier if it will be run before the entities classifier. More information about the way to use the source attribute as entities language attribute is presented in .
To create a new Amazon Comprehend Enrich Scanner job click on New Scanner button and select "AmazonComprehendEnrich" from the adapter type dropdown list. Once the adapter type has been selected, the parameters list will be populated with the Amazon Comprehend Enrich Scanner parameters.
The Properties window of a scanner can be accessed by double-clicking the scanner in the list or selecting the Properties button or entry from the toolbar or context menu.
The common adaptor parameters are described in .
The configuration parameters available for the Amazon Comprehend Enrich Scanner are described below:
publicKey
The Amazon public key used to create a connection to AWS.
privateKey
The Amazon private key. This should be the pair of the public key.
region
Parameters marked with an asterisk (*) are mandatory.
The classifiers are configured using an XML file. The structure of this file is a predefined one and allows the user to configure the classifiers as much as possible.
The supported classifiers are divided into two types: standard classifiers and custom classifiers. There is a predefined XML structure for each classifier type. An example of this configuration file can be found in \fme AG\migration-center Server Components <Version>\lib\mc-aws-comprehend-scanner\classifiers-config.xml.
For every classifier, you can specify if the score should be displayed by using the XML attribute "dispayScore". You need to specify this attribute just if you want to have the score as an attribute in migration-center otherwise, the attribute can be omitted because the default value is false.
The standard classifiers are split into two supported classifiers and the difference between them is made using an XML attribute named "type".
Dominant Language Classifier
The structure of this classifier is presented in the following block. The "threshold" XML element is mandatory and is used to filter the values. If the score for a specific language is lower than the threshold value then the language is not saved on database.
Entities Classifier
The structure for the entities classifier is presented in the following block.
The XML sub-elements are:
threshold - is used to filter the entities. If the entity score is less than the threshold value then the entity will not be saved in the database.
language - is a mandatory parameter used to specify the language of the documents. If the user has documents with different languages then the user is allowed to use a source attribute to specify the language. The attribute name should be prefixed with $ character, eg. $aws_language.
entityRecognizerArn - is used to specify the custom entity classifier instead of the standard one.
The Custom Classifier is used to classify documents using custom created categories. The scanner allows users to use multiple custom classifiers in the same scan run.
The XML sub-element "classifierEndpointArn" is mandatory and specifies the Amazon Resource Names of the custom classifier.
The "threshold" sub-element is to filter the classes. If the class score is lower than the provided value for the threshold, then the attribute will not be saved on the database. The attribute name on the database will be "aws_className_awsJobId".
The Amazon Comprehend Enrich Scanner can be run in two modes: simulation mode and enrich mode.
To extract the text in both cases the scanner uses Tika and Tesseract for OCR. The OCR is disabled by default, but it can be activated by the user. More information can be found in chapter and .
The parameter "executeClassifiers" should be not checked when you want to run the scanner in simulation mode. To see the information generated by the scanner, the parameter "loggingLevel" should be set to 3 or 4.
The scanner extracts the text from documents locally and computes the number of characters and units to help the user to estimate the cost of classifiers execution.
The information generated during execution is present in the report log. An example of a report log is present in the following image.
To run the scanner in enrich mode you need to check the parameter "executeClassifiers".
The first step that the Amazon Comprehend Enrich Scanner does is to extract locally the text from documents. After that, the text files are uploaded to S3 on inputS3Uri. The classifiers jobs are fired and the result of those are saved in S3 on outputS3Uri. The scanner downloads the files and saves the results on database.
The following image presents the attributes in the database after one scan run on enrich mode with standard entities classifier and dominant language classifier.
The Tika library is used by the scanner to extract the text from documents.
The scanner provides a tika configuration file that contains all necessary parsers to extract the text from all office documents. The user can modify the configuration file if more tunings are wanted. The file is located on \fme AG\migration-center Server Components <Version>\lib\mc-aws-comprehend-scanner\tika-config.xml.
The "OOXMLParser" is used for office documents like docx and the "PDFParser" is used for pdf documents. The default configuration provided by the Tika library will be used for other documents type.
More information about the configuration can be found at .
The Tesseract OCR is used to extract the text from the embedded images and also from the image file. The documentation of this library is .
To install this library you can follow the article: . The executable file can be download from or .
After you installed the Tesseract you need to complete the TesseractOCRConfig.properties file with tesseractPath and tessdataPath. Example:
By default, the Tesseract is disabled. If the user wants to enable the Tesseract, the following steps should be followed:
Open tika-config.xml and remove from DefaultParser the line <parser-eexclude class="org.apache.tika.parser.ocr.TesseractOCRParser"/>
Change the value of the ocrStrategy XML element of PDFParser with ocr_and_text.
For configuring some additional parameters that will apply to all scanner runs, a configuration file (internal-configuration.properties) provided in the folder …\lib\mc-aws-comprehend-scanner. The following settings are available:
User creation script; this is where the user is created and privileges are granted to the user
WARNING! Do not change the user name!
Y
Y
drop_fmemc_schema.sql
Drop user/schema fmemc and all objects owned by fmemc WARNING! This will delete all migration center data from the database instance!
Y
N
The scanners running in Job Server extract the content of documents from the DMS and store them in a file system folder. That folder might be located on the Job Server machine (in case of small and medium migration projects) or on dedicated storage machine, NAS or fileserver in case of large and very large projects. How much disk space is needed to be reserved for exporting the content depends on the number and the size of documents that have to be migrated.
The Unicode (AL32UTF8) character set is recommended to be used in order to handle correctly any kind of character that may appear in the metadata.
Other recommendations
MC inserts and updates rows intensively and therefore fast disks help the performance.
Even though the rows are inserted and updated intensively the MC transactions are generally small. There are no situations when more than 5,000 table rows are inserted, updated or deleted in a single transaction.
It is very recommended the instance has at least 3 Redo Log files having in total a minimum size of 1 GB. This is important when multiple big transformation and validation jobs are run by MC because those jobs update a big number of database rows that require enough redo log space. You may get the information about existing redo log files by running the query: SELECT * FROM v$log;
Make sure that instance has at least 4 Redo Log files having in total a minimum size of 1.5 GB. This is important when multiple big transformation and validation jobs are run by MC because those jobs update a big number of database rows that require enough redo log space. You may get the information about existing redo log files by running the query: SELECT * FROM v$log;
Is recommended that FMEMC_DATA tablespace to be split on multiple physical data files stored on different physical disks in order to maximize the performance for a specific hardware configuration.
Make sure that instance has at least 5 Redo Log files having in total a minimum size of 2 GB. This is important when multiple big batch jobs (transformations, validations, scanners, importers) jobs are run by MC because those jobs update a big number of database rows in quite a short time and therefore redo log space should be sized accordingly in order to prevent redo log wait events. You may get the information about existing redo log files by running the query: SELECT * FROM v$log;
Operating system:
Windows Server 2003 , 2008, 2012, or 2016
Windows 7, 8, or 10
Required software:
Oracle Client 11g R2 - 19c, 32-bit
CPU:
Any CPU that is supported by OS will be supported by MC client
RAM:
Usually it doesn’t consume more the 200 MB of RAM. This threshold might be overtaken when loading more than 100,000 objects in a grid.
HDD:
10MB
Operating system:
Windows Server 2003 , 2008, 2012, or 2016
Windows 7, 8, or 10
Required software:
Oracle / OpenJDK 8 or Oracle / OpenJDK 11, 32-bit or 64-bit
For migration to/from Documentum DFC 5.3 or later needs to be installed
CPU:
Dual or Quad core processor min. 2.5 GHz
RAM:
The Job Server is configured by default to use 1 GB of memory. This will be enough in most of the cases. In some special cases (multiple big scanner/importer batches) it can be extended to 1.5 GB (with 32-bit Java) or higher values (with 64-bit Java) through the configuration.
HDD:
For installation 300 MB of disk space is required. An additional disk space is required for the logs. In most of the productive migration when debugging is not activated, about 50 MB should be reserved for every 100,000 migrated objects.
Operating system:
See Oracle system requirements
Required software:
Oracle 11g R2, or Oracle 12c R1 and R2, Oracle 18c, Oracle 19c
CPU:
Depends on the migration size (see next chapters)
RAM:
Depends on the migration size (see next chapters).
Data storage:
Generally sizing of the data files is determined based on the number of objects expected to be migrated using the respective database instance. By default, the tablespaces created by MC installer totalize 60 MB. They are set to auto extend automatically when more storage space is required by MC components. There is no upper limit set. The required storage is dependent by the number of objects that will be migrated and the amount of metadata that will be scanned and imported. Roughly 75% of necessary storage is occupied by the objects metadata (source and target metadata). The rest of 25% are required by the configurations and other internal data.
To estimate the necessary storage for a migration set the following formula might be used:
Storage size = 5 * (NR_OF_OBJECTS) * (AVG_METADATA_SIZE)
NR_OF_OBJECTS – the number of objects and relations to be migrated
AVG_METADATA_SIZE – the average size in bytes of an object metadata (attribute names size + attribute values size)
Example: Migration of 800,000 documents and folders from Documentum into Documentum. The medium number of attributes was 70 and the estimated AVG_METADATA_SIZE was 5,000 bytes.
Storage size = 5 * 800,000 * 5,000 = ~20 GB.
Note: In order to be accessible from any MC client, the scanner/importer report log files are stored in MC database as CLOB fields. If big scanners or importer are run with “debugLevel=4” the size of report logs gets increased significantly and therefore additional tablespace should be taken in consideration.
Content storage:
Character set
executeClassifiers
Flag indicating if the classifiers will be executed. If this parameter is not checked then the scanner will run in Simulation mode, otherwise, the classifiers jobs will be fired in Comprehend. See Classifiers Configuration.
inputS3Uri
The S3 location where the text files will be uploaded.
outputS3Uri
The S3 location where the output of the classifier will be located.
kmsKeyId
The ARN of custom managed key used to encrypt the data in S3.
Example: arn:aws:kms:eu-central-1:0908887578777:key/d484ee92-ffff1-444e-bcbb0-7cccceffcffc
dataAccessRoleArn
The ARN of the role that has Comprehend as trusted entities.
Example: MCDEMO_Comprehend
deleteFiles
Flag indicating if the files from S3 will be deleted. If the parameter is checked then the files from inputS3Uriand outputS3Uri will be deleted.
jobRunId*
The id of the job which scanned the objects that will be enriched.The jobRunId must exist.
configurationFile
The location of the file where the classifiers are configured. When the executeClassifiers parameter is checked, then this parameter is mandatory. The way to configure the classifiers is detailed in Classifiers Configuration.
loggingLevel*
See Common Parameters.
entities - specify the entities that will be saved on the database. If the entity is not present in the entities list, then the attribute will be ignored by the scanner.
Configuration name
Description
waiting_time_between_requests
The time in seconds that the scanner will wait until it will make a request to Amazon to get the Comprehend Classifier Job status.
Example: waiting_time_between_requests=10 means that the scanner will make a request and if the status is "in progress" then the scanner will wait 10 seconds until it will make another request to check the status
Extract content(document), metadata
Extract versions
Exclude specified content types
Exclude specified file types
Exclude specified columns (attributes)
Calculate checksum during scan to be used later for validating the imported content (in combination with importers supporting this feature)
The SharePoint Scanner is implemented mainly as SharePoint Solution running on the SharePoint Server, with the Job Server part managing communication between migration-center and the SharePoint component.
The SharePoint Scanner might receive timeout error from SharePoint when scanning libraries with more than 5000 documents (#52865)
Currently a workaround can be used if the timeout errors are encountered by running the scanner with the following CAML query:
This query will result in only the objects with IDs between 1 and 5000 being scanned. This query can be adapted to scan in increments so that the timeout error is avoided.
The migration-center SharePoint Scanner requires installing an additional, separate component from the main product components. The migration-center SharePoint Scanner is a SharePoint Solution which manages the scan (extraction) process from Microsoft SharePoint Server. This component will need to be installed and deployed manually on the machine hosting the Microsoft SharePoint Server. The required steps are detailed in this chapter.
To install the main product components consult the migration-center Installation Guide document.
To install the migration-center SharePoint Scanner, read on.
The migration-center SharePoint Scanner is implemented as a SharePoint Solution, a functionality supported only with Microsoft SharePoint Server 2007 or newer.
Since the migration-center SharePoint Scanner Solution must be installed on the same machine as Microsoft SharePoint Server, the range of Windows operating systems supported is the same as those supported by Microsoft SharePoint Server 2007-2013 respectively. Please consult the documentation for Microsoft SharePoint Server 2007-2016 for more information regarding supported operating systems and system requirements.
Administrative rights are required for performing the required uninstallation, installation and deployment procedures described in this chapter.
Follow the standard installation procedure described in the Installation Guide to install the migration-center Server Components containing Job Server and corresponding part of the SharePoint Scanner.
Connect to the SharePoint Server (log in directly or via Remote Desktop); in a farm, any server should be suited for this purpose.
Copy the McScanner.wsp file from <migration-center Server Components installation folder>/lib/mc-sharepoint-scanner/Sharepoint <SPVersion> to a location on the SharePoint Server
Open an administrative Command Prompt
Navigate to C:\Program Files\Common Files\Microsoft Shared\Web Server Extensions\<Hive Folder>\BIN
Use the STSADM tool to install the SharePoint Solution part of the SharePoint Scanner STSADM –o addsolution –filename <path to the file copied at step 2>\McScanner.wsp
For SharePoint 2010, 2013 and 2016 an alternative installation using PowerShell is possible and can be used if preferred:
Connect to the SharePoint Server (log in directly or via Remote Desktop); in a farm, any server should be suited for this purpose.
Copy the McScanner.wsp file from <migration-center Server Components installation folder>/lib/mc-sharepoint-scanner/Sharepoint <SPVersion> to a location on the SharePoint Server
Open the SharePoint Management Shell from the Start menu
Use the following PowerShell commands to install the SharePoint Solution part of the SharePoint Scanner Add-SPSolution <path to the file copied at step 2>\McScanner.wsp The output should be like
Name
SolutionId
Deployed
mcscanner.wsp
f905025e-3de7-44c9-828a-f7b12f726bc1
False
Having installed the SharePoint Solution it is now time to deploy it. Due to differences in the various SharePoint versions’ management interfaces, the procedure differs slightly depending on the version used. Follow the steps below corresponding to the targeted SharePoint version:
SharePoint 2007:
Open SharePoint Central Administration
Go to Operations
Under Global Configuration, click Solution Management
Click McScanner.wsp and follow instructions to deploy the solution.
SharePoint 2010, 2013 and 2016:
Open SharePoint Central Administration
Go to System Settings
Under Farm Management, click Manage Farm Solutions
Click McScanner.wsp and follow the instructions to deploy the solution
Verify the solution works correctly after deployment by calling the following URL in a web browser:
http://<your sharepoint farm>/_vti_bin/McScanner.asmx?wsdl
If the output looks like picture below, deployment was successful and the SharePoint Scanner is working.
If the SharePoint site is configured to run over HTTPS using the SSL protocol, the two SharePoint Scanner components (the mc Job Server part running in Java, and the SharePoint Solution part running on IIS) need additional configuration to communicate between one another.
In this case the issuer of the server’s SSL certificate must set as a trusted certification authority on the JVM used by the Job Server to allow the Job Server component of the SharePoint Scanner to trust and connect to the secure SharePoint site.
Follow the steps below to register the certification authority with the JVM:
Export the certificate as a .cer file
Transfer the file to the machine running the Job Server
Open a command prompt
Import the certificate file to the Java keystore using the following command (use the actual path corresponding to JAVA_HOME instead of the placeholder; the below is one single command/line!) JAVA_HOME\bin\keytool –import –alias <set an alias of your choice, e.g. SP2013> -keystore ..\lib\security\cacerts –file <full path and name of certificate file from step 2>
Enter “changeit” when asked for the password to the keystore
The information contained in the certificate is displayed. Verify the information is correct and describes the certification authority used to issue the SSL certificate used by the secure SharePoint connection
Type “y” when prompted “Trust this certificate?”
“Certificate was added to keystore” is displayed, confirming the addition of the CA from the certificate as a certification authority now trusted by Java.
Restart the Job Server
Repeat the above steps for all machines if you have multiple Job Servers with the SharePoint Scanner running.
To create a new SharePoint Scanner, create a new scanner and select SharePoint from the Adapter Type drop-down. Once the adapter type has been selected, the Parameters list will be populated with the parameters specific to the selected adapter type. Mandatory parameters are marked with an *.
The Properties of an existing scanner can be accessed after creating the scanner by double-clicking the scanner in the list or selecting the Properties button/menu item from the toolbar/context menu. A description is always displayed at the bottom of the window for the selected parameter.
Multiple scanners can be created for scanning different locations, provided each scanner has a unique name.
The common adaptor parameters are described in Common Parameters.
The configuration parameters available for the SharePoint Scanner are described below:
webserviceUrl* This is the URL to the SharePoint Scanner component installed on the SharePoint Server
Also see chapter 3 Configuration for more information.
Example: http://<sharepointfarm>/<site>/
username* The SharePoint user on whose behalf the scan process will be executed.
This user also needs to be able to access the temporary storage location where the scanned objects will be saved to (see parameter exportLocation below).
Should be a SharePoint Administrator.
Example: sharepoint.corporate.domain\spadmin
password* Password of the user specified above
includeLibraries* List of Document Libraries the connector should scan. Multiple values can be entered and separated with the “|” character. At least one valid Document Library must be specified
query Sharepoint CAML query for a detailed selection of scan documents.
Does not work with excludeContentTypes.
excludeContentTypes Exclude unneeded content types when scanning the document libraries specified above.
Multiple values can be entered and separated with the “|” character.
excludeFileExtensions Exclude unneeded file types when scanning the document libraries specified above.
Multiple values can be entered and separated with the “|” character.
excludeAttributes Exclude unneeded columns (attributes) when scanning the document libraries specified above.
Multiple values can be entered and separated with the “|” character.
includeInternalAttributes List of internal SharePoint attributes to be scanned.
scanDocuments If enabled the scanner will a process all the Documents it encounters for the configured valid path.
scanListItems If enabled the scanner will a process all the List Items it encounters for the configured valid path
scanFolders If enabled the scanner will a process all the Folders it encounters for the configured valid path
scanLists If enabled the scanner will a process all the Lists/Libraries it encounters for the configured valid path
scanSubsites If enabled the scanner will a process the data of the subsites
scanPermissions If enabled each created item no matter the type will have the Permissions scanned into the migration center database for further use in the migration process
scanVersionsAsSingleObjects If enabled the scanner will process each version tree as a single object in MC, which contains the content and metadata of the latest version and also the link to the contents of the other versions in the mc_previous_version_content_paths attribute
computeChecksum If enabled the scanner calculates a checksum for every content it scans. These checksums can be used during import to compare against a second checksum computed during import of the documents. If the checksums differ, it means the content has been corrupted or otherwise altered, causing the affected document to be rolled back and transitioned to the “import error” status in migration-center.
hashAlgorithm Specifies the algorithm to be used if the computeChecksum parameter is checked.
Supported algorithms: MD5, SHA-1, SHA-224, SHA-256, SHA-384 and SHA-512. Default algorithm is MD5.
hashEncoding Specified the encoding to be used if the computeChecksum parameter is checked.
Supported algorithms: HEX and Base64. Default is HEX.
exportLocation* Folder path. The location where the exported object content should be temporary saved. See: .
loggingLevel*
See: .
Parameters marked with an asterisk (*) are mandatory.
When scanning from SharePoint, the “exportLocation” parameter must be set.
For ensuring proper functionality of the content export there are a few considerations to keep in mind:
Regarding the path: The export location should (ideally) be a UNC path that points to a shared location (e.g., \\server\fileshare). If a local system path is used (D:\Temp), this path will be relative to the SharePoint Server where the WSP solution is running, and NOT to the Job Server machine.
Regarding the credentials: For accessing the specified file share the SharePoint scanner will use the credentials provided in the scanner configuration. Therefore, the same user used to do the migration (e.g., sharepoint\mcuser) must have write permissions on the file share.
Starting from version 3.3 of migration-center the SharePoint scanner is able to use SharePoint CAML queries for filtering which objects are to be scanned. Based on the entered query, the scanner scans documents, folders and list items in the lists/libraries, which are specified in the parameter “includeLibraries”. If the parameter “includeLibraries” contains *, the query applies to all lists/libraries within the site.
The following example shows a simple CAML query for scanning the contents of the "Level1" folder inside the "TestLib" library alongside all its subfolders:
<Where>
<BeginsWith>
<FieldRef Name='FileDirRef'/>
<Value Type='Text'>/sites/mc/TestLib/Level1</Value>
</BeginsWith>
</Where>
For details on how to form CAML queries for each version of SharePoint please consult the official Microsoft MSDN documentation.
Additional logs are generated by the SharePoint Solution part of the SharePoint Scanner on the server side. The location of this log file can be configured through the file C:\Program Files\Common Files\Microsoft Shared\Web Server Extensions\15\CONFIG\ Migration_Center_SP_Scanner.config .
Open the file with a text editor and edit the line below to configure the path to the log file
<file type="log4net.Util.PatternString" value="C:\MC\logs\%property{LogFileName}" />
Export documents content and their metadata (versions, ACLs, categories, attribute sets, classification trees, records management classifications, renditions)
Export folders and their metadata (categories, attribute sets, classifications)
Export projects and their metadata
Export shortcuts of documents and folders
Scale the performance by using multiple threads for scanning data
A "MalformedURLException: no protocol" error is thrown when the rmWebserviceUrl parameter has no value. (#66471) Install MC23.1_hotfix1 to fix this issue.
User fields from a category that contain deleted users are scanned as IDs only with a warning in the log (#52982)
The scanner might extract the ID instead of the username when scanning attributes that reference a user. This happens when the internal id of the user cannot be resolved by the Content Server. When this happens, a warning is logged in the report log. (#52847)
Email folder can only be extracted from the Content Server 16 and later.
Wildcards feature is supported, but it has some limitations:
Folders which contain the character “?” in the name will not be scanned using “*” wildcard. Example: "/*" will not scan "/test?name"
The wildcards in the middle of the path do not work: “/*/Level2” will scan no documents under the “Level2” folder
When using scanFolderPaths or rootFolderIds, if if two or more paths overlap, the documents which are located under them will be scanned twice or more. Content is not affected as each duplicate document will have a separate content location.
Example: if "folder1" contains "folder2" and scanFolderPaths is set to “/folder1, /folder1/folder2”, the contents of folder2 will be scanned twice.
To create a new OpenText Scanner job, specify the respective adapter type in the Scanner Properties window from the list of available connectors, OpenText must be selected. Once the adapter type has been selected, the Parameters list will be populated with the parameters specific to the selected adapter type, in this case the OpenText parameters.
The Properties window of a scanner can be accessed by double-clicking a scanner in the list or selecting the [Properties] button or entry from the toolbar or context menu.
The common adaptor parameters are described in Common Parameters.
The configuration parameters available for the OpenText Content Server Scanner are described below:
username* The OpenText Content Server user with "System Administration Rights". This privilege is required so the scanner can access all objects in the scanning scope.
password* The user password
webserviceUrl* The URL to the .NET Content Web Services.
http://server:port/cws/Authentication.svc"
authenticationWebserviceUrl* The URL to a valid authentication webservice. Currently, CWS and OTDS authentication webservices are accepted.
authenticationType* The authentication type. Valid values are CWS for standard content server authentication and OTDS for OpenText Directory Services authentication.
classificationsWebserviceUrl The URL to a valid classification webservice or similar. Use only for Content Server 10.0.0 or later.
Ex: http://server:port/les-services-classifications/Classifications.svc
rmWebserviceUrl The URL of the Record Management WebService. This is necessary when we need to scan objects with Records Management Classifications. Ex: http://server:port/les-recman/services/Classifications
sessionLength* The length of the session which is set into Content Server. The length is represented in minutes and has to be bigger or equal than 16 minutes. This is required for refreshing the authentication token.
rootFoldeIds* The IDs of the nodes whose containers and documents will be scanned. The IDs can be provided either as a list of node IDs separated by a comma or as a CSV file path that contains a node ID value on each row. The CSV path must start with "@". By default, the value is 2000. Can be set with any folder IDs.
scanFolderPaths The list of folder paths where the scanner looks for objects (documents and folders) relative to the specified root folders. Each of the specified paths must be in at least one of the root folders. The paths must start with "/". Multiple paths can be separated using the “|” character. If empty, the scanner will scan the entire folder structure under each specified root folder.
The following wildcards are allowed in the folder path:
* - replace zero, one or multiple characters
? - replace a single character
Examples of using wildcards:
excludeFolderPaths The list of folder paths to be excluded from the scan. Paths must start with "/" and must be relative to at least one ID specified in rootFolderIds.
exportDocuments Flag indicating if the documents will be exported. When exportDocuments is enabled, the scanner will scan all the documents and their versions linked under the folders specified in rootFolderIds and scanFolderPaths The documents are exported as OTCS(document) objects to MC database.
exportLatestVersions A number specifying how many versions from every version tree will be exported starting from the latest version to the older versions. If it is empty, 0 or negative, all versions will be exported.
exportCompoundDocuments Flag indicating if the compound documents will be exported. When enabled the scanner will scan the latest version of the compound document together with its children. There will be no migration-center relations between the compound document and its children. The children are related to the compound document through the parent folder attribute.
The parameter exportCompoundDocuments can be enabled only when exportDocuments is enabled.
exportClassifications Flag indicating if the classifications will be exported. When exportClassifications is enabled, the scanner will export the classifications of the scanned folders and documents in the source attribute "Classifications". Each classification will be a distinct value of the attribute "Classifications". The classification values will be saved as paths. The export of classifications will be available only for CS 10, 10.5 and 16 since CS 9.7.1 does not provide this functionality.
Ex: Corporate Information/News/Newsletter
exportShortcuts Flag indicating if the shortcuts of scanned documents and folders will be exported. The full path of every shortcut pointing to the current object (document or folder) is scanned in the source attribute “Shortcuts”.
exportShortcutsAsObjects Flag indicating if the shortcuts of scanned documents and folders will be exported as independent objects. The shortcuts and generations are exported as OTCS(shortcut) objects to MC database.
exportURLs The flag indicating if the URLs will be exported as OTCS(object) to MC database. If the flag is not set, the URLs will not be exported.
exportRenditions Flag indicating if the renditions will be exported.
exportFolderStructure Flag indicating if the structure of folders will be exported. When enabled the scanner will scan entire folder structure under the folders configured by parameters rootFolderIds and scanFolderPaths. The scanner will export all folders as OTCS(container) objects to MC database.
skipContent Flag indicating if the documents content will be exported from repository. If checked only the metadata will be exported.
exportLocation* The location where the exported object content should be saved. It can be a job server local folder or a shared folder. It must exist and it should be writable.
computeChecksum When it's checked the checksum of scanned files will be computed. Useful for determining whether files with different names and from different locations have in fact the same content, as can frequently happen with common documents copied and stored by several users in a file share environment.
Do not enable this option unless necessary, since the performance impact is significant due to the scanner having to read the full content for each and compute the checksum for it.
hashAlgorithm Specifies the algorithm that will be used to compute the Checksum of the scanned objects.
Possible values are "MD2", "MD5", "SHA-1", "SHA-224", "SHA-256", "SHA-384" and "SHA-512". Default value is MD5.
hashEncoding Specifies the encoding that will be used to compute the Checksum of the scanned objects.
Possible values are "HEX", "Base32" and "Base64". Default value is HEX.
numberOfThreads The number of threads that will be used for scanning the documents. Maximum allowed is 20.
loggingLevel* See: .
Parameters marked with an asterisk (*) are mandatory.
The OpenText scanner connects to the OpenText Content Server via the specified “webserviceURL” set in the scanner properties and can export folders, documents or compound documents. The account used to connect to the content server must have System Administration Rights to extract the content. All subfolders of the specified folder(s) will automatically be processed as well; an option for excluding select subfolders from scanning is also available. See OpenText Scanner Properties below for more information about the features and configuration parameters available in the OpenText scanner. Email folders are supported so the documents and emails located in email folders are scanned as well.
In addition to the documents themselves, renditions and properties can also be extracted. The content and renditions are exported as files on disk, while the properties are stored to the mc database, as it is the standard with all migration-center scanners.
After a scan has completed, the newly scanned documents and their properties are available for further processing in migration-center.
Below is a list of object types, which are currently supported by the OpenText scanner:
Containers: Folder, Email Folder, Project, Binder
Document (ID: 144)
Compound Document (ID: 136)
Email (ID: 749)
Shortcut
Generation
CAD Document (ID: 736) - scanned as a regular document
Url
Physical item
The objects above are collected from other types of containers like Business Workspaces.
Any objects with different types will be ignored during initialization. A list of all node types of scanned containers is provided in the run log as well as all node types in the scope of scanning that were not exported because they are not supported.
The ACLs of the scanned folders and documents will be exported automatically as source attribute ACLs.
ACLs attribute can have multiple values, so that each value has the following format:
<ACLType#RightName#Permission-1|Permission-2|Permission-n>
The following table describes all valid values for defining a correct ACLs value:
Element
Possible Values
Description
ACLType
· Owner
· OwnerGroup
· Public
· ACL
This refers to the default and assigned access.
RightName
· Content Server User Login Name
· Content Server Group Name
· -1
It’s set with the owner name or owner access, with the username or group name for the assigned access and with “-1” for the public access.
Permissions
· See
· SeeContents
· Modify
· EditAtts
· CreateNode
· Checkout
· DeleteVersions
· Delete
· EditPerms
The granted permissions separated by |.
Ex:
ACL#csuser#See|SeeContents
Owner#manager1#See|SeeContents|Modify
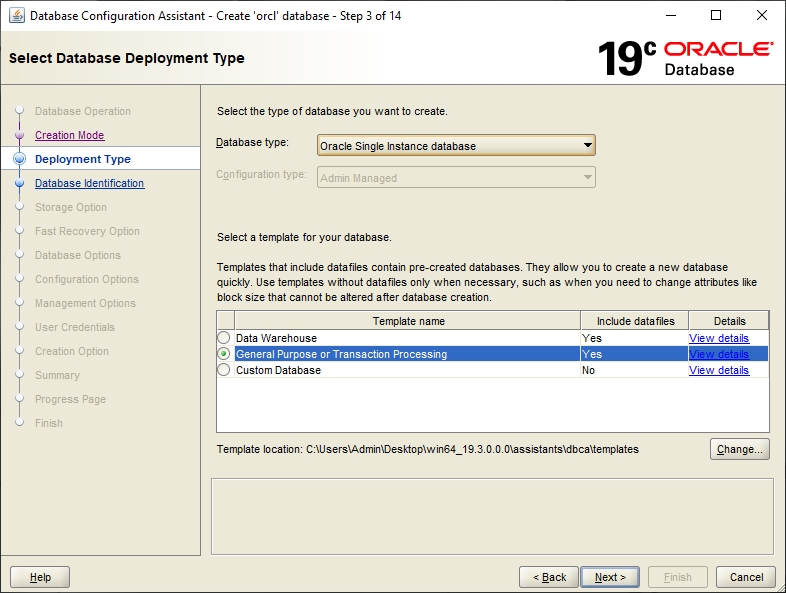
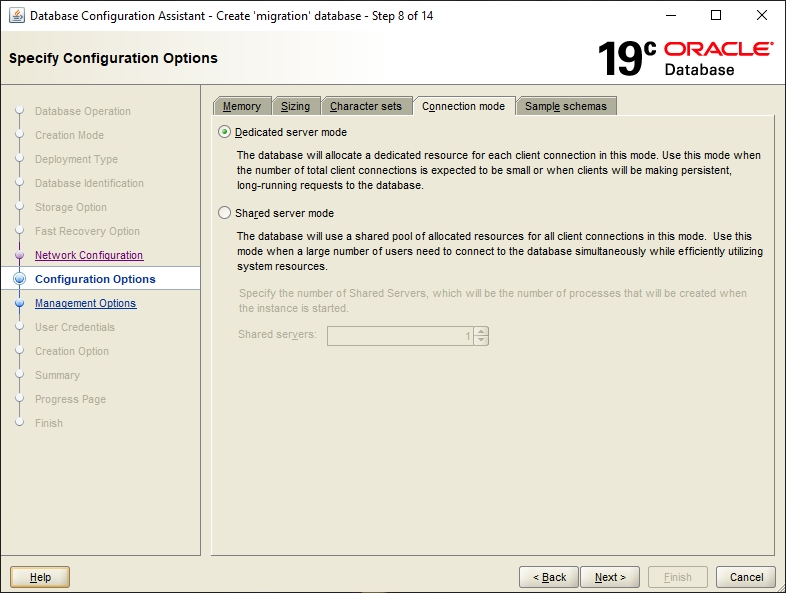
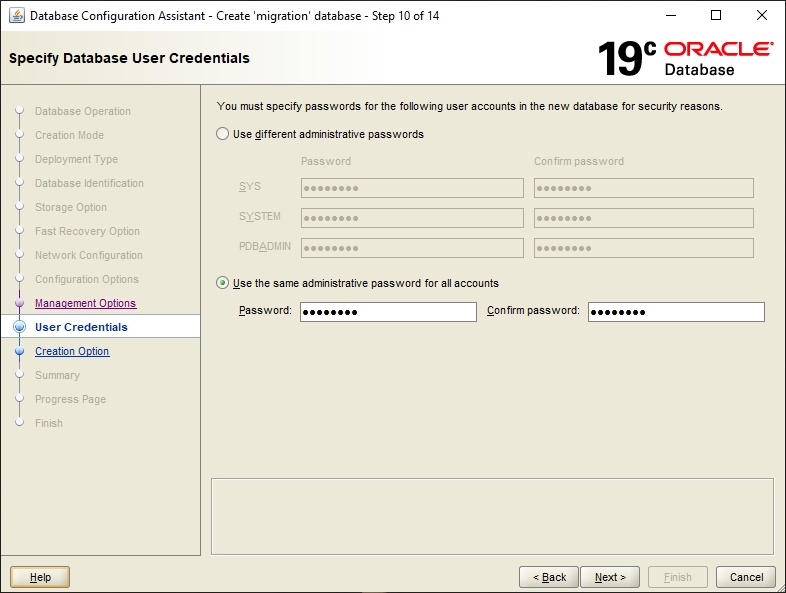
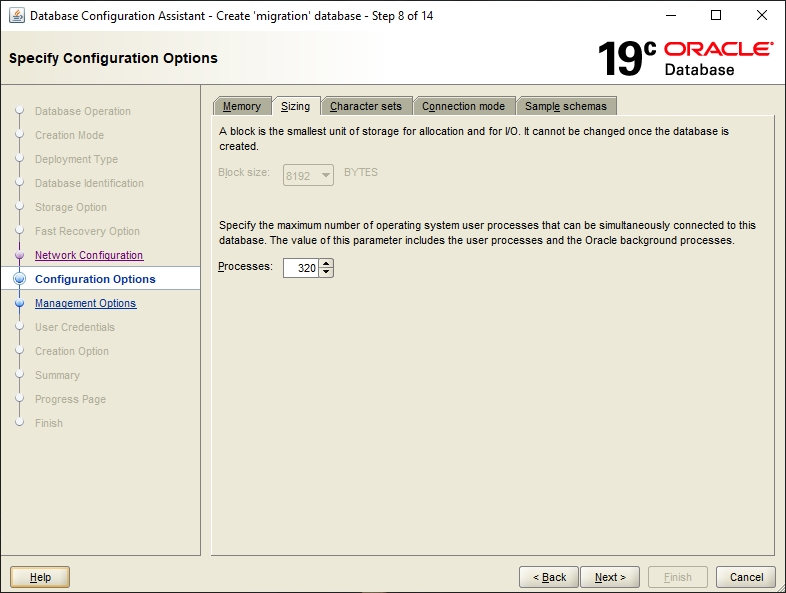
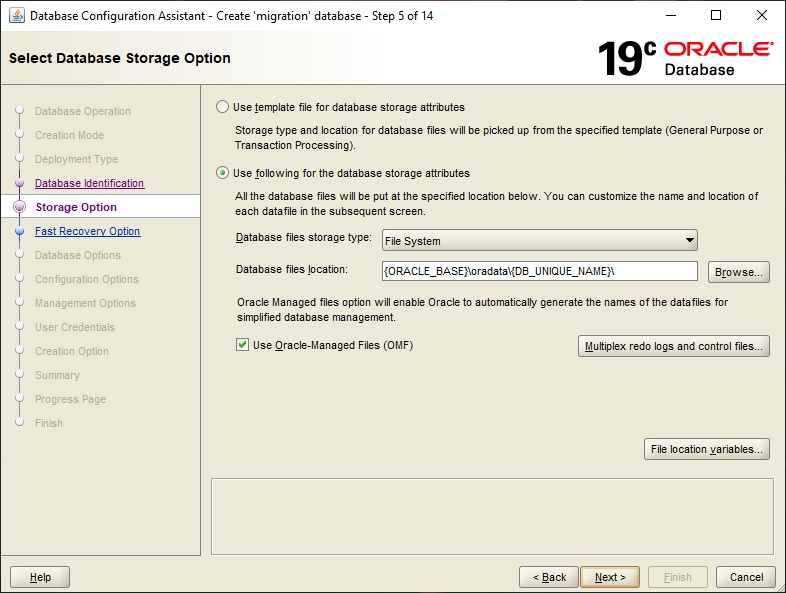

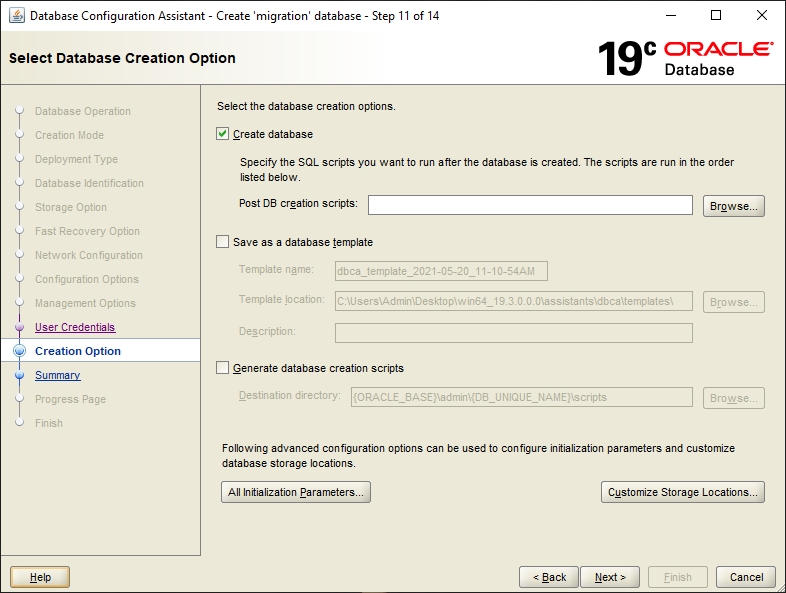
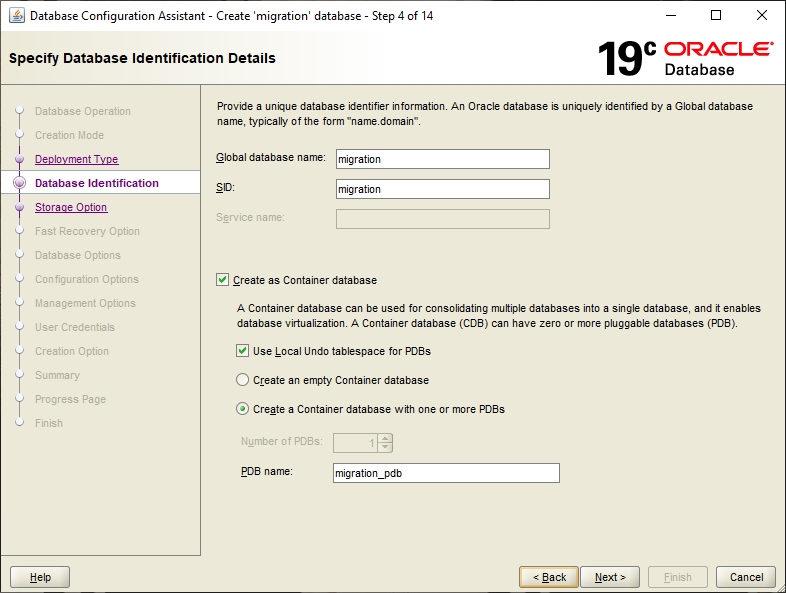
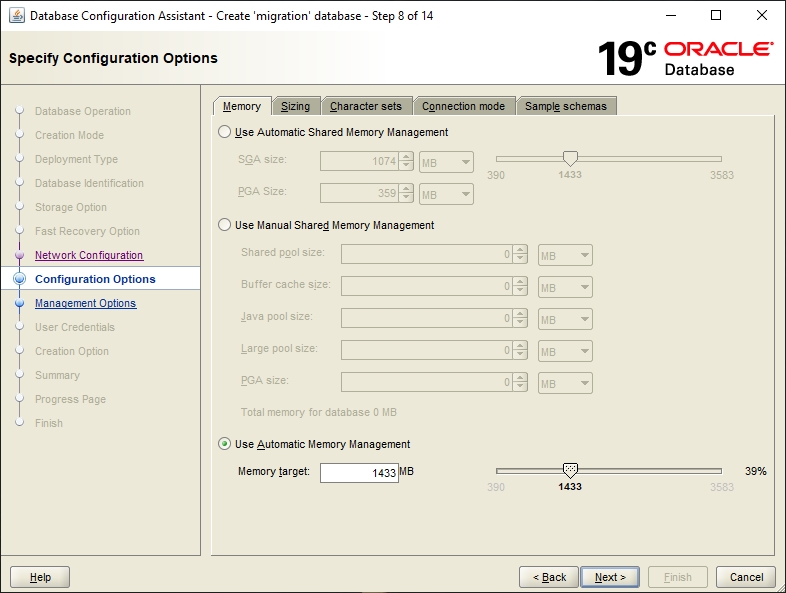
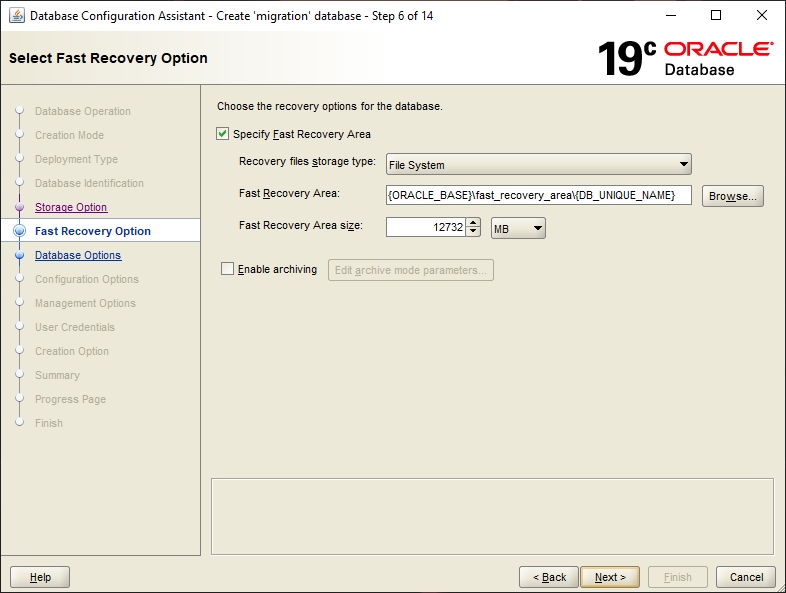
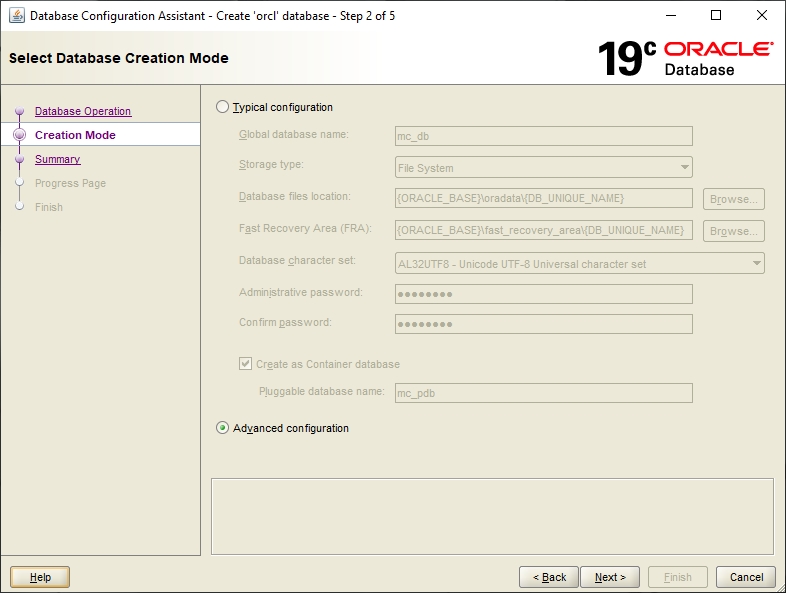
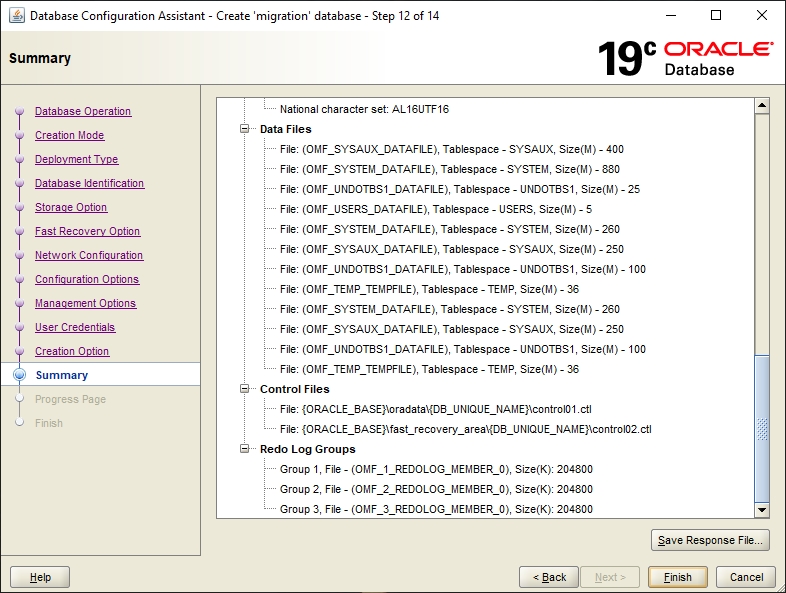
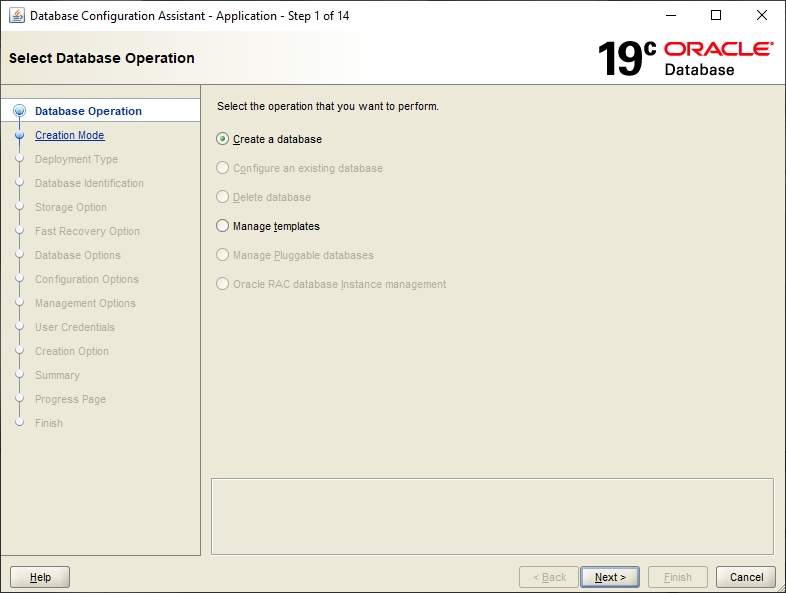
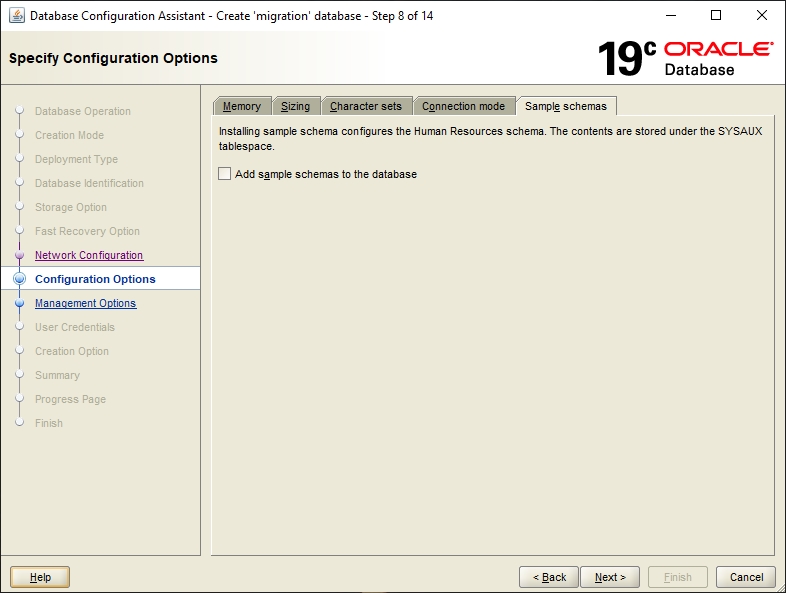
The Database scanner can access SQL compliant databases and extract information via user specified SQL SELECT statements.
The Database scanner can extract BLOB or CLOB content from a database or use the content files on disk, get their path via the query and use it during the transformation process via the mc_content_location system attribute.
The database scanner accesses databases via a JDBC driver.
For scanning Oracle and Postgres databases the JDBC drivers are already included in the Jobserver.
For scaning any other type of Database the specific JDBC driver for that database needs to be installed/downloaded and then configured for the Job Server.
To configure a JDBC driver all required Java jar files and Java library paths need to be added to the ... \migration-center Server Components \jdbc.conf file.
The file contains all necessary information for the configurations in the comments.
Since many content management systems rely on some type of SQL compliant database to manage their data, the Database scanner can also be used as a generic interface for extracting information from unsupported/obsolete/custom built content management systems. The types of database management systems supported are not limited to any particular vendor or brand, as access happens via JDBC, hence any SQL compliant database having a (compatible) JDBC adapter available can be accessed and queried.
Some common content management system features supported by migration-center Database scanner are metadata, including system metadata such as permission information, owner, creator, content path, etc, as well as version information, as long as these types of information can be obtained from the respective system’s SQL database. The information extracted by the database scanner is stored in the migration-center database and can be processed, transformed, validated and imported just like any other type of scanned information.
Note that the Database Scanner can extract content from a database stored in BLOB/CLOB fields. Alternatively, the content files corresponding to the objects can be specified by the user during the transformation process via the mc_content_location system attribute.
Depending on the way the content is stored, it may be necessary to extract the content to the filesystem first by other means before migration-center can process it. For the mc_content_location system attribute any of the available transformation functions can be used, so it is easy to generate a value resembling a path pointing to the location of the object’s content file, which a migration-center importer can use to import the content. A good practice would be to export content files to the filesystem using the object’s unique identifier as the filename, and then build the path information based on the known path and the objects unique identifier. This location would need to be accessible to the Job Server running the import which will migrate the content to the new target system.
To create a new database Scanner job, specify the respective adapter type in the Scanner Properties window – from the list of available connectors, “Database” must be selected. Once the adapter type has been selected, the Parameters list will be populated with the parameters specific to the selected adapter type, in this case the Database Scanner.
The Properties window of a scanner can be accessed by double-clicking a scanner in the list or selecting the Properties button or entry from the toolbar or context menu.
The common adaptor parameters are described in .
The configuration parameters available for the Database Scanner are described below:
connectionURL*
The database connection URL that is a string that your DBMS JDBC driver uses to connect to a database. It can contain information such as where to search for the database, the name of the database to connect to, and configuration properties. The exact syntax of a database connection URL is specified by your DBMS.
Example connection strings for some common databases:
jdbc:oracle:thin:@[host][:port]:SID
jdbc:sqlserver://[serverName[\instanceName][:portNumber]][;property=value[;property=value]]
Parameters marked with an asterisk (*) are mandatory.
Any queries you want the Database Scanner to run need to be set in an XML file and the path to it set in the queryFile parameter in the scanner.
The database scanner will need at least one main query for which it may chain different optional queries deppending on the desired mode of operation.
The scanner has two main modes of operating: scanning unversioned objects or versioned objects.
There are two ways of extracting metadata for database objects that don't have versions:
Using just a "main" query that contains the unique identifier for the objects and all the columns containing the object's metadata.
The column that represents the unique ID must be stated explicitly in the select statement and also specified in the key element of the query. This value must be unique across all objects you intend to scan with migration-center. I will be used as the id_in_source_system.
Using a "main" query paired with at least one "main-metadata" query:
The main query returns only the unique identifier for the objects. The main-metadata queries are run for each row returned by the "main" query. And the ? symbol will be replaced with the value of the key column specified in the main query.
If the main query has other columns in the select other than the ID, the main-metadata queries are ignored.
To scan versioned objects from a database you need two types of information from the objects:
A version identifier that has the same value for all objects that are part of the same version tree.
A way of speficying the order of the versions. This can be done either by ordering the results of the query based version number for example, or by using the parentid element to point to the previous version of the current one, with the first version having null for the parentid.
In this case the purpose of the main query is just to provide the versionid value for the versions query. Afterwards, the versions query is ran for each versionid, and creates the objects for each version tree. If no parentid is provided, the versions are taken in the order the SQL query returns them.
If you use a versions query, you need to use the version-metadata queries for fetching the metadata.
If your database references objects that already exist on a filesystem outside the database, you can add an element named contentpath to your main-metadata or version-metadata queries to specify which column contains this information.
The content will not be exported by the scanner in the location specified by this attribute. The value should point to an existing file.
If your database contains content stored in BLOB or CLOB columns you can extract this content by adding a main-content or version-content query to your query file (deppending on wether you're scanning versions or not).
The column for BLOB/CLOB is mandatory and it must have the alias BLOB_CONTENT or CLOB_CONTENT for the scanner to process the value correctly and extract the content.
The columns [nameOfFile] and [nameOfExtenstion] are optional.
If they are set, the scanner will use the values to build the name of the file where the content will be exported.
The scanner avoids overwriting exiting files by adapting the file name to be unique in the export folder. Characters that are not allowed in the file name will be replaced.
Filename and extensions are also saved as source attributes so they can be used in the transformation engine.
For avoiding name conflicts with the other attributes, you can set aliases for these columns.
If the columns are not set, the scanner will use the value of the id in source system as a filename.
Multiple contents for a single object are allowed. If the query returns multiple rows the content returned by every row is exported. All the paths will be stored in the source attribute “mc_content_location” and the path from the last returned row is set as primary content in the column “content_location”.
If the parameter “scanUpdates” is not checked, the scanner will only scan new objects or new versions of existing objects and it will ignore all objects that were previously scanned, i.e. that already exist in the MC database (based on their ID in source system).
If the parameter “scanUpdates” is checked, the scanner will scan new objects or new versions of existing objects and it will detect if it should scan existing objects as updates. If an object will be scanned as an update depends on several factors:
If there are no attributes specified in the “deltaFields” parameter, the scanner will scan every object that already exists in the MC database as an update.
If one or multiple attributes are specified in the “deltaFields” parameter, the scanner will scan an object that was previously scanned as an update only if a value of a delta field in the source database is different than the corresponding value in the MC database. If all values (of all fields defined in “deltaFields”) in the source database match the values in the MC database, then the object will not be scanned as an update, it will just be ignored.
The scanner will validate the queries configuration file against the following xml schema:
The xml file is composed for <query> elements that contain the queries that will be run by scanner for extracting objects and metadata. The <query> element may have the following attributes (some of them mandatory):
Defines the type of the query. The following values are possible: main, versions, main-metadata, version-metadata.
main – is the query the returns the unique identifier of every object the will be scanned. In case there is no main-metadata query, the main query may contains any number of columns which values will be added as metadata. In this case the query element may contain the contentpath attribute that will indicate the column where the object content location is stored. If a main-metadata query is specified, only the key column in the main query will be returned, all the other columns being ignored. A valid configuration must contain a single main query definition. If you need to deal with versions, this should also return the unique identifier of every version that will be passed to versions query.
versions – is the query the returns the unique identifier and optionally metadata of every version for the objects returned by the main query. It will take as parameter the value of column specified in attribute versionid defined in the main query. This query will be run once for every row returns by the main query. This also may contain the contentpath attribute that will indicate the column where the version content location is stored.
Defines the name of the query and it will be used for logging purpose.
Mandatory for main and versions queries. Defines the column name which value will be stored in MC column id_in_source_system. The value of the column defined in this attribute will be passed as parameter in main-metadata or version-metadata.
Defines the column name which value will be passed as parameter to the versions query. It can be defined only for main query.
Defines the column name that contains the id of the parent version. This might be used only in case of branches. When not used, the versions will be scanned in the order they are returned by the query. Optional for versions query.
Defines the column name that contains the path where object content is stored. It will be used to populate the MC column "content_location".
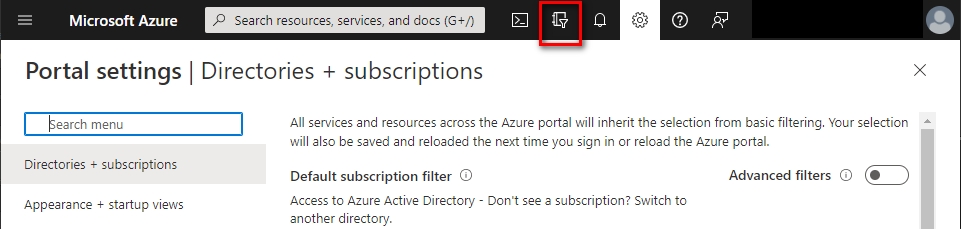
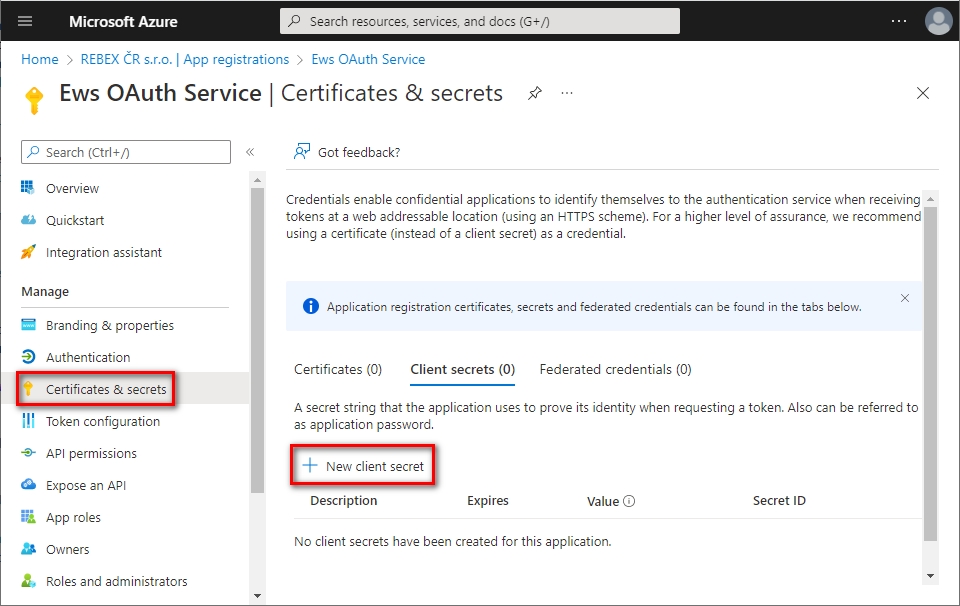
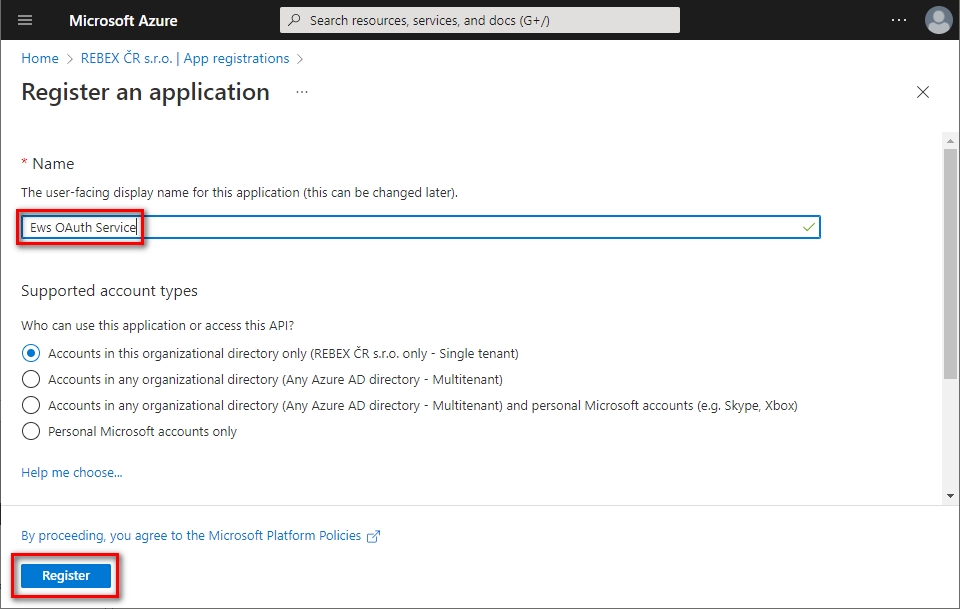
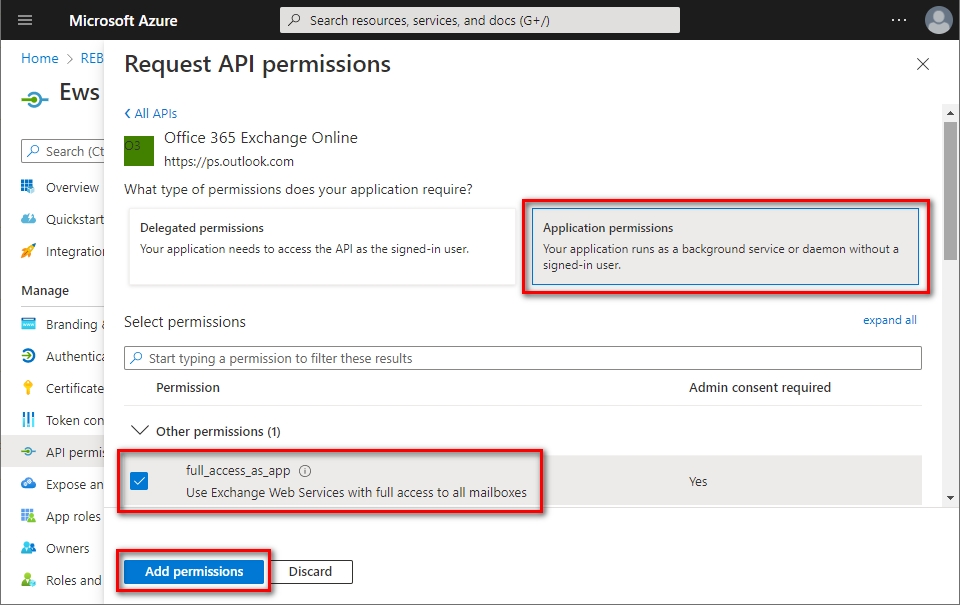
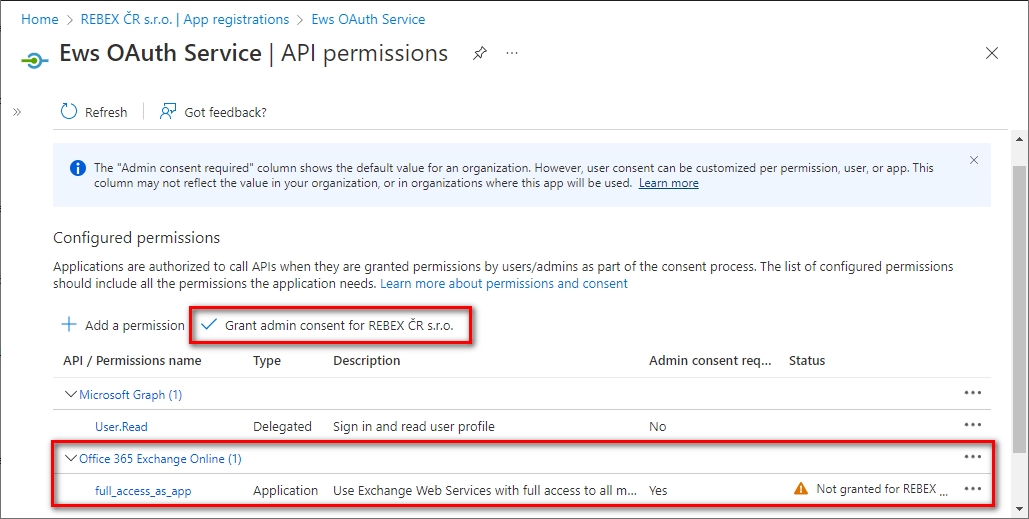
The box importer takes files processed in migration-center and imports them into the target box site.
Starting with migration-center 23.2, the box Importer uses the box API 4.2.1 to communicate with the box cloud through the respective box web services.
Starting with migration-center 23.3, the box importer can now import and update folder objects.
<standard_classifier type="language" displayScore="true">
<threshold>0.8</threshold>
</standard_classifier><standard_classifier type="entities">
<threshold>0.6</threshold>
<language>de</language>
<entityRecognizerArn>arn:aws:comprehend:eu-central-1:0000000000:entities-classifiers/docClassifier-copy</entityRecognizerArn>
<entities>DATE,PERSON</entities>
</standard_classifier><custom_classifier displayScore="true">
<classifierEndpointArn>arn:aws:comprehend:eu-central-1:000000000:document-classifier/docClassifier-copy</classifierEndpointArn>
<threshold>0.7</threshold>
</custom_classifier>tesseractPath=C:\\Users\\user\\AppData\\Local\\Tesseract-OCR
tessdataPath=C:\\Users\\user\\AppData\\Local\\Tesseract-OCR\\tessdata<parser class="org.apache.tika.parser.DefaultParser">
<parser-exclude class="org.apache.tika.parser.executable.ExecutableParser" />
<parser-exclude class="org.apache.tika.parser.pdf.PDFParser" />
<parser-exclude class="org.apache.tika.parser.microsoft.ooxml.OOXMLParser" />
</parser><parser class="org.apache.tika.parser.pdf.PDFParser">
<params>
<param name="extractInlineImages" type="bool">true</param>
<param name="sortByPosition" type="bool">true</param>
<param name="extractUniqueInlineImagesOnly" type="bool">false</param>
<param name="ocrStrategy" type="string">ocr_and_text</param>
<param name="ocrImageType" type="string">rgb</param>
<param name="ocrDPI" type="int">100</param>
</params>
</parser> <Where>
<And>
<Geq>
<FieldRef Name='ID' />
<Value Type='Counter'>1</Value>
</Geq>
<Lt>
<FieldRef Name='ID' />
<Value Type='Counter'>5000</Value>
</Lt>
</And>
</Where>/Shelf/Drugs/*
/Shelf/Drugs/Drug No. ?/Test
/Shelf/Drugs/*end/Ultimate
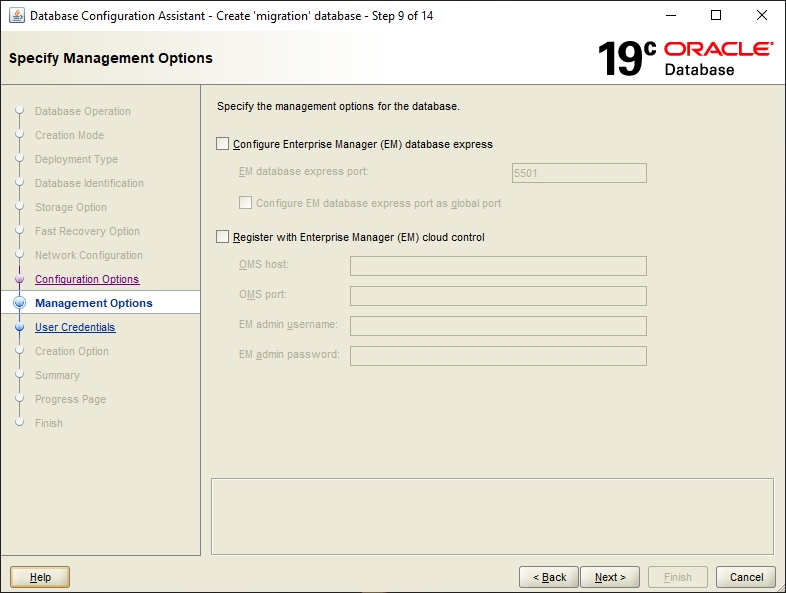
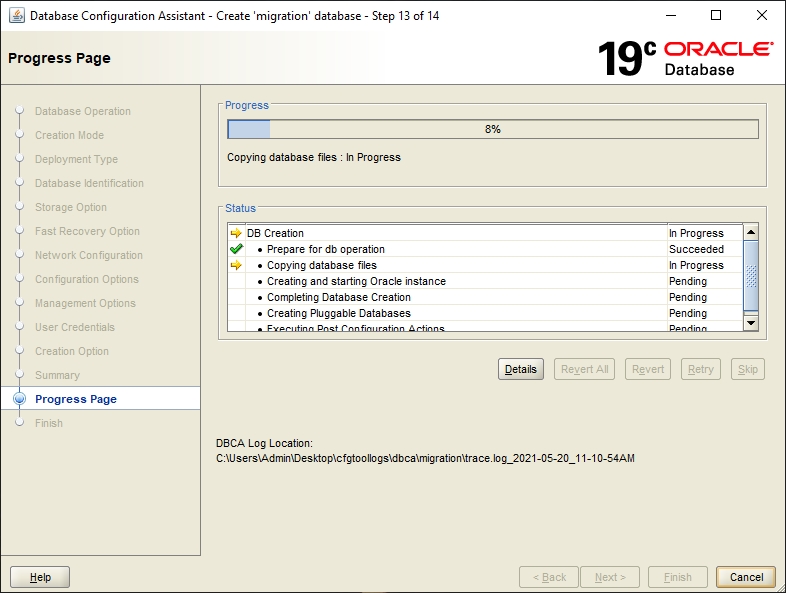
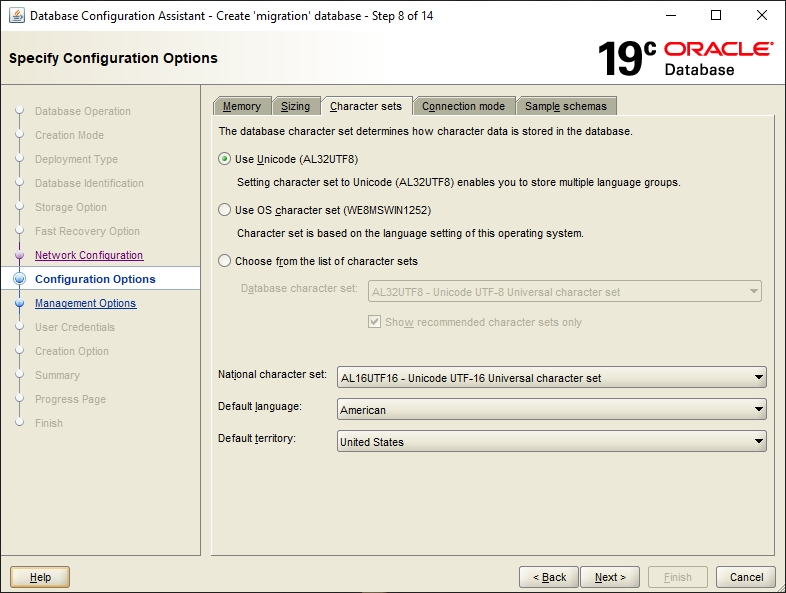
jdbc:mysql://host_name:port/dbname
driverClass*
The JDBC driver entry class that is the class the implement the interface java.sql.Driver.
Examples:
oracle.jdbc.OracleDriver
com.microsoft.sqlserver.jdbc.SQLServerDriver
sun.jdbc.odbc.JdbcOdbcDriver
username*
Database username used for jdbc connection.
password*
Password used for jdbc connection.
queryFile*
The xml file path that contains the SQL queries that will be used by scanner to extract objects and metadata from database.
See the Queries Configuration for more details about configuring queries.
scanUpdates*
Enables the scanner to update previously scanned objects in the mc database. If unticked, previous scanned objects will be skipped. See Delta migration.
deltaFields
Contains the fields that will be used for detecting if an object needs to be scanned as an update. Taken in consideration only when “scanUpdates” is checked. See Delta Migration.
computeChecksum
When it's checked the checksum of scanned files will be computed. Useful for determining whether files with different names and from different locations have in fact the same content.
Do not enable this option unless necessary, since the performance impact is significant due to the scanner having to read the full content for each and compute the checksum for it.
hashAlgorithm
Specifies the algorithm that will be used to compute the checksum of the scanned objects.
Possible values are "MD2", "MD5", "SHA-1", "SHA-224", "SHA-256", "SHA-384" and "SHA-512". Default value is MD5.
hashEncoding
Specifies the encoding that will be used to compute the Checksum of the scanned objects.
Possible values are "HEX", "Base32" and "Base64". Default value is HEX.
exportLocation
The location where the exported object content should be saved. It can be a job server local folder or a shared folder and it should exist and it should be writable.
loggingLevel*
See Common Parameters.
main-metadata - are the queries that extracts the metadata for main objects. They take as parameter the value return by the main query in the column specified by attribute key. These queries will be run once for every row returns by the main query. You can define an unlimited number of such queries.
version-metadata - are the queries that extracts the metadata for versions. They take as parameter the value return by the versions query in the column specified by attribute key. These queries will be run once for every row returns by the versions query. You can define an unlimited number of such queries.
main-content – is the query that extracts the content for main objects. It takes as parameter the value return by the main query in the column specified by attribute key. The query will be run once for every row returned by the main query.
version-content - is the query that extracts the content for version objects. It takes as parameter the value return by the versions query in the column specified by attribute key. The query will be run once for every row returned by the versions query. Note: If versions query is present, only the objects returned by this query will be extracted. The main query will be used only for identifying the version trees that will be scanned. In this case the main-metadata queries will be ignored.
<queries>
<query type="main" key="uid">
select uid, name, title, subject from docs.my_table where folder like '/test%'
</query>
</queries><queries>
<query type="main" key="uid">
select uid from docs.my_table where folder like '/test%'
</query>
<query type="main-metadata">
select name, title, subject from docs.my_table where uid = ?
</query>
<query type="main-metadata">
select extra_metadata, special_info from docs.other_table where uid = ?
</query>
</queries><queries>
<query type="main" key="uid" versionid="version_identifier">
select uid, version_identifier from docs.my_table where folder like '/test%'
</query>
<query type="versions" key="uid">
select uid, version_level from docs.my_table
where version_identifier = ?
order by version_level asc
</query>
<query type="version-metadata">
select name, title, subject from docs.my_table where uid = ?
</query>
</queries><queries>
<query type="main" key="uid" versionid="version_identifier">
select uid, version_identifier from docs.my_table where folder like '/test%'
</query>
<query type="versions" key="uid" parentid="previous_ver">
select uid, previous_ver from docs.my_table
where version_identifier = ?
</query>
<query type="version-metadata">
select name, title, subject from docs.my_table where uid = ?
</query>
</queries><queries>
<query type="main" key="uid">
select uid from docs.my_table where folder like '/test%'
</query>
<query type="main-metadata" contentpath="file_location">
select name, title, subject, file_location from docs.my_table where uid = ?
</query><query type="main-content">
select [nameOfBlobColumn] as BLOB_CONTENT, [nameOfFile] as FILE_NAME, [nameOfExtenstion] as FILE_EXTENSION from MYTABEL where ID = ?
</query>
<query type="main-content">
select [nameOfClobColumn] as CLOB_CONTENT, [nameOfFile] as FILE_NAME, [nameOfExtenstion] as FILE_EXTENSION from MYTABEL where ID = ?
</query><query type="version-content">
select [nameOfBlobColumn] as BLOB_CONTENT, [nameOfFile] as FILE_NAME, [nameOfExtenstion] as FILE_EXTENSION from MYTABEL where ID = ?
</query>
<query type="version-content">
select [nameOfClobColumn] as CLOB_CONTENT, [nameOfFile] as FILE_NAME, [nameOfExtenstion] as FILE_EXTENSION from MYTABEL where ID = ?
</query><?xml version="1.0" encoding="utf-8"?>
<xs:schema attributeFormDefault="unqualified" elementFormDefault="qualified" xmlns:xs="http://www.w3.org/2001/XMLSchema">
<xs:element name="queries">
<xs:complexType>
<xs:sequence>
<xs:element maxOccurs="unbounded" name="query">
<xs:complexType>
<xs:simpleContent>
<xs:extension base="xs:string">
<xs:attribute name="type" type="QueryType" use="required" />
<xs:attribute name="name" type="xs:string" use="optional" />
<xs:attribute name="key" type="xs:string" use="optional" />
<xs:attribute name="versionid" type="xs:string" use="optional" />
<xs:attribute name="parentid" type="xs:string" use="optional" />
<xs:attribute name="contentpath" type="xs:string" use="optional" />
</xs:extension>
</xs:simpleContent>
</xs:complexType>
</xs:element>
</xs:sequence>
</xs:complexType>
</xs:element>
<xs:simpleType name="QueryType">
<xs:restriction base="xs:string">
<xs:enumeration value="main"/>
<xs:enumeration value="versions"/>
<xs:enumeration value="main-metadata"/>
<xs:enumeration value="version-metadata"/>
<xs:enumeration value="main-content"/>
<xs:enumeration value="version-content"/>
</xs:restriction>
</xs:simpleType>
</xs:schema>The Properties window of a scanner can be accessed by double-clicking a scanner in the list, or selecting the Properties button/menu item from the toolbar/context menu.
A detailed description is always displayed at the bottom of the window for the currently selected parameter.
The common adaptor parameters are described in Common Parameters.
The configuration parameters available for the FileSystem Scanner are described below:
scanFolderPaths* The folder paths to be scanned.
Can be local paths or network file shares (SMB/Samba)
Multiple values can be entered by separating them with the “|” character. They also can be provided as a list of folder paths, one on each row, stored in a text file. The text file path must start with "@".
Those two methods of providing folder paths are mutually exclusive.
Examples:
scanning a network share and a local path:
\\share1\testfolder|c:\documents
scanning folders provided in a text file:
@C:\MC\folders-to-scan.txt
Note: To scan network file shares the Job Server running the respective Scanner must be configured to run using a domain account that has full read permission for the given network share.
For information about configuring the Job Server to run using a specific account, see Windows Help for configuring services to run using a different user account, since the Job Server runs as a regular Windows service.
excludeFolderPaths The folders that need to be excluded from the scan. The folder paths to be excluded from the scan must be subpaths of the “scanFolderPaths” parameter and must be specified either as an absolute or relative path. The relative path will start with "*".
Examples:
absolute path:
c:\documents\invoices\do-not-migrate
relative path:
*\excludedFolder
The scanner will automatically add each relative path the each of the folders specified in "scanFolderPaths" and add the result to the list of folders to exclude. Example: If "c:\users\Frank|c:\users\Michael" and "*\do-not-migrate" were specified in "scanFolderPaths" and "excludeFolderPaths" respectively, the scanner would skip the folders "c:\users\Frank\do-not-migrate" and "c:\users\Michael\do-not-migrate".
Multiple values can be entered by separating them with the “|” character.
excludeFiles Filename pattern used to exclude certain types of files from scanning. This parameter uses regular expressions.
For example to exclude all documents that have the extension “txt”, use this regular expression: (.)+\.txt
Use “|” as delimiter if you want to enter multiple exclusion patterns.
Note:
The regular expressions use syntax similar to Perl. For more technical details please read the specific javadocs page at:
For more information about regular expressions, please visit !
ignoreHiddenFiles Specifies whether files marked as “Hidden” in the file system should be scanned or not.
scanChangedFilesBehaviour Specifies the behavior of the scanner when a file update is detected. Accepted values are:
1 – (default) – the changed file will be added as update object
2 – the changed file will be added as a new version
3 – the changed file will be added as a new object
Format: String
For more details please consult chapter
moveFilesToFolder Set a valid local file system path or UNC path folder where to move the scanned files.
NOTE: The moved files are DELETED from the source location (this is not a copy).
The id_in_source_system and content_location values will reflect the new path. The new location will clone the parent folder structure of each file.
Example:
scanFolderPath = c:\source\documents
moveFilesToFolder = c:\moved\documents
The source file c:\source\documents\folderA\document.doc will be moved to c:\moved\documents\<
scanFolders If flag is checked folders will be scanned as fully editable and transformable objects. This way custom attributes, object types, owner and permissions can be defined for the folders. Otherwise folders will be retained only as path references from the documents and will be created using default folder settings in Documentum.
mcMetadataFileExtension The file-extension of the XML files which contains extra metadata for the scanned files and folders.
Note: The file extension must be specified without a dot, i.e. just "fme" and not ".fme".
For more details please consult chapter
metadataXsltFile The path to XSLT file that should be applied to metadata XML files before processing. Leave it empty if metadata XML files are already in expected format.
scanExtendedMetadata Flag indicating if extended metadata will be scanned for common documents like: MS Office documents, pdf, etc. Extended metadata is extracted using apache tika library. For more information about all supported formats please refer the apache-tika documentation:
extendedMetadataDateFormats Can be used for setting one or more Java date formats the scanner will be used to detect the date attribute in the document content. If empty, the default list of patterns will be used
ignoredAttributesList Contains list of attributes (comma delimited) that will be ignored. All this attributes will be ignored during scanning saving performance and database storage.
computeChecksum When it's checked the checksum of scanned files will be computed. Useful for determining whether files with different names and from different locations have in fact the same content, as can frequently happen with common documents copied and stored by several users in a file share environment.
Do not enable this option unless necessary, since the performance impact is significant due to the scanner having to read the full content for each and compute the checksum for it.
hashAlgorithm Specifies the algorithm that will be used to compute the Checksum of the scanned objects.
Possible values are "MD2", "MD5", "SHA-1", "SHA-224", "SHA-256", "SHA-384" and "SHA-512". Default value is MD5.
hashEncoding Specifies the encoding that will be used to compute the Checksum of the scanned objects.
Possible values are "HEX", "Base32" and "Base64". Default value is HEX.
ignoreWarnings When it's checked the following warnings are ignored so the affected objects will be scanned:
Warning when an xml-metadata file is missing or cannot be read;
Warning when "owner name" or "creation date" cannot be extracted;
Warning when check sum cannot be computed;
versionIdentifierAttribute See section from .
versionLevelAttribute See section from .
loggingLevel* See: .
Parameters marked with an asterisk (*) are mandatory.
A basic scanner configuration supposes setting a list of folders to be scanned. Local paths and UNC paths are supported. The scanner will scan all files located inside given folders and their subfolders. The common windows attributes like filename, file path, creation date, modify date, content size etc. are extracted and saved in MC database as metadata.
To scan folders as distinct objects in migration-center the flag scanFolders needs to be checked. In this case all subfolders of the given folder list will be saved in migration-center database together with their metadata.
Additional metadata stored in external files can be used to enrich the files and folders originating from the file system. This file needs to contain the XML schema used by migration-center format and adhere to the naming convention expected by migration-center. The format for such a file is described below.
Although the files’ contents are XML, the extension of such metadata files can be arbitrary and is NOT recommended to be set to XML in order to prevent potential conflicts with actual files using the XML extension. The file extension migration-center should consider as metadata files can be specified in the mcMetadataFileExtension parameter of the Filesystem scanner. If the option has been set and the metadata file for a file or folder cannot be found, an appropriate warning will be logged.
If metadata files and/or folders are not required in the first place, clear the mcMetadataFileExtension parameter to disable additional metadata processing entirely. If some files require additional metadata and others don’t, configure the mcMetadataFileExtension parameters as if all files had metadata. In this case it is safe to ignore the warnings related to missing metadata files for the documents where metadata files are not required or available.
One metadata file should be available in the source system for each file and folder which is supposed to have additional metadata provided by such means. The naming for the metadata file has to follow a simple rule:
for files: filename.extension.metadataextension
for folders: .foldername. metadataextension
Filename and extension are self-explaining and refer to the filename and extension of the actual document, while metadaextension should be the custom extension chosen to identify metadata files and must be specified as the value for the mcMetadataFileExtension parameter, as described in the paragraph above.
E.g.: If the document is named report.pdf, and the extension for the metadata files is determined to be fme, then the metadata file for this document needs to be called report.pdf.fme and fme has to be entered as the value for the mcMetadataFileExtension parameter.
If the folder is Migration the metadata file for it must be .Migration.fme.
A sample metadata file’s XML structure is illustrated below. The sample content could belong to the report.pdf.fme file mentioned above. In this case the report.pdf file has 4 attributes, each attribute being defined as a name-value pair. There are five lines because one of the attributes is a multi-value attribute. Multi-value attributes are represented by repeating the attribute element with the same name, but different value attribute (i.e. the keywords attribute is listed twice, but with different values)
The number, name and values of attributes defined in such a file are not subject to any restrictions and can be chosen freely. The value of the name attribute will appear accordingly as a source attribute in migration-center.
If the metadata file has not the expected XML structure, the scanner will use the XSLT file that should be provided before processing in metadataXsltFile, to process the enriching metadata from the file.
Once the document and any additional metadata have been scanned, migration-center no longer differentiates between attributes originating from different sources. Attributes resulting from metadata files will appear alongside the regular attributes extracted from the file system properties but they are prefixed with “xml_“. The full transformation functionality is available for these attributes.
In addition to metadata obtained from the standard file system properties and metadata added via external metadata files, the Filesystem Scanner can also extract metadata from supported document formats. This type of metadata is called external metadata. The corresponding functionality can be toggled in the Filesystem Scanner via the “scanExtendedMetadata” parameter.
The scanner can parse the following file formats for metadata:
HyperText Markup Language
XML and derived formats
Microsoft Office document formats
OpenDocument Format
Portable Document Format
Electronic Publication Format
Rich Text Format
Compression and packaging formats
Text formats
Audio formats
Image formats
Video formats
Java class files and archives
The mbox format
Metadata extracted from these files will be added to the respective documents metadata. Extended metadata source attributes will be prefixed with “ext_“ to indicate their source. Apart from their naming, these attributes are not handled differently by migration-center. Just as with attributes provided via metadata files, extended attributes will appear and work alongside the standard file system attributes. The full transformation functionality is available for these attributes.
A standard file system in Windows or Linux doesn't have any integrated versioning mechanism. However the Filesystem scanner has two ways of processing versions from such a filesystem.
By running multiple scans over the same files (delta migration) and processing any changed file as a new version to the previously scanned one: implicit versioning
By using versioning information from external XML files to create link separate files into a single version tree: explicit versioning
To scan versions implicitly during a Delta Scan, you need to set the scanChangedFilesBehaviour parameter to the value 2.
This parameter can take the following values:
1 - the changed file will be added as update object. This means that during import the object already imported with migration-center will be updated (i.e. overwritten) with the new attributes of the modified object, directly in the target system. (default value)
2 - the changed file will be added as a new version of the existing object. This means that a new version of the document will be created, its parent will be set to the previous version and the level in version tree will be incremented by 1.
3 - the changed file will be added as a new separate object. If the user does not change the object’s name in migration-center, the document is imported in the target repository with the same name and linked under the same folder as the original object, if this is supported by the target system.
A file is detected as changed if either its content or its metadata file has been modified since the previous scan.
If scanFolders is used, a folder is detected as changed if its metadata file has been modified since the previous scan. In this case it is saved as an update.
To scan versions explicitly you need an external XML file. The file must to contain two attributes and you need to set them in the scanner on the following parameters: versionIdentifierAttribute and versionLevelAttribute. Both parameters must be set.
The attribute names need to be prefixed with the xml_ prefix.
i.e. xml_version_id if the attribute name inside the XML file is called version_id
versionIdentifierAttribute specifies the attribute which identifies a version tree/group. All objects that are part of the same version tree should have the same value for this attribute. Any string value is permitted as long as it fulfills the previous requirement.
versionLevelAttribute specifies the attribute which identifies the order of objects in a version tree.
The values must be distinct for all objects within the same version tree (i.e. that have the same versionIdentifierAttribute value)
The values must be positive numbers that fit the following format: '9999999.999999'
The decimal point and the value value after it may be omitted.
Setting these parameters to attributes containing valid information will allow the Filesystem Scanner to linked objects together to form versions. This information can then be understood and processed by migration-center importers which support versioning.
Limitations
The explicit versioning is not applied in the following cases:
the attribute names versionIdentifierAttribute and versionLevelAttribute are invalid
attribute value used for versionLevelAttribute is not a number for one or more scanned documents
Before version 3.16 the explicit versioning was only applied to the objects in the current scanner run. Since 3.16, if a new version are be added to the versions trees that were created by previous scanner runs. Nevertheless, this only applies if all scanner runs belong to the same scanner.
The character \ is not recognized as a path delimiter
The folder_path system attribute must start with /
Sometimes a newly created folder in Box cannot be found by the importer in the first 10 minutes after creation
Cannot set Created and Modified date on Box Folders (#69471)
In order to use the Box Importer it is necessary to create a Box Application within the developer console because the adapter uses the JWT authentication.
More about JWT with SDKs at https://developer.box.com/guides/authentication/jwt/with-sdk/
In order to create a Box Application that can be used with Migration-Center Box Importer, please follow the steps:
Log into Box and go to the Developer Console(https://app.box.com/developers/console)
Select Create New App
Choose Custom App
Set the App Name and Purpose to Automation
Optional: Set the Description and Who is building this application
Click Next and choose Server Application (with JWT) as Authentication Method in the next Dialog.
Click Create App
Now the application is created and some additional configurations must be done:
On the Configuration tab go to App Access Level and choose App Access Only
On the Configuration tab go to Application Scopes and under Content Actions section select Read all files and folders stored in Box
On the Configuration tab go to Advance Features and select Make API calls using the as-user header and Generate user access tokens
The Box Importer needs some information about the Box Application in a JSON file. To generate this file the following steps are necessary:
On Configuration tab go to Add and Manage Public Keys and click on Generate a Public/Private Keypair. Note: The logged in user is required to have MFA authentication setup on his account
After security check, a JSON file containing authentication data is downloaded in the browser
Save this file, it will be used by Migration-Center Box Importer to connect to the Box API
Ensure the both checkboxes on Advanced Feature are still checked
Click on Save Changes
On the Authorization tab click Review and Submit
Click Submit on the new the Review App Authorization Submission tab
After submitting the Application needs to be Authozired by an admin (or co-admin) account
Before the application can be used, a Box Admin needs to authorize the application within the Box Admin Console.
If not already connected, login to Box with an admin or co-admin account
Open Admin Console -> Apps -> Custom Apps Manager
The previously created app is pending authorization approval
Click on the three dots and select Authorize App
Verify Application Scopes and confirm by clicking on Authorize.
To create a new box Importer job, specify the respective adapter type in the Importer Properties window – from the list of available connectors “Box” must be selected. Once the adapter type has been selected, the Parameters list will be populated with the parameters specific to the selected adapter type.
The Properties window of an importer can be accessed by double-clicking an importer in the list or by selecting the Properties button or entry from the toolbar or context menu.
The common adaptor parameters are described in Common Parameters.
The configuration parameters available for the Box importer are described below:
configFileJson* File containing the Box Application's private key and other details. Those details are obtained when the application is created.
JSON file containing clientID, clientSecret and appAuth(publicKeyID, privateKey, passphrase)
userIds* The Box user ids used to establish the API connections. It is possible to use multiple users in order to improve the import performance.
numberOfThreadsPerUser Maximum number of parallel threads allowed to use simultaneous the same Box API user connection. The allowed values are between 1 and 4. The importer working threads number will be equal to numberOfThreadsPerUser*count(userIds)
importLocation Box folder path where documents will be imported. This must start with '/' The value from the folder_path attribute will be concatenated at the end of this path.
autoCreateFolders Flag indicating if the missing folders will be created automatically based on the values provided in the system rule folder_path.
checkContentHash Requests the checksum computed by Box when the file is imported to be compared with the checksum computed by mc before import. The checksum must be computed using the SHA-1 algorithm because it is the algorithm used by Box. If the checksum was not computed before, at the scanning phase, the importer will compute the file checksum before importing it. If the two checksums do not match, an appropriate error will be logged, and the affected documents will be moved to the “Import error” state.
loggingLevel* See .
Parameters marked with an asterisk (*) are mandatory.
The box importer can import files to Box. All files imported to box will have their own permissions, so only the box user whose credentials were used for the import can access the imported files on the box site.
Documents targeted at a box site will have to be added to a migration set. Create a new migration set and set the <source object type>ToBox(document) object type in the Type drop-down. This is set in the -Migration Set Properties- window which appears when creating a new migration set (the type of object can no longer be changed after a migration set has been created).
The migration set is now set to work with box documents.
As with other target systems, migration-center objects targeted at box have some predefined system rules available in Transformation Rules. For box, these are “file_name”, “folder_path”, "mc_content_location" and “target_type”. Additional transformation rules for other box document attributes can of course be defined by the user.
If rules for specific attributes are defined, the values need to be associated with the target attributes of a box_document. This is done on the Associations tab of the –Transformation Rules- window by selecting the box_document object type and pointing the target_type rule at it. In this case the value output by the target type rule should be “box_document”, as it must match the object type selected below.
Collaborators can be set by making a transformation rule with the following format <emailaddress>;<role>.
i.e. [email protected];editor or [email protected];viewer.
This transformation rule needs to be associated to the collaborators attribute of the box_document object type.
Comments can be set by associating a multi-value rule to the comments attribute of the box_document object type.
The user is allowed to set multiple values to comments, the attribute is defined as repeating.
The following format should be used @[user_id:name] (i.e. @[12345:Cristina]) to mention a user in a comment.
Tags can be set by associating a multi-value rule to the tags attribute of the box_document object type.
The user can set multiple values as tags, the attribute is defined as repeating.
Tasks can be set by associating valid rules for the following target attributes:
task_users: needs to contain the valid email of a user
task_comment: needs to contain a valid text comment
task_date: (optional) a valid future date for when the task should finish
Multiple tasks can be set by having repeating values on the 3 attributes. All 3 attributes will need to contain the same number of repeating values for the import to succeed.
Note that if the task_users attribute is set, then task_comment needs to be set as well for the task to be successfully imported.
Template metadata can be set using Box Importer.
The user should define a new object type having the same name as the Template Key on Box.
The Template Name can differ from the Template Key.
The Template Key can be found in the URL of the template page.
The template metadata fields are defined as object type attributes having the name as the one on Box and the type mapped to the ones available on Migration-Center.
The dropdown field will be mapped to a String attribute.
The dropdown multivalue field will be mapped to a repeating String attribute.
After the object is defined, it should be added to the target_type system attribute after box_document value and associated in the Association tab similar to box_document.
Setting custom metadata is possible by adding the metadata name as an attribute to the box_document object type.
The metadata value will be specified using a rule in the migset.
The last step is to associate the attribute from box_document with the rule defined in migset.
The Box Importer can import folder objects that have their own metadata templates and attributes.
To import folder objects you need to create a <source object type>ToBox(folder) migset.
folder_path - The path to where the folder will be imported. The last folder in the path will be the Folder Object itself.
target_type - Multivalue attribute holding the Object Type and any Metadata Template being used.
You can set Collaborators by making a transformation rule with the following format <emailaddress>;<role>.
i.e. [email protected];Editor or [email protected];Viewer.
You then need to associate the rule to the collaborators attribute of the box_folder object type.
You can set Tags by associating a multi-value rule to the tags attribute of the box_folder object type.
You can set multiple values as tags, the attribute is defined as repeating.
Objects that have changed in the source system since the last scan, are (re-)scanned as update objects. Whether an object in a migration set is an update or not can be seen by checking the value of the Is_update column – if it’s 1, the current object is an update to a previously scanned object (the base object). There are some things to consider when working with the update migration feature:
An update object cannot be imported unless its base object has been imported previously.
Objects deleted from the source after having been migrated are not detected and will not be deleted in the target system. This is by design (due to the added overhead, complexity and risk involved in deleting customer data).
Updates/changes to primary content will be detected and updated accordingly.
The TrackWise Importer comes with the following features, limitations, and known issues:
The importer only supports
import of documents with metadata
The following column/field types are currently supported by the importer:
Checkbox
Currency
Date
Date/Time
Geolocation
Number
Percent
Phone
Picklist
Picklist (Multi-Select)
Text
TextArea
Time
URL
The documents can be imported only in Draft status or Effective status.
The TrackWise Importer does currently not support delta migration.
The TrackWise Importer is not able to import document versions.
The TrackWise Importer does not validate for nonexistent values or inactive fields for system rules.
The error message is not clear when setting nonexistent values for fields that could not be validated.
The documents will not be deleted from TrackWise if something goes wrong during the import (no rollback).
Importing documents with content over 800 MB on multi-threading at the same time may produce some errors.
Before you can start working with the importer, you need to configure a Connected App for the migration-center that is used for authentication with TrackWise Platform. The Connected App is the recommended solution to integrate an external application with your Salesforce API.
Please follow these steps in order to setup your migration-center application in your TrackWise Platform.
For more details please see https://help.salesforce.com/articleView?id=connected_app_create.htm&type=5
From Setup page, enter App Manager in the Quick Find box.
Click New Connected App.
Fill the connected app’s name with a unique name on your organization.
Enter the API name of the connected app.
Fill the contact email field with a valid email which will be used in case Salesforce wants to contact you.
The other attributes from Basic Information could be filled if those are considered necessary.
Check the Enable OAuth Settings checkbox from API (Enable OAuth Settings) section.
Enter a value for the Callback URL. This value will not be used by migration-center. Example: https://test.salesforce.com/services/oauth2/success
Select the Access and manage your data (api) and Access your basic information (id, profile, email, address, phone) permissions from Selected OAuth Scopes attribute.
Leave all other options at their defaults and click Save.
Click Continue when the following message will be displayed.
Click Manage from the created Connected App page to open the Connected App Detail page.
When the Connected App Detail page click Edit Policies button.
Set the Permitted Users to All users may self-authorize.
Set the IP Relaxation setting to Relax IP restrictions.
Click Save.
Go to App Manager tab, select the created Connected App, and click the View option.
The Client Id and Client Secret could be found on the opened page.
The user used to migrate the data must have the API Enabled permission and to enable this permission the following steps are necessary:
From Setup page, enter Permission Sets in the Quick Find box.
Choose the permission set assigned to migration user.
From System section, click the System Permissions.
From this page click Edit button.
Check the API Enabled checkbox and click Save.
To create a new TrackWise Importer, go to "Importers" and press the "New" button. Then select Adapter type as Trackwise.
The common adaptor parameters are described in Common Parameters.
The configuration parameters available for the TrackWise Importer are described below:
username* The name of the Trackwise user. Example: [email protected]
password* The user's password.
serverUrl* The URL of the Trackwise Platform. Example: https://dmsdwqau--spring3.my.salesforce.com
clientId* The client id of the Connected App. Example: VG9hq7jmfCuKff2B0jhB_Fgm3aWv2oFSXDTxqm_yBBCuxwvDwA0BD
clientSecret* The client secret, which you have generated when you configured the Connected App.
namedCredentialsUsername* The username configured in the Salesforce Named Credentials.
namedCredentialsPassword* The password of the user configured in the Salesforce Named Credentials.
tokenEndpointUrl* The token endpoint URL configured in the Auth Provider.
recordUniqueIdentifier* The document field used to identify uniquely every document in a batch. Example: Name
batchSize* Number of documents that will be imported in a single bulk operation.
numberOfThreads* Number of threads that shall be imported in parallel. Default: 10
loggingLevel* See: .
Parameters marked with an asterisk (*) are mandatory.
In this chapter, you will learn to work with the TrackWise Importer. Specifically, you will see how to import documents with metadata in the TrackWise Platform.
In order to import documents, you need to create a migration set with a processing type of “<Source>ToTrackwise(document)”.
After you have selected the objects to import from the file scans, you need to configure the migration set’s transformation rules. A migration set with a target type of “Trackwise(document)” has the following system attributes:
document_department* Rule for setting the Department of the corporate document. Example: Quality (Q)
document_status* Rule for setting the document status. The only allowed values are Draft and Effective. Example: Draft
document_type* Name of the corporate document type. Example: SOP
document_workflow* The corporate document workflow name. Example: WF_Upload
justifications The justifications of the corporate document. This field is used to add multiple justifications to the corporate document. Example: Review complete
mc_content_location Optional rule for importing the content from another location than the one exported by the scanner.
name* The name of the document. Example: My Document.docx
target_type* The name of the object type from the migration-center’s objects type definitions. This field may contain additional values like: trackwise-control-printing, trackwise-control-download, trackwise-reviewers and trackwise-approvers. Example: trackwise-corporate-document Note: The first value of this field must be the trackwise-corporate-document.
template_type The name of template type. This attribute should be filled if the “document_type” represents a template. Example: Template (TPT)
template_name The template name if the “document_type” represents a template that has values for the template name. Example: Test Template
Usually you want to set additional custom attributes on the documents. Therefore, you need to define the attributes in trackwise-corporate-document target type first, define the regular transformation rules and associate them with the defined target type attributes after that.
For more details on transformation rules and associations, please see the corresponding chapters in the Client User Guide.
The reviewers are an important part of the corporate document, so the importer allows you to set the document reviewers. To perform this action, it is necessary to define two new regular transformation rules, which will represent the reviewer's name and the review cycle. Those attributes should be multi-value attributes and the first value from the attribute that represent the reviewer’s name is related to the first value from the other attribute that represents the review cycle.
Example: Let’s suppose that the reviewer’s name attribute is reviewer_name and the review cycle attribute is review_cycle.
The values for review_name are: [email protected], user2@ mail.com.
The review_cycle values are: WF_R2_A1_1, WF_R2_A1_2.
So, this means that the reviewer with username [email protected] is responsible for WF_R2_A1_1 cycle of the review.
If you want to add a user as a reviewer you must use the prefix “user.” and if you want to add a group as a reviewer you must use the prefix “group.”.
The allowed values for Reviewers are the user name of the DMS Users or the group name of the DMS Group.
The next step is to add the "trackwise-reviewers" value to the "target_type" system attribute.
The final step is to associate the regular transformation rule with the defined target type attribute.
The TrackWise Importer is able to add approvers to the corporate documents, and the steps to define the approvers are similar to the ones to set the reviewers.
First, you need to define two regular transformation rules, one for approvers names and one for approve cycles.
Those attributes should be multi-value attributes and the first value from the attribute that represent the approver’s name is related to the first value from the other attribute that represents the approval cycle.
Example: Let’s suppose that the approver’s name attribute is approver_name and the approve cycle attribute is approve_cycle.
The values for approver_name are: [email protected], user2@ mail.com.
The approve_cycle values are: WF_R2_A2_1, WF_R2_A2_2.
So, this means that the approver with username [email protected] is responsible for WF_R2_A2_1 cycle of the approval.
If you want to add a user as approver you must use the prefix “user.” and if you want to add a group as approver you must use the prefix “group.”.
The allowed values for Approvers are the user name of the DMS Users or the group name of the DMS Group.
After that, the value "trackwise-approvers" should be added to the "traget_type" system attribute.
The final step is to associate the regular transformation rule with the defined target type attribute.
All the attributes used to control the download of a corporate document can be set using the Trackwise Importer.
To set those attributes you need to use the trackwise-control-download object type.
DOWNLOAD_Selected_Groups Represents the groups that can perform the download action. The values are represented by the group name of the Regular Salesforce Groups. Example: GroupA
DOWNLOAD_Selected_Users Represents the users that can perform the download action. The values are represented by the user name of the Salesforce Users. Example: Alex
SPARTADMS_Allow_Download__c Indicates if the download action is allowed. The only accepted values are TRUE or FALSE.
SPARTADMS_Can_be_downloaded_by__c The attributes specify if the download action can be performed by “Selected Users” or “No Users”. The only accepted values are Selected Users or No Users. Example: Selected Users
SPARTADMS_Limit__c This attribute indicates if the download action should be limited. The allowed values are TRUE or FALSE. Example: TRUE
SPARTADMS_Limit_number_of_downloads__c The number of downloads that a user can do. If the “SPARTADMS_Limit__c” is FALSE then the attribute should have no value. The value must be greater than 0.
SPARTADMS_Per__c Specify if the limitation should be applied to “each user” or to “all users”. The attribute should be set if the “SPARTADMS_Limit__c” is TRUE. The allowed values are each user or all users.
SPARTADMS_Frequency__c Represents the frequency of limitation. The attribute should be set if “SPARTADMS_Limit__c” is TRUE. The supported values are None, Daily, Weekly, Monthly.
The Trackwise Importer can import all attributes used to control printing of corporate documents.
To set those attributes you need to use the trackwise-control-printing object type.
PRINT_Selected_Groups Represents the groups that can perform the print action. The values are represented by the group name of the Regular Salesforce Groups. Example: GroupA
PRINT_Selected_Users Represents the users that can perform the print action. The values are represented by the user name of the Salesforce Users. Example: Alex
SPARTADMS_Enable_Controlled_Printing __c Indicates if the print action is allowed. The only accepted values are TRUE or FALSE.
SPARTADMS_Can_be_printed_by__c The attributes that specify if the print action can be performed by “Selected Users” or “No Users”. The only accepted values are Selected Users or No Users.
SPARTADMS_Limit_Print__c This attribute indicates if the print action should be limited. The allowed values are TRUE or FALSE. Example: TRUE
SPARTADMS_Limit_number_of_prints__c The number of prints that a user can do. If the “SPARTADMS_Limit_Print__c” is FALSE then the attribute should have no value. The value must be greater than 0.
SPARTADMS_Per_Print__c Specify if the limitation should be applied to “each user” or to “all users”. The attribute should be set if the “SPARTADMS_Limit_Print__c” is TRUE. The allowed values are each user or all users.
SPARTADMS_Frequency_Print__c Represents the frequency of limitation. The attribute should be set if “SPARTADMS_Limit_Print__c” is TRUE. The supported values are None, Daily, Weekly, Monthly.
Additional Log files generated by the Trackwise Importer can be found in the Server Components installation folder of the machine where the job was run, e.g. …\fme AG\migration-center Server Components <version>\logs\Trackwise Importer\<job run id>
You can find the following files in the <job run id> folder:
The import-job.log contains detailed information about the job run and can be used to investigate import issues.
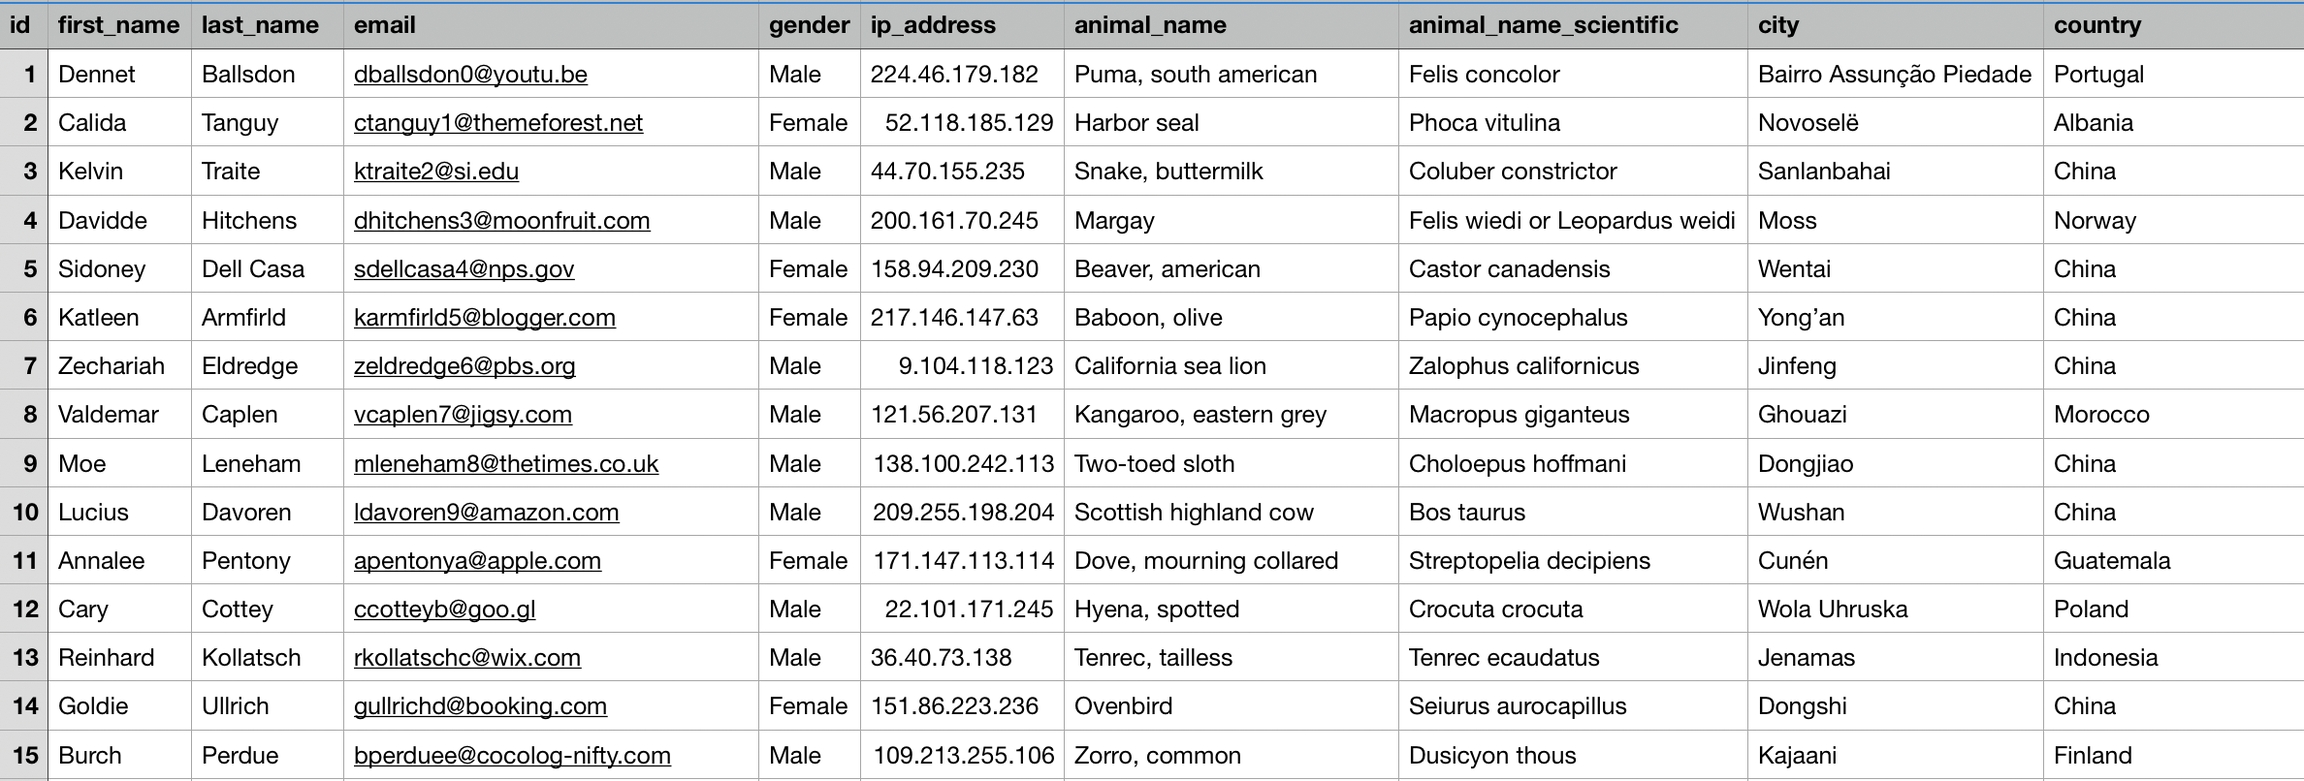

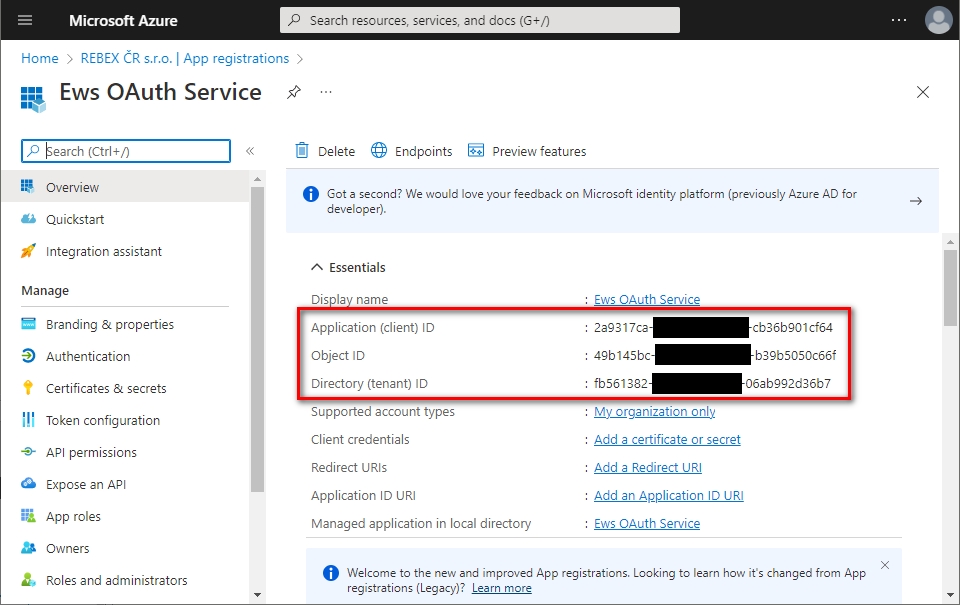
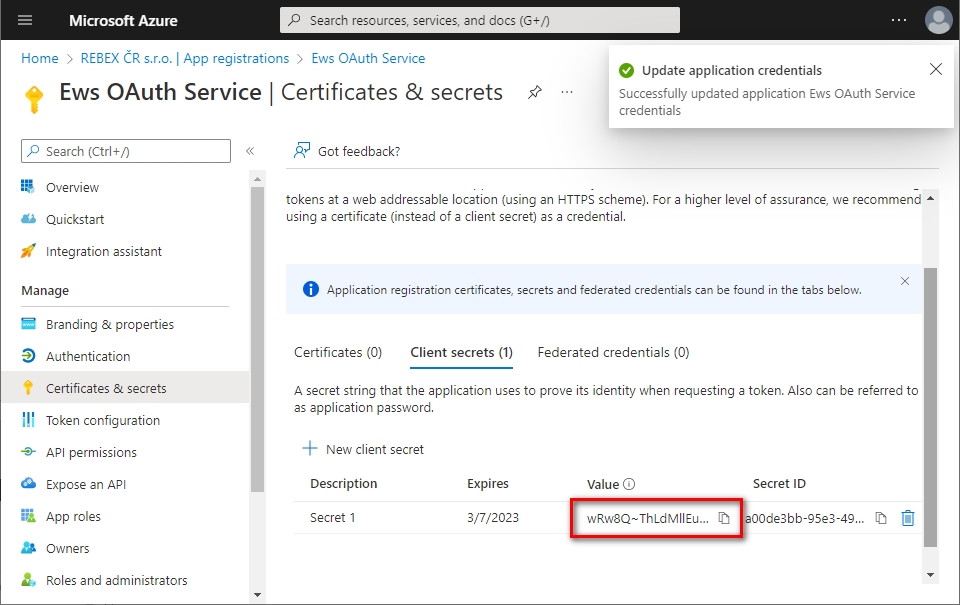
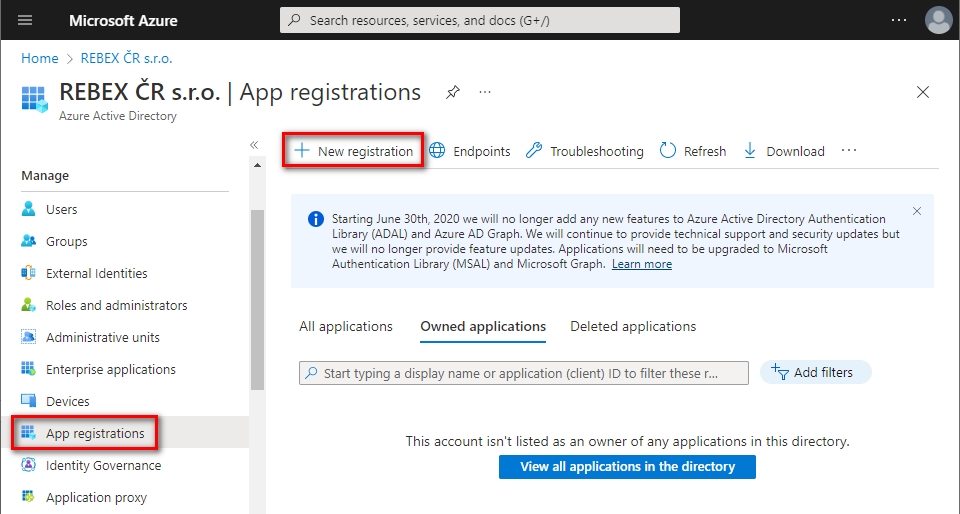
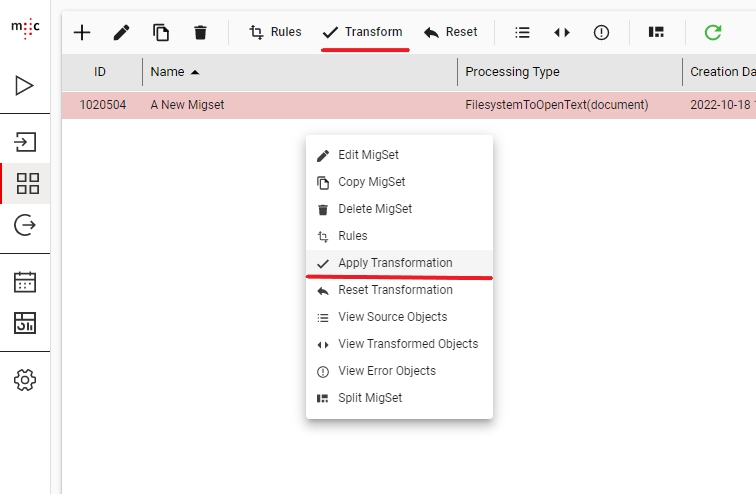
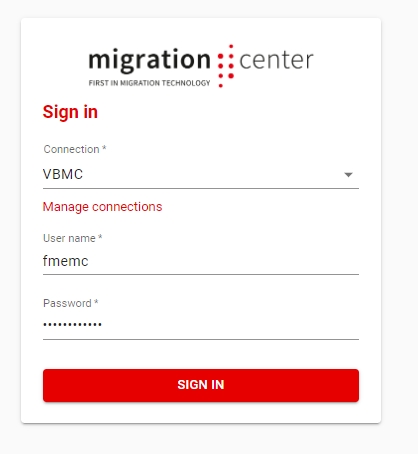

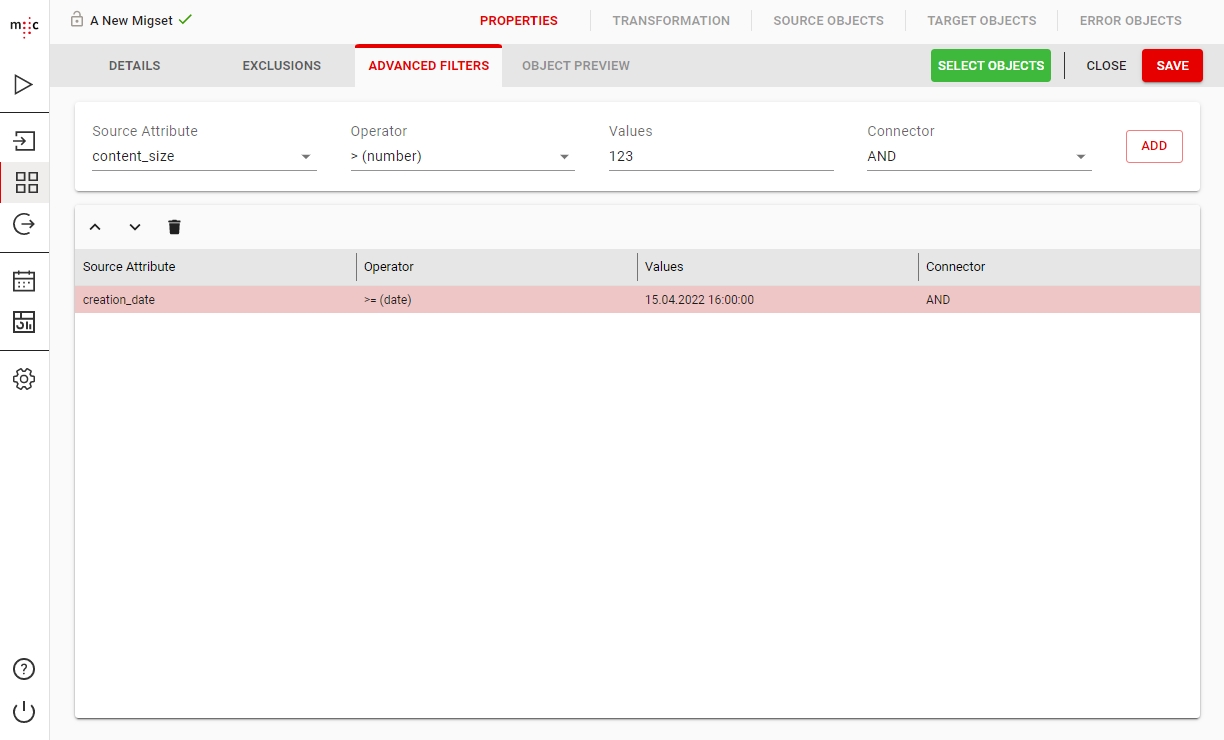
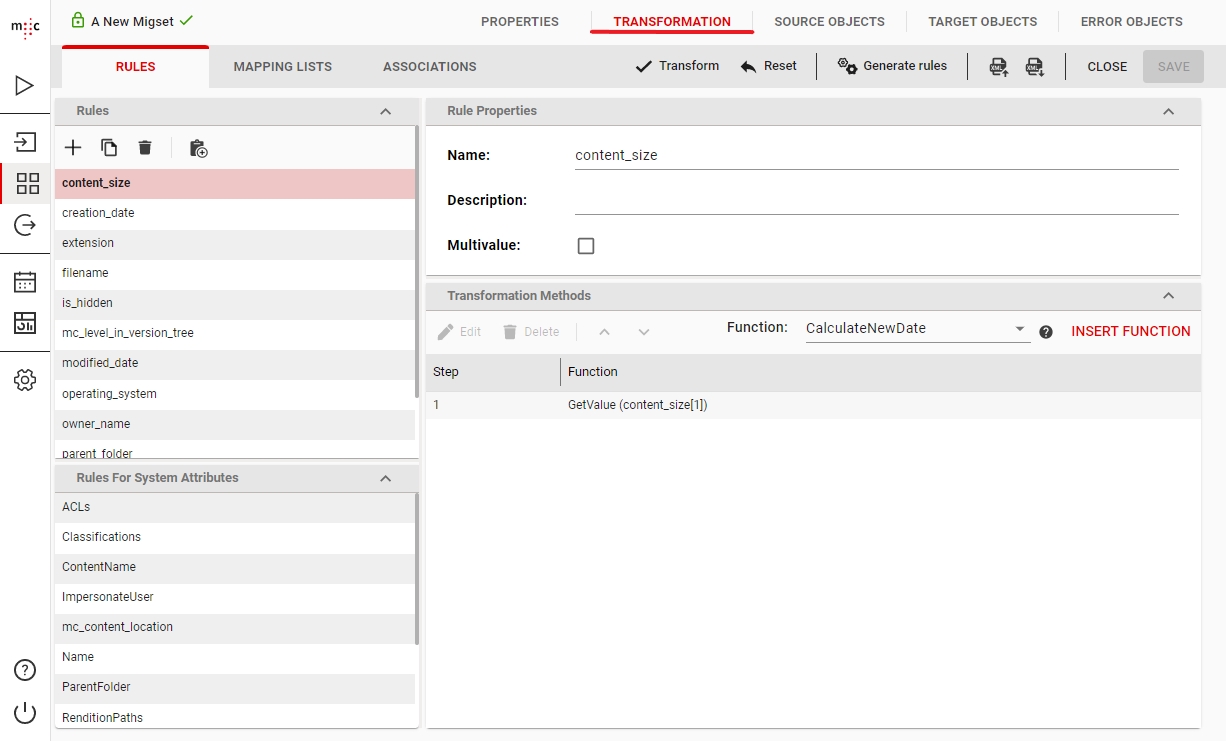
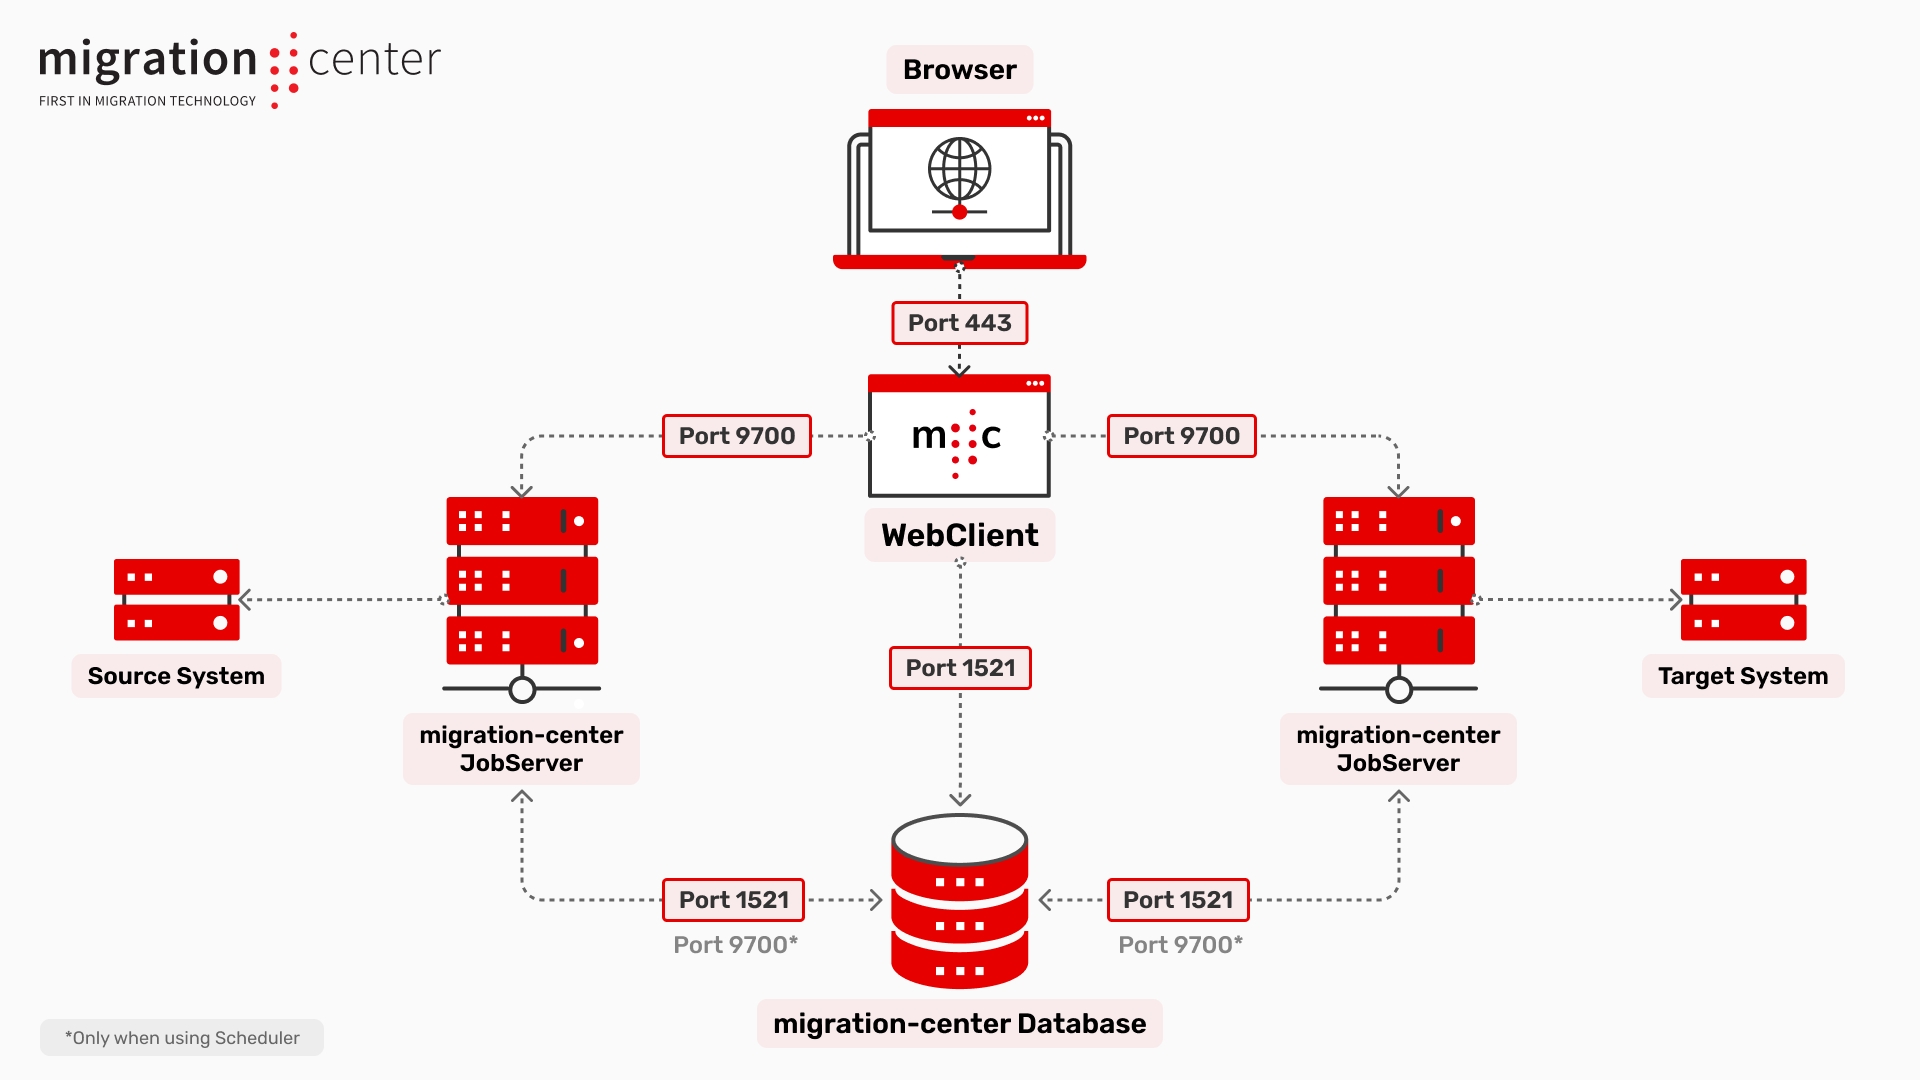
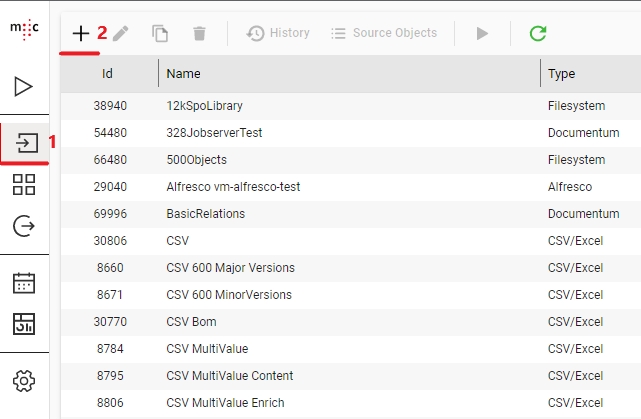
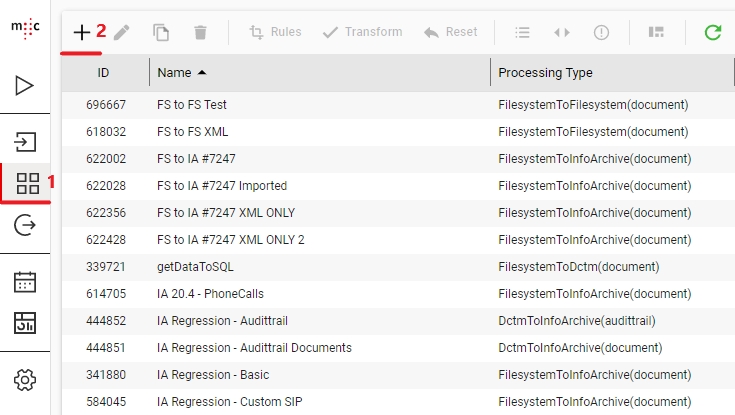
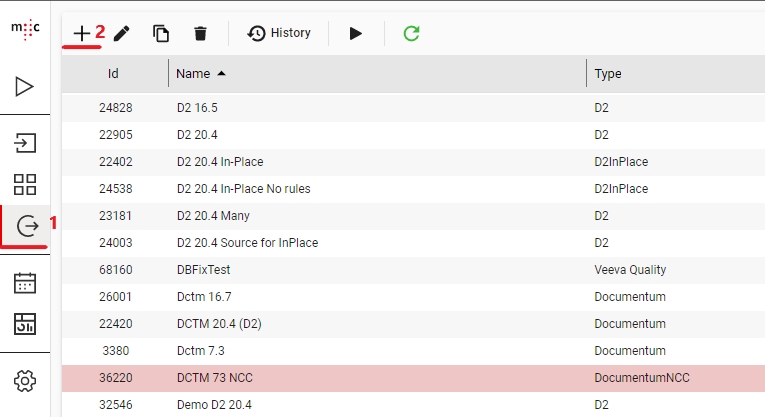
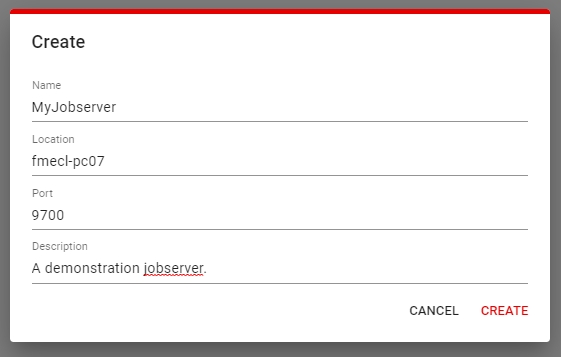
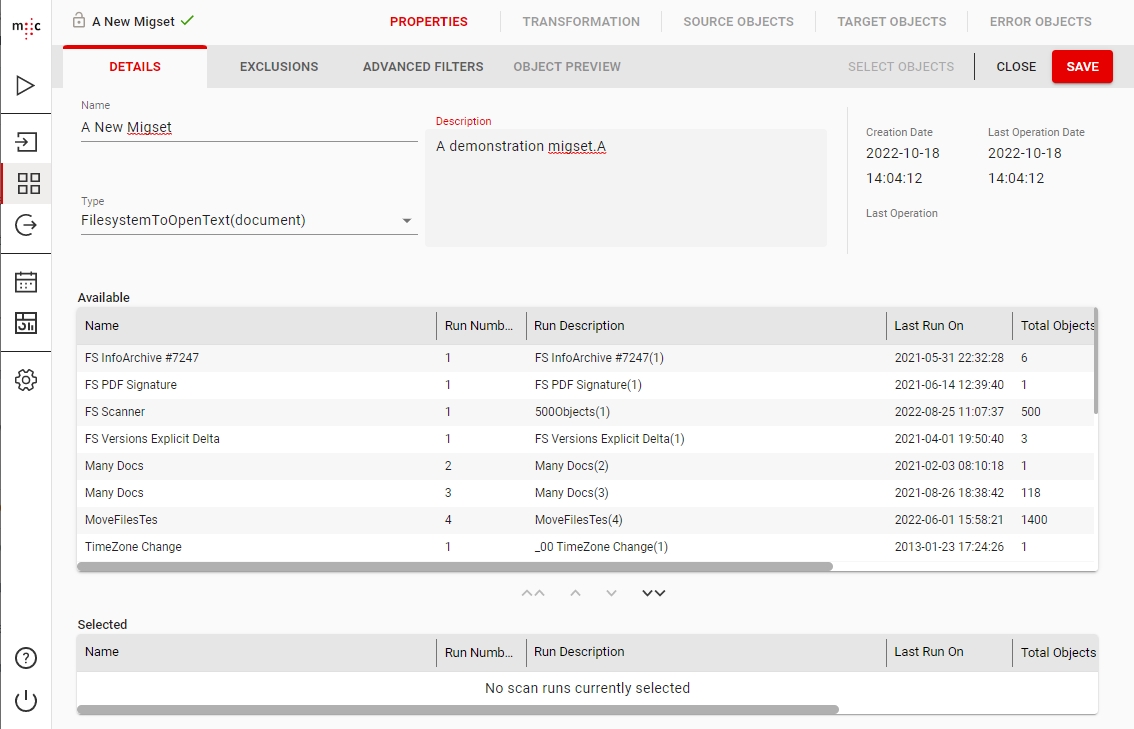
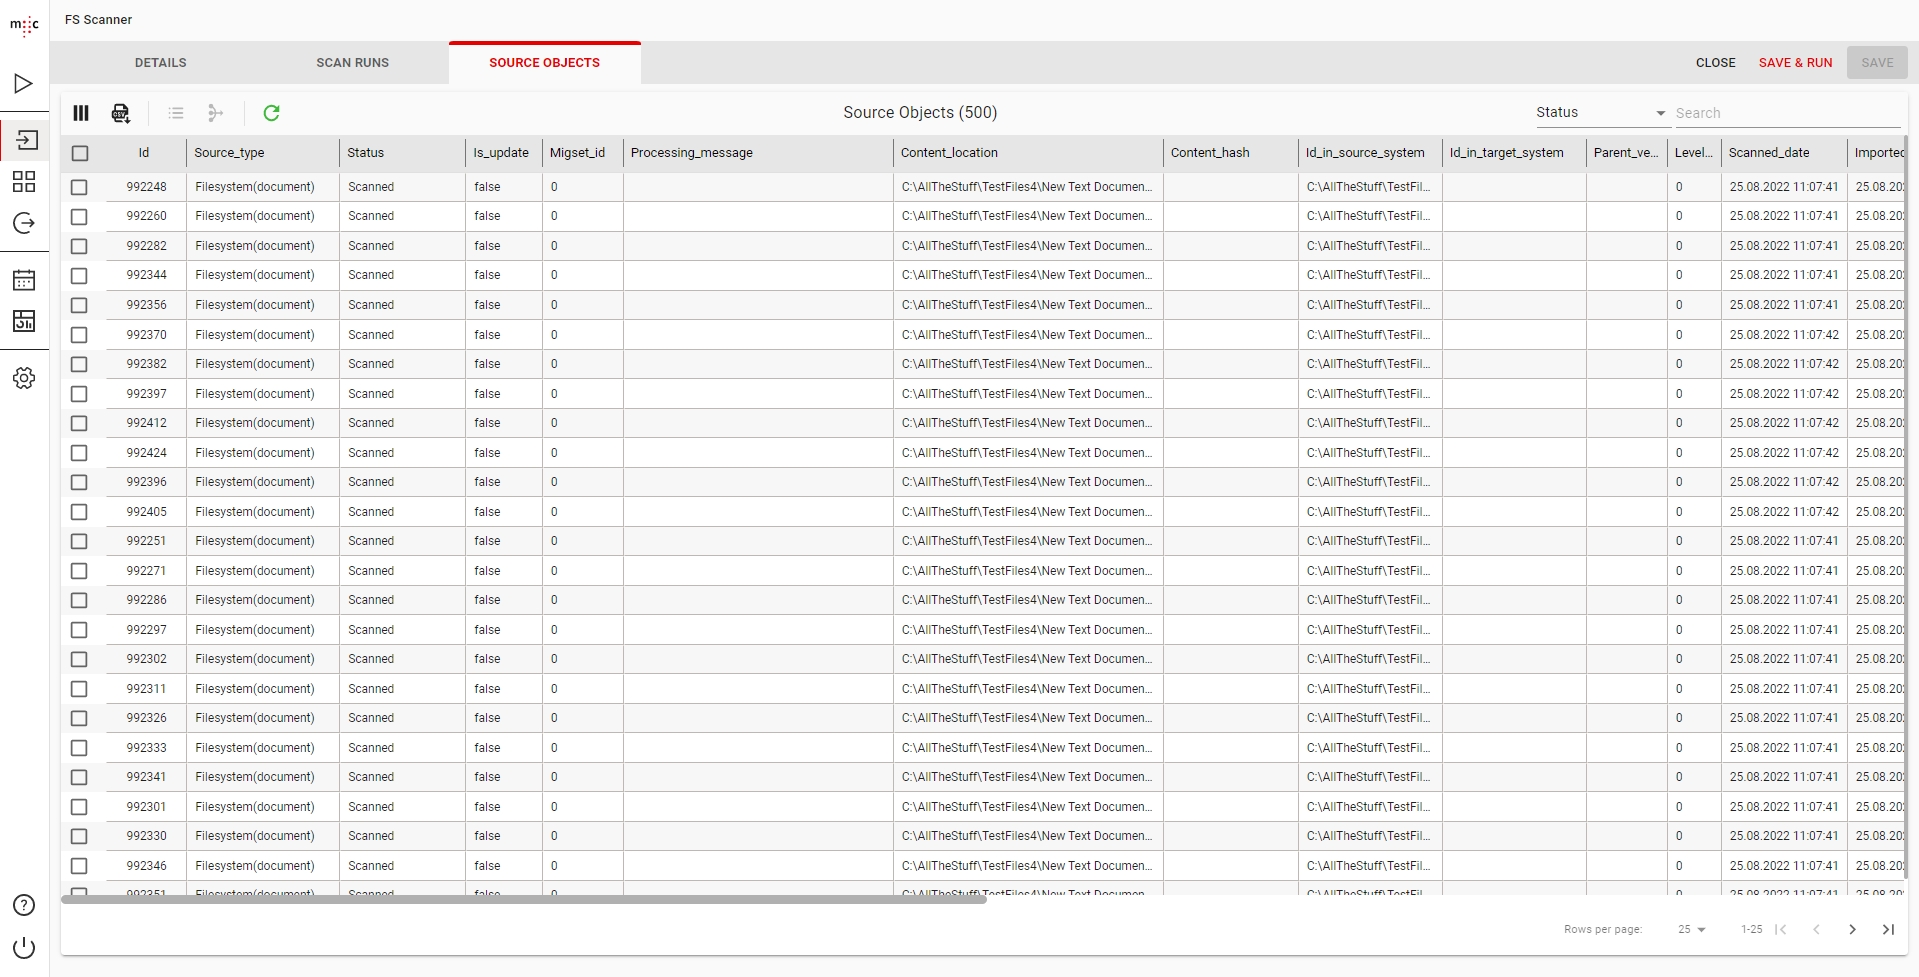
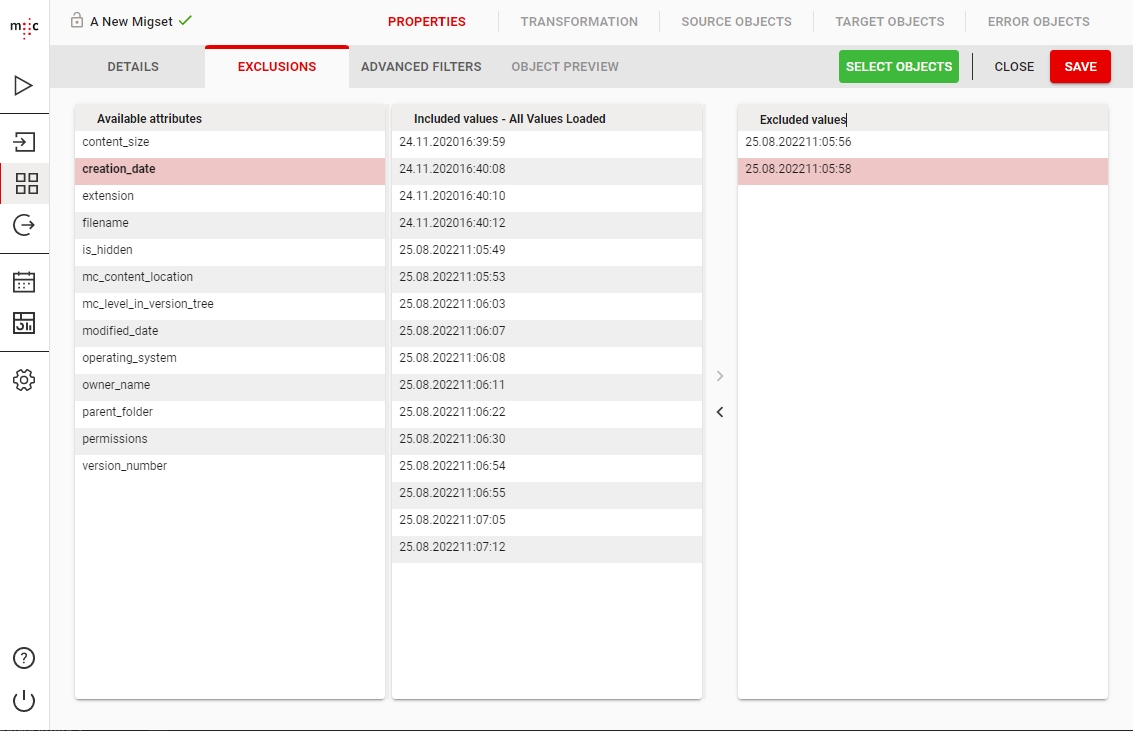
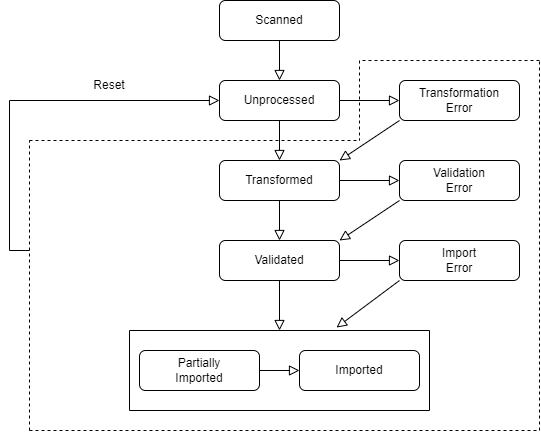
Each migration-center component has its own installer and the kit has a main installer that assists the installation of each component.
The three individual components can also be distributed and installed separately with the installers from the following table:
<?xml version="1.0" encoding="UTF-8" ?>
<contentattributes>
<attribute name="keywords" value="Benchmark" />
<attribute name="keywords" value="Technical" />
<attribute name="reference_period" value="26.11.2001" />
<attribute name="reference_period_from" value="26.11.2001" />
<attribute name="reference_period_to" value="01.01.2100" />
</contentattributes>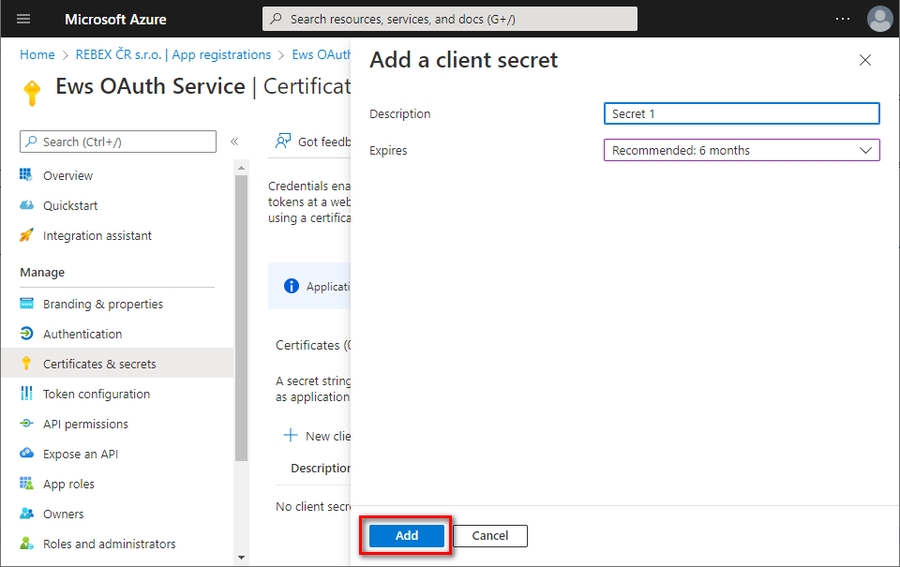
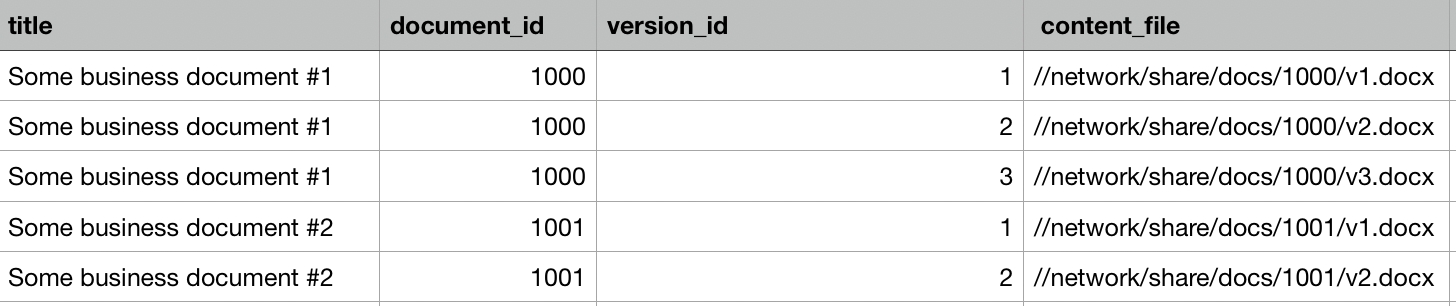

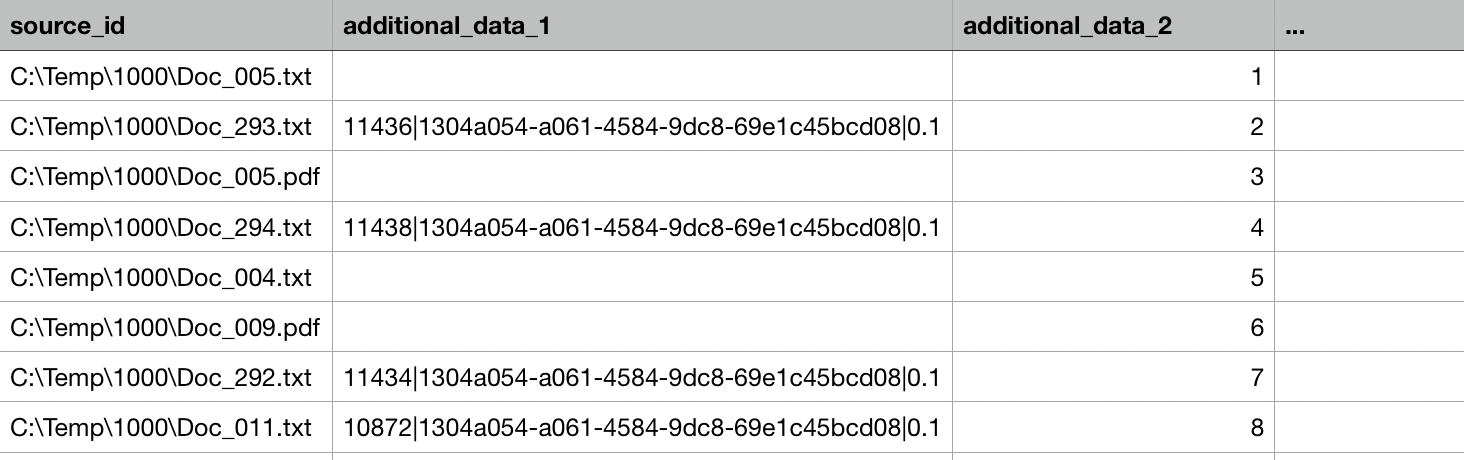
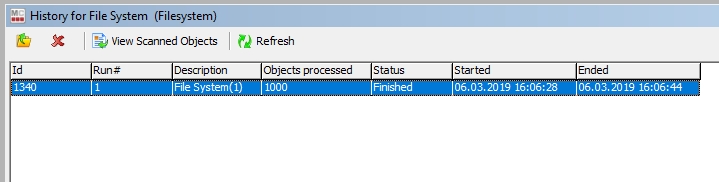


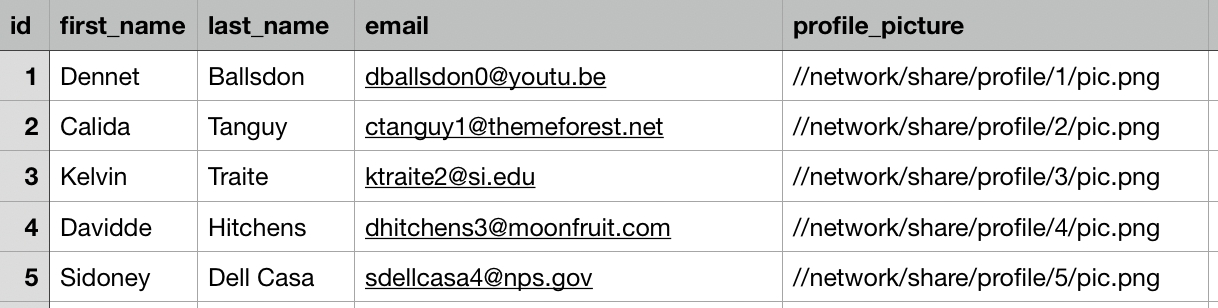
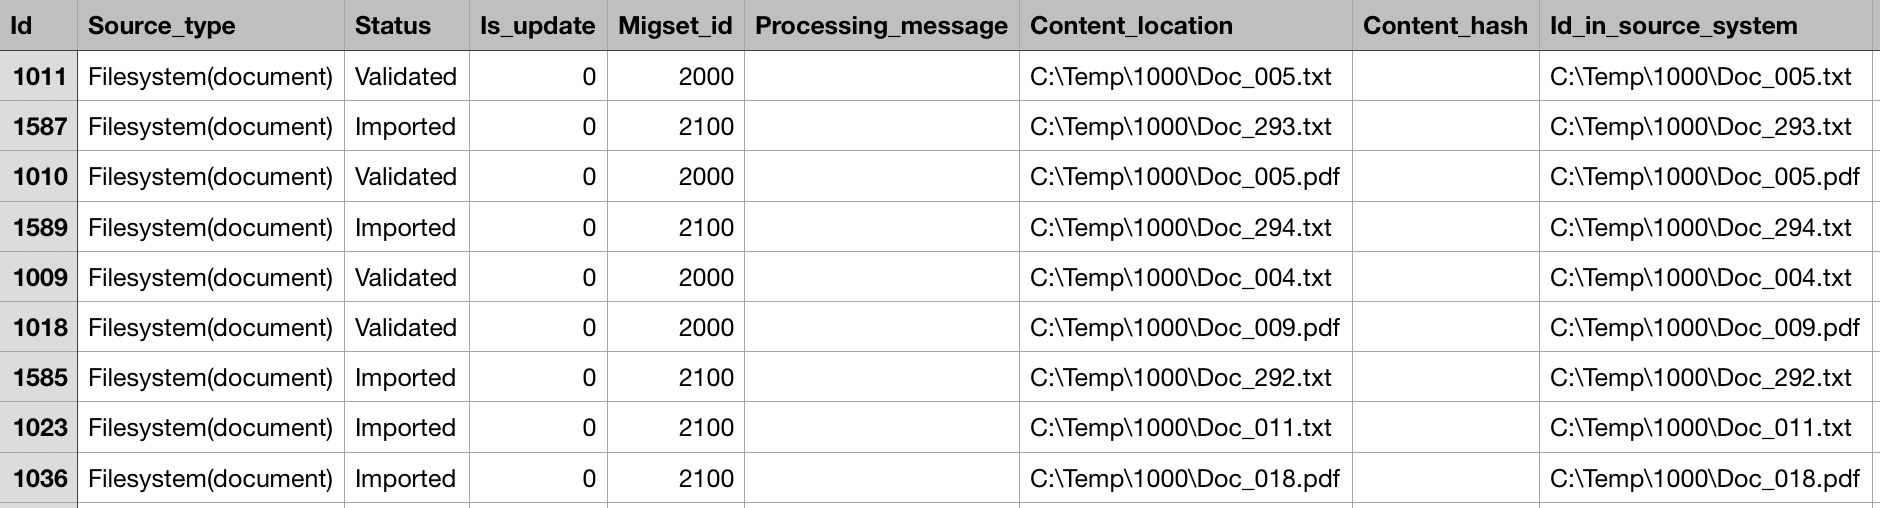
Warning when extended metadata cannot be extracted;
At the following step, the user will choose the components of migration-center to install.
The following are different installation variants:
Full installation All components of migration-center are installed
Compact Installation This variant installs the migration-center WebClient and database only.
Custom installation The user-defined installation allows the user to select specific components.
The full installation is recommended as a first installation option, or a custom installation can be performed by selecting only components that need to be installed.
By confirming the choice by selecting Next, all chosen components will be installed one after another. For each of the components there will be an individual installation assistant.
The WebClient installer deploys an Apache Tomcat server containing the migration-center WebClient component.
Start the WebClient installer and click Next to proceed.
Select the installation path for the application. The default installation path proposed by the installer is recommended but can be changed if needed.
Select start menu folder
The Windows Start Menu shortcuts will be created for migration-center WebClient. The name of the folder for these shortcuts can be set here.
Installation summary
Before starting the installation process, all previously set options are displayed. In order to change settings, the user can navigate to the previous pages by clicking Back. Click Install to start the installation.
Install in progress
Wait for the install to finish.
Finish the installation
You have the option of launching the migration-center WebClient after clicking on Finish.
This will open your default browser with the localhost URL for accessing the WebClient https://localhost/mc-web-client
This section described how to install the WebClient on a different version of Tomcat than the one provided in the migration-center package.
Only the following versions were tested by us, other versions could work but we cannot guarantee there aren't any compatibility issues:
version 9.0.87
version 9.0.73 (one provided by migration-center package)
Download the desired Tomcat version and extract it in a folder location. In the following steps /tomcat/ will reffer to the folder where the Tomcat version was extracted to and /kit/ will reffer to the migration-center kit.
From the /tomcat/bin folder, open the catalina.bat file with a text editor.
After the setlocal command paste the following lines and save thje file:
rem Set min and max memory allocation pool with CATALINA_OPTS
set CATALINA_OPTS=-Xms1024m -Xmx4096m
Copy from the serviceMcWebClient.bat and removeMcWebClient.bat files from /kit/Webclient/webclient/bin into the /tomcat/bin folder.
Open the catalina.propertis file from /tomcat/conf . Search for the common.loader property.
At the end of this line append the following text and save the file:
,"${catalina.home}/extra"
Copy the server.xml file from /kit/Webclient/webclient/conf folder and replace it in the /tomcat/conf folder.
Copy the tomcat-ssl.p12 file from /kit/Webclient/webclient/conf folder into /tomcat/conf folder.
Copy the extra folder from /kit/Webclient/webclient into the /tomcat folder.
Delete the following folders: docs, examples, host-manager, ROOT from the /tomcat/webapps folder.
Copy the mc-web-client folder and the mc-rest-api.war file from /kit/Webclient/webclient/webapps into /tomcat/webapps folder.
Open the Windows System Enviroment Variables window and add the following string in the PATH environment variable %SystemRoot%\System32.
Open a Command Prompt with Run as administrator in the /tomcat/bin folder. Then run the serviceMcWebClient.bat script. This will install the windows service.
If you cannot edit system variables, skip step 9 and do the following after step 10:
Open the Windows Services, select Migration Center Web Client and open its Properties. On the Log On tab select Local System Account. Save and start the service.
The WebClient server is delivered with a self signed certificate for localhost. Because the certificate is self signed it is not recognized by the browser as a trusted certificate. Therefore, when accessing the WebClient on localhost the browser will show a disclaimer "Your connection is not private" so first time when accessing the webclient the user needs to confirm by clicking "Proceed to localhost(unsafe)".
To get rid of the "Not secure" warning in the browser any customer can generate a trusted certificate for the machine(s) where the WebClient. To publish the trusted certificate in the WebClient the following steps are required:
Copy the generated certificate (p12) in the conf folder.
Edit the conf\server.xml file with a text editor and change the keystoreFile and keystorePass to match the certificate file name and the certificate password.
3. Restart the WebClient service (Migration Center Web Client)
The migration-center Server Components, or Jobserver, is the part which contains all the connectors that interact with the source and target systems. The installation process will copy the files and also create a windows service.
Select destination location
Next, the user will select the installation location for the Server Components. The default installation path proposed by the installer is recommended but can be changed if needed.
Select Job Server port
Next you can select the port on which the migration-center Client will communicate with the Jobserver.
The default port is 9700 but any free port can be used.
Select log folder location
Default value is the logs folder in the Server Components installation folder, but it can be set to any valid local path or UNC network share. Write access to the log location is needed by the user which under which the Jobserver will be running.
Completion of the installation
Complete the installation by selecting Install.
Not all connectors are available on the Linux version of Server Components. The ones available are:
Scanners: Documentum, Filesystem, Database, eRoom, Exchange
Importers: Documentum, Filesystem, InfoArchive
The Linux version of the migration-center Server Components can be found in the folder ServerComponents_Linux.
In order to install the Migration Center Job Server extract the archive Jobserver.tar.gz in the desired location using the command:
tar -zxvf Jobserver.tar.gz
All necessary Job Server files will be extracted in the “Jobserver” folder.
To install the Job Server as a service / daemon, follow these steps:
1. Switch to the “bin” folder of the “Jobserver” folder
2. Run the command sudo ./installDaemon.sh
Instead of installing the Job Server as a service/daemon, you can run it in the terminal by executing the script ./runConsole.sh in the bin folder
The default TCP listening port is 9701 and can be changed in “server-config.properties” file located in “lib/mc-core” folder.
For running Documentum Scanner or Importer on Linux the DFC (Documentum Foundation Classes) needs to be configured in “conf/dfc.conf” as it is described in the Scanner and Importer user guides.
Depending on the requirements or possibilities of each migration project, it can make sense to install multiple Job Servers across the environment, either to share the workload, or to exploit performance advantages due to the geographical location of the various source and/or target system, i.e. installing the Job Server on a node as close as possible to the source or target system it is supposed to communicate with.
In terms of throughput, local installations will provide benefits over remote installations and local networks will always be faster than remote networks.
Besides throughput, latency needs to be considered as well, since increased latency can affect performance just as much, even leading to timeouts or connection breakdowns in severe cases.
The Database installer is started by running the InstallOracleDataBase.bat file. This requires a valid Java installation.
The installer prepares the database for use with migration-center by creating a user, tables, installing the packages containing migration-center functionality and setting default configuration options. All of these objects will be created in a schema called FMEMC. Currently it is not possible to change the schema’s name or install multiple schemas on the same database instance.
Welcome screen
The first screen containing some general information. Click Next to proceed.
Connection Details
Insert the details for connecting to the database instance where you want to install the migration-center FMEMC schema. Set username, password. The user must be the predefined SYS user or an Oracle administrative user with enough privileges. Then set the database details host, port and service name.
You can test the details by clicking Test Connection. Click on Next to proceed.
Selecting the logs and tablespaces path
Set the location to create the log files for the database installer.
Set the location for the database tablespaces. The default path provided by the database instance is recommended.
Enter License Key
Insert a valid migration-center license key.
Wait for the install to finish
When the installation finishes click on Next to proceed.
Set date/time pattern
You can set the Datetime Pattern that will be used for displaying date values in the WebClient. The dropdown menu includes of 4 the mostly widely used date/time formats.
Click Finish to complete the installation.
During the installation, the following Oracle Users will be created for migration-center.
User
Authorizations
FMEMC
This Oracle User is the owner of all migration-center objects and tablespaces
Default password is migration123. Password can be changed after authorization.
GRANT CONNECT TO FMEMC
GRANT RESOURCE TO FMEMC
GRANT CREATE JOB TO FMEMC
GRANT SELECT ON SYS.V_$INSTANCE TO FMEMC
GRANT SELECT ON SYS.DBA_DATA_FILES TO FMEMC
GRANT SELECT ON SYS.DBA_TABLESPACES TO FMEMC
GRANT CREATE VIEW TO FMEMC
Additionally the user FMEMC will be granted to use the following Oracle packages:
SYS.UTL_TCP TO FMEMC;
SYS.UTL_SMTP TO FMEMC;
SYS.DBMS_LOCK TO FMEMC;
SYS.UTL_RAW TO FMEMC;
SYS.UTL_ENCODE TO FMEMC;
SYS.DBMS_SCHEDULER TO FMEMC;
SYS.DBMS_OBFUSCATION_TOOLKIT TO FMEMC;
Furthermore, during the installation, the following tablespaces will be created for migration-center:
FMEMC_DATA (40MB)
FMEMC_INDEX (20MB)
The user role FMEMC_USER_ROLE will be created and granted the required privileges on FMEMC schema objects. This role must be granted to any database user that needs to use migration center.
The Database installer is started by running the InstallPostgreDataBase.bat file. This requires a valid Java installation.
The installer prepares the database for use with migration-center by creating a user, tables, schemas, installing the packages containing migration-center functionality and setting default configuration options.
The first screen containing some general information. Click Next to proceed.
Insert the details for connecting to the database instance where you want to install the migration-center FMEMC schema. Set username, password. The user must be the predefined postgres user or a PostgreSQL administrative user with enough privileges. Then set the database details host, port and database name.
Do not use the default database named "Postgres". That is reserved for manangement and is not meant to be used as an actual database.
You can test the details by clicking Test Connection. Click on Next to proceed.
Selecting the logs and tablespaces path
Set the location to create the log files for the database installer.
Set the location for the tablespaces if custom table space locations are selected.
Enter License Key
Insert a valid migration-center license key.
Wait for the install to finish
When the installation finishes click on Next to proceed.
Set date/time pattern
You can set the Datetime Pattern that will be used for displaying date values in the WebClient. The dropdown menu includes of 4 the mostly widely used date/time formats.
Click Finish to complete the installation.
User
Authorizations
FMEMC
This User is the owner of all migration-center objects and tablespaces
Default password is migration123. Password can be changed after authorization.
The FMEMC user will be created as a Superuser.
Tables and indexes will be created in the default Tablepace unless custom tablespace locations were specified.
The user role FMEMC_USER_ROLE will be created and granted the required privileges on all created schema objects. This role must be granted to any database user that needs to use migration center.
PostgreSQL DB Access
In order to connect to the PostgreSQL database, the FMEMC user and the machine hosting the WebClient need to be specified in the PostgreSQL Client Authentication Configuration File (pg_hba.conf) for your PostgreSQL database installation.
We highly recommend reading the official PostgreSQL documentation for the pg_hba.conf
To give access to the database for one WebClient and one Jobserver on separate servers each, for a basic configuration, you would need to add the IPs of the servers in the pg_hba.conf file in the follwoing format:
The file can be found on the PostgreSQL server. The default path is: C:\Program Files\PostgreSQL\15\data\pg_hba.conf
Example for IPv4:
Example for IPv6:
The tablespaces and FMEMC user can be created manually via scripts, and the Database installer can be run with the FMEMC user afterwards, instead of using the SYS user. This can be done by running the scripts located in ...\Database\Oracle\Util folder of the installation kit. The scripts are:
create_tablespaces_default_location.sql or create_tablespaces_custom_location.sql
create_user_fmemc.sql
These tablespaces must be created prior to the creation of the FMEMC user.
The tablespaces can be separated or merged into any number of individual datafiles, but the tablespace’s names cannot be changed (FMEMC_DATA and FMEMC_INDEX must not be changed).
This option is useful for if the default settings for the user FMEMC and tablespaces do not meet the requirements of the customer or conflict with internal company policies and guidelines.
The FMEMC user can be created manually via script, and the Database installer can be run with the FMEMC user afterwards, instead of using the Postgres user. This can be done by running the script located in ...\postgres\Install folder of the installation kit:
create_user.sql
This option is useful for if the default settings for the user FMEMC do not meet the requirements of the customer or conflict with internal company policies and guidelines.
To install the migration-center database component in an Oracle instance on AWS RDS you must use the scripts provided in the ...\Database\Oracle\Util\AWS-RDS folder under the install kit. Follow the steps in this order:
run the create_tablespaces_aws_rds.sql script
run the create_user_fmemc_aws_rds.sql script
run the Database installer and use the FMEMC user to connect to your AWS RDS Oracle instance
Main installation assistant
setupMigCenter.exe
migration-center WebClient
WebClient/McWebClientSetup.exe
migration-center Database
Database/InstallDataBase.bat
migration-center Server Components (Job Server)
ServerComponents/SPsetup.exe
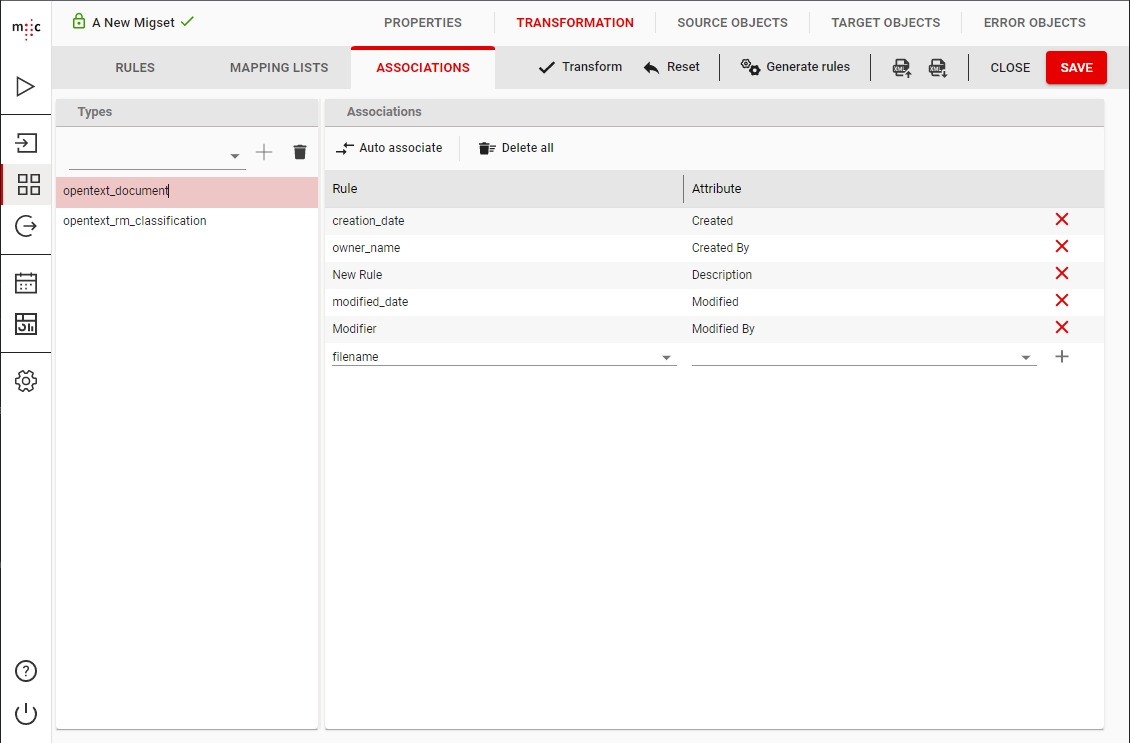

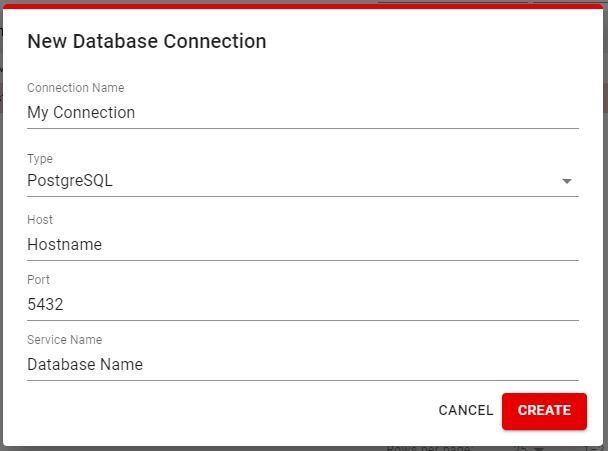
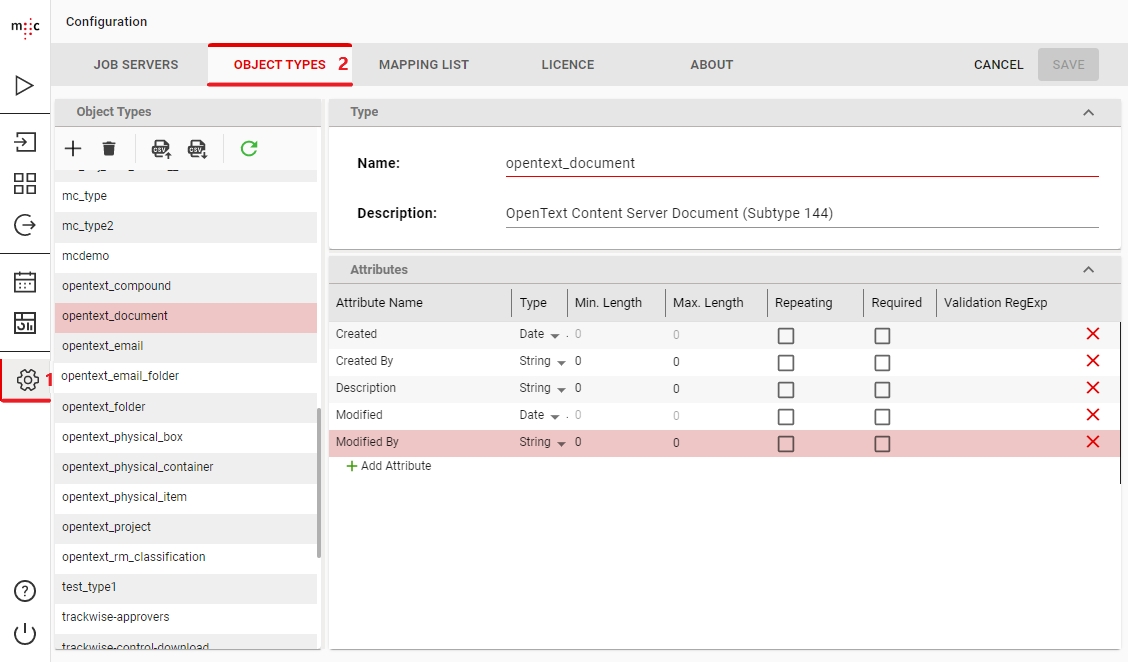
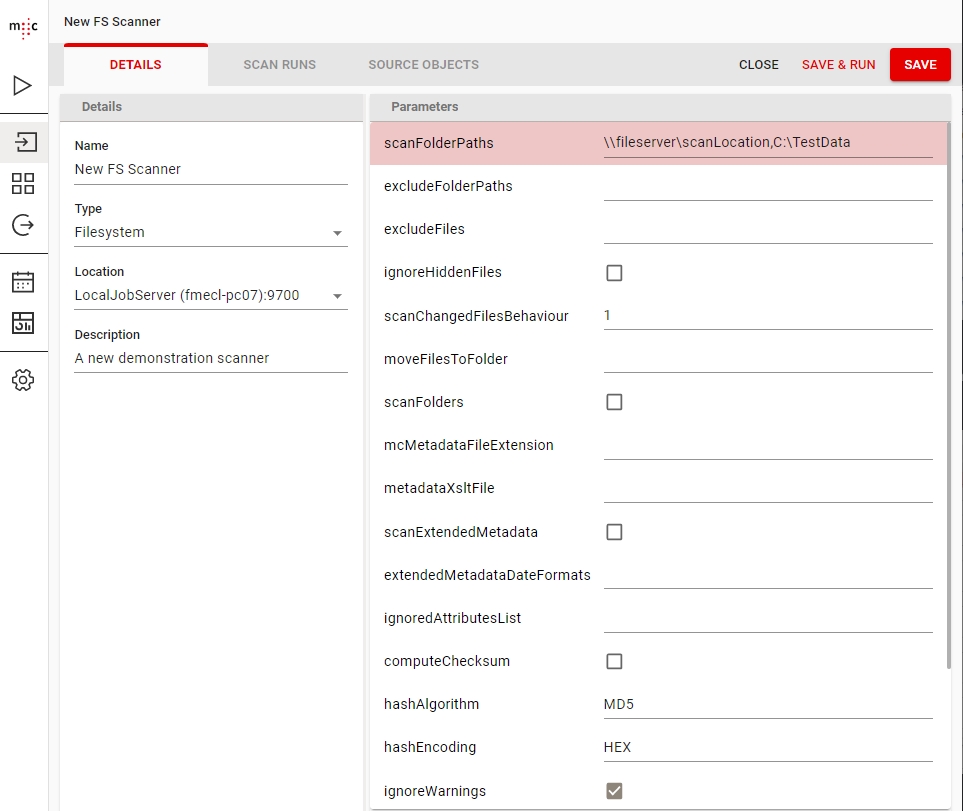

<Connector port="443" protocol="org.apache.coyote.http11.Http11NioProtocol"
maxThreads="200" scheme="https" secure="true" SSLEnabled="true"
keystoreFile="conf/your_own_certificate.p12" keystorePass="yourpass"
clientAuth="false" sslProtocol="TLS" >
</Connector>host database user IP-address/IP-mask auth-methodhost all all 192.118.1.216/32 scram-sha-256
host all all 192.118.1.114/32 scram-sha-256host all all fe80::147c:db68:9a19:7b0b%22/128 scram-sha-256
host all all fe80::d2ce:5e91:6e5:9232%17/128 scram-sha-256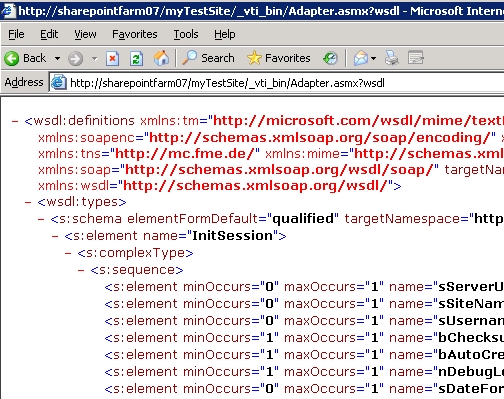
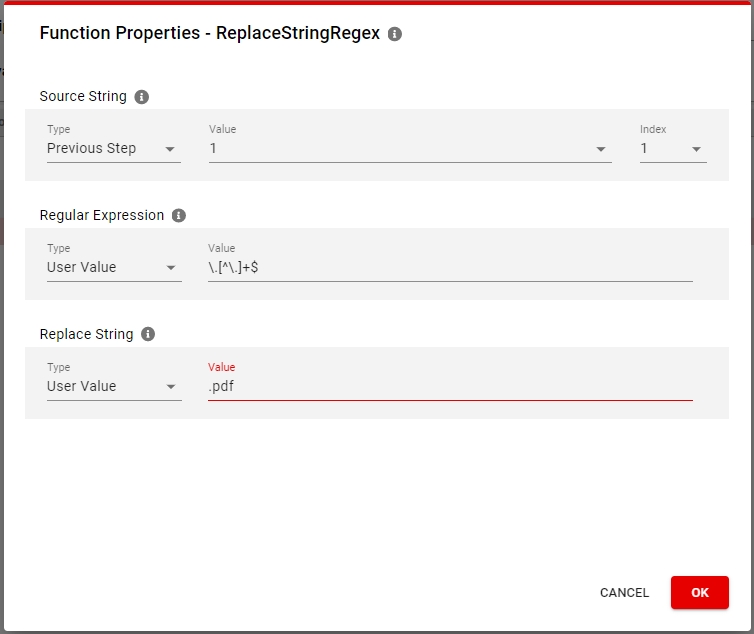
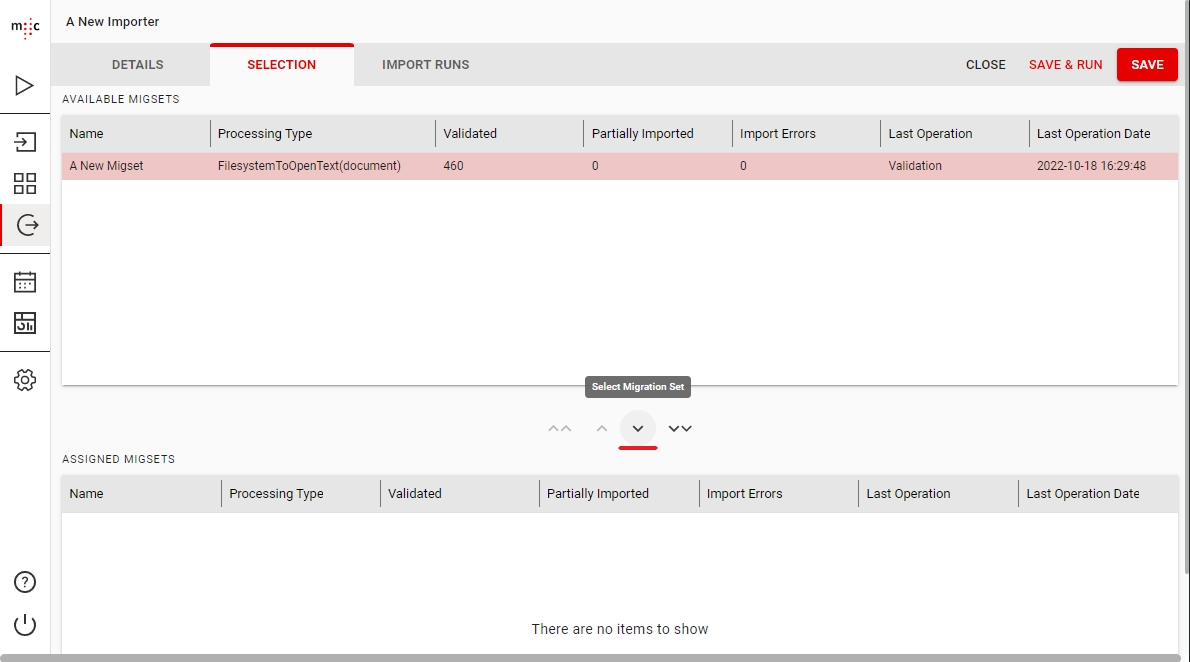
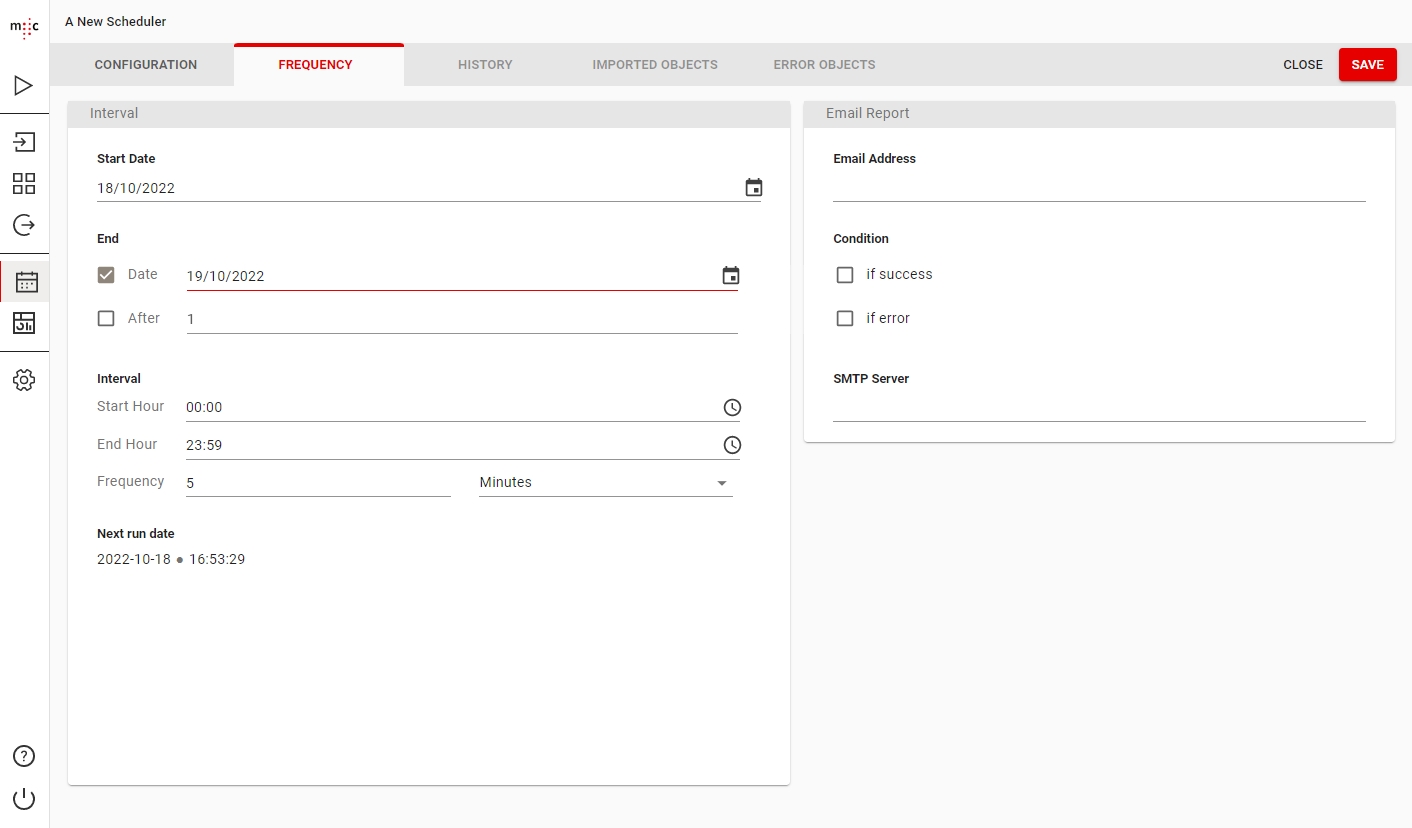
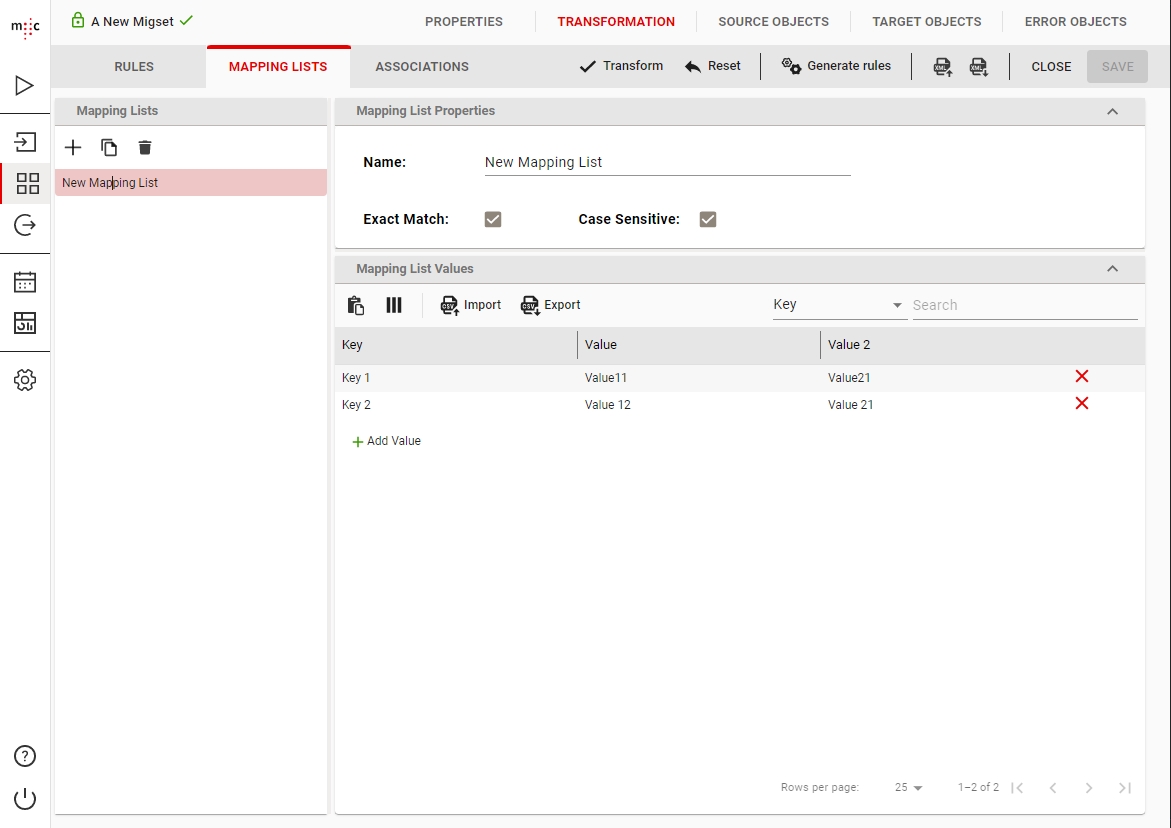
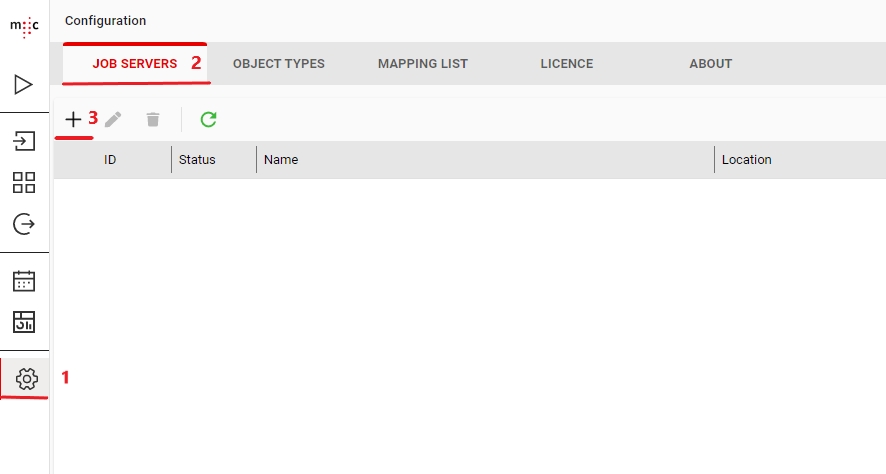


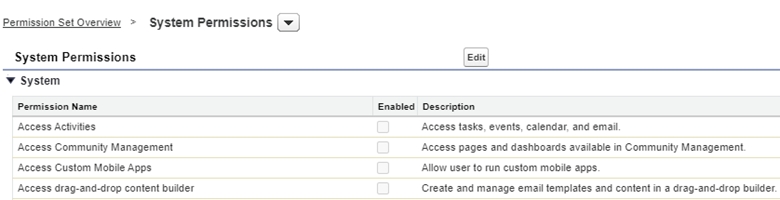

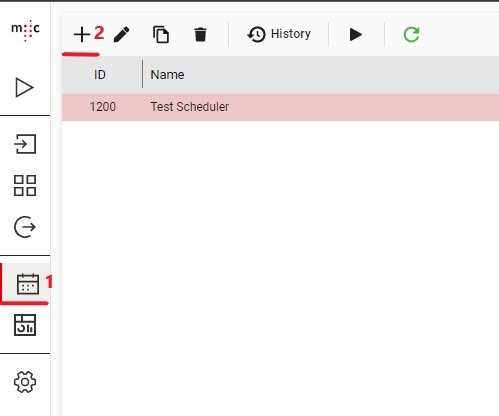
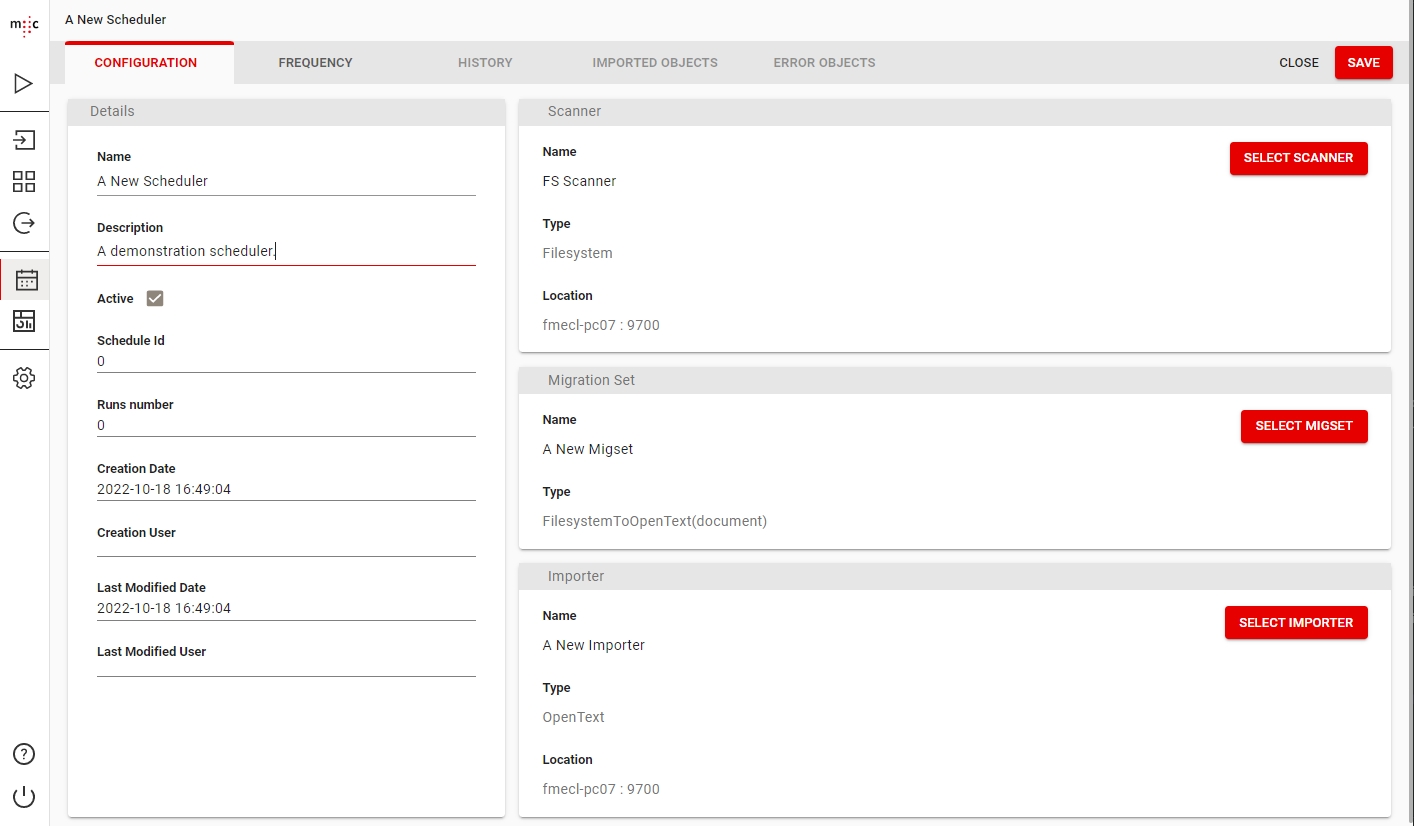
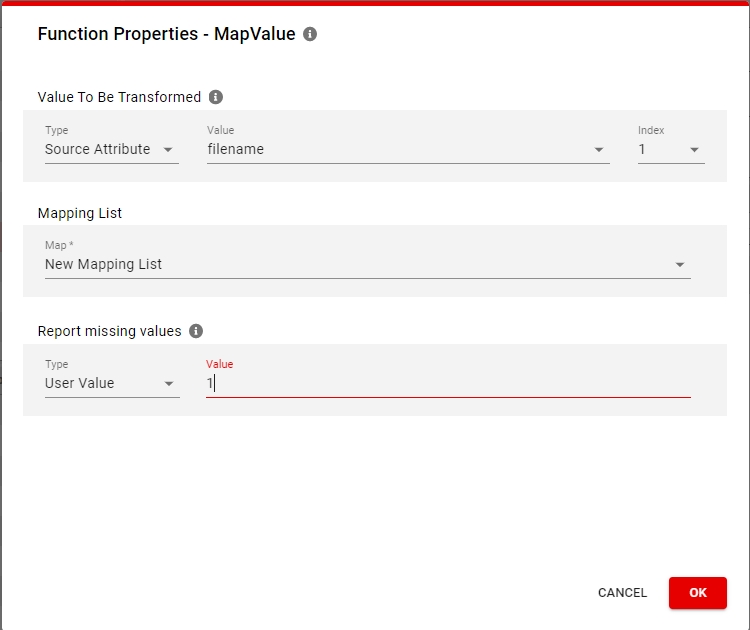
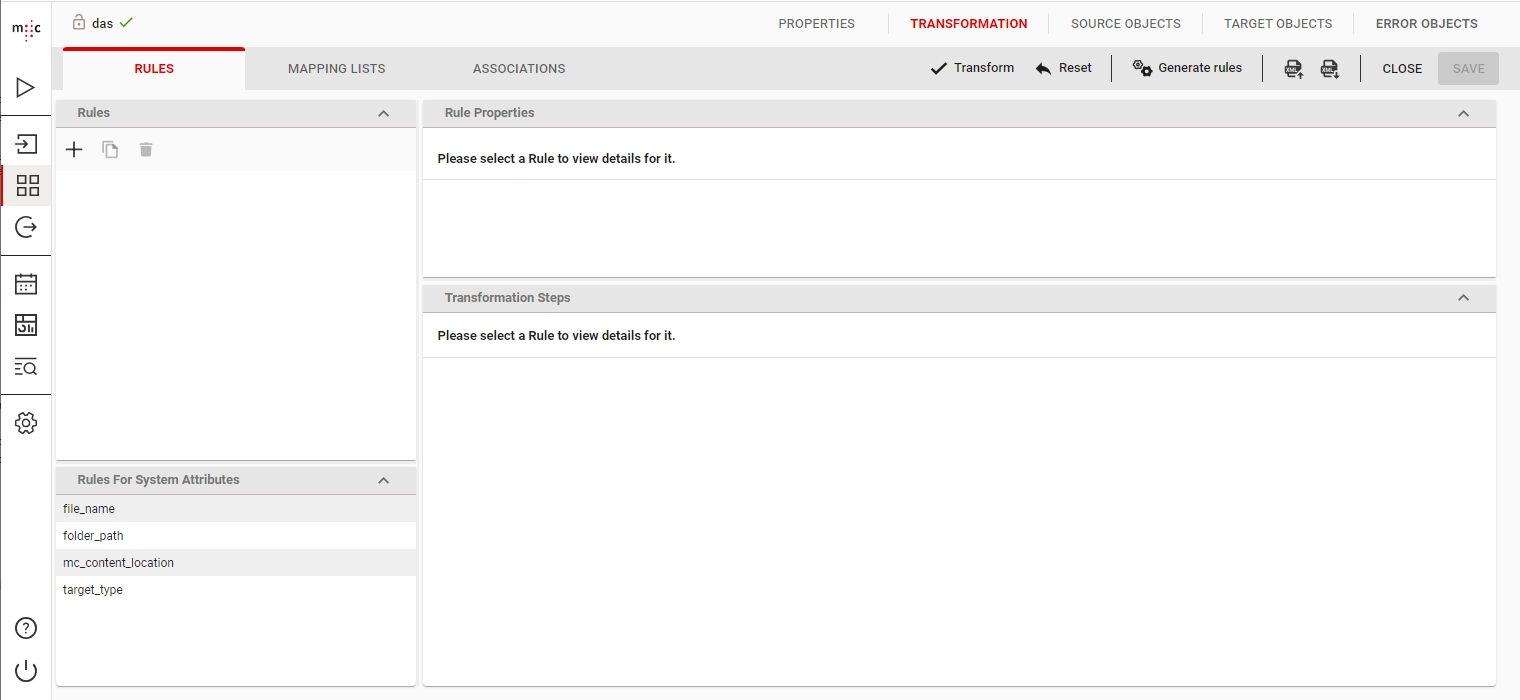

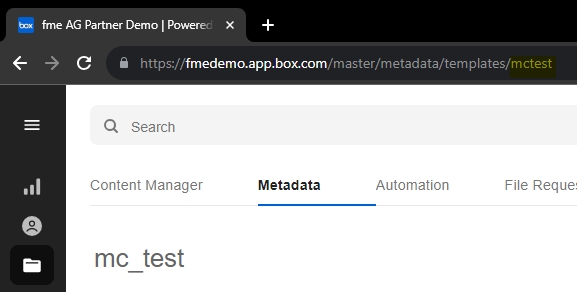
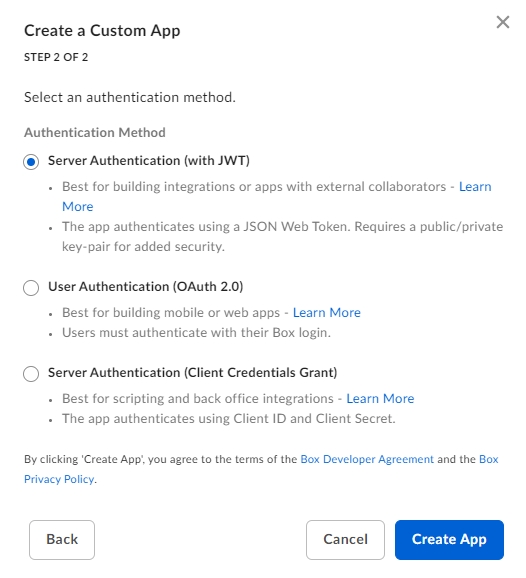


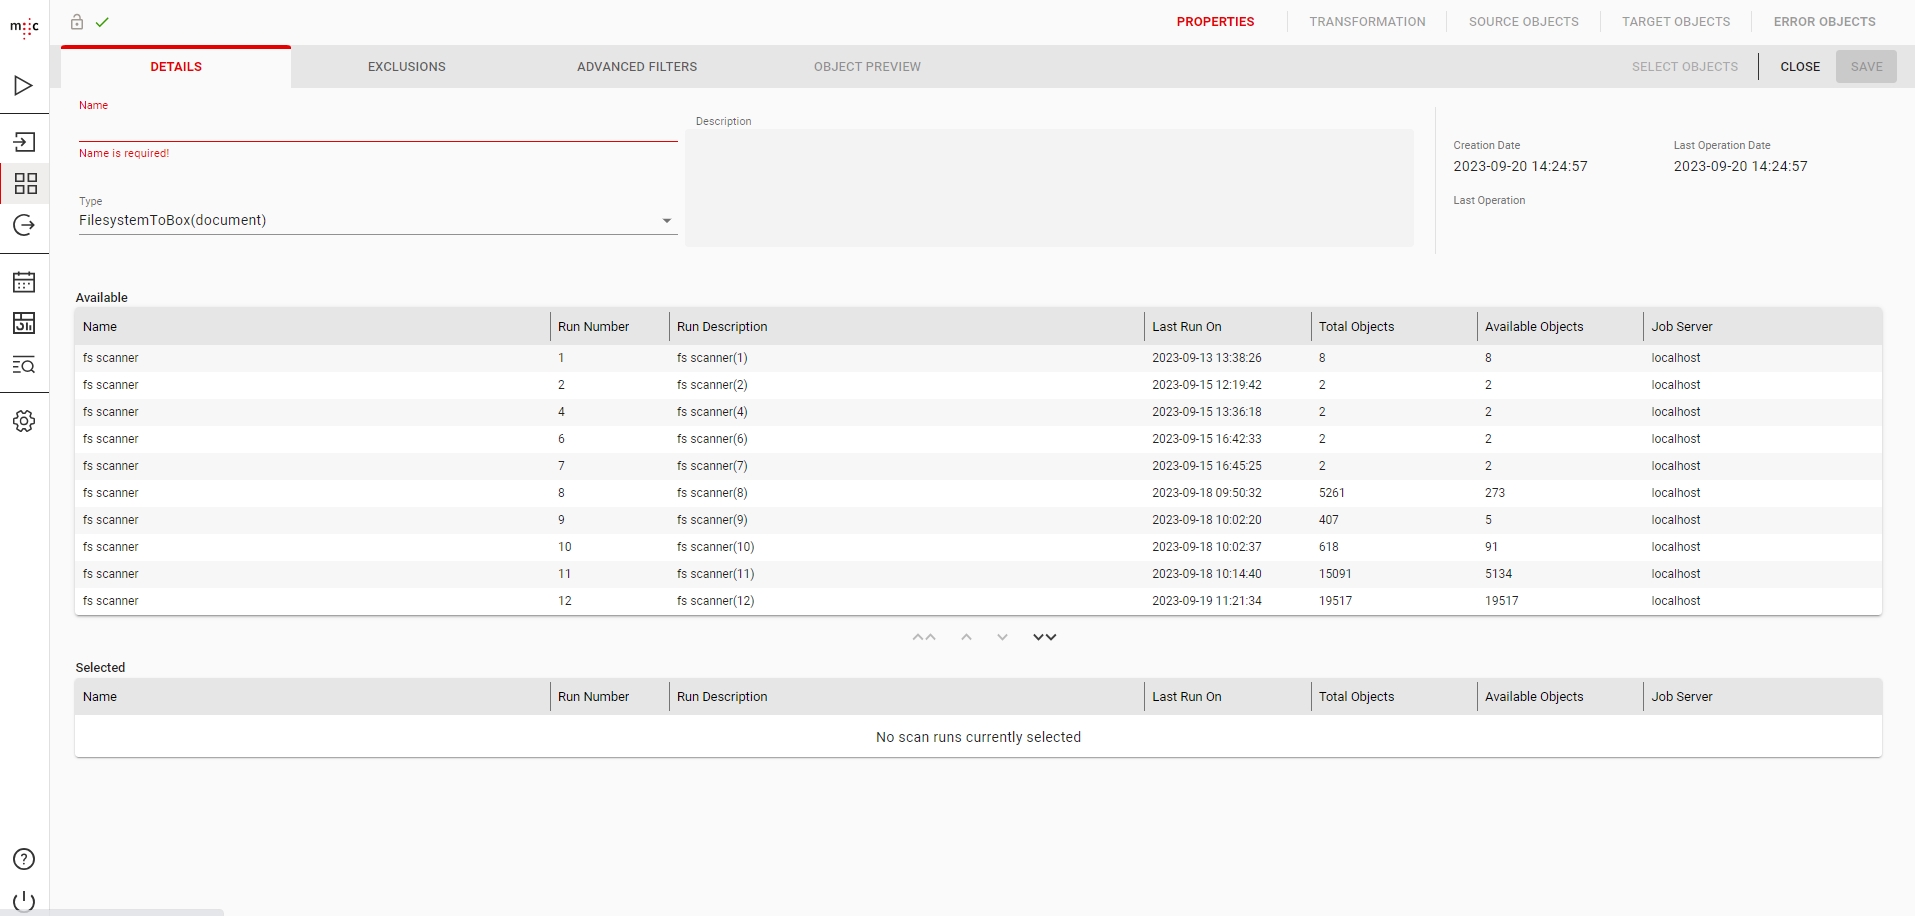
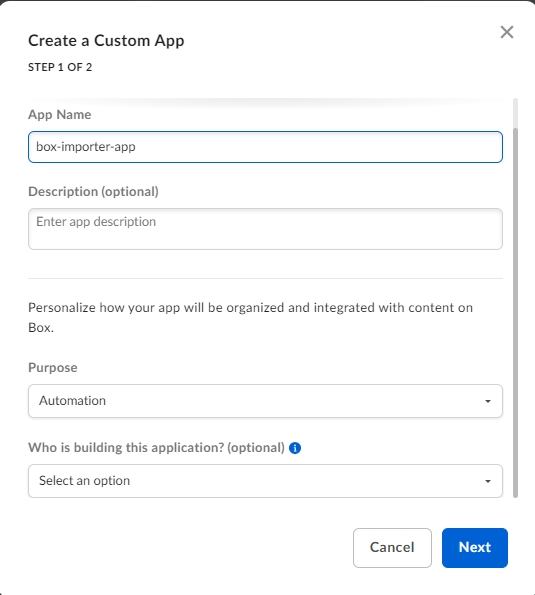
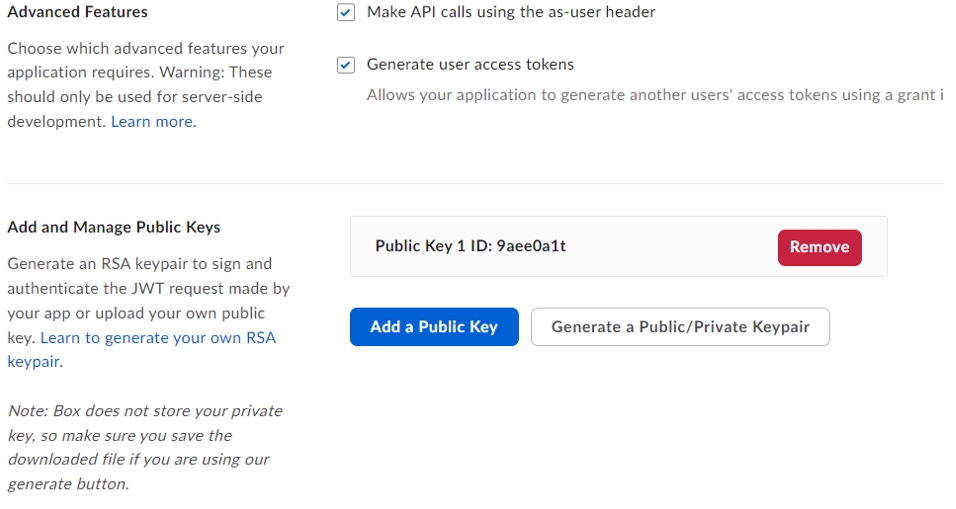
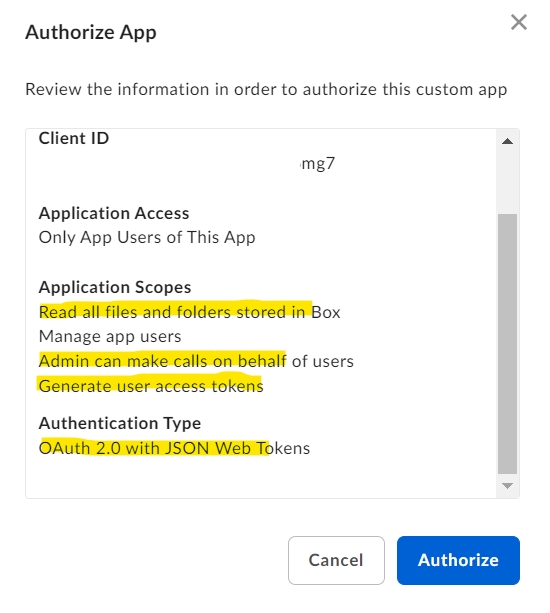
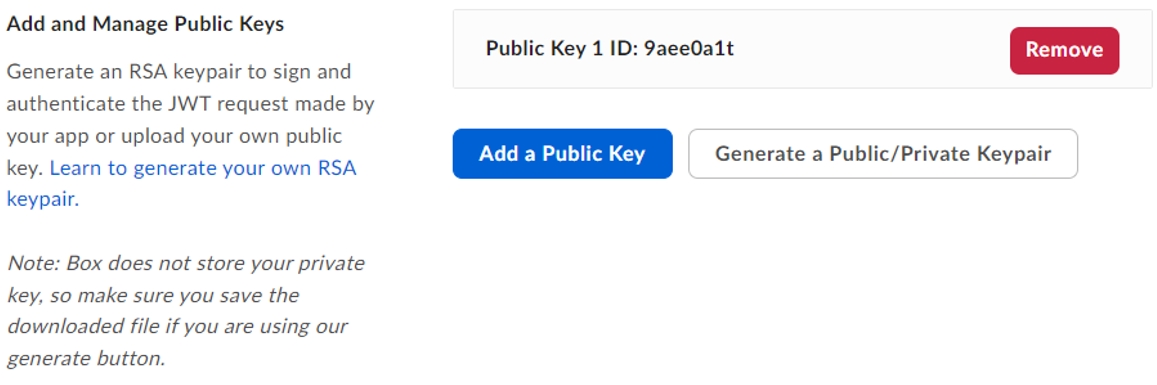
The SharePoint Online Scanner allows extracting documents, folders and their related information from Microsoft SharePoint Online libraries.
SPO Scanner might receive timeout error from SharePoint Online when scanning libraries with more than 5000 documents (#52865). This can be solved by increasing the timeout values depending on your situation.
There are 3 situations when the scanner can get a timeout exception:
The initialization phase: the java component waits for the C# component to retrieve all the objects that satisfy the conditions. This is solved by increasing the value for the initialization_timeout property which is present in the additionalConfig.properties file (...\lib\mc-sharepoint-online-scanner).
The migration-center SharePoint Online Scanner requires installing an additional component.
This additional component needs the .NET Framework 4.7.2 installed and it’s designed to run as a Windows service and must be installed on all machines where the a Job Server is installed.
To install this additional component, it is necessary to run an installation file, which is located within the SharePoint folder in the Jobserver instal: ...\lib\mc-sharepoint-online-scanner\CSOM_Service\install
To install the service run the install.bat file using administrative privileges. You need to start it manually after the install. Afterwards the service is configured to start automatically at system startup.
When running the CSOM service with a domain account you might need to grant access to the account by running the following command:
netsh http add urlacl url=http://+:57096/ user=<your user>
<your user> might be in the format domain\username or [email protected]
To uninstall the service run the uninstall.bat file using administrative privileges.
Before uninstalling the Jobserver component, the CSOM service must be uninstalled as described here.
The app-only principal authentication used by the scanner calls the following HTTPS endpoints. Please ensure that the job server machine has access to those endpoints:
<tenant name>.sharepoint.com:443
accounts.accesscontrol.windows.net:443
The scanner supports only app-principal authentication for connecting to SharePoint Online. The app-principal authentication comes in two flavors:
Azure AD app-only principal authentication Requires full control access for the migration-center application on your SharePoint Online tenant. This includes full control on ALL site collections of your tenant.
SharePoint app-only principal authentication Can be set to restrict the access of the migration-center application to certain site collections or sites.
The migration-center SharePoint Online Scanner supports Azure AD app-only authentication. This is the authentication method for background processes accessing SharePoint Online recommended by Microsoft. When using SharePoint Online you can define applications in Azure AD and these applications can be granted permissions to your SharePoint Online tenant.
Please follow these steps in order to setup your migration-center application in your Azure AD.
The information in this chapter is based on the following Microsoft guidelines:
In Azure AD when doing App-Only you typically use a certificate to request access: anyone having the certificate and its private key can use the app and the permissions granted to the app. The below steps walk you through the setup of this model.
You are now ready to configure the Azure AD Application for invoking SharePoint Online with an App-Only access token. To do that, you must create and configure a self-signed X.509 certificate, which will be used to authenticate your migration-center Application against Azure AD, while requesting the App-Only access token. First you must create the self-signed X.509 Certificate, which can be created using the makecert.exe tool that is available in the Windows SDK or through a provided PowerShell script which does not have a dependency to makecert. Using the PowerShell script is the preferred method and is explained in this chapter.
To create a self-signed certificate with this script, which you can find in the <job server folder>\lib\mc-spo-batch-importer\scripts folder:
.\Create-SelfSignedCertificate.ps1 -CommonName "MyCompanyName" -StartDate 2020-07-01 -EndDate 2022-06-30
You will be asked to give a password to encrypt your private key, and both the .PFX file and .CER file will be exported to the current folder.
Next step is registering an Azure AD application in the Azure Active Directory tenant that is linked to your Office 365 tenant. To do that, open the Office 365 Admin Center () using the account of a user member of the Tenant Global Admins group. Click on the "Azure Active Directory" link that is available under the "Admin centers" group in the left-side tree view of the Office 365 Admin Center. In the new browser's tab that will be opened you will find the Microsoft Azure portal (https://portal.azure.com/). If it is the first time that you access the Azure portal with your account, you will have to register a new Azure subscription, providing some information and a credit card for any payment need. But don't worry, in order to play with Azure AD and to register an Office 365 Application you will not pay anything. In fact, those are free capabilities. Once having access to the Azure portal, select the "Azure Active Directory" section and choose the option "App registrations". See the next figure for further details.
In the "App registrations" tab you will find the list of Azure AD applications registered in your tenant. Click the "New registration" button in the upper left part of the blade. Next, provide a name for your application, e.g. “migration-center” and click on "Register" at the bottom of the blade.
Once the application has been created copy the "Application (client) ID" as you’ll need it later.
Now click on "API permissions" in the left menu bar and click on the "Add a permission" button. A new blade will appear. Here you choose the permissions that are required by migration-center. Choose i.e.:
Microsoft APIs
SharePoint
Application permissions
Sites
Click on the blue "Add permissions" button at the bottom to add the permissions to your application. The "Application permissions" are those granted to the migration-center application when running as App Only.
Next step is “connecting” the certificate you created earlier to the application. Click on "Certificates & secrets" in the left menu bar. Click on the "Upload certificate" button, select the .CER file you generated earlier and click on "Add" to upload it.
The “Sites.FullControl.All” application permission requires admin consent in a tenant before it can be used. In order to do this, click on "API permissions" in the left menu again. At the bottom you will see a section "Grand consent". Click on the "Grand admin consent for" button and confirm the action by clicking on the "Yes" button that appears at the top.
In order to use Azure AD app-only principal authentication with the SharePoint Online Batch importer you need to fill in the following importer parameters with the information you gathered in the steps above:
SharePoint app-only authentication allows you to grant fine granular access permissions on your SharePoint Online tenant for the migration-center application.
The information in this chapter is based on the following guidelines from Microsoft:
In Azure AD when doing App-Only you typically use a certificate to request access: anyone having the certificate and its private key can use the app and the permissions granted to the app. The below steps walk you through the setup of this model.
You are now ready to configure the Azure AD Application for invoking SharePoint Online with an App-Only access token. To do that, you must create and configure a self-signed X.509 certificate, which will be used to authenticate your migration-center Application against Azure AD, while requesting the App-Only access token. First you must create the self-signed X.509 Certificate, which can be created by using the makecert.exe tool that is available in the Windows SDK or through a provided PowerShell script which does not have a dependency to makecert. Using the PowerShell script is the preferred method and is explained in this chapter.
To create a self-signed certificate with this script, which you can find in the <job server folder>\lib\mc-spo-batch-importer\scripts folder:
.\Create-SelfSignedCertificate.ps1 -CommonName "MyCompanyName" -StartDate 2020-07-01 -EndDate 2022-06-30
You will be asked to give a password to encrypt your private key, and both the .PFX file and .CER file will be exported to the current folder.
Next step is registering an Azure AD application in the Azure Active Directory tenant that is linked to your Office 365 tenant. To do that, open the Office 365 Admin Center () using the account of a user member of the Tenant Global Admins group. Click on the "Azure Active Directory" link that is available under the "Admin centers" group in the left-side tree view of the Office 365 Admin Center. In the new browser's tab that will be opened you will find the Microsoft Azure portal (https://portal.azure.com/). If it is the first time that you access the Azure portal with your account, you will have to register a new Azure subscription, providing some information and a credit card for any payment need. But don't worry, in order to play with Azure AD and to register an Office 365 Application you will not pay anything. In fact, those are free capabilities. Once having access to the Azure portal, select the "Azure Active Directory" section and choose the option "App registrations". See the next figure for further details.
In the "App registrations" tab you will find the list of Azure AD applications registered in your tenant. Click the "New registration" button in the upper left part of the blade. Next, provide a name for your application, e.g. “migration-center” and click on "Register" at the bottom of the blade.
Next step is “connecting” the certificate you created earlier to the application. Click on "Certificates & secrets" in the left menu bar. Click on the "Upload certificate" button, select the .CER file you generated earlier and click on "Add" to upload it.
After that, you need to create a secret key. Click on “New client secret” to generate a new secret key. Give it an appropriate description, e.g. “migration-center” and choose an expiration period that matches your migration project time frame. Click on “Add” to create the key.
Store the retrieved information (client id and client secret) since you'll need this later! Please safeguard the created client id/secret combination as would it be your administrator account. Using this client id/secret one can read/update all data in your SharePoint Online environment!
Next step is granting permissions to the newly created principal in SharePoint Online.
If you want to grant tenant scoped permissions this granting can only be done via the “appinv.aspx” page on the tenant administration site. If your tenant URL is https://contoso-admin.sharepoint.com, you can reach this site via https://contoso-admin.sharepoint.com/_layouts/15/appinv.aspx.
If you want to grant site collection scoped permissions, open the “appinv.aspx” on the specific site collection, e.g. https://contoso.sharepoint.com/sites/mysite/_layouts/15/appinv.aspx.
Once the page is loaded add your client id and look up the created principal by pressing the "Lookup" button:
Please enter “www.migration-center.com” in field “App Domain” and “https://www.migration-center.com” in field “Redirect URL”.
To grant permissions, you'll need to provide the permission XML that describes the needed permissions. The migration-center application will always need the “FullControl” permission. Use the following permission XML for granting tenant scoped permissions:
Use this permission XML for granting site collection scoped permissions:
When you click on “Create” you'll be presented with a permission consent dialog. Press “Trust It” to grant the permissions:
Please safeguard the created client id/secret combination as would it be your administrator account. Using these one can read/update all data in your SharePoint Online environment!
In order to use SharePoint app-only principal authentication with the SharePoint Online importer you need to fill in the following importer parameters with the information you gathered in the steps above:
To create a new SharePoint Online Scanner, create a new scanner and select SharePoint Online from the Adapter Type drop-down. Once the adapter type has been selected, the Parameters list will be populated with the parameters specific to the selected adapter type. Mandatory parameters are marked with an *.
The Properties of an existing scanner can be accessed after creating the scanner by double-clicking the scanner in the list or by selecting the Properties button/menu item from the toolbar/context menu. A description is always displayed at the bottom of the window for the selected parameter.
Multiple scanners can be created for scanning different locations, provided each scanner has a unique name.
The common adaptor parameters are described in .
The configuration parameters available for the SharePoint Online Scanner are described below:
tenantName* The name of your SharePoint Online Tenant
Example: Contoso
There are several web site that explain how to determine a SharePoint Online tenant name, e.g.
tenantURL* The URL of your SharePoint Online Tenant
Example:
siteName
Parameters marked with an asterisk (*) are mandatory.
You can scan documents from OneDrive using the same parameters as for scanning SharePoint Online libraries but with a different format for some of them.
Scanning from OneDrive requires the Azure AD app-only principal authentication with the self-signed certificate and password. It does not work with SharePoint app-only credentials with the appClientSecret.
tenantName The name of your SharePoint Online Tenant Example: fme
siteName For scanning from a personal OneDrive the URL format will be: https://tennantName-my.sharepoint.com e.g. https://fme-my.sharepoint.com
includeListsAndLibraries For scanning from a personal OneDrive use /personal/<your personal site> as site, e.g. /personal/john_doe_onmicrosoft_com
The SharePoint Online scanner can use SharePoint CAML queries for filtering which objects are to be scanned. Based on the entered query, the scanner scans documents and folders in the lists/libraries.
The queries used must only contain the content that would be placed inside the <Where> block. The scope is already set to recursive.
The following example shows a simple CAML query for scanning the contents of the Docs folder. In this example "mc" is the source site, "Versioning" a subsite, "VersionNumber" a library and "Docs" a folder.
More complex queries can also be used. This next example scans only documents created before a chosen date from 2 different subsites.
For details on how to form CAML queries for each version of SharePoint please consult the official Microsoft MSDN documentation.
The SharePoint Online scanner can extract permission information for documents and folders. Note that only unique permissions are extracted. Permissions inherited from parent objects are not extracted by the scanner.
There is a configuration file for additional settings regarding the SharePoint Online Scanner. Located under the …/lib/mc-sharepointonline-scanner/ folder in the Job Server install location it has the following properties that can be set:
excluded_file_extensions List of file extensions that will be ignored by the scanner.
Default: .aspx|.webpart|.dwp|.master|.preview.
excluded_attributes List of attributes that will be ignored by the scanner. Use "|" as a delimiter when specifying more than one attribute.
initialization_timeout Amount of time in milliseconds to wait before the scanner throws a timeout error during the initialization phase.
Default: 21600000 ms
An additional log file is generated by the SharePoint Online Scanner.
The location of this log file is in the same folder as the regular SharePoint Online scanner log files with the name: mc-sharepointonline-scanner.log.
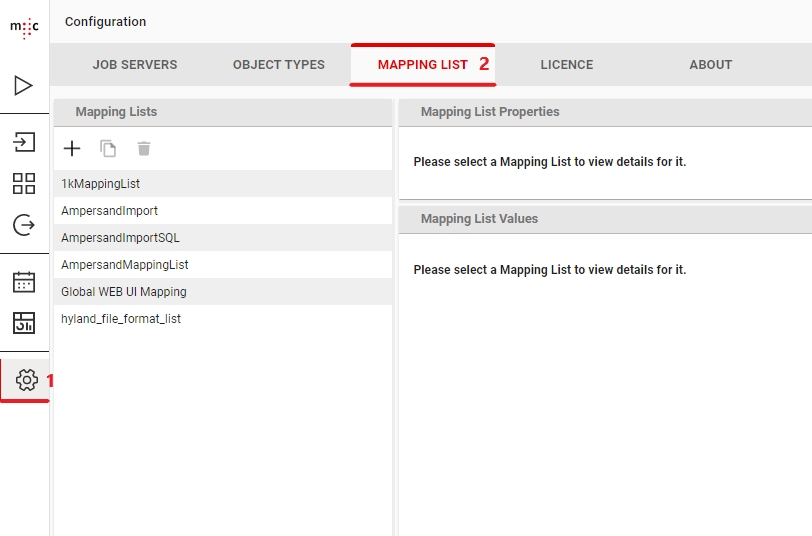
The communication between the Java component and the C# component: This is solved by increasing the value for the timeout property which is present in the serverConfig.properties file (...\lib\mc-sharepoint-online-scanner).
The communication between the C# component and Sharepoint: This is solved by increasing the value for the variable sharepointCommunicationTimeout which is present in the de.fme.mc.spo.scanner.winservice.exe.config file (...\lib\mc-sharepoint-online-scanner\CSOM_service)
Sites.FullControl.All
TermStore
TermStore.Read.All
User
User.Read.All
Graph
Application permissions
Sites
Sites.FullControl.All
Example: /sites/My Site
appClientId* The ID of either the migration-center Azure AD application or the SharePoint application.
Example: ab187da0-c04d-4f82-9f43-51f41c0a3bf0
appCertificatePath The full path to the certificate .PFX file, which you have generated when setting up the Azure AD application.
Example: D:\migration-center\config\azure-ad-app-cert.pfx
appCertificatePassword The password to read the certificate specified in appCertificatePath.
appClientSecret The client secret, which you have generated when setting up the SharePoint application (SharePoint app-only principal authentication).
proxyServer The name or IP of the proxy server. Example: http://myProxy.com
proxyPort The port of the proxy server.
proxyUsername The username if required by the proxy server.
proxyPassword The password for the proxy username.
camlQuery CAML statement that will be used to retrieve the ids of objects that will be scanned.
In case of setting this parameter the parameters excludeListAndLibraries, includeListAndLibraries, scanSubsites, excludeSubsites must not be set.
excludeListsAndLibraries The list of libraries and lists path to be excluded from scanning.
includeListsAndLibraries List of Lists and Libraries the connector should scan.
excludeSubsites The list of subsites path to be excluded from scanning.
excludeContentTypes The list of content types to be excluded from scanning.
excludeFolders The list of folders to be excluded from scanning. All the folders with the specified name from the site/subsite/library/list depending of scanner configuration will be ignored by the scanner. To exclude a specific folder, it is necessary to specify the full path.
Multiple values can be entered and separated with the “,” character.
Example: folder1 then all the folders with the folder1 name from the site/subsites/library/list will be excluded.
<Some_Library>/<Test_folder>/folder1 the scanner will exclude just the folder1 that is in the Test_folder.
includeFolders List of folders the connector should scan. All the folders with the specified name from the site/subsite/library/list depending of scanner configuration will be scanned. To scan a specific folder, it is necessary to specify the full path.
The values of the parameter “excludeFolders” will be ignored if this attribute contains values.
Multiple values can be entered and separated with the “,” character.
Example: folder1 then all the folders with the folder1 name from the site/subsites/library/list will be scanned.
<Some_Library>/<Test_folder>/folder1 the scanner will scan just the folder1 that is in the Test_folder.
scanSubsites Flag indicting if the objects from subsites will be scanned.
scanDocuments Flag indicting if the documents scanned will be added as migration-center objects.
scanFolders Flag indicting if the folders scanned will be added as migration center objects.
includeAttributes The internal attributes that will be scanned even if the value is null
scanLatestVersionOnly Flag indicating if just the latest version of a document will be scanned.
computeChecksum If enabled the scanner calculates a checksum for every content it scans. These checksums can be used during import to compare against a second checksum computed during import of the documents. If the checksums differ, it means the content has been corrupted or otherwise altered, causing the affected document to be rolled back and transitioned to the “import error” status in migration-center.
hashAlgorithm Specifies the algorithm to be used if the "computeChecksum" parameter is checked. Supported algorithms: MD5, SHA-1, SHA-224, SHA-256, SHA-384 and SHA-512.
Default algorithm is MD5.
hashEncoding The encoding type which will be used for checksum computation. Supported encoding types are HEX, Base32, Base64.
Default encoding is HEX.
exportLocation* Folder path. The location where the exported object content should be temporary saved. It can be a local folder on the same machine with the Job Server or a shared folder on the network. This folder must exist prior to launching the scanner and must have write permissions. migration-center will not create this folder automatically. If the folder cannot be found an appropriate error will be raised and logged. This path must be accessible by both scanner and importer so if they are running on different machines, it should be a shared folder.
numberOfThreads Maximum number of concurrent threads.
Default is 10 and maximum allowed is 20.
loggingLevel*
See: Common Parameters.
Configuration parameters
Values
appClientId
The ID of the migration-center Azure AD application.
appCertificatePath
The full path to the certificate .PFX file, which you have generated when setting up the Azure AD application.
appCertificatePassword
The password to read the certificate specified in appCertificatePath.
Configuration parameters
Values
appClientId
The ID of the SharePoint application you have created.
appClientSecret
The client secret, which you have generated when setting up the SharePoint application.

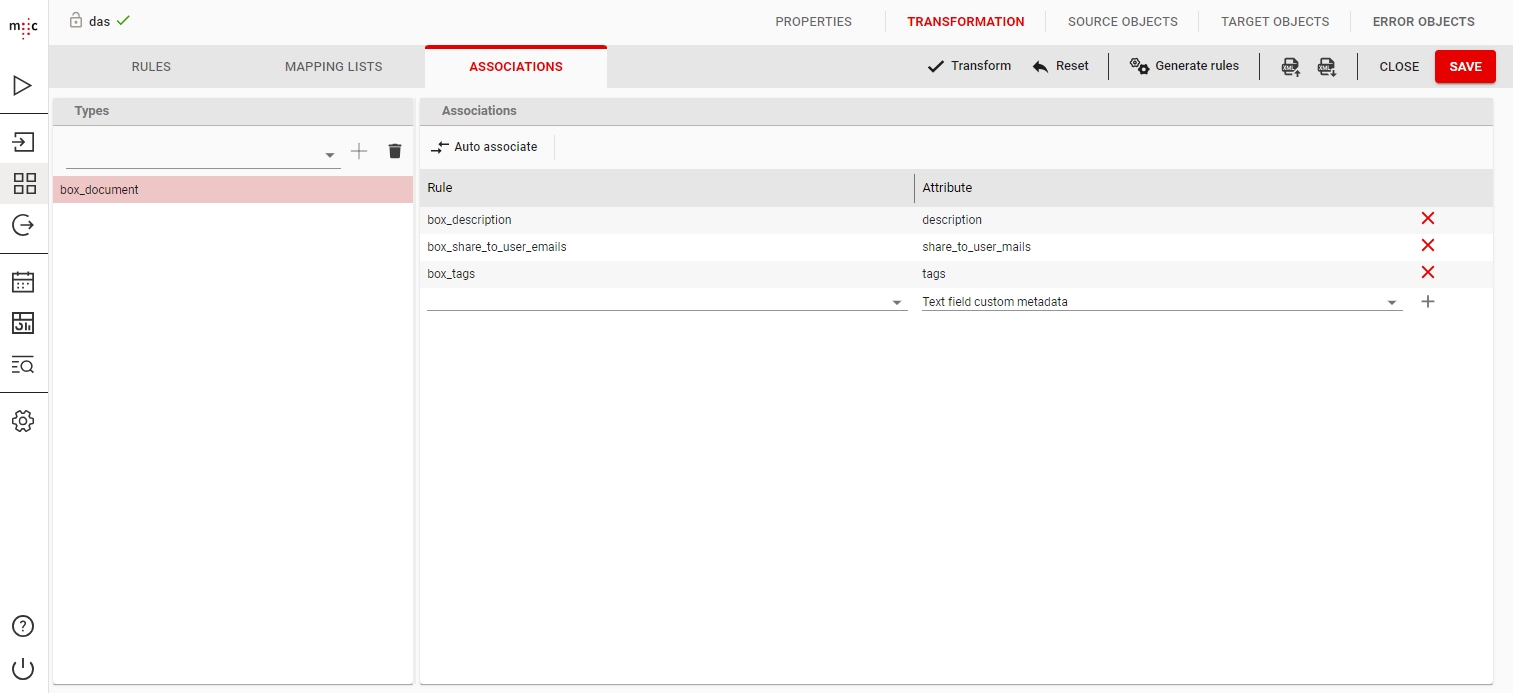
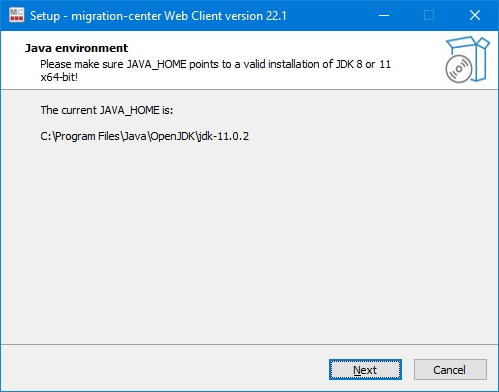
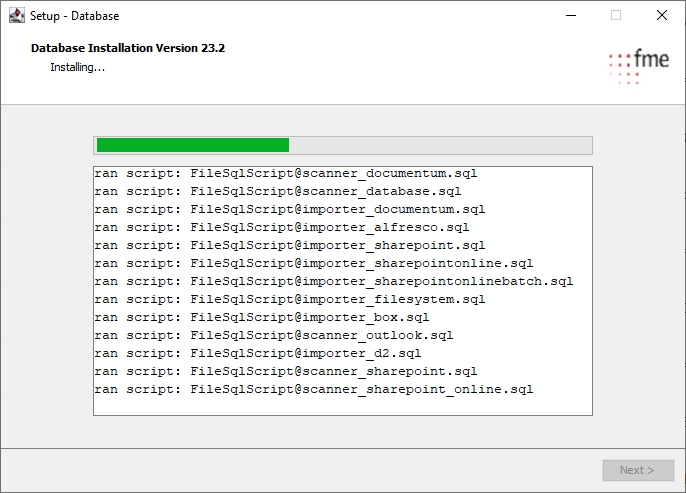
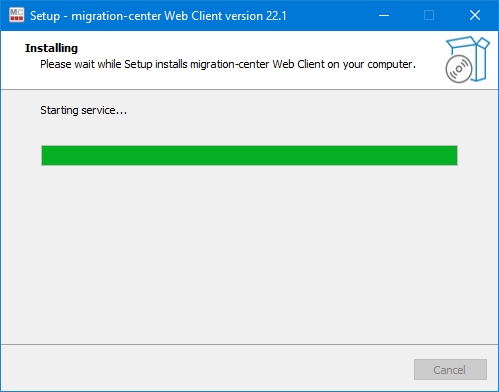


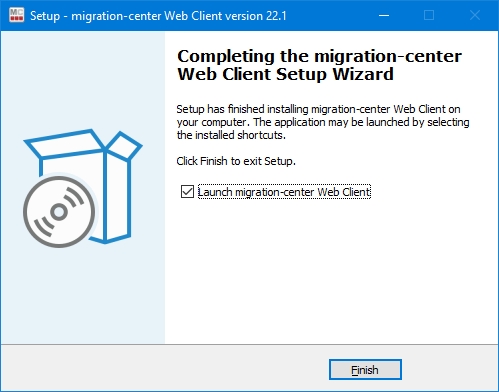
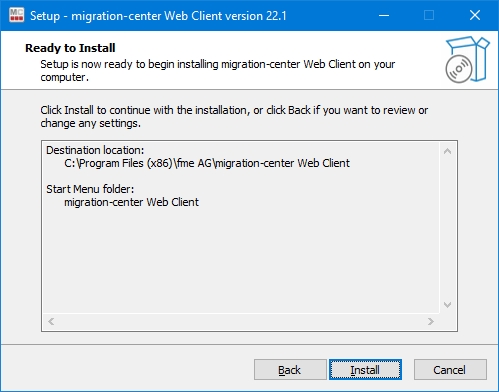
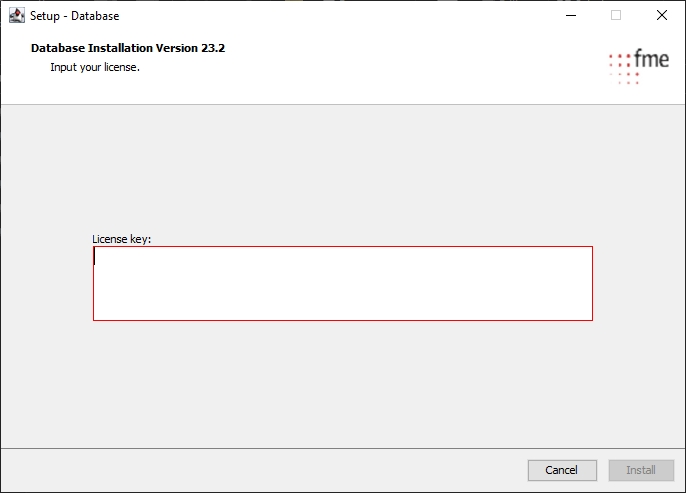

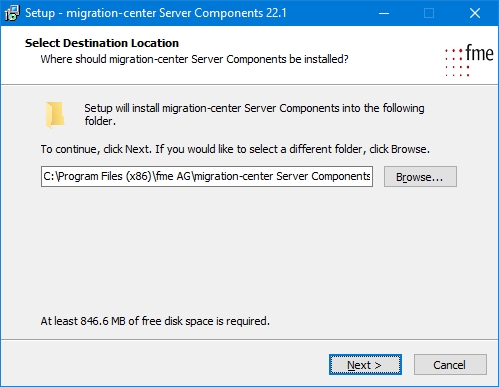
<AppPermissionRequests AllowAppOnlyPolicy="true">
<AppPermissionRequest Scope="http://sharepoint/content/tenant" Right="FullControl" />
<AppPermissionRequest Scope="http://sharepoint/taxonomy" Right="Read" />
</AppPermissionRequests><AppPermissionRequests AllowAppOnlyPolicy="true">
<AppPermissionRequest Scope="http://sharepoint/content/sitecollection" Right="FullControl" />
<AppPermissionRequest Scope="http://sharepoint/taxonomy" Right="Read" />
</AppPermissionRequests><BeginsWith>
<FieldRef Name='FileDirRef'/>
<Value Type='Text'>mc/Versioning/VersionNumber/Docs</Value>
</BeginsWith><And>
<Or>
<BeginsWith>
<FieldRef Name='FileDirRef'/>
<Value Type='Text'>mc/Versioning/VersionNumber/Docs</Value>
</BeginsWith>
<BeginsWith>
<FieldRef Name='FileDirRef'/>
<Value Type='Text'>mc/docLib/SubFolder</Value>
</BeginsWith>
</Or>
<Leq>
<FieldRef Name='Created' />
<Value IncludeTimeValue='TRUE' Type='DateTime'>2020-12-31T00:00:00Z</Value>
</Leq>
</And>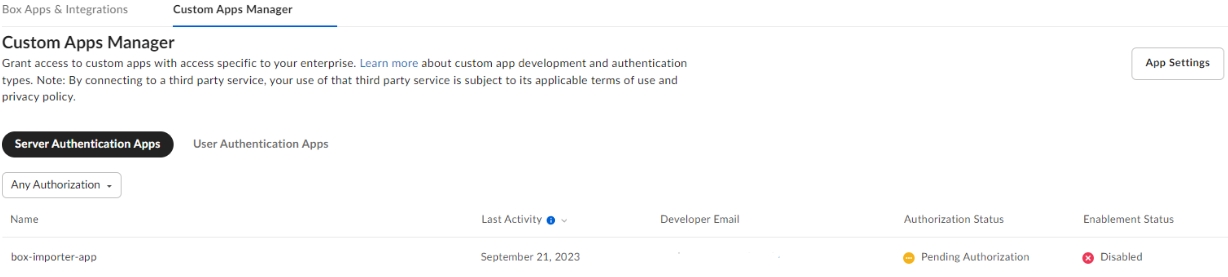
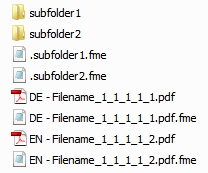
Importing not allowed items in the physical item container is permitted during delta migration (#50978)
RM classifications for physical objects are not removed during delta migration (#50979)
Physical objects properties of type date are not updated during delta migration (#50980)
The les-services for v10.5 or the Content Web Services for v10.5+ must be installed on the Content Server for migration-center to connect to it.
The Classification Webservice must be installed on the Content Server to be able to set classifications to documents or folders.
The Record Management Webservice must be installed on the Content Server to be able to set Record Management Classifications.
To be able to import larger .txt files to OTCS, the WebService configuration file (OPENTEXT\webservices\dotnet\cws\Web.Config) needs to contain the following configuration:
Some importer features require installing of some of the provided patches on the Content Server.
The patches are in the migration-center kit in the following folder: ..\ServerComponents\Jobserver\lib\mc-otcs-importer\cspatches
To deploy the patches, copy the provided files to the folder .\patch on the Content Server and restart it.
This patch extends the OpenText DOCMANSERVICE.Service.DocumentManagement.CreateSimpleFolder method.
The patch allows setting of custom CreateDate, ModifyDate, FileCreateDate and FileModifiyDate for nodes and versions.
To create a new OpenText Importer job specify the respective adapter type in the importer’s
properties window from the list of available adapters “OpenText” must be selected. Once the adapter type has been selected, the Parameters list will be populated with the parameters specific to the selected adapter type, in this case OpenText.
The -Properties window- of an importer can be accessed by double-clicking an importer in the list, by selecting the [Properties] button from the toolbar or from the context menu.
The common adaptor parameters are described in Common Parameters.
The configuration parameters available for the OpenText Content Server Importer are described below:
username* The OpenText Content Server user with “System Administration Rights”
Note:
“System Administration Rights” are required to internally allow “Impersonating” other users as the individual owners of the objects to be imported.
Use either built-in user [email protected] if Content Server is deployed under OpenText “Runtime and Core Services” or user “Admin” which have already “System Administration Rights”. If you have to use another user, set this privilege within the OpenText Content Server User Administration for that user.
This user is also internally used for assigning permissions based on the MC System Rule “ACLs”
password* The user’s password.
authenticationMode* The OpenText Content Server authentication mode.
Valid values are:
CWS for regular Content Server authentication
RCS for authentication of OpenText Runtime and Core Services
RCSCAP for authentication via Common Authentication Protocol over Runtime and Core Services
webserviceURL* The URL of the OpenText Content Web Services. Ex: http://server:port/les-services/services/Authentication http://server:port/cws/Authentication.svc
classificationsWebServiceURL The URL of the Classification WebService. This is necessary when need to set classifications to the imported objects. Ex: http://server:port/les-classifications/services/Classifications http://server:port/Services/Classifications.svc
rmWebserviceURL The URL of the Record Management WebService. This is necessary when need to set records management classifications to the imported objects. Ex: http://server:port/les-recman/services/Classifications
rcsAuthenticationWebserviceURL The URL of the Authentication Service for RCS. It must be set only when RCS or RCSCAP is used. Ex: http://server:port/ot-authws/services/Authentication
physicalObjectsWebserviceUrl The URL of the Physical Objects WebService. This is necessary when need to import physical items. Ex: http://server:port/les-physicalObjects/services/PhysicalObjects
rootFolder* The internal node id of the Content Server root folder where the content of the imported objects will be stored. Note: The individual location for each object to be imported below this “rootfolder” is defined by MC System Rule “ParentFolder”
autoCreateFolders Check this if you want to automatically create missing folders while importing objects to OpenText Content Server.
inheritFolderCategories When enabled, the imported folders will inherit the categories from the parent folder. When the folders are created by autoCreateFolders functionality, the auto created folders will also inherit the categories from the parent folder. When not enabled the categories will not be inherited by the created folders.
inheritDocumentCategories When enabled, the categories from the parent folder will be assigned to the imported documents. The following rules applies:
The importer will not inherit the categories that have been assigned to the documents in the migration-center.
The folder categories (other than the ones defined for documents in migration-center) will be inherited by the imported documents.
excludeFolderCategories The list of folder categories (list the names of the categories) that will not be inherited from the parent folder by the documents and folders when “inheritFolderCategories” or “inheritDocumentCategories” parameter is activated. If the parameter is left empty, all folder categories will be inherited from the parent folder.
inheritFolderPermissions When enabled, the folder permissions together with the permissions set in the “ACLS” rule will applied to the documents. If set to false, only the permissions set in the “ACLs” rule will be set to the documents.
classRootFolder The internal node id of the Classification root folder. This is required when setting classifications.
extractMetadataFromEmail When checked, the related metadata of email type object will be extracted from the msg file. If not, the email metadata will be mapped from source attributes.
extractAttachmentsFromEmail When checked, the email attachments will be extracted as XReference into the content server. The attachment will be created as distinct objects into the same place with the email.
crossRefCode The value of parameter must match set in the Content Server Configuration. (Records Management -> Records Management Administration -> System Settings -> RM Settings -> Email Cross-Reference). It becomes mandatory if extractAttachmentsFromEmail is checked.
checkContentIntegrity When checked the content integrity will be checked after the import based on the checksum calculated during scan.
hashAlgorithm Specify the hash algorithm that will be used for checking the content integrity. It is mandatory when “checkContentIntegrity” is checked, so it should be set with the same algorithm that was used at scanning phase. Valid values are: MD2, MD5, SHA-1, SHA-224, SHA-256, SHA-384, SHA-512
hashEncoding Specify the hash encoding that will be used for checking the content integrity. It is mandatory when “checkContentIntegrity” is checked, so it should be set with the same encoding that was used at scanning phase. Valid values are: HEX, Base32, Base64
moveDocumentsToCD When checked, the documents that are children of compound documents are moved the folder where they have been initially imported to the compound document. When not checked, the child document remains in the original location but a shortcut pointing to the compound document is created.
numberOfThreads The number of threads that will be used for importing the documents. Maximum allowed is 20. Note: Due to their hierarchical structure the Folders will be created using a single thread.
loggingLevel* See .
Parameters marked with an asterisk (*) are mandatory.
The OpenText importer can import different object types. This is specified by migset type i.e.<source type>ToOpenText(document) and the value set in the target_type system rule.
Below you can find details on each of the types.
There are two ways to create folders in the OpenText repository with the importer:
On the fly when importing documents When creating a new migration set choose the “<source type>ToOpenText(document)“ type – this will create migration set containing documents targeted at OpenText. Use the “autoCreateFolders” parameter from the OpenText Importer configuration to generate the folder structure based on values extract in the system rule “ParentFolder”. No categories, classification or permissions can be set on the created folders.
Using a dedicated migration set for folders When creating a new migration set choose the “<source type>ToOpenText(container)“ type – this will create a migration set containing folders targeted at OpenText.
Now only the scanner runs containing folder objects will be displayed on the |Filescan Selection| tab. Note that the number of objects contained in the displayed scanner runs now indicates folders and not documents, which is why the number on display (folders) can be different from the total number of objects processed by the scan (if it contains other types of objects besides folders). When creating transformation rules for the migration set, keep in mind that folder-only migration sets have folder-specific attributes to work with, in this case attributes specifically targeted at OpenText folder objects. You can set permissions, categories and classifications to the imported folders.
When importing folder migration set, in case an existing folder structure is already in place an error will be thrown for the folder objects that already exist. It is not possible to avoid this behavior unless you skip them manually by removing them from the migset or putting them in an invalid state for import.
OpenText importer supports importing project objects that were scanned from an OpenText source environment. After scanning Project objects these objects will be seen as containers with the Type "Project" in migration center. The functionality of this feature is similar to the importing of Folders using a dedicated migration set. When creating a new migration set choose the “<source type>ToOpenText(folder)“ type – this will create a migration set containing folders or projects targeted at OpenText. When selecting a scan run only scan runs containing folders and projects will be available. The scan run containing the objects of the Type "Project" needs to be selected. Project specific metadata can be set using the migration set transformation rules.
OpenText importer allows importing documents from any supported source system to OpenText. For that a migset of type “<Source>toOpenTextDocument” has to be created.
Importing documents with multiple versions is supported by OpenText importer. The structure of the versions tree is generated by the scanners of the systems that support this feature and provide means to extract it. Although the version tree is immutable (i.e. the ordering of the objects relative to their antecedents cannot be changed) the type of the versions (linear, minor or major) can be set in the system attribute “VersionControl” (see next sections for more detailed)
The Content Validation functionality is based on checksums computed for the document’s contents during scan (by the Scanner itself) and after import (by the Importer). The two checksums are then compared - for any given piece of content its checksums from before and after the migration should be identical.
If the two checksums differ in any way, this is an indication that the content has been corrupted/modified during/after migration. Modifications can happen on purpose or simply by user or environment error. Actual data corruption rarely happens and is usually due to software and/or hardware errors on the systems involved during content transfer or storage.
Validating content is always performed after the content has been imported to the target repository, thus adding another step to the migration process. Accordingly, using this feature may significantly increase import time due to having to read back every piece of content for every document and compute its checksum in order to compare it against the initial checksum computer during scan.
This feature is controlled through the checkContentIntegrity parameter in the OpenText Importer (disabled by default).
This current version of the importer allows importing virtual documents scanned from Documentum as compound document in OpenText. For creating a compound document, the first value of the system attribute “target_type” must be “opentext_compound”. Setting the categories and classifications to the compound documents are supported as they are supported for normal documents. The children of the VD will be imported inside the compound documents in a “box-in-box” manner, similar to the way VDs, children, content, and VDs in VDs are represented in Documentum Webtop.
Importing multiple versions of compound documents is not supported. Therefore, the option for scanning only the last version of the virtual documents from Documentum should be activated. For more details please check the Documentum Scanner user guide.
Importing virtual documents as compound documents is done by OpentText Importer in two steps:
Import all virtual documents as empty CD and all non-virtual documents as normal documents. They are all imported within the folder specified in the "ParentFolder" attribute.
Add the virtual documents children to the compound documents based on the VDRelation relations scanned from Documentum in the following way:
if the child is linked in the folder where it was imported in the step 1 and the importer parameter “moveDocumentsToCD” is checked, then the child document is moved to the compound document. If “moveDocumentsToCD” is not checked then a shortcut to the child is added inside the compound document.
if the child is already linked in a compound document then a shortcut is created in the current compound document (the case when a document is child of a multiple VDs)
If the virtual documents being imported as compound documents have content, the content is imported as the first child of the compound document having the same name as the compound document itself.
OpenText importer allows importing emails scanned as MSG files from Outlook, Exchange or from other supported systems. In order to be imported as emails, the objects in migration center need to be associated with the target type “opentext_email”.
If the importer parameter “extractAttachmentsFromEmail” is checked the importer will extract the email attachments and import them as cross references for the imported email. In this case the parameter “crossRefCode” should be set with the value of Email Cross-Reference in the RM settings (Records Management -> Records Management Administration -> System Settings -> RM Settings -> Email Cross-Reference) .
For the case when MSG files are scanned from other source system than Outlook or Exchange, the importer allows extracting the email properties (subject, from, to, cc, body, etc) from the email file. This is done during the import.
Starting with version 3.7 the importer allows users to import the scanned documents and folders as Physical Items. All predefined types of physical items (Non Container, Container and Box) are supported. For importing physical objects, the user needs to configure the webservice URL in the “physicalObjectsWebserviceURL”.
Physical Items can be imported with migsets having the appropriate processing type: <SourceType>toOpentext(physicalObj). Physical objects migration sets have a predefined set of rules for system attributes listed under - Rules for system attributes- in the -Transformation rules- window. The system attributes have a special meaning for the importer, so they have to be set with valid values as it is described below.
Attribute Name Multivalue: No Mandatory: No Description: Responsible for assigning an existing area code to the physical item.
Area Multivalue: No Mandatory: No Description: Responsible for assigning an existing area code to the physical item.
Client Multivalue: No Mandatory: No Description: The username to be set as Client to the physical item.
Facility Multivalue: No Mandatory: No Description: Responsible for assigning a valid facility code (that allow users to track boxes that are sent to off-site storage facilities) to the physical item.
HomeLocation Multivalue: No Mandatory: Yes Description: Responsible for assigning a value to attribute 'HomeLocation'. This value can be from location table or a new value specified by user.
Keywords Multivalue: Yes Mandatory: No Description: Responsible for assigning values to target object's 'Keywords' attribute.
Locator Multivalue: No Mandatory: No Description: Responsible for assigning a valid Locator name to the physical item. The Locator should be predefined in Content Server
LocatorType Multivalue: No Mandatory: No Description: Responsible for assigning an existing locator type code from Locator Type Table to the physical item.
Name Multivalue: No Mandatory: Yes Description: Responsible for assigning the Name of the physical item.
OffsiteStorageID Multivalue: No Mandatory: No Description: Responsible for assigning a valid value to 'Offsite Storage ID' attribute.
ParentFolder Multivalue: No Mandatory: Yes Description: Responsible for holding the folder path where the physical item will be imported.
PhysicalBoxPath Multivalue: No Mandatory: No Description: Responsible for holding the path to the Physical Box where the item will be assigned. If it’s not set, the physical object is imported to the folder specified in the “ParentFolder” but it is not assigned to any box.
PhysicalItemType Multivalue: No Mandatory: Yes Description: This attribute specifies the Physical Item Type for physical object. The value should be already defined in Content Server.
ReferenceRate
Multivalue: No
Mandatory: No
Description: Responsible for assigning a valid reference rate code to the target type. The value should be already defined in Reference Rate table.
TemporaryID
Multivalue: No
Mandatory: No
Description: Responsible for assigning a valid value to 'TemporaryID' attribute.
UniqueId
Multivalue: No
Mandatory: No
Description: Responsible for assigning a unique value to 'Unique ID' attribute. This value should be unique in entire Opentext Content Server.
Until version 3.12 of migration-center assigning physical items into physical box items was done by setting the ParentFolder system rule to point to the box item. This would import the physical item in the parent folder of the box item and assign it to the box item.
Starting from version 3.13 a new parameter was added, PhysicalBoxPath, for specifying which box item the object should be assigned to. This allows setting the ParentFolder to any other location, in order to better replicate the OTCS functionality.
The first value of the target type should be set with a valid Physical Object Type that is defined in the section Manage/Object types…. The accepted values should start with one of the following value: “opentext_physical_item”, “opentext_physical_box”, “opentext_physical_container”. For distinguish between different Item type you can create new types like: “opentext_physical_item_notebook”, “opentext_physical_container_records”. The provided object types can be extended with the custom physical properties that are defined in the Content Server for every Physical Item Type (Physical Properties).
Starting with the second value of “target_type” rule the user is allowed to optionally set one or multiple categories and records management classifications. See the dedicated chapters for more details regarding these features.
Starting with version 3.7 the Records Management Classifications are not handled anymore as system rules, but they are handled internally as a dedicated and predefined object type: “opentext_rm_classification”.
For assigning the record management classification to the imported objects (Documents, Containers and Physical Items) the “target_type” system rule should have one value (after the first value) equal with: “opentext_rm_classification”. For setting the specific attributes of the classification the association with the predefined type “opentext_rm_classification” and its attributes should be associated.
OpenText importer allows assigning categories to the imported documents and folders. A category is handled internally by migration center client as target object type and therefore the categories has to be defined in the migration-center client as object types (menu Manage/Object types…):
Since multiple categories with the same name can exist in an OpenText repository the category name must be always followed by its internal id. Ex: BankCustomer-44632.
The sets defined in the OpenText categories are supported by migration-center. The set attributes will be defined within the corresponding object type using the pattern <Set Name>#<Attribute Name> . The importer will recognize the attributes containing the separator “#” to be attributes belonging to the named Set and it will import them accordingly.
Only the categories specified in the system rules “target_type” will be assigned to the imported objects:
For setting the category attributes the rules must be associated with the category attributes in the migration set’s |Associations| tab.
Since version 3.2.9 table key lookup attributes are supported in the categories. These attributes should be defined in migration-center in the same way the other attributes for categories are defined. Supported type of table key lookup attributes are Varchar, Number and Date. The only limitation is that Date type attributes should be of type String in the migration-center Object types.
Both folders and documents migration sets have a predefined set of rules for system attributes listed under -Rules for system attributes- in the -Transformation rules- window. The system attributes have a special meaning for the importer, so they have to be set with valid values as it is described in the next sections.
The following list has all provided system attributes available for documents and folders.
ACLs Migset Type: OpenText(container), OpenText(document) Multivalue: Yes Mandatory: No
Classifications Migset Type: OpenText(container), OpenText(document) Multivalue: Yes Mandatory: No
ContentName Migset Type: OpenText(container) Multivalue: No Mandatory: Yes
Impersonate-User Migset Type: OpenText(container), OpenText(document) Multivalue: No Mandatory: No
mc_content_location Migset Type: OpenText(document) Multivalue: No Mandatory: No
Name Migset Type: OpenText(container), OpenText(document) Multivalue: No Mandatory: Yes
ParentFolder Migset Type: OpenText(container), OpenText(document) Multivalue: No Mandatory: Yes
RenditionTypes Migset Type: OpenText(container) Multivalue: Yes Mandatory: No
Shortcuts Migset Type: OpenText(container), OpenText(document) Multivalue: Yes Mandatory: No
target_type Migset Type: OpenText(container), OpenText(document) Multivalue: Yes Mandatory: Yes
VersionControl Migset Type: OpenText(document) Multivalue: No Mandatory: Yes
The system attribute ACLs (Access Control List) is responsible for optionally assigning permissions based on the source data to the target object.
Each value to be assigned consists of three main elements separated by #. The third value for individual permissions itself is separated by |.
<ACLType#RightName#Permission-1|Permission-2|Permission-n>
Sample ACLs value string: ACL#csuser#See|SeeContents
The following table describes all valid values for defining a correct ACLs value:
Element Possible Values: Owner, OwnerGroup, Public, ACL Description: Owner is responsible for setting owner permissions of the Content Server object OwnerGroup is responsible for setting owner group permissions of the Content Server object Public is responsible for setting public permissions of the Content Server object ACL is responsible for setting specific permissions for a user or group of the Content Server object
RightName Possible Values: Content Server User Login Name, Content Server Group Name, -1 Description: Use a valid Content Server User Login Name or Group Name for ACLType, "Owner", "OwnerGroup" and "ACL". Use -1 for ACLType "Public"
Permissions Possible Values: See, SeeContents, Modify, EditAtts, CreateNode, Checkout, DeleteVersions, Delete, EditPerms Description: Use a valid combination of permissions concatenated by |. Note: You must ensure that that given combination of permissions is valid. This means setting only Delete would not be valid for Content Server since for Delete Permission at least See, SeeContents, Modify and DeleteVersions is required too.
Example:
The system attribute Classifications is responsible for optionally assigning one or more Classifications to the target object.
Each value for a Classification to be assigned must be an existing Content Server Classification path, divided with forward slashes (/), located under the node specified in the importer parameter "classRootFolder" (see OpenText Importer parameters).
The system attribute “ContentName” is responsible for assigning the internal target version filename for the source document to be uploaded.
The system attribute ImpersonateUser is responsible for assigning the correct owner of the source object to the imported target object.
Notes: If authenticated via RCS add the appropriate domain to the user.
Since the creation of the object to be imported is done with the context of this assigned user, this user needs at least "Add Items" permissions assigned for the target location defined in MC System Rule 'ParentFolder'
This attribute can be used to import the content of the document from another place than the location where the scanner exported the document. It should be set with a valid file path. If it’s not set the content will be picked up from the original location.
The system attribute Name is responsible for assigning a Name to the target document or folder. If a node with the same name already exists, the object will be skipped and the importer will throw an error.
The system attribute ParentFolder will be set with the full path of the container where the current object will be imported.
Notes: The adaptor internally uses forward slash (/) as the path delimiter. Make sure to consider this in your rules.
If a folder name in the path contains a forward slash (/) that should be escaped with the character sequence: %2F
The system rules RenditionPaths and RenditionTypes can be used for importing renditions that had been exported from the source system.
RenditionTypes is multiple-value rule that will be set with the rendition types that will be imported to the content server (Ex: “pdf”, “png”). If no values are set for this attribute there will be no imported rendition.
RenditionPaths is multiple-value rule that will be used to set the paths where renditions exported from source system are located. If the rendition paths will not be set, the importer will ask the content server to generate the rendition on the file based on the document content.
RenditionTypes and RenditionPaths work in pairs in the following way:
when RenditionTypes has one or more values and the corresponding rendition paths are readable, the renditions are imported
when a RenditionTypes value is missing but a rendition path value is present, renditions are ignored
If a RenditionTypes value is duplicated the first pair of rendition type-rendition path are take in the consideration, the second pair being ignored.
The system attribute Shortcuts is responsible for optionally creating shortcuts to the imported document or folder in the folder specified as value of this attribute. One or more folder paths can be specified. If the specified folder does not exist, it will be created automatically if “autoCreateFolders” is enabled in the importer.
If a shortcut cannot be created when importing a document an appropriate error will be reported by the importer and the document will be skipped.
If a shortcut cannot be created when importing a folder, the folder will be created but its status in migration center will be partially imported.
The first value of this attribute must be the type of object to be imported. For documents migsets the value must be “opentext_document”, for folders migsets the value must be “opentext_folder”.
The next values of this attribute are reserved to the categories that will be assigned to the imported document or folder.
The system attribute VersionControl is used for controlling the creation of versions at Content Server side with the required versioning method (Linear Versioning or Advanced Versioning with Minor or Major Versions).
The valid values are:
“0” - for creating a linear version at Content Server side
“1” - for creating minor version at Content Sever side
“2” - for creating a major version at Content Server side
Objects that have been changed in the source system since the last scan are scanned as update objects. Whether an object in a migration set is an update or not can be seen by checking the value of the Is_update column – if it’s 1, the current object is an update to a previously scanned object (the base object). An update object cannot be imported unless its base object has been imported previously.
Depending on the source systems the object comes from, the method of obtaining the update information will differ but the objects behavior will stay the same once scanned. See the documentation of the scanners in case you need more information about the supported updates and how they are detected.
In order for delta migration to work properly it is essential to not reset the migration sets (objects) after they have been imported.
When updating the documents or versions, the importer may need to delete some documents or versions that where imported previously. This is because of a limitation of the Content Webservice that does not allow updating the content of existing objects. If Records Manager is installed on the Content Server, importing documents updates may not work since the Content Server does not allow deleting documents and versions.
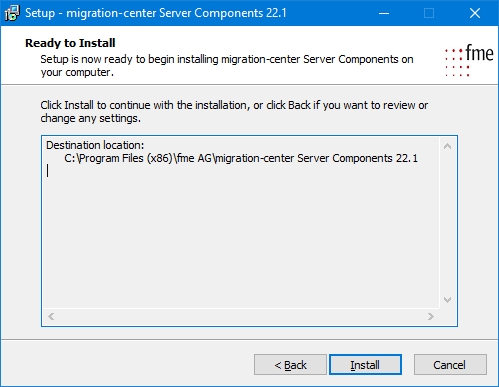
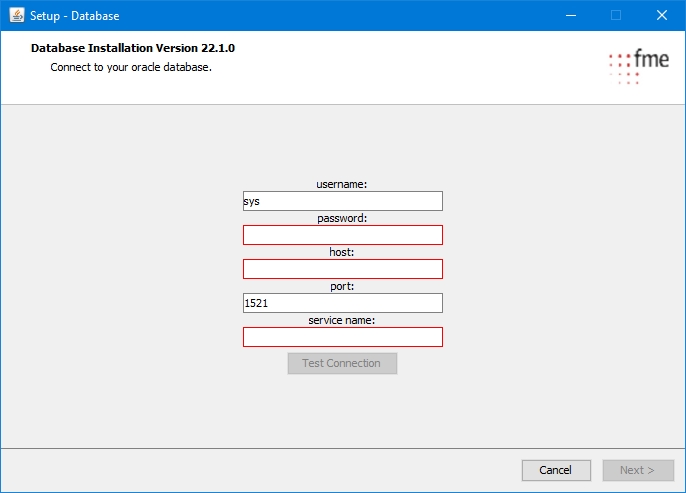
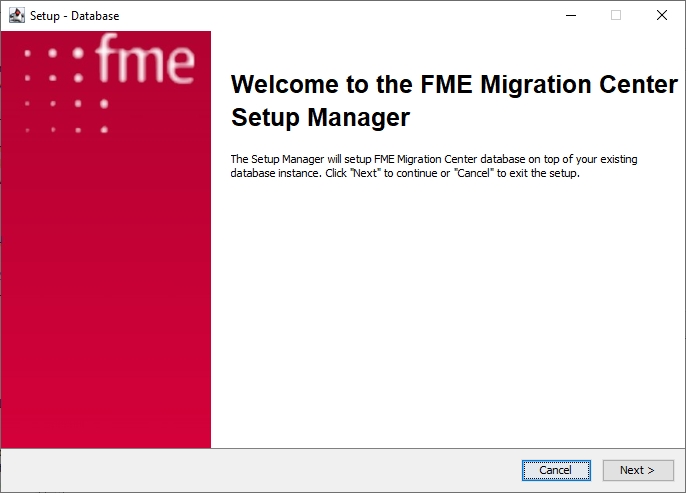
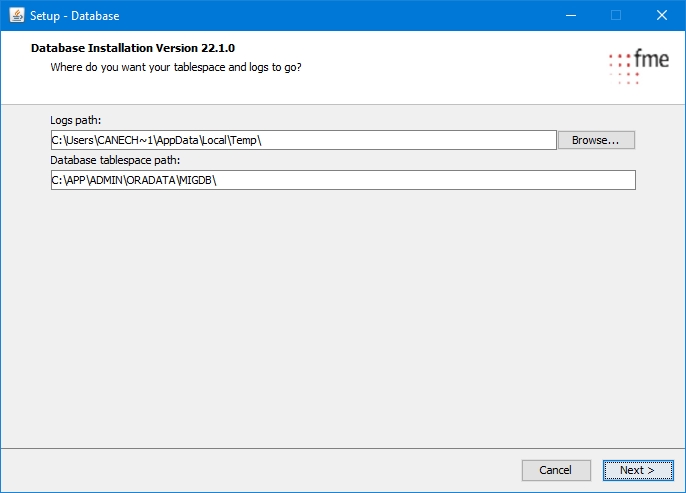
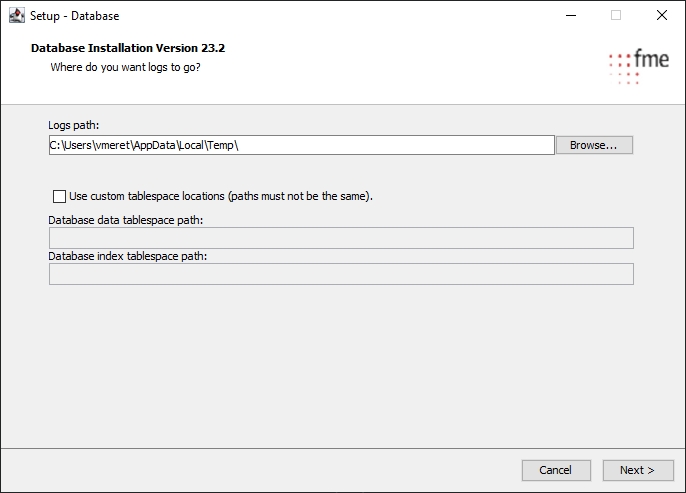

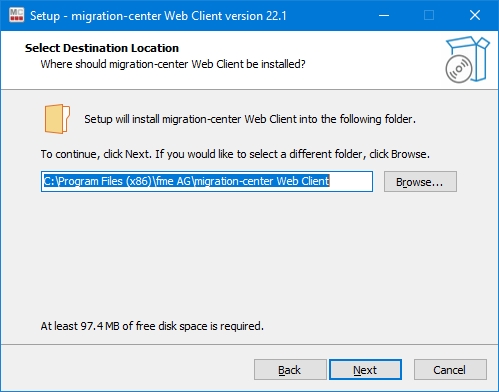
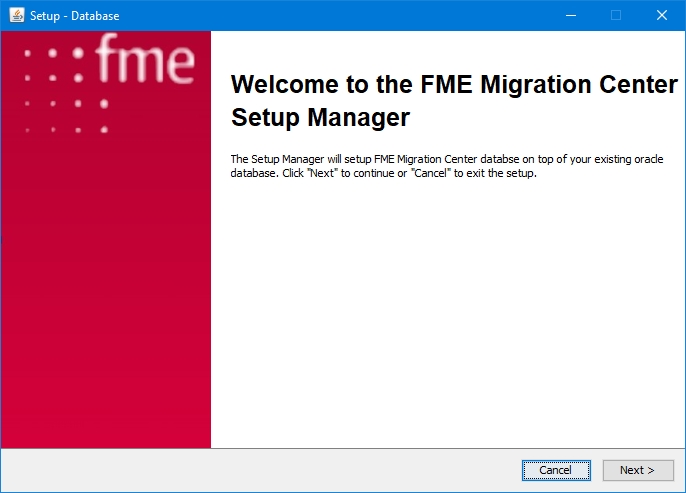
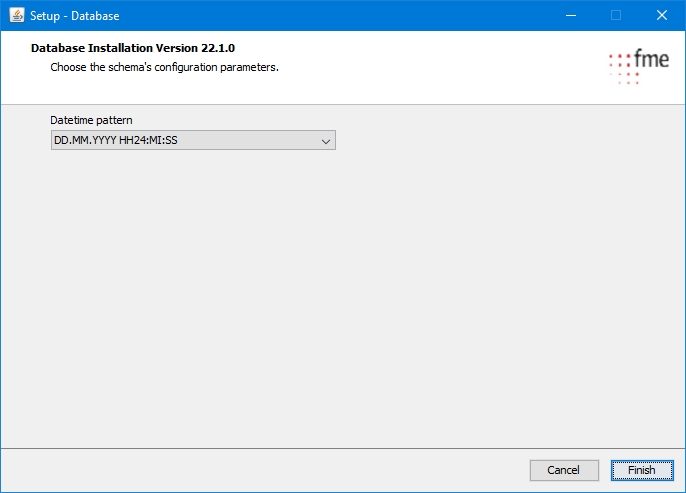
The Documentum Scanner extracts objects such as files, folders, relations, etc. from a source Documentum repository and saves this data to migration-center for further processing. As a change in migration-center 3.2, the Documentum Scanner and Importer, are no longer tied to one another – data scanned with the Documentum Scanner can now be imported by any other importer, including of course the Documentum. Starting with version 3.2.9 objects derived from dm_sysobject are supported.
The Documentum Scanner currently supports Documentum Content Server versions 4i, 5.2.5 to 21.4, including service packs.
For accessing a Documentum repository Documentum Foundation Classes 5.3 or newer is required. Any combinations of DFC versions and Content Server versions supported by EMC Documentum are also supported by migration-center’s Documentum Scanner, but it is recommended to use the DFC version matching the version of the Content Server being scanned. The DFC must be installed and configured on every machine where migration-center Server Components is deployed.
For scanning a Documentum 4i or 5.2.5 source repository, DFC version 5.3 must be used since newer DFC versions do not support accessing older Documentum repositories properly. At the same time, migration-center does not support DFC versions older than 5.3, therefore DFC 5.3 is the only option in this case.
Starting from version 3.9 of migration-center additional configurations need to be made for the Documentum connector to be able to locate Documentum Foundation Classes. This is done by modifying the dfc.conf file, located in the Job Server installation folder.
There are two settings inside the file that by default match the paths of a standard DFC install. One needs to have the path for the config folder of DFC and the other needs the path to the dctm.jar.
See below example:
wrapper.java.classpath.dfcConfig=C:/Documentum/config
wrapper.java.classpath.dfcDctmJar=C:/Program Files/Documentum/dctm.jar
If the DFC version used by the migration-center Jobserver is not compatible with the Java version or the Content Server it is connecting to, errors might be encountered when running a Documentum connector.
When encountering the following error, the first thing to check is the DFC - Java - DCTM compatibility matrixes.
To create a new Documentum Scanner job, specify the respective adapter type in the Scanner Properties window – from the list of available connectors “Documentum” must be selected. Once the adapter type has been selected, the Parameters list will be populated with the parameters specific to the selected adapter type.
The Properties window of a scanner can be accessed by double-clicking a scanner in the list or selecting the Properties button/menu item from the toolbar/context menu.
A detailed description is always displayed at the bottom of the window for the currently selected parameter.
The common adaptor parameters are described in .
The configuration parameters available for the Documentum Scanner are described below:
username*
Username for connecting to the source repository.
This user should have the required permissions and privileges to read access all required objects. Though not mandatory, a user account with super user privileges is recommended.
password*
The user’s password.
Parameters marked with an asterisk (*) are mandatory.
The dqlString parameter holds a DQL query that will be used to retrieve the r_object_id of the objects that will be scanned. The query must select only the r_object_id of current versions. Example:
Using the dqlString parameter overrides the scanFolderPaths, excludeFolderPaths and documentTypes parameters.
Do not use the (ALL) option in this DQL statement (e.g.”select … from dm_document(all)” ) in an attempt to extract all versions of an object. To scan versions, use the exportVersions parameter instead.
To use a DQL longer than 4000 characters, put it in a text file and set the path to the file in this parameter, prefixed by an "@" character. i.e. "@C:\myDQL.txt"
There are some limitations and best practices regarding dqlString parameter:
The query must return only r_object_id and therefore it must start with "select r_object_id" or "select distinct r_object_id"
"order by" clause and "union" is not allowed in the query
The query should return only ids of documents (strings starting with "09..")
The query should return only the current version of the document (check "exportVersions" for exporting all versions)
Specify one or more additional DQL statement to be executed for each document within the scope of the scan. This can be used to access other database tables than the standard dm_document table and extract additional information from there. Any valid DQL statement is accepted, but it must include the “{id}” string as a place holder for the current object’s r_object_id.
If a query returns multiple rows or multiple values for an attribute all values will be added to the corresponding source attribute. In order to prevent wrong DQL configuration the maximum number of values for an extended attribute is limited to 1,000. A warning will be logged when the number of values for a single attribute exceed 1,000.
Example query that will return information from the dmr_content table of each dm_document type object within the scanner’s scope:
When scanning Documentum documents, their folder paths are also scanned, and the folder structure can be automatically re-created by migration-center in the target system. This procedure will not keep any of the metadata attached to the folder objects, such as owners, permissions, specific object types, or any custom attributes. Depending on project requirements, it may be required to do a “folder-only migration” first, e.g. for migrating a complete folder structure including custom folder object types, permissions and other attributes first, and then populate this folder structure with documents afterwards. In order to execute a folder-only migration the following steps should be performed to configure the migration process accordingly:
Scanner: on the scanner’s |Parameters| tab check the exportFolderStructure option. Set scanFolderPaths (mandatory in that case) and excludeFolderPaths (if any, optional) leave the parameter documentTypes empty to scan only the folder structure without the documents; list document types as well if both folders and documents should be scanned; now only folders will be scanned without any documents they may contain. Note: Scanning folders is not possible via the dqlString option in the scanner.
Migration set: When creating a new migration set choose a <source type to target type>(folder) object type. Now only the scanner runs containing folder objects will be displayed on the |Filescan Selection| tab. Note that the number of objects contained in the displayed scanner runs now indicates folders and not documents, which is why the number on display (folders) can be different from the total number of objects processed by the scan (if it contains other types of objects besides folders, such as documents).
Versions (and branches) are supported by the Documentum Scanner, including custom version labels. The exportVersions parameter in the scanner’s configuration parameters determines if all versions (checked) or only current versions of documents (not checked, default setting) are scanned.
It is important to know that a consistency check of the version tree is performed by migration-center before scanning. A version tree containing invalid or missing references will not be exported at all and the operation will be reported as an error in the scanner’s log. It is not possible for migration-center to process or repair such a version structure because of the missing references.
For documents with versions, the version label extracted by the scanner from the Documentum attribute r_version_label can be changed by the means of the transformation rules during processing. The version structure (i.e. the ordering of the objects relative to their antecedents) cannot be changed using migration-center.
Scanning large version trees
Processing a version tree is based on a recursive algorithm, which implies that all objects which are part of a version tree must be loaded into memory together. This can be problematic with very large version trees (several thousand versions). By default, the Documentum Scanner can load and process version trees up to around 2,000 versions in size. For even larger version trees to be processed the Java heap size for the Job Server must be increased according to the following steps:
Stop the Job Server
Open the wrapper.conf file located in the migration-center Server Components installation folder (by default it is %programfiles%\fme AG\migration-center Server Components <Version>)
Search for
# Java Additional Parameters
# Increase the value of this parameter it if your documentum scanner needs
# to scan a large number of versions per document. Alocate 256k for every
# 1000 versions/document.
The number of latest versions to be scanned can be limited through the exportLatestVersions parameter. Valid values are positive integers >=1. If the number set is larger than the total number of versions for an object, all versions will be scanned.
Values <=0 will have no effect and cause all versions to be scanned.
This option does not work with branches due to the inconsistencies it would introduce. If version structures with branches are found, this parameter will be ignored.
This option does not work with Virtual Documents due to the inconsistencies it would introduce If both exportLatestVersions and exportVirtualDocs are checked in the scanner, an error will be raised forcing the user to take action and decide on using only one or the other feature, but not both.
The scanner exports the primary content of all documents unless the skipContent or exportStoragePath are checked. The locations where the content was exported can be seen in the column Content location and in the source attribute mc_content_location,If a primary content has multiple pages, the column Content location stores the location where the page 0 was exported since mc_content_location stores all locations of all pages.
If skipContent is checked the primary content and the renditions of the document will not be exported. So, the documents will be exported as content less objects.
If exportStoragePath is checked the primary content and the renditions of the document will not be exported to staging area. Instead the content related attributes (content_location, mc_content_location, dctm_obj_rendition) will be set with the full path of the content in the repository file store.
Renditions are supported by the Documentum Scanner. The “exportRenditions” parameter in the scanner’s configuration parameters determines if renditions are scanned. Renditions of an object will not count as individual objects, since they are different instances of content belonging to one and the same object. The scanner extracts rendition’s contents, format, page modifiers page numberand storage location used. This information is exposed to the user via migration-center source objects attributes starting with dctm_obj_rendition* in any documents migration set that has Documentum or FirstDoc as source system.
Documentum 4i does not have the page modifier attribute/feature for renditions, therefore such information will not be extracted from a Documentum 4i repository.
The scanner collects the full folder paths where the document is linked and add them to the following source attributes:
dctm_obj_link - stores the first path of every folder where the document is linked. If the folder itself is linked on multiple other folders, only the first path of the folder is extracted.
dctm_obj_al_links - stores all paths (r_folder_path) of all folders where the document is linked.
Relations are supported by the Documentum Scanner. The option named exportRelations in the scanner’s configuration determines if they are scanned and added to the migration-center database. Information about them cannot be altered using transformation. Migration-center will manage relations automatically if the appropriate options in the scanner and importer have been selected. They will always be connected to their parent object and can be viewed in migration-center by right-clicking on an object in any view of a migration set and selecting <View Relations> from the context menu. The resulting dialog will list all relations of the selected object with their associated metadata, such as relation name, child object, etc.
IMPORTANT: The children of the scanned relations are not scanned automatically if they are not in the scope of the scanner. The user must ensure the documents and folders that are children in the scanned relations are included in the scope of the scanner (they are linked under the scanned path or they are returned by dqlString).
The mapRelationNames parameter is used to change the name of a dm_relation object between a source and a target system. Once a relation has been scanned its name cannot be changed using transformation rules.
For the feature to work a text file named relation_config.properties must be created in the migration-center Server Components installation folder (...\migration-center Server Components)
Its contents must be relation name mappings such as:
As an alternative to scanning relations as they are in Documentum, the scanner offers the possibility to scan the child related documents as renditions of the parent document. For that, the parameter “exportRelationsAsRendtions” should be checked. This requires “scanRelations” to be checked as well. You can filter the relations that will be scanned as renditions by setting the relation names in the parameter “relationsAsRenditionNames”. If this is not set, all relations to documents will be processed as renditions.
Documentum Virtual Documents are supported by the Documentum Importer. The option named exportVirtualDocs in the configuration of the scanner determines if virtual documents are scanned and exported to migration-center.
There is a second parameter related to virtual documents, named maintainVirtualDocsIntegrity. This option will allow the scanner to include children of VDs which may be outside the scope of the scanner (paths to scan or dqlString) in order to maintain the integrity of the VD. If this parameter is disabled, any children in the VD that are out of scope (they are not linked under the scanned path or they are not returned by dqlString) will not be scanned and the VD may be incomplete.
The VD binding information (dmr_containment objects) are always scanned and attached to the root object of a VD regardless of the maintainVirtualDocsIntegrity option. In this way it is possible to scan any missing child objects later on and still be able to restore the correct VD structure based on the information stored with the root object.
The exportVDVersions options allows exporting only the latest version of the VD documents. This option applies only to virtual documents since the exportVersions option applies only to normal documents.
The exportVersions option needs to be checked for scanning Virtual Documents (i.e. if the exportVirtualDocuments option is checked) even if the virtual documents themselves do not have multiple versions, otherwise the virtual documents export might produce unexpected results. This is because the VD parents may still reference child objects that are not current versions of those respective objects. This is not an actual product limitation, but rather an issue caused by this particular combination of scanner options and Documentum’s VD features, which rely on information related to versioning.
The Documentum Scanner also supports audit trail entries for documents and folders. To enable scanning audit trails, the scanner parameter exportAuditTrail must be checked; in this case the audit trail entries of all documents and folders within the scope of the scan will be scanned as Documentum(audittrail) type objects, similarly to Documentum(document) or Documentum(folder) type objects.
There are some additional parameters used for fine tuning the selection and type of audit trail entries the scanner should consider:
auditTrailType – is the Documentum audit trail object type. By default, this is dm_audittrail but custom audit trail types (derived from dm_audittrail) are supported as well
auditTrailSelection – is used for narrowing down the selection of audit trail records since the number of audit trails can grow large especially in old systems, but not necessarily all audit trail entries may be relevant for a migration to a new system. This option accepts a DQL conformant WHERE clause as would be used in a SELECT statement. If this returns no results, all audit trail objects of scanned documents and folders will be scanned. Example 1: event_name in ('dm_save', 'dm_checkin') Example 2: event_name = 'dm_checkin' and time_stamp >= DATE('01.01.2012', 'DD.MM.YYYY')
Because there are target systems that don’t allow importing audit trail objects, Documentum scanner allows exporting audit trail objects to PDF renditions of the scanned documents. Exporting audit trails objects as PDF renditions applies only to documents.
The following scanner parameters are used for applying this feature:
exportAuditTrailAsRendition – when checked the audit trail entries are written in a PDF files that are saved as renditions for the documents. This parameter can be checked only when exportAuditTrail is checked and skipContent is not checked. If not checked the audit trail entries are exported as Documentum(audittrail).
auditTrailPerVersionTree – this apply only when exportAuditTrailsAsRendition is checked. When it is checked one PDF is generated for all audit trail entries of all versions of the document. The audit trails entries related to the deleted versions are exported as well. The rendition is assigned to the latest version in the tree. When not checked, one PDF rendition is generated for every version in the tree. In this case the audit trails entries related to the deleted versions are not exported because those versions are not exported by the scanner since they don’t exist anymore in the repository.
Scanning aspects is supported with the latest update of the migration-center Documentum Scanner. Attributes resulting from aspects are scanned automatically for any document or folder type object within scope of the scan.
The notation used by the Documentum Scanner to identify attributes which result from aspects appended to the objects being scanned is the same as used by Documentum, namely <aspect_name>.<aspect_attribute>.
Any number of aspects per document/folder, as well as any number of attributes per aspect are supported.
After a scan has finished, attributes scanned from aspects are available for further processing just like any other source attribute and can be used normally in any transformation rule.
Starting with version 3.2.8 Update 2 of migration-center the possibility of scanning PDF annotations has been added to the Documentum Scanner. When activating “exportAnnotations” the scanner will scan the related “dm_note” objects together with DM_ANNOTATE relations. The “dm_note” objects are scanned as normal objects since the DM_ANNOTATE relations are exported as MC relation having the relation_type = “DctmAnnotationRelation”.
During delta migration, the scanner is able to identify the annotation changes and scan them accordingly.
Scanning the documents and folders related comments is possible and can be activated (default is deactivated) by changing the scanner parameter “exportComments” to true.
The best-known use case for documents and folders comments is within xCP (xCelerated Composition Platform) application, but it can also be used in custom WDK Documentum solutions.
The comment objects will be scanned as MC relation objects and can be seen in the MC client by opening the relations view of a scanned object. They will have the value of RELATION_TYPE as “CommentRelation”. All comment related attributes that have values will be scanned as attributes of these relations.
For performance reason, when a document has more versions, the comment relations will be attached only to the first document version that had comments (since all document versions share the same comments).
During delta migration, the scanner is able to identify comment changes, based on modifications of “i_vstamp” so it will rescan the corresponding document with all its comments (the first version document that had comments – see paragraph above) even if the document did not change.
Objects that have changed in the source system since the last scan are scanned as update objects. Whether an object in a migration set is an update or not can be seen by checking the value of the Is_update column – if it’s 1, the current object is an update to a previously scanned object (the base object). There are some things to consider when working with the update migration feature:
Updated objects are detected based on the r_modify_date and i_vstamp attributes. If one of these attributes has changed, the object itself is considered to have changed and will be scanned and added as an update. Typically any action performed in Documentum changes at least one if not both of these attributes, offering a reliable way to detect whether an object has changed since the last scan or not; on the other hand, objects changed by third party code/applications without touching these attributes might not be detected by migration-center as having changed.
Objects deleted from the source after having been migrated are not detected and will not be deleted in the target system. This is by design (due to the added overhead, complexity and risk involved in deleting customer data).
Updates/changes to primary content, renditions, metadata, VD structures, and relations of objects will be detected and updated accordingly.
The D2 Importer currently supports the following D2 versions: 4.7, 16.5, 16.6, 20.2, 20.4, 21.4, 22.4. For using the importer with a D2 version older than 20.4, some additional configurations are required (see chapter D2 Configuration for older versions).
Since D2 itself is still based on the Documentum platform, D2’s requirements regarding Documentum product also apply to the migration-center D2 Importer – namely Documentum Content Server 6.6 and higher as well as DFC version 6.6 or higher. When migrating between different Documentum and Documentum-based systems, it is recommended to use the DFC version matching the Content Server being accessed. Should different versions of Documentum Content Server be involved in the same migration project at the same time, it is recommended to use the DFC version matching the latest Content Server in use.
The validation against a property page is skipped in the following cases and therefore invalid attribute values are imported successfully:
The property page contains a label field that has a value assistance. Workaround: Remove the value assistance from every label fields in the property page.
The property page contains a combo field that is not linked to a property and "Auto select single value list" is checked. Workaround: Uncheck "Auto select single value list" for combo files that are not linked to a property.
Starting from version 3.9 of migration-center additional configurations need to be made for the Documentum connector to be able to locate Documentum Foundation Classes. This is done by modifying the dfc.conf file, located in the Job Server installation folder.
There are two settings inside the file that by default match the paths of a standard DFC install. One needs to have the path for the config folder of DFC and the other needs the path to the dctm.jar.
Example:
If the DFC version used by the migration-center Jobserver is not compatible with the Java version or the Content Server version it is connecting to, errors might be encountered when running a Documentum connector.
When encountering the following error, the first thing to check is the DFC - Java - DCTM compatibility matrixes.
For using the D2 Importer with a D2 Content Server older than 20.4 some additional steps must be performed:
Ensure the Job Server is stopped
Go to the ...\lib\mc-d2-importer folder
Remove all jar files (either by moving them outside the Job Server folder, or by deleting them)
If your D2 version is 4.7 unzip all files from ...\D2-4.7 \d2-4.7-importer
If your D2 environment has a lockbox configured additional steps need to be performed for the D2 Importer to work properly. The D2 lockbox files must be configured on the machine where the Job Server will perform the import job.
Before running the D2 installer please make sure that Microsoft Visual C++ 2010 Service Pack 1 Redistributable Package MFC Security Update - 32 bit is installed.
Run the D2 installer according to the D2 Installation Guide, using the same java version as on the D2 environment:
select Configure Lockbox
select Lockbox for – Other Application Server
set the install location to …\lib\mc-d2-importer\Lockbox of the Job Server folder location.
set the correct password and passphrase as it was configured on the D2 Server
Note that if a different location is selected for the Lockbox installation the wrapper.conf file must be change to reflect the new location:
wrapper.java.classpath.14=./lib/mc-d2-importer/LockBox/lib/*.jar
wrapper.java.classpath.15=./lib/mc-d2-importer/LockBox
wrapper.java.additional.3=-Dclb.library.path=./lib/mc-d2-importer/LockBox/lib/native/win_vc100_ia32
To create a new D2 Importer job specify the respective adapter type in the New Importer Properties window – from the list of available connectors “D2” must be selected. Once the adapter type has been selected, the Parameters list will be populated with the parameters specific to the selected adapter type, in this case the D2 connector’s parameters.
The Properties window of an importer can be accessed by double-clicking an importer in the list, or selecting the Properties button or entry from the toolbar or context menu.
The common adaptor parameters are described in .
The configuration parameters available for the D2 importer are described below:
username* User name for connecting to the target repository. A user account with superuser privileges must be used to support the full Documentum functionality offered by migration-center.
password* The user’s password.
repository* Name of the target repository. The target repository must be accessible from the machine where the selected Job Server is running.
importObjects
Parameters marked with an asterisk (*) are mandatory.
Many of the new features available through D2 have been implemented in the migration-center D2 connector in addition to the basic functionalities of importing documents and setting attributes. Features such as Autolinking, Autonaming and Security are all available. In addition, more features such as validating attribute values obtained from transformation rules using D2 dictionaries and taxonomies, using D2 templates for setting predefined default values, or applying D2 rules based on a document’s owner rather than the user the import process is configured to run with are provided.
The D2 autonaming feature is fully supported by the D2 Importer. The feature can be toggled on or off through the applyD2Autonaming parameter present in a D2 Importer’s properties.
If the applyD2Autonaming parameter is checked, D2’s autonaming rules will take effect as documents are imported; this also means any value set in Transformation Rules for the object_name attribute will be ignored and overridden by D2’s autonaming rules.
If the applyD2Autonaming parameter is unchecked (which is the default state the parameter is set to), D2’s autonaming rules will not be used. Instead the value set for object_name will be set for the imported documents, as is the case currently when using the standard Documentum Importer
The D2 autolinking feature is fully supported by the D2 Importer. The feature can be toggled on or off through the applyD2Autolinking parameter present in a D2 Importer’s properties.
If the applyD2Autolinking parameter is checked, D2’s autolinking rules will take effect as documents are imported, with the documents being arranged in the folder structure imposed by the rules applicable to the imported document(s).
If the applyD2Autolinking parameter is unchecked (which is the default state the parameter is set to), D2’s autolinking rules will not be used. Instead the dctm_obj_link system rule will be used as the target path for the imported documents, as is the case currently when using the standard Documentum Importer
The D2 Security feature is fully supported by the D2 Importer. The feature can be toggled on or off through the applyD2Security parameter present in a D2 Importer’s properties.
If the applyD2Security parameter is checked, D2’s Security rules will take effect as documents are imported; this also means any value set in Transformation Rules for the acl_name attribute will be ignored and overridden by D2’s Security rules which will set the appropriate ACLs.
If the applyD2Security parameter is unchecked (which is the default state the parameter is set to), D2’s Security rules will not be used. Instead the value set for acl_name will be used to set the ACL for the imported documents, as is the case currently when using the standard Documentum Importer. If neither the acl_name rule nor the applyD2Security parameter has been set, then the documents will fall back to the Content Server’s configuration for setting a default ACL; depending on the Content Server configuration this may or may not be appropriate, therefore please setting permissions explicitly by using either the acl_name rule or enabling the applyD2Security parameter.
The D2 Importer can set D2 Lifecycle states and run the state actions on documents. Lifecycles can be applied on documents by checking the applyD2Lifecycle property in the D2 Importer configuration. The lifecycle to be used can either be specified in the d2_lifecycle_name system rule, or not specified at all. Specifying it should increase performance as the importer does not need to search for it.
If no state was specified in the a_status system rule, the importer will apply the initial state as defined in D2-Config. The importer is able to set states that are only on the first 2 or 3 levels in the lifecycle. The third level is available only if the first state automatically transitions to the second one (see (init) -> Draft states). Note that state entry conditions are not checked upon setting the state.
When applying a lifecycle some of the attributes set in migration-center may get overwritten by the state actions. In order to work around this issue, the reapplyAttrsAfterD2Lifecycle property can be set. Here you can specify which attribute values to be reapplied after setting the lifecycle state.
The throwD2LifecycleErrors parameter can be used to specify whether the objects should be set to Error or Partially Imported when an error occurs during the application of lifecycle actions.
The D2 Importer can use D2 templates to set default values for attributes. The template to be used can be specified through the d2_default_template system rule. If a valid template has been set through the, all attributes configured with a default value in the respective template will get the default value set during import.
It is possible to override the default value even if the d2_default_template system rule has been set to a valid D2 template by creating a transformation rule for the respective attributes. Thus if both a transformation rule and a default value via D2 template apply to a given attribute, the value resulting from the transformation rule will override the default value resulting from the template.
Certain attributes associated with D2 dictionaries or taxonomies can be validated to make sure the value set is among the permissible values defined in the associated D2 dictionary/taxonomy.
D2 creates such an association through a property page. Migration-center can be configured to read a D2 property page, identify attributes associated with dictionaries and taxonomies and validate the values resulting from the transformation rules of the respective attributes against the values defined in the associated dictionary/taxonomy.
One property page can be defined per migration set through the d2_property system rule; the resulting value must be the name of a valid D2 property page.
Failure to validate an attribute value in accordance with its associated dictionary/taxonomy will cause the entire document to fail during import and transition to the Import error status.
The D2 importer allows D2 rules to be applied to objects during import based on the object’s owner, rather than the user running the import process. This makes sense, as the import process would typically be running using the same user all the time, while real-life usage scenarios with D2 would involve different users connecting using their own accounts, based on which D2 rules would then apply. Migration-center can simulate this behavior by passing on the document owner as the user based on which rules should be applied instead of the currently connected user the import process is running with.
The feature can be enabled through the ApplyD2RulesbyOwner parameter in the D2 Importer. In order for the feature to work, a rule for the owner_name attribute must also be defined and reference a valid user. Should the parameter be enabled without an owner having been set, it will have no effect.
In addition to the dedicated D2 features presented in the previous chapter, the D2 Importer also supports basic Documentum features used by D2, such as versions, renditions, virtual documents, audit trails, and so on. These features generally work the same as they do in the migration-center Documentum Importer and should be instantly familiar to users of the Documentum connector.
Versions (including branches) are supported by the D2 Importer, including custom version labels. Version information is generated during scan, be it a Documentum Scanner or other scanners supporting systems where version information can be extracted from. This version information (essentially the Documentum r_version_label) can be changed using the transformation rules prior to import. The version structure (i.e. the ordering of the objects relative to their antecedents) cannot be changed using migration-center.
Renditions are supported by the D2 Importer. Rendition information is typically generated during scan, be it by the Documentum Scanner or other scanners supporting systems where rendition information or other similar features can be extracted. Should rendition information not be obtainable using a particular scanner, or if the respective source system doesn’t have renditions at all, it is still possible to add files as renditions to objects during the transformation process. The renditions of an object can be controlled through the migration-center system attribute called dctm_obj_rendition. The dctm_obj_rendition attribute appears in the “System attributes” area of the Transformation Rules window. If the object contains at least one rendition in addition to the main content, the source attribute dctm_obj_rendition will be available for use in transformation rules. To keep the renditions for an object and migrate them as they are, the system attribute dctm_obj_rendition must be set to contain one single transformation function: GetValue(dctm_obj_rendition[all]). This will reference the path of the files where the corresponding renditions have been exported to; the Importer will pick up the content from this location and add them as renditions to the respective documents.
It is possible to add/remove individual renditions to/from objects by using the provided transformation functions. This can prove useful if renditions generated by third party software need to be appended during migration. These renditions can be saved to files in any location which is accessible to the Job Server where the import will be run from. The paths to these files can be specified as values for the dctm_obj_rendition attribute. A good practice for being able to assign such third party renditions to the respective objects is to name the files with the objects’ id and use the format name as the extension. This way the dctm_obj_rendition attributes’ values can be built easily to match external rendition files to respective D2 documents.
Other properties of renditions are also available to be set by the user through a series of rendition-related system attribute which are available automatically in any migset targeting a Documentum, D2 or FirstDoc system:
dctm_obj_rendition Specify a file on disk (full path) to be used as the content of that particular rendition
dctm_obj_rendition_format Specify a valid Documentum format to be set for the rendition Leave empty to let Documentum decide the format automatically based on the extension of the file specified in dctm_obj_rendition (if the extension is not known to Documentum the rendition’s format will be unknown) Will be ignored if dctm_obj_rendition is not set
dctm_obj_rendition_modifier Specify a page modifier to be set for the rendition. Any string can be set (must conform to Documentum’s page_modifier attribute, as that’s where the value would end up) Leave empty if you don’t want to set any page modifiers for renditions. Will be ignored if dctm_obj_rendition is not set
Relations are supported by D2 Importer. Relations for import to D2 can currently be generated only by the Documentum Scanner, but technically it is possible to customize any scanner to generate relation information that can be processed by the D2 Importer if information similar or close to Documentum relations needs to be extracted from non-Documentum system. The option named exportRelations in the Documentum scanner’s configuration determines if relations are scanned and exported to migration-center.
An option corresponding to the scanners’ must be selected in the importer as well to restore the relations between objects on import; the option is labeled importRelations. The importer can be configured to import objects and relations together or independently of one another. This can be used to migrate only the objects first and attach relations to the imported objects later.
Relations will always be connected to the parent object of the relation, which is why importing a relation will always be attempted when importing its parent object and the importRelations option mentioned above is selected as well. Importing a relation will fail if its child object is not present at the import location. This is not to be considered a fatal error. Since the relation is connected to the parent object, the parent object itself will be imported successfully and marked as “Partially Imported”, indicating it has one or more relations which could not be imported (because the respective child object could not be found). After the child object gets imported, the import for the parent object can be repeated. The already imported parent object will not be touched, but its missing relation(s) will now be created and connected to the child object. Once all relations have been successfully created, the parent object’s status will change from “Partially imported” to “Imported”, indicating a fully migrated object, including all its relations. Should some objects remain in a “Partially imported” state because the child objects the relation depends on are not migrated for a reason, then the objects can remain in this state and this state can be considered a final state equivalent to “imported” in such a case. The “Partially imported” state does not have any adverse effects on the current or future migrations even if these depend on the respective objects.
Documentum Virtual Documents are supported by the D2 Importer. The option named exportVirtualDocs in the configuration of the scanner determines if virtual documents are scanned and exported to migration-center.
Another option related to virtual documents, named maintainVirtualDocsIntegrity is recommended when scanning VDs. This option will allow the scanner to include children of VDs which may be outside the scope of the scanner (paths to scan or dqlString) in order to maintain the integrity of the VD. If this option is not turned on, the children in the VD that are out of scope (they are not linked under the scanned path or they are not returned by dqlString) will not be scanned and the VD may be incomplete. This option can be enabled/disabled based on whichever setting makes sense for the migration project.
The VD binding information (dmr_containment objects) are always scanned and attached to the root object of a VD regardless of the maintainVirtualDocsIntegrity option. This way it is possible to scan any missing child objects later on and still be able to restore the correct VD structure based on the information stored with the root object.
The D2 Importer also supports migrating audit trails of documents and folders. Audit Trails can be scanned using the Documentum Scanner (see the user guide for more information about scanning audit trails), added to a DctmToD2(audittrail) migset and imported using the D2 Importer.
DctmtoD2(audittrail) migsets are subject to the exact same migration procedure as Documentum documents and folders. DctmtoD2(audittrail) migsets can be imported together with the document and folder migsets they are related to, or on their own at any time after the required document and folder objects have been migrated. It is of course not possible to import any audit trails if the actual object the audit trails belong to hasn’t been migrated.
Importing audit trails is controlled in the D2 Importer via the importAuditTrails parameter (disabled by default).
A typical workflow for migrating audit trails consists of the following main steps:
Scan folders/documents with Documentum Scanner by enabling the “exportAuditTrail” parameter. The scanning process will create tree kind of distinct objects in migration-center: Documentum(folder), Documentum(document) and Documentum(audittrail).
Assign audit trail objects to (a) DctmToD2(audittrail) migset(s) and follow the regular migration-center workflow to promote the objects through transformation rules to a “Validated” state required for the objects to be imported.
Import audit trails objects using D2 Importer by assigning the respective migset(s) to a D2 Importer job with the importAuditTrails parameter enabled (checked)
In order to prepare audit trail for import, first create a migset containing audit trail objects (more than one migset containing audit trails can be created, just like for documents or folders). For a migset to work with audit trails, the type of object must be set “DctmToD2(audittrail)” accordingly. After setting the migset type to “DctmToD2(audittrail)” the | Filescan | tab will display only scans which contain Documentum audit trail objects. Any of these can be added/removed to/from the migration set as usual.
Transformation rules allow setting values for the attributes audit trail entries on import to the target system. Values can be simply carried over unchanged from the source attributes, or they can be transformed using the available transformation functions. All attributes that can be set and associated are defined in the target type “dm_audittrail”.
As with other migration-center objects, audit trail objects have some predefined system attributes:
audited_object_id this should be filled with the corresponding value that comes from source system. No transformation or mapping is necessary because the importer will translate that id into the corresponding id in target repository.
r_object_type must be set to a valid Documentum audit trail object type. This is normally “dm_audittrail” but custom audit trails object types are supported as well.
The following audit trail attributes don’t need to be set through the transformation rules because they are automatically taken from the corresponding audited object in target system: chronicle_id, version_label, object_type.
All other “dm_audittrail” attributes that refer to the audited object (acl_domain, acl_name, audited_obj_vstamp, controlling_app, time_stamp, etc) can be set either to the values that come from the source repository or not set at all, case in which the importer will set the corresponding values by taking them from the audited object located in the target repository.
The source attributes “attribute_list” and “attribute_list_old” may appear as multi-value in migration-center. This is because their values may exceed the maximum size of a value allowed in migration-center (4000 bytes), case in which migration-center handles such an attribute as a multi-value attribute internally. The user doesn’t need to take any action to handle such attributes; the importer knows how to process and set these values correctly in Documentum.
Working with rules and associations is core product functionality and is described in detail in the .
The D2 Importer does also support “Update” or “Delta” migration if the source data is proved through a scanner which also supports the feature, such as the Documentum Scanner or File System Scanner.
Objects that have changed in the source system since the last scan are scanned as update objects. Whether an object in a migration set is an update or not can be seen by checking the value of the Is_update column – if it’s 1, the current object is an update to a previously scanned object (the base object). Some things that need to be considered when working with the update migration feature in combination with the Documentum Scanner will be illustrated next:
An update object cannot be imported unless its base object has been imported previously.
Updated objects are detected based on the r_modify_date and i_vstamp attributes. If one of these attributes has changed, the object is considered to have been updated and will be registered accordingly. By default actions performed in Documentum change at least one if not both of these attributes, offering a reliable way to detect whether an object has changed since the last scan; on the other hand, objects changed by third party code/applications which do not touch these attributes might not be detected by migration-center as having changed.
Objects deleted from the source after having been migrated are not detected and will not be deleted in the target system. This is by design (due to the added overhead, complexity and risk involved in deleting customer data).
Updates/changes to primary content, renditions, metadata, VD structures, and relations of objects will be detected and updated accordingly.
migration-center Client, which is used to set up transformation and validation rules does not connect directly to any source or target system to extract this information. Object type definitions can be exported from the respective systems to a CSV file which in turn can be imported to migration-center.
One tool to easily accomplish this for Documentum object types is dqMan, which is used in the following steps to illustrate the process. dqMan is an administration Tool for EMC Documentum supporting DQL queries and API commands and much more. dqMan can be purchased at . Other comparable administration tools can also be used, provided they can output a compatible CSV file or generate some similar output which can be processed to match the required format using other tools.
Start dqMan and connect to the target DOCUMENTUM repository. dqMan normally starts with the interface for working with DQL selected by default. Press the [DQL] button in the toolbar if not already selected.
In the “DQL Query” -box paste the following command and replace dm_document with the targeted object type: select distinct t.attr_name, t.attr_type, '0' as min_length, t.attr_length, t.attr_repeating, a.not_null as mandatory from dm_type t, dmi_dd_attr_info a where t.name=a.type_name and t.attr_name=a.attr_name and t.name='dm_document' enable(row_based); Press the [Run] button.
Click somewhere in the “Results” box. Use {CTRL+A} to select all. Right-click to open the context menu and choose <Export to> <CSV>.
The Content Validation functionality is based on checksums (an MD5 hash) computed for the document’s contents during scan (by the Scanner itself) and after import (by the Importer). The two checksums are then compared - for any given piece of content its checksums from before and after the migration should be identical.
If the two checksums differ in any way, this is an indication that the content has been corrupted/modified during/after migration. Modifications can happen on purpose or simply by user error and can usually be traced back based on the r_modifier and r_modify_date attributes of the affected object. Actual data corruption rarely happens and is usually due to software and/or hardware errors on the systems involved during content transfer or storage.
Validating content is always performed after the content has been imported to the target repository, thus adding another step to the migration process. Accordingly, using this feature may significantly increase import time due to having to read back every piece of content for every document and compute its checksum in order to compare it against the initial checksum computer during scan.
This feature is controlled through the checkContentIntegrity parameter in the D2 Importer (disabled by default).
Note: Currently only documents scanned by Documentum Scanner or Filesystem Scanner can be used in a migration workflow involving Documentum Content Validation. The D2 Importer does support Content Validation when used with the previously mentioned Scanners.
The Documentum Content Validation also supports renditions in addition to a document’s main content. Renditions are processed automatically if found and do not require further configuration by the user.
There is one limitation that applies to renditions though: since the Content Validation functionality is based on a checksum computed initially during scan (before the migration), renditions are supported only if scanned from a Documentum repository using the Documentum Scanner. Currently this is the only scanner aware of calculating the required checksums for renditions; other scanners, even though they may provide metadata pointing to other content files which, may become renditions during import, do not handle the content directly and therefore do not compute the checksum at scan time needed by the Content Validation to be compared against the imported content’s checksum.
Each job run of the importer generates along with its log a rollback script that can be used to remove all the imported data from the target system. This feature can be very useful in the testing phase to clear the resulting items or even in production in case the user wants to correct the imported data and redo the import.
The name of the rollback script is build based on the following formula:
<Importer name>(<run number>)_<script generation date time>_ rollback_script.api
Its location is the same as the logs location:
<Server components installation folder>/logs/DCTM-Importer/
Composed by a series of Documentum API commands that will remove in the proper order the items created in the import process, the script should look similar to the following example:
//Links:
//Virtual Document Components:
//Relations:
//Documents:
destroy,c,090000138001ab99,1
destroy,c,090000138001ab96,1
destroy,c,090000138001ab77,1
destroy,c,090000138001ab94,1
//Folders:
destroy,c,0c0000138001ab5b,1
You can run it with any applications that supports Documentum API scripting this includes the fme dqMan application and the IAPI tool from Documentum.
<system.web>
<httpModules>
<add type="OpenText.Livelink.Service.Core.LogModule" name="LogModule" />
</httpModules>
<httpRuntime maxRequestLength="2097151" executionTimeout="60000"/>
</system.web>Name of the source repository. The source repository must be accessible from the machine where the selected Job Server is running.
scanFolderPaths
Folder paths to be scanned. Paths must always be absolute paths (including the starting “/”, cabinet name, etc.)
Multiple values can be entered by separating them with the “|” character. Not used when using dqlString.
excludeFolderPaths
The list of folder paths to be excluded from the scan.
Multiple values can be entered by separating them with the “|” character.
Not used when using dqlString.
documentTypes
List of documents types to be scanned. Only documents having the types specified here will be scanned. When this parameter is set it also requires scanFolderPaths to be set. If scanFolderPaths is set but documentTypes is empty only the folder structure will be exported.
Multiple values can be entered by separating them with the “|” character.
Not used when using dqlString.
idsFilePath
Path to a file containing a list of IDs to be scanned. The ids in the files can be delimited by: ,(coma), ;(semicolon) or new line. When this parameter is set, the scanFolderPaths, documentTypes and dqlString parameters must be empty.
dqlString
The DQL statement that will be used to retrieve the r_object_id of the objects that will be scanned.
NOTE: do not use the (ALL) option in this DQL statement (e.g.”select … from dm_document(all)” ) To scan versions, use the exportVersions parameter instead (described below). See: Using DQL.
dqlExtendedString
Specify one or more additional DQL statement to be executed for each document within the scope of the scan. See: Using DQL.
exportRenditions
Boolean. Flag indicating if the document renditions will be exported.
exportVersions
Boolean. Flag indicating if the entire document version tree should be exported. If not checked, only current version will be exported. See: Versions.
exportLatestVersions
Specifies the number of latest versions to scan.
exportVirtualDocs
Boolean. Flag indicating if Virtual Documents should be exported. If not checked, virtual documents will be scanned as normal documents, so VD structure will be lost. See: Virtual Documents.
exportVDversions
Boolean. Flag indicating if all versions of virtual documents should be exported. If not checked, only the latest version will be exported.
maintainVirtualDocsIntegrity
Boolean. Flag indicating if virtual document’s children which are out of scope (objects not included in the scan paths or dqlString) should also be exported. If set to false, the children which are out of scope will not be exported but the virtual document’s structure information will be exported (the dmr_containment objects of a VD will be all exported as relations).
exportStoragePath
Boolean. Flag indicating if the content path in the file storage (for documents) will be calculated and exported as metadata (content_location, mc_content_location, dctm_obj_rendition) instead of exporting the content to an external location (specified in the exportLocation parameter)
computeChecksum
When it's checked the checksum of scanned files will be computed. Useful for determining whether files with different names and from different locations have in fact the same content.
Do not enable this option unless necessary, since the performance impact is significant due to the scanner having to read the full content for each and compute the checksum for it.
hashAlgorithm
Specifies the algorithm that will be used to compute the Checksum of the scanned objects.
Possible values are "MD2", "MD5", "SHA-1", "SHA-224", "SHA-256", "SHA-384" and "SHA-512". Default value is MD5.
hashEncoding
Specifies the encoding that will be used to compute the Checksum of the scanned objects.
Possible values are "HEX", "Base32" and "Base64". Default value is HEX.
ignoredAttributesList
List of attribute names ignored by the scanner. Multiple values can be entered by separating them with the “ , ” character. Default values are attributes that are set automatically by a target Documentum system.
scanNullAttributes
Boolean. Flag indicating whether attributes with all null values should be scanned. By default, the option is off in order to reduce clutter in the database.
exportFolderStructure
Boolean. Flag indicating if the folder structure should be exported. If checked, each folder from target will be exported as a migration-center object. See Information on folder migration.
exportAnnotations
Boolean. Flag indicating if the document's annotations will be exported. See: PDF Annotations.
exportComments
Boolean. Flag indicating if the document's comments (dmc_comment) will be exported. This will work only when exportVersions is checked and exportLatestVersions is empty. See: Comments.
exportRelations Boolean. Flag indicating if the relations (dm_relation objects) between the exported objects (folders, documents) must be exported. See: Relations.
exportRelationsAsRenditions Boolen. Flag indicating if the child documents of relation will be exported as renditions of the parent document. If checked, the scanner will only export the child of the valid relations and add the rendition path to the source attribute "dctm_obj_rendition” See: Export relations as renditions.
relationsDqlCondition DQL selecting the relations that will be exported as renditions. If set, only the relations selected by this DQL will be exported. If not set, all relations that have a document or folder as a child, will be exported as renditions. Ex: relation_name in ('relation1','relation2')
mapRelationNames Boolean. Check to change names of scanned relations to user specified names (since relation information cannot be edited using transformation rules).
See: Using mapRelationNames.
skipContent Boolean. Flag indicating if the documents content should be ignored. If activated all documents will be scanned as content less objects.
exportLocation* Folder path. The location where the exported object content should be temporary saved. It can be a local folder on the same machine with the Job Server or a shared folder on the network. This folder must exist prior to launching the scanner. The Jobserver must have write permissions for the folder. This path must be accessible by both scanner and importer so if they are running on different machines, it should be a shared folder.
exportAuditTrail
Boolean. Check to enable scanning existing audit trails for any documents and folders resulting from the other scanner parameters See: Audit Trails.
auditTrailType Specify the Documentum audit trail object type (dm_audittail or custom subtype)
auditTrailSelection DQL with conditions for selecting the audit trail objects. Leave it empty to export all audit trail entries.
Ex: event_name in ('dm_save', 'dm_checkin')
auditTrailIgnoreAttributes List of audit trail attributes that will be ignored by the scanner
exportAuditTrailAsRendition Boolean. Flag indicating if audit trails entries will be exported to PDF renditions. See: Export relations as renditions.
auditTrailPerVersionTree Boolean. Flag indicating if one PDF audit trail rendition is generated per entire version tree. See: Export relations as renditions.
loggingLevel*
See: Common Parameters.
For better performance, the query should return distinct values for r_object_id
Edit the line wrapper.java.additional.1=-Xss512k, incrementing the default 512k by 256k for every additional 1,000 versions mc should be able to process.
E.g. for enabling processing of version trees containing up to 4,000 versions (2,000+1,000+1,000 versions), set the value to 1024k (512k+256k+256k)
Save the file
Start the Job Server
The D2 Importer does not validate values for Editable ComboBox if they are not in the dictionary due to D2 API limitation (#49115)
If your D2 version is greater then 4.7 but less or equal with 20.2 unzip all files from ...\D2-20.2 \d2-20.2-importer into the folder...\lib\mc-d2-importer folder
Start the Job Server service again
restart the Job Server
importRelations Determines whether to import relations between objects. In this case a relation means both dm_relations and dmr_containment objects. Hint: Depending on project requirements and possibilities, it can make sense to import folders and documents first, and add relations between these objects in a second migration step. For such a two-step approach the importer can be configured accordingly using the importObjects and importRelations parameters. It is possible to select both options at the same time as well and import everything in a single step is the migration data is organized suitably. It doesn’t make sense, however, to deselect both options.
importAuditTrails Determines whether Documentum(audit trail) migsets are imported or not. If the setting is false, any Documentum(audit trail) migsets added to the Importer will be ignored (but can be imported later, after enabling this option)
importLocation The path inside the target repository where objects are to be imported. It must be a valid Documentum path. This path will be appended in front of each dctm_obj_link (for documents) and r_folder_path (for folders) before linking objects if both the importLocation parameter and the dctm_obj_link/r_folder_path attribute values are set. If the attributes mentioned previously already contain a full path, the importLocation parameter does not need to be filled.
autoCreateFolders Flag indicating if the folder paths defined in "dctm_obj_link" attribute should be automatically created using the default folder type.
defaultFolderType The Documentum folder type name used when automatically creating the missing object links. If left empty, dm_folder will be used as default type.
applyD2Autonaming Enable or disable D2’s autonaming rules on import. See Autonaming for more details.
applyD2Autolinking Enable or disable D2’s autolinking rules on import. See Autolinking for more details.
applyD2Security Enable or disable D2’s Security rules on import. See Security for more details.
applyD2RulesByOwner Apply D2 rules based on the current document’s owner, rather than the user configured to run the import process. See Applying D2 rules based on a document’s owner for more details.
throwD2LifecycleErrors Specifies the behaviour when an error occurs during the application of D2 lifecycle actions:
checked - the lifecycle error is reported and the affected object is moved to the error state
unchecked - the error is reported as warning and the object is set as partially imported so next time when it will be imported only the lifecycle actions will be performed.
applyD2Lifecycle Apply the appropriate D2 Lifecycle, or the one specified in the d2_lifecycle_name system rule. See D2 Lifecycle for more details.
reapplyAttrsAfterD2Lifecycle Comma separated list of attributes existing in the transformation rules to be reapplied after attaching lifecycle. This is useful when some attributes are overwritten by the lifecycle state actions.
numberOfThreads The number of threads on which the import should be done. Each document will be imported as a separate session on its own thread. Max. no. is 20
checkContentIntegrity If enabled will check compare the checksums of imported objects with the checksum computed during scan time. Objects with a different checksum will be treated as errors. May significantly increase import time due to having to read back every document and compute its checksum after import.
ignoreRenditionErrors Determines whether errors affecting individual renditions will also trigger an error for the entire object.
checked - renditions with errors will be reported as warnings; the objects and other renditions will be imported normally
unchecked - renditions with errors will cause the entire object, including other renditions to fail on import. The object will be transitioned to the "Import error" status and will not be imported.
loggingLevel*
See Common Parameters.
dctm_obj_rendition_page The page number where the rendition is linked. A repeating attribute to allow multiple values. Used for multiple page content. Leave empty if you don’t want to set any page for renditions. Will be ignored if dctm_obj_rendition is not set
dctm_obj_rendition_storage Specify a valid Documentum filestore where the rendition’s content file will be stored. Leave empty to store the rendition file in Documentum’s default filestore. Will be ignored if dctm_obj_rendition is not set
The extracted object type template is now ready to be imported to migration-center 3.x as described in the Client User Guide.
The job could not be executed! ERROR: java.lang.Exception: java.lang.NullPointerExceptionSelect r_object_id from dm_document where Folder(‘/Finance/Invoices’, descend)select set_client, set_file, set_time from dmr_content WHERE rendition = 0 and any parent_id = ‘{id}’;oldRelationName=newRelation
source_relation=target_relationwrapper.java.classpath.dfcConfig=C:/Documentum/config
wrapper.java.classpath.dfcDctmJar=C:/Program Files/Documentum/dctm.jarThe job could not be executed! ERROR: java.lang.Exception: java.lang.NullPointerExceptionNote: If this version of OpenText Content Server Import Adaptor is used together with together with “Extended ECM for SAP Solutions”, then ‘authenticationmode’ has to be set to “RCS”, since OpenText Content Server together with “Extended ECM for SAP Solutions” is deployed under “Runtime and Core Services”. For details of the individual authentication mechanisms and scenarios provided by OpenText, see appropriate documentation at OpenText KnowledgeCenter.
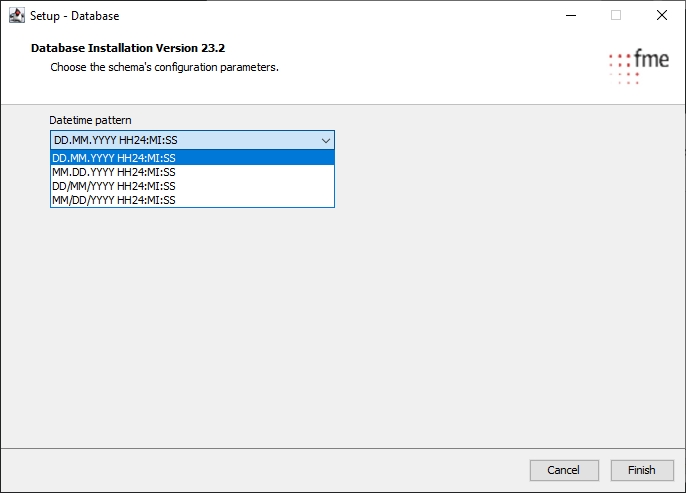
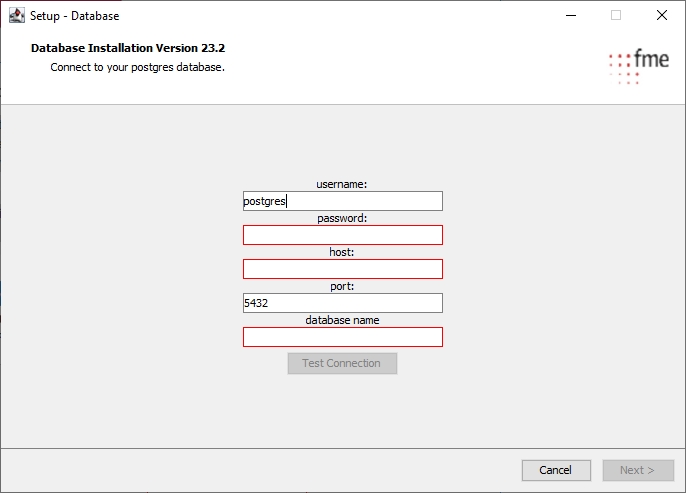
The Cara Importer is one of the target connectors available in migration-center starting with version 3.16. It takes the object processed in migration-center and imports them into Cara platform. We currently support Cara 5.9.
When binding relations by version label, no error is thrown when incorrect or missing version label mapping is provided(#60093)
Importing a base document and one update (as result of delta scan) results in unpredictable behavior(#60118)
An update object can be imported as a new object in Cara if no other object with the same sourceId exists in Cara platform
Validation against nonexistent fields in Cara cannot be made during the validation process
The Cara Importer needs Java 11 to be run. Please make sure you have installed Java 11 and all the environment variables are set correctly.
The user which will do the import must have bulk import rights in Cara.
To create a new Cara Importer job click on the New Importer button and select "Cara" from the adapter type dropdown list. Once the adapter type has been selected, the parameters list will be populated with the Cara parameters.
The Properties window of an importer can be accessed by double-clicking an importer in the list or selecting the Properties button or entry from the toolbar or context menu.
The common adaptor parameters are described in .
The configuration parameters available for the Alfresco importer are described below:
restServiceUrl* The URL of the Cara REST API.
Example: http://migration.cara.cloud:8090/api
username* Cara username. The user must have bulk import rights in Cara.
password* The user's password.
Parameters marked with an asterisk (*) are mandatory.
In case your proxy server is configured to require username and password, then a new configuration should be added in the wrapper.conf file. Replace "x" with the next available number:
wrapper.java.additional.x=-Djdk.http.auth.tunneling.disabledSchemes=""
Cara importer allows importing documents from any supported source system to any supported Cara platform. For that, a migset of type <Source>toCara(document) must be created.
Importing documents with multiple versions is supported by the Cara importer. The structure of the version tree is generated by the scanners of the system that support this feature. The order of versions in Cara is set through the system rules: version_label and version_no.
After you created the desired migration set and you have selected the objects to import from the scan runs, you need to configure the migration set's transformation rules.
A migration set with a target type of "Cara(document)" has the following system attributes.
cara_target_name* The name of the Type being used for the document in the Cara target system. This can differ from the name of the Object Type being used for the Associations in MC. (see target_type) Example: cara_document
is_latest Rule used to indicate if the document is the latest version in the version tree.
object_id* The ID of the document. This sets the source_id attribute in Cara. Should be unique per object.
To set other standard document attributes you need to define the attributes in the migration object types, create the rules in the migration set and associate those in the Associations tab.
Three new rules should be added when import documents with content. Those attributes are content.path, content.format and content.type. You can see those attributes on the predefined cara_document object type.
The content.path attribute specifies the file path to the document's content. There are three possible values that this attribute can have, based on the importer configuration:
If uploadContentUsingRest is not checked and fileTransferProtocol is empty, the name of the document from the staging folder should be set. The specified document must exist before import. Example: 0906ea5b80043861.pdf
If uploadContentUsingRest is not checked and fileTransferProtocol is set to a supported value, the local file path should be set. The transfer will be done by connecting to the specified FTP server and uploading the content on the transfer folder defined using the fileTransferFolder configuration parameter. Example: C:\ExportFolder\3143\0906ea5b80043861.pdf
The content.format attribute specifies the file extension of the document's content. Whether the content.path is set then the content.format must be set, it cannot be empty or null because the content.path depends on the content.format.
The content.type attribute specifies the MIME type of the document's content.
The content.created attribute specifies the content creation.
The checksum validation feature is also possible in migration-center. To use this feature the parameter content.checksum should be filled with the checksum of the document's content.
Cara Importer allows you to import a document with multiple or no renditions. The attributes used are multi-value attribute and their names are rendition.path, rendition.format, rendition.type.
The rendition.path attribute specifies the file path to the document's rendition. There are three possible values that this attribute can have based on the importer configuration.
If uploadContentUsingRest is not checked and fileTransferProtocol is empty, the name of the document rendition from the staging folder should be set. The specified document must exist before import. Example: 0906ea5b80043861.pdf
If uploadContentUsingRest is not checked and fileTransferProtocol is set to a supported value, the local file path should be set. The transfer will be done by connecting to the specified FTP server and uploading the file on the transfer folder, the folder defined using the fileTransferFolder configuration parameter. Example: C:\ExportFolder\3143\0906ea5b80043861.pdf
The rendition.format attribute represents the file extension of the document rendition. Whether the rendition.path is set then the rendition.format must be set, it cannot be empty or null because rendition.path depends on rendition.format.
The rendition.type attribute specifies the document rendition MIME type.
The rendition.identifier attribute can be set to a custom string.
The rendition.created attribute specified the rendition creation date.
Cara Importer allows checksum validation for document renditions. To use this feature the parameter rendition.checksum should be filled with document rendition checksum.
The Cara Importer can also set additional standard or custom attributes on the documents by defining the attributes in a target object type first and associating transformation rules to them. For example the predefined type cara_document can be used to add one standard attribute and one custom attribute.
The custom attributes must be prefixed with "doc." in the target Object Type.
A new standard attribute is_published was added to the cara_document object type and a custom one doc.file_name. The custom attribute name in Cara is file_name, but in migration-center the custom attributes are prefixed with "doc.".
After that, new rules are defined in the migration set Rules tab and are associated with the defined target type attributes.
For more details on transformation rules and associations, please see the .
To set Object Reference Attributes, add them in the Object Type like any regular attribute and associate them in the migset.
You have two options on how to set an object reference field:
using the source_id: the id set through migration-center when importing a object.
using the object_id: the Unique ID generated by CARA.
To use the object_id you need to prefix the ID with the tag TARGET_ID:
Ex: For object_id = 1234 the value set in MC should be TARGET_ID:1234
Any value without the prefix will be assumed to be a source_id.
If the Object Reference attribute contains the ID of an object that is not currently present in Cara, the imported object will be set to Partially Imported and the Object Reference attribute will not be set. A warning message will be shown in the import log.
If the missing referenced objects are then imported you can reimport the original migset to set the Object Reference Attributes to the now existing objects. This will set the documents to Imported.
If the referenced object has Status = Hidden only the object_id can be used. Using the source_id will result in the imported objects being set to partially imported as if the referenced object does not exist.
Cara importer allows importing virtual documents from Documentum source system to any supported Cara platform. The virtual documents are managed in Cara Importer as documents and are automatically transformed into structures based on the virtual document relations. For that, a migset of type DctmToCara(document) must be created.
For more details on how to set the migration set see the section.
A Cara structure or relation can have children that are bonded to a specific version label from the version tree. In this case, a properties file was added to help users make the mapping between the source version label and target version label. The file is named labelsMapping.properties and can be found under '…\migration-center Server Components <version>\lib\mc-generiscara-importer'.
For example, in Documentum the version label for the current version from the version tree is CURRENT, but in Cara, the version label is LATEST. To solve this problem in the properties file the following line will be added.
When scanning a virtual document, that has a child bound to the default version, the relation will not have any version label. So in the properties file we added a default key, DEFAULT_LABEL, to specify the target version label that will be used in Cara. The example, the properties file contains a line with the following setting, which means that all the children that are bound in Documentum source system to the default label will be bind in Cara to the LATEST version label.
Relations are supported by Cara Importer. They can currently be generated only by the Documentum Scanner, but technically it is possible to customize any scanner to compute the necessary information if similar data or close to Documentum relations can be extracted from their source systems.
Relations cannot be altered using transformation rules; migration-center will manage them automatically if the appropriate options in the scanner and importer have been selected. A connection between the parent object and its relations must always exist and can be viewed in migration-center by right-clicking on the object in any view of a migration set and selecting <View Relations> from the context menu. A grid with all the relations of the selected object will be displayed together with their associated metadata, such as relation name, child object, etc.
A parent object will be set as "Partially Imported" if its relation fails to import for any reason (missing child object, incorrect relation mapping etc). This means that the document has been imported but its relation has not. If the problem keeping the relation from being imported is fixed, the import can be ran again and, if successful, the document will be set to "Imported" (both the document and its relations have been imported).
The relation type of a relation that was scanned might have a different name from the relation type in Cara. In order to map the Source relation type to a Cara relation type a relations mapping file can be used. This file needs to be created as a text file but can have any custom extension. The path to this file must be set in the relationsMappingFile parameter of the Cara Importer. For example, a scan run from Documentum might have a relation type named mc_relation1 while in the Cara repository we might have a relation type named cara_relation1. The following line will need to be present in the mapping file in order to import the relation under the correct Cara relation type.
This mapping can be also done for multiple relation types. The example bellow maps two source relation types to the same Cara relation type and a third source relation type mapped to a different Cara relation type.
The child_label attribute of the source relation can be empty or have a value.
If child_label is empty, the binding between parent and child will be done to the version id specified in the attribute child_id.
If child_label is set, the binding between parent and child will be done to the version specified there. The child_id is set with the root version id (ichronicle_id) . The version label present in child_label will be set as it is or it will be mapped based on the Label Mapping File (see ).
Cara importer allows importing audit trails from Documentum source system to any supported Cara platform. For that, a migset of type DctmtoCara(audittrail) must be created. After you created the desired migration set and you have selected the objects to import from the scan runs, you need to configure the migration set's transformation rules.
A migration set of a type DctmToCara(audittrail) has the following system attributes.
attribute_list Attributes list with current values, from Documentum.
attribute_list_old Attributes list with old values, from Documentum.
audited_type* The type name of the audited object. Example: clinical_document
event The audit trail event.
A predefined target type (cara_audit_trail) is provided for setting the rest of the audit trail attributes. If you will import the audit objects as audit trail entries in Cara then only the attributes provided in this type can be set by the importer. If you associate the rules with other attributes the importer may not set them.
If you want to import audit trails as any custom object, the Importer parameter importAuditAsCustomObjects must to be checked. In this case you may set any attribute that is supported by custom type. This feature is provided for backward compatibility so it may be removed in future versions.
For more details on transformation rules and associations, please see the
Custom Properties Change attributes for audit trails can be added, changed or removed through the transformation rules.
properties.added.[attribute_name] Adds a custom attribute with the name [attribute_name]. The value of this rule will be the value of the added attribute.
properties.changed.[attribute_name].old Changes the value of a custom attribute with the name [attribute_name]. The value of this rule will be the old value of the changed attribute.
properties.changed.[attribute_name].new Changes the value of a custom attribute with the name [attribute_name]. The value of this rule will be the new value of the changed attribute.
These attributes need to be added to the object type that will be used for the migration set. You must then associate a transformation rule with the desired attribute for them to take effect.
Cara Importer supports the delta migration feature for documents. The related documents are identified by Cara using the sourceId attribute. When a document is imported using Migration-Center, the document's sourceId is set to the value specified by the object_id system rule.
If you imported a document with a specific sourceId in Cara and you want to update some metadata, then the object which contains the new metadata should have the same sourceId as the imported one. As opposed to most importers, for Cara this document does not need the is_update flag set to 1 for the delta import to work.
Log files generated by the Cara Importer can be found in the Server Components installation folder of the machine where the job was run, e.g. …\fme AG\migration-center Server Components <version>\logs\Cara Importer\<job run id>
You can find the following files in the <job run id> folder:
The import-job.log contains detailed information about the job run and can be used to investigate import issues.

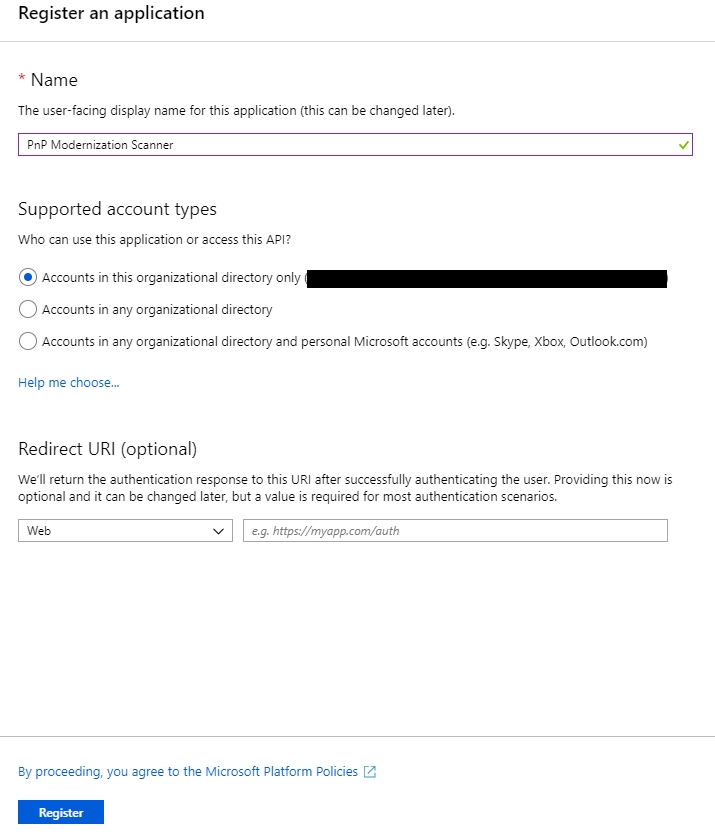

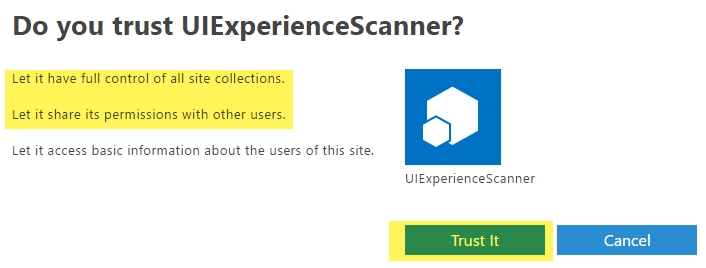
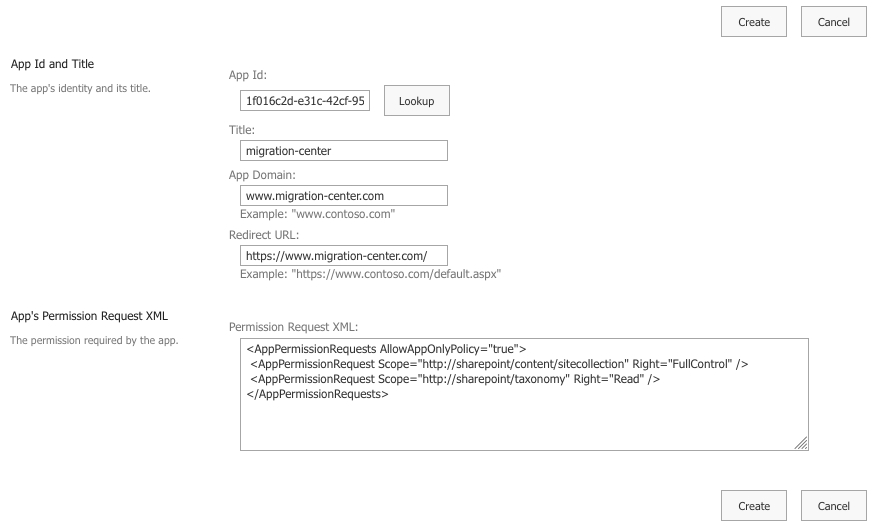
Scanner is the term used in migration-center for an input connector. Using the IBM Domino scanner module to read the data that needs processing into migration-center is the first step in a migration project, thus “scan” also refers to the process used to input data to migration-center.
The IBM Domino Scanner is available since migration-center 3.2.5. It extracts documents, metadata and attachments from IBM Domino/Notes applications and use them as input for migration-center. After the scan the generated data can be processed and migrated to other systems supported by the various migration-center importers.
The currently supported formats of the documents export are Domino XML (dxl), Hypertext Markup Language (html), ARPA Internet Text Message (rfc 822/eml) and HTML from the EML. In addition, the scanner is capable of generating a Portable Document Format (pdf) rendition based on a DXL file of that document.
InfoArchive is an archive system from OpenText which fulfils the international standard OAIS ().
The InfoArchive Importer provides the necessary functionality for creating Submission Information Packages (SIP) compressed into ZIP format that will be ready to be ingested into an InfoArchive repository. A SIP is a data container used to transport data to be archived from the producer (source application) to InfoArchive. It consists of a SIP descriptor containing packaging and archival information about the package and the data to be archived. Based on the metadata configured in migration-center the InfoArchive Importer will create a valid SIP descriptor (eas_sip.xml) and a valid PDI file (eas_pdi.xml) for every generated SIP.
The supported InfoArchive versions are 3.2 – 20.4. Synchronous ingestion is only supported for version 3.2.
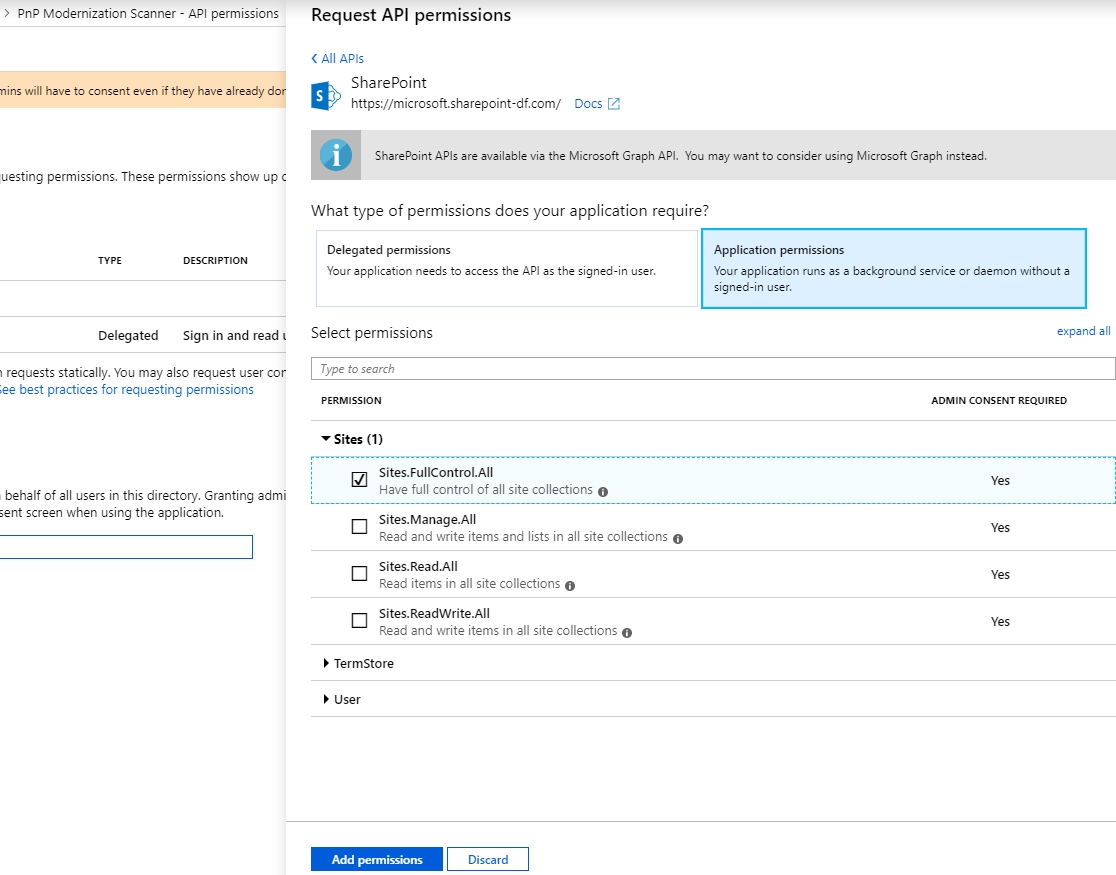
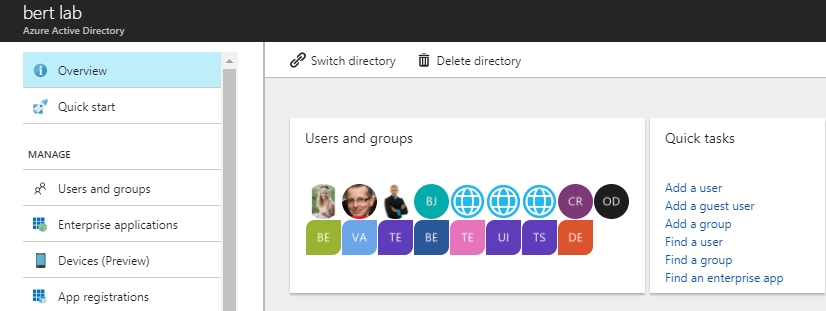
proxyPort The port of the proxy server.
proxyUser The username if required by the proxy server.
proxyPassword The password if required by the proxy server.
uploadContentUsingRest Indicates if the content will be uploaded to the FTP staging folder using the REST API.
importAuditAsCustomObjects Indicates if the audit trails will be imported as audit trail objects or as custom objects.
language The user's local language. If no value is provided the default value ("en") will be used. This parameter is to create a connection with Cara platform.
Example: en
bulkSize* The number of objects that will be imported in a single bulk operation.
fileTransferProtocol
The protocol name for upload content files to Cara. If the content files were uploaded prior to the importer leave the parameter empty.
Supported values are: SFTP
fileTransferHost The hostname where the files are uploaded. If the fileTransferProtocol is empty, this parameter will be ignored.
fileTransferFolder The path of the folder on the file transfer host where the content files are uploaded. This path must exist on the file transfer host and the user must have write access to the folder. If the fileTransferProtocol parameter is empty, this parameter will be ignored.
indexDocuments Indicates if imported documents will be be indexed or not.
asynchronousIndex Indicates if imported documents will be indexed asynchronous or synchronous.
labelsMappingFile The path of the file which contains the mapping between the source version label and the target version label. This file is used just for structures. See Configure Label Mapping File for more details.
relationsMappingFile The path of the file which contains the mapping between source relation type names and target relation type names. This file is used for importing relations. See Configure Relations Mapping File for more details.
loggingLevel* See Common Parameters.
previous_version_id The id of the document previous version. This should be set when you import multiple versions.
root_version_id The id of the root version of the document.
target_type* The name of the Object Type associated in MC for the document. This can differ from the actual Type name in the Cara target system. (see cara_target_name)
Example: cara_document
version_label* The document version labels. This is a multi-value rule because a document can have multiple labels.
version_no* The number of the document version in the version tree.
object_id* The id of the audit trail. The object_id should be unique per object_type.
object_name* The name of the audit trail.
source_object_id* The source id of audited object.
time_stamp* The time when the event has happen.
type_name* The type name of the audit trail. Example: cara_audit_trail
CURRENT=LATESTDEFAULT_LABEL=LATESTmc_relation1=cara_relation1mc_relation1=cara_relation1
mc_relation2=cara_relation1
mc_relation3=cara_relation2The module works as a job that can be run at any time and can even be executed repeatedly. For every run a detailed history and log file are created.
A Scanner is defined by a unique name, a set of configuration parameters and an optional description.
IBM Domino scanners can be created, configured, started and monitored through migration-center client, but the corresponding processes are executed by migration-center Job Server.
The scanner is available in 32 bit and 64 bit versions. Each version has different prerequisites and limitations. Both versions require additional software installed on the migration-center Jobserver.
The 32-bit scanner requires:
Microsoft Windows 32-bit or 64-bit
Java 1.8.x (32-bit)
IBM Notes 9.0.1 or later
Microsoft Visual C++ 2017 Redistributable Package (x86) Can be downloaded from: https://aka.ms/vs/16/release/vc_redist.x86.exe
The 64-bit scanner requires:
Microsoft Windows 64-bit
Java 1.8.x (64-bit)
IBM Domino 9.0.1 or later
Microsoft Visual C++ 2017 Redistributable Package (x64) Can be downloaded from: https://aka.ms/vs/16/release/vc_redist.x64.exe
Because the 64-bit version uses the IBM Domino software the scanner can currently not generate any formats other than DXL and PDF
If you are scanning Domino documents containing Object Linking and Embedding (OLE) objects, Apache OpenOffice 4.1.5 or later must be installed. See section Exporting OLE objects.
For transforming the documents into PDFs an additional PDF Generation Module needs to be installed on a second system which acts as a Rendition Server. See section Generating PDF renditions.
The PDF Generation Module is licensed separately
Regardless of using the 32-bit or 64-bit scanner, the installation steps are the same. All the steps should be performed on the Jobserver machine where the Domino scanner will be run.
Install IBM Notes and/or IBM Domino software
Add the folder path of the software's executables in the PATH environment variable
Install the appropriate Microsoft Visual C++ 2017 Redistributable Package
Install the migration-center Jobserver. See
Locate the mc-domino-scanner_windows-x86-x64_[ver].exe installer in the Domino package
Run the installer using Run As Admin
Set the install location to the .../lib/mc-domino-scanner folder of the Jobserver
Start the Migration Center Jobserver Service
By default the Jobserver is configured to work with the 32 bit version of Domino Scanner.
In order to use the 64 bit version you need to change the following lines having x86 to x64 in the wrapper.conf:
wrapper.java.additional.4=-Djava.library.path=./lib/mc-dctm-adaptor;./lib/mc-outlook-adaptor;./lib/mc-domino-scanner/lib/x86;${path_env}
wrapper.app.env.path=./lib/mc-domino-scanner/lib/x86;${path_env}
And also change the java used by the jobserver to 64 bit by changing the JAVA_HOME or JRE_HOME environment variable and re-installing the Jobserver service.
IBM Domino stores all date and time information based on GMT/UTC internally. When a datetime value is converted into text for display purposes, the value is always displayed using the client’s current timezone settings.
Therefore the timezone settings on the migration-center Jobserver will be used to convert values of datetime attributes.
If you require date and time values to be scanned based on a specific timezone set migration-center Jobserver’s timezone accordingly.
If you require “normalized” date and time values in migration-center, set the migration-center Jobserver’s timezone to GMT/UTC.
The IBM Domino Scanner connects to a specified IBM Domino/Notes application and can extract documents, content of richtext fields (composite items), metadata and attachments out of this application based on user-defined criteria. See chapter IBM Domino Scanner parameters below for more information about the features and configuration parameters available in the IBM Domino Scanner.
After a scan has completed, the newly scanned documents along with their metadata, attachments and the content of the richtext fields they contain are available for further processing in migration-center.
To create a new IBM Domino Scanner job, specify the respective adapter type in the scanner properties window – from the list of available connectors, “Domino” must be selected. Once the adapter type has been selected, the list of parameters will be populated with the parameters specific to the selected adapter type.
The properties window of a scanner can be accessed by double-clicking a scanner in the list or by selecting the [Properties] button for the corresponding selected entry on the toolbar or context menu.
The common adaptor parameters are described in Common Parameters.
The configuration parameters available for the Database Scanner are described below:
dominoServer The IBM Domino server used to connect to the application. If the application (”.nsf” file) is stored and accessed locally without using an IBM Domino server, leave this field empty.
dominoDatabase* The filename of the “.nsf” file that holds the application’s documents. If the “.nsf” file is stored inside the IBM Domino/Notes data directory, the path of the “.nsf” file relative to the IBM Domino/Notes data directory is sufficient, otherwise specify the fully qualified filename of the “.nsf” file.
If PDF is used as either the primary format or one of the secondary formats and PDF is to be generated based on existing documents (s.a.), the value for “dominoServer” and “dominoDatabase” will be passed to PDF generation module. Therefore, the database filename should be specified relative to the IBM Domino/Notes data directory.
idFilename* The filename of the ID file used to access the application.
This ID must have full permissions for all documents that are due to be scanned.
password The password for the ID file referenced in parameter “idFilename”.
selectionFormula* An IBM Notes formula to select the documents that should be processed by the scanner.
The default is “select @all” which will process all documents
profileName* The name of the profile used to extract information out of the IBM Domino/Notes application.
The default value for this parameter “mcProfile” which will cause the scanner to process the application according to the the other scanner configuration parameters, e.g. extract document metadata, document contents and attachments etc. By changing the value to ''mcStatistics'' the scanner will ignore most of the other scanner configuration parameters and - instead of processing each document (extract metadata, document contents and attachments) - generate a text file with statistical information about the application (forms, documents, attributes). The generated file will be placed inside the folder specified by scanner parameter “exportLocation” and named “<jobID>_statistics.txt”. The profile “mcStatistics” will not generate any objects in the migration-center database.
This parameter’s value must not be changed to any other value than “mcProfile” or “mcStatistics” unless a customized profile has been developed to fulfill specific customer needs.
primaryDocumentFormat* The primary format used to extract the document. The resulting file will be treated as the primary document content in mc database. Valid values are “dxl”, “html”, “eml”, “eml2html” and “pdf”.
Details regarding the different formats can be found in chapter .
The default value is “dxl”.
The 64-bit version of the scanner can only generate “DXL” and “PDF”. Configuring any other format will cause the scanner to fail.
secondaryDocumentFormats A list of all document formats that should be generated in addition to the primary document format (see “primaryDocumentFormat” above). Multiple values must be separated by “|” (pipe). Valid values are “dxl”, “html”, “eml”, “eml2html” and “pdf”.
The resulting files will be associated with the mc object as secondary formats. Their (fully-qualified) filenames are made available using the mc object’s “secondaryFormats” attribute which is a multi-value attribute.
Details regarding the different formats can be found in chapter .
The 64-bit version of the scanner can only generate “DXL” and “PDF”. Configuring any other format will cause the scanner to fail.
includeAttributes A list of all document attributes (metadata) that should be extracted from the IBM Domino/Notes application and made available inside the MC database. If all attributes should be extracted, leave this field empty
excludedAttributeTypes A filter specifying Domino data types that should not be exported from the IBM Domino/Notes application.
Please refer to chapter for details.
Default value is “1” which will exclude all composite items from being exported to the migration-center database
attributeSplitterMaxChunkSizeBytes Large attribute values are split into chunks of max. bytes as specified with correct handling of multi-byte characters to avoid any SQL exceptions.
Migration-center uses Oracle’s “varchar2” datatype which has a
Maximum of 4,000 bytes.
exportCompositeItems* Specifies whether composite items (i.e. richtext fields) contained in an IBM Domino/Notes document (e.g. an e-mail’s “Body” element) should be extracted from the document and made available as separate richtext files (RTF format). Valid values are “false” and “true” as well as “0” and “1”.
If this option is chosen, the scanner will generate one RTF file for each of an IBM Domino/Notes document’s composite items. The name of the file will be created as <document’s NoteID>_<item’s name>.rtf.
This option is especially useful if the document’s contents (typically contained in richtext fields) should be editable once the document has been migrated into the target system.
This feature is not supported with the 64-bit version of the scanner.
includedCompositeItems A list of names of composite items in a document (e.g. “Body”) that should be extracted into separate richtext files. Multiple values must be separated by “|” (pipe), If all composite items should be extracted, leave this field empty.
If you want to exclude specific attributes, prefix each attribute name with a “!”.
It is not possible to mix include and exclude operations. If one composite item’s name in the list is prefixed with “!”, then only those composite item names starting with “!” will be considered and the corresponding items will be excluded
exportAttachments* Specifies whether attachments contained in the IBM Domino/Notes documents should be extracted from the document in their native format and made available as separate MC objects. Valid values are “false” and “true” as well as “0” and “1”.
embedAttachmentsIntoPDF* Determines whether the Domino documents’ attachments are extracted and embedded into a PDF rendition of the Domino document. If this parameter is set to true:
- all attachments will automatically be extracted from the document independent of “exportAttachments” parameter’s value,
- a PDF rendition will automatically be created even if it has not been requested according to the values of parameters “primaryDocumentFormat” or “secondaryDocumentFormats”.
embedLinksIntoPDF If a PDF rendition is requested and this parameter is set to true, links (Domino document links and URL links) contained in the original Domino document will be added as bookmarks to the PDF file.
The default value is “false”.
initializingFoldersDocumentIsLinkedTo Defines whether the names of the folders that a document is linked to should be read when a document is opened and made available in migration-center
cachingFoldersDocumentsAreLinkedTo Defines whether the lookup table for finding folders that a document is linked to is read only once and cached or read for each document
exportLocation* The location where the exported object content should be temporary saved. It can be a local folder on the machine that runs the job server or a shared folder on the network.
This folder must exist prior to launching the scanner and the MC user must have write permission for it. MC will not create this folder automatically. If the folder cannot be found, an appropriate error will be raised and logged.
This path must be accessible by both scanner and importer. Therefore, if scanner and importer are running on different machines, using a shared network folder is advisable.
loggingLevel* See .
Parameters marked with an asterisk (*) are mandatory.
The IBM Domino Scanner for fme migration-center supports the generation of different output formats for a Domino document. Each of the formats has its advantages and disadvantages. Which one best suits your needs can be determined by closely looking at your requirements, i.e. how users should work with the documents once migration into the new target system has been completed.
The formats currently supported will be described in detail in the following sections.
The Domino XML (DXL) format is an XML format that has been defined by IBM/Lotus. It has been around for a while (at least since Domino version 6). A DXL file represents an entire Domino document including all its metadata, richtext elements and attachments.
The generation of DXL files from Domino documents relies on core functionality of Domino’s C-API as provided by IBM.
DXL files can be used to extract any document information from Domino applications. Based on special helper applications that are not part of Domino/Notes, a DXL file can be re-imported back into the original Domino application in order to read its content or otherwise work with the document at a later point in time.
DXL is especially useful whenever Domino documents should be transformed into PDF. The “PDF Generation Module” which is available as an add-on product for the IBM Domino Scanner makes use of the DXL format for PDF generation.
The ARPA Internet Text Message format (RFC 822) describes the syntax for messages that are sent among computer users (e-mail). The EML file format adheres to RFC 822.
Any Domino document – not only e-mails – can be transformed into EML format based on core functionality of Domino’s C-API as provided by IBM. An EML file contains the document’s content, its metadata as well as its attachments.
The major benefit of EML is that – since version 8 of Notes – an EML file can be opened in Notes again without the need for special helper applications.
Hypertext Markup Language (HTML) files can be generated for Domino documents based on two different approaches both of which will now be described.
Hypertext Markup Language (HTML) – direct approach
The Domino C-API offers the ability to directly transform a domino document into an HTML file.
As with the EML file format, the direct HTML generation based on the Domino C-API has some issues regarding completeness of information. One example are images that had been embedded into richtext fields. Those images will not be visible in the HTML file created.
EML to Hypertext Markup Language (EML2HTML) – indirect approach
Besides the direct approach described in the previous section, HTML can also be created from the EML format.
In most scenarios that the Domino scanner has been tested on, the result of the indirect approach had a much higher quality than that of the direct approach.
The MSG format is the format that is used by Microsoft Outlook to store e-mails on the filesystem. It’s a container format that includes the e-mail and all its attachments.
The Domino scanner can extract the entire Domino document (not just the document’s richtext fields) as a single RTF file. This functionality is provided by the Domino C-API.
Based on the add-on “PDF Generation Module” (see Exporting OLE objects), the Domino scanner is capable of generating PDF, PDF/a-1a or PDF/a-1b files for any type of Domino document – independent of the application it originates from.
All the PDF formats preserve the Domino document in a read-only form that looks like the document opened in Notes.
The PDF generation module takes care of collapsible sections, fixed-width images and tables and other Domino specific features that PDF printing might interfere with.
If required, all the Domino document’s attachments can be re-attached to the PDF file that was generated (see parameter “embedAttachmentsIntoPDF”). Thereby, the entire e-mail will be preserved in a read-only format that can be viewed anywhere at any time requiring a standard PDF reader only.
If the IBM Domino documents contain OLE embedded objects, Apache OpenOffice 4.1.5 or later must be installed and configured on the migration-center job server in order to properly extract the OLE objects.
Install Apache OpenOffice 4.1.5 on the migration-center job server.
Add the folder containing the “soffice.exe” file to the system’s search path. This folder is typically:
<Apache OpenOffice installation folder>/program
Add the following entry to the file “wrapper.conf” inside the migration-center server components installation folder and replace <#> with an appropriate value for your installation:
wrapper.java.classpath.<#>=<Apache OpenOffice installation folder>/program/classes/*.jar
Open the configuration file „documentDirectoryRuntimeConfiguration.xml“ located in subfolder „lib/mc-domino-scanner/conf“ of your migration-center server components‘ installation folder in your favorite editor for XML files.
Go to line 83 of the file which looks like:
<parameter name="exportOLEObjects">false</parameter>
and replace “false” with “true”.
The entry inside the configuration file should look like:
<parameter name="exportOLEObjects">true</parameter>
If you want to use a different port for the Apache OpenOffice server than the default port (8100), go to line 84 of the file:
<!--<parameter name="apacheOpenOfficePort">8100</parameter>-->
Uncomment it and and replace “8100” with the portnumber to use, e.g “1234”.
The entry inside the configuration file should look like:
<parameter name="apacheOpenOfficePort">1234</parameter>
Save the configuration file.
While PDF generation can be activated in the scanner’s configuration (parameters “primaryDocumentFormat”, “secondaryDocumentFormats” and “embedAttachmentsIntoPDF”), the setup of PDF generation requires and the additional “PDF Generation Module”.
From a technical perspective, the “PDF Generation Module” requires an additional system (“rendition server”). This system will be used to print any IBM Notes document using a PDF printer driver based on IBM Notes’ standard print functionality. The process for PDF generation is as follows:
The scanner submits a request to create a PDF rendition for an existing Domino document or a DXL file to PDF Generation Module on the rendition server.
PDF Generation Module creates a PDF rendition of the document.
If PDF generation was successful, PDF Generation Module will save the PDF to a shared network drive.
PDF Generation Module will signal success or failure to the scanner.
Setting up the rendition server requires additional configurative actions. For each IBM Domino application/database template that was used to create documents, an empty database needs to be created based on this template and either made available locally on the rendition server or on the IBM Domino server.
Each of these empty databases needs to be prepared for PDF printing. As necessary configuration steps vary depending on the application that is being worked on, they cannot be described here.
Please contact your fme representative should you wish to implement PDF generation for migration of an IBM Domino application/database.
A complete history is available for any IBM Domino Scanner job from the respective item’s history window. It is accessible through the [History] button/menu entry on the toolbar/context menu.
The History window displays a list of all runs for the selected job together with additional information, such as the number of processed objects, the start and ending time and the status.
Double clicking an entry or clicking the [Open] button on the toolbar opens the log file created by that run. The log file contains more information about the run of the selected job:
version information of the migration-center Server Components the job was run with
the parameters the job was run with
the execution summary that contains the total number of objects processed, the number of documents and folders scanned or imported, the count of warnings and errors that occurred during runtime
Log files generated by the IBM Domino Scanner can be found in the server components installation folder of the machine where the job was run, e.g. …\fme AG\migration-center Server Components <Version>\logs
Here are causes and solutions for some common errors when trying to setup the Domino Scanner:
DominoBackendJNI is missing dependent libraries; please check the installation prerequisites!
This error message means you need to do one of the following things if not done correctly:
- The IBM Notes or IBM Domino install path was not correctly to the PATH variable
- Install the correct VC++ Redistributable package
- Reinstall the Jobserver Windows Service using UninstallWinNTService.bat and InstallWinNTService.bat
The following issues with the MC Domino Scanner are known to exist and will be fixed in later releases:
The scanner requires that the temporary directory for the user running MC Job Server Service exists and that the user can write to this directory. If the directory does either not exist or the user does not have write permission to the directory, the creation of temporary files during document and attachment extraction will fail. The logfile will show error messages like
„INFO | jvm 1 | 2014/10/02 12:06:26 | 12:06:26,850 ERROR [Job 1351] com.think_e_solutions.application.documentdirectory… - java.io.IOException: The system cannot find the path specified“.
To work around this issue, make sure the temporary folder exists and the user has write permission for this folder. If the MC Job Server is started manually as a normal user then the Temp folder should be C:\Users\Username\AppData\Local\Temp. Therefore, if the MC Job Server is run as a service by the Local System account, the folder is one of the following:
For the 32-bit version of Windows:
C:\Windows\System32\config\systemprofile\AppData\Local\Temp
For the 64-bit version of Windows:
C:\Windows\SysWOW64\config\systemprofile\AppData\Local\Temp
If a document is exported from IBM Domino but the related entries in the mc database cannot be created (e.g. because an attribute’s value exceeds the maximum number of characters allowed for a field in the mc database), the related files can be found in the filesystem (inside the export directory). If this document is scanned again, it will be treated as a new document, not as an update.
If the scanner parameter “relationType” is set to “relation”, relations will be automatically deleted by migration-center if they do not exist anymore. If the scanner parameter “relationType” is set to “object”, objects representing relationships cannot be deleted if the relation is invalidated.
Example: If a document had one attachment when scanned in scanner run #1 and that attachment was removed from the document before scanner run #2, the scanner cannot remove the object representing the “attachment” relation between document and attachment (created in scanner run #1) in scanner run #2.
If a PDF rendition is requested and DXLUtility receives the request to generate the rendition but isn’t able to import the DXL file into the appropriate IBM Domino database on the rendition server, it’s likely that the shared folder used to transfer DXL and PDF files between the scanner and PDF Generation Module cannot be read by the user running PDF Generation Module on the rendition server.
The scanner will crash the Java VM if the parameter “exportCompositeItems” is set to “true” and the log level in log4j.xml (located in subdirectory “conf” of the scanner installation directory) is set to “ERROR”.
The 64-bit version of the scanner relies on IBM Domino. As Domino lacks the required libraries to export “EML”, “HTML” or “RTF”, the 64-bit version of the scanner cannot export documents in any other format than “DXL” or “PDF”. If other formats are required, the scanner’s 32-bit version needs to be run based on IBM Notes instead.
The following table lists all (relevant) Domino attribute types.
The scanner parameter “excludedAttributeTypes” is a logical “OR” of all types that should be excluded from the scan.
Type
Numeric value
TYPE_ACTION
16
TYPE_ASSISTANT_INFO
17
TYPE_CALENDAR_FORMAT
24
TYPE_COLLATION
2
TYPE_COMPOSITE
1
This module works as a job that can be run at any time and can even be executed repeatedly. For every run, a detailed history and log file are created. An importer is defined by a unique name, a set of configuration parameters and an optional description.
InfoArchive Importers can be created, configured, started and monitored through migration-center Client, but the corresponding processes are executed by migration-center Job Server.
Use Java 11 for InfoArchive migrations due to the issue below
Generating large PDI files when the Jobserver is running with Java 8 may result in incorrect values in the PDI file. This may be seen by the XSD validation failing during import, or it might pass silently (#59214)
includeChildrenOnce feature does not work with versioned Child Documents and with includeChildrenVersions set to False (#57766)
InfoArchive Importer leaves xml file in Temp when running out of disk space (#66241)
The InfoArchive Importer will create the SIP Zips in the default temporary folder for the user running the Jobserver. By default it is dictated by the TMP environment variable.
These ZIP files are normally deleted from the temporary location when the Job finishes, unless loggingLevel parameter in the importer is set to 4 (Debug).
To change the location where the staging files are created, add a line with your custom path in the wrapper.conf file of the jobserver after the existing wrapper.java.additional entries:
Restart the jobserver afterwards.
You need to use forward slashes even on a Windows machine. This is a requirement of the wrapper.
To create a new InfoArchive Importer job, specify the respective adapter type in the Importer Properties window from the list of available connectors “InfoArchive”. Once the adapter type has been selected, the Parameters list will be populated with the parameters specific to the selected adapter type.
The Properties window of an importer can be accessed by double-clicking an importer in the list, or selecting the Properties button/menu item from the toolbar/context menu.
A detailed description is always displayed at the bottom of the window for a selected parameter.
The common adaptor parameters are described in Common Parameters.
The configuration parameters available for the InfoArchive importer are described below:
pdiSchemasPath Should be set with the folder path where XSL and XSD files needed for generating and validating PDI files are located.
If no value is set to this parameter the PDI file will be generated in the default format. In most cases, this parameter needs to be set.
For more details about PDI generation see Generation of PDI file.
targetDirectory The folder where SIP files will be created. Can be a local drive or a network share.
includeAuditTrails Enable audittrail entries to be added the generated SIPs. The audittrail migsets need to be associated with the importer. This works only with the audittrail objects exported from Documentum.
includeVirtualDocuments Enable the children of the virtual documents (scanned from Documentum) to be included in the SIP together with the parent document.
includeChildrenVersions Indicates whether all children of the virtual documents will be included in the SIP. If not checked, only the most recent version of the children will be added to the SIP. This parameter is used only when “includeVirtualDocuments” is checked.
includeChildrenOnce If enabled, the VD children will be only added under the parent node in the PDI. If disabled, they will be added also as distinct nodes.
batchMode Enable batch ingestion mode. Enabling this parameter has effect only when “maxObjectsPerSIP” or “maxContentSizePerSIP” is set with a value greater than 0.
maxObjectsPerSIP The maximum number of objects in a SIP (ZIP). If it’s 0 or less it will be ignored.
maxContentSizePerSIP Maximum overall content size of a SIP (ZIP) in MB. If it’s 0 or less it will be ignored.
computeChecksum Flag indicating if the checksum of the generated eas_pdi.xml file should be computed. The importer will use the SHA-256 algorithm and base64 encoding.
triggerScript Path to a custom script or batch file to be executed at the end of the import.
webServiceURL Set a valid Webservice URL here if the SIP files should be transferred via InfoArchive webserviecs. With this is empty, no Webservice transfer will be done.
moveFilesToFolder If set, successfully transferred files will be moved to another folder. (only webservice transfer related)
keepUntransferredSIPs Enable this to keep SIPs that have produced an error while being transferred. Normally SIPs get deleted in case of an error. Transfer errors can either be technically (e.g. connection lost) or e.g. attribute validation failed, the schema is missing and other misconfigurations.
numberOfThreads Set the maximum number of threads to use for each Webservice transfer. Default is 10.
loggingLevel*
See .
Parameters marked with an asterisk (*) are mandatory.
Objects meant to be migrated to InfoArchive using the InfoArchive Importer have their own type in migration-center. This allows migration-center and the user to target aspects and properties specific to the filesystem.
Documents targeted at InfoArchive will have to be added to a migration set first. This migration set must be configured to accept objects of type <source object type>ToInfoArchive(document).
Create a new migration set and set the <source object type>ToInfoArchive(document) object type in the Type drop-down. The type of object can no longer be changed after a migration set has been created.
The migration sets of type “<source object type>ToInfoArchive(document)” have a number of predefined rules listed under Rules for system attributes in the –Transformation Rules - window.
The values of system rules prefixed with DSS are used by the InfoArchive Importer to create the SIP descriptor (eas_sip.xml) as shown in the following example:
Every unique combination of the values of the “DSS_” rules together with the “target_type” will correspond to a “Data Submission Session (DSS)”. See more information about DSS in the InfoArchive configuration guide.
content_name* Must be set with the names of the content files in the SIP associated with the current document. If the current document does not have content this attribute will be ignored by the importer. If this attribute contains multiple values, the number values must match and be in the same order as the corresponding ones in the mc_content_location attribute Important: This rule must have the same value as the rule associated with the PDI attribute configured in the holding as the content reference.
custom_attribute_key Represents the name parameter for custom attributes from eas_sip.xml. The number of repeating attributes must match with custom_attribute_value
custom_attribute_value Represents the values of custom attributes from eas_sip.xml. The number of repeating attributes must match with custom_attribute_key
DSS_application* Sets the <application> Value
DSS_base_retention_date* Sets the <base_retention_date> Value
DSS_entity* Sets the <entity> Value
DSS_holding* Sets the <holding> Value
This value will be used for naming the generated SIP file(s)
DSS_id* Sets the <id> Value
DSS_pdi_schema* Sets the <pdi_schema> Value
DSS_pdi_schema_version Sets the <pdi_schema_version> Value
DSS_priority* Sets the <priority> Value
DSS_producer* Sets the <producer> Value
DSS_production_date* Sets the <production_date> Value
DSS_rentention_class Sets the <retention_class> Value if needed
mc_content_location By default, the document content will be picked up by the importer from its original location (the location where the scanner exported it to) If mc_content_location is set with a local path or network share pointing to an existing file then the original location will be ignored and the content will be picked up from the location specified in this attribute. If the value “nocontent” is set to this system rule the document will be handled by the importer as a content less object.
target_type* Must be set with the MC internal types that will be used for association. Important: The first value of this attribute also determines which XSL and XSD file will be used for generating and validating PDI File (eas_pdi.xml)! E.g. Value=”Office, PhoneCalls” XML filenames must be: Office.xsl, Office.xsd. See for more details.
Parameters marked with an asterisk (*) are mandatory.
The target types should be defined in MC according to the InfoArchive PDI schema definition. The object types are used by the validation engine to validate the attributes before the import phase. They are also used by the importer to generate the PDI file for the SIPs.
The importer generates the PDI file (eas_pdi.xml) by transforming the structured data from a standard structure based on an XSL file and validating it against an XSD file. An example of the standard structure of the PDI file can be found in Default format of PDI File.
The “pdiSchemasPath” parameter in the importer configuration is used to locate the XSL and XSD files needed for the PDI file (eas_pdi.xml) transformation and validation. If this parameter does not have any value then the eas_pdi.xml file will be created using the standard structure.
If the parameter does contain a value, then the user must make sure that the XSL and XSD files are present in the path. The name of the XSL and XSD files must match the first value of system rule “target_type” otherwise the importer will return an error. If the “pdiSchemasPath” is set to “D:\IA\config” and “target_type” has the following multiple values “Office,PhoneCalls,Tweets” then the XSL and XSD file names must be: “Office.xsl” and “Office.xsd”.
The XSD file needed for the PDI validation should be the same one used in InfoArchive when configuring a holding and specifying a PDI schema. The XSL file however needs to be created manually by the user. The XSL is responsible for extracting the correct values from the standard output generated by the importer in memory and transforming them into the needed structure for your configuration. An example of such files can be found at Sample PDI schema and Sample PDI transformation style sheet.
You should allocate to the jobserver 2.5x more memory for the Java Heap space than the size of the biggest generated PDI XML file.
Example: PBI file (~1 gb) <-> Java Heap space (~2.5-3 gb)
Starting from version 3.2.9 of migration-center the InfoArchive Importer supports generation of PDI files that contain metadata from multiple object types. By specifying multiple object types definitions in the “target_type” system attribute, one can associate metadata to multiple object types in the associations' tab. Note that only the first value from this rule will be used to find the XSD and XSL files for transforming and validating the eas_pdi.xml file. Those files need to support the standard output provided by the importer as seen in Default format of PDI File.
Starting from version 3.2.9 of migration-center the InfoArchive Importer supports multiple contents per AIU. Each content location must be specified in the mc_content_location system attribute as repeating values, and the names of each content must be specified in the content_name system attribute as repeating values as well.
The number of repeating values must be the same for both attributes.
Starting from version 3.2.9 of migration-center the InfoArchive Importer supports setting custom attributes in the eas_sip.xml file. This can be done by setting the “custom_attribute_key” and custom_attribute_value” system attributes. The number of repeating values in these attributes must match.
custom_attribute_key: which represents the name parameter for custom attributes from eas_sip.xml.
custom_attribute_value: which represents the values of custom attributes from eas_sip.xml.
Please see Default format of PDI File for more details on how the output will look like.
The InfoArchive Importer offers the possibility to automatically distribute the given content to multiple sequential SIPs grouped together as a batch that pertains to a single Data Submission Session (DSS). For activating this feature the check box “batchMode” must be enabled in the importer configuration. Additionally one of the parameters “maxObjectsPerSIP" or "maxContentSizePerSIP" must be set with a value greater than 0.
The importer will process sequentially the documents having the same values for "DSS_" system rules and a new SIP file will be generated anytime when one of the following conditions is met:
The number of objects in the current SIP exceeds the value of "maxObjectsPerSIP"
The total size of the objects' content exceeds the "maxContentSizePerSIP"
The importer will set the value of <seqno> element of the SIP descriptor with the sequence number of the SIP inside the DSS. The value of the element <is_last> will be set to "false" for all SIPs that belong to the same DSS except for the last one where it will be set to "true".
For the cases when the generated SIP will contain too many objects or the size of the SIP will be too big, the importer offers the possibility to distribute the given content to multiple independent SIPs (that belong to different DSS). For activating this feature the check box “batchMode” must be disabled but one of the parameters “maxObjectsPerSIP" or "maxContentSizePerSIP" must be set to a value greater than 0. The importer will create a new independent SIP any time when one of the following conditions is met:
The number of objects in the current SIP exceeds the value of "maxObjectsPerSIP"
The total size of the objects' content exceeds the "maxContentSizePerSIP"
In this scenario the value of <seqno> element in SIP descriptor will be set to “1” and <is_last> will be set to “true” for all generated SIPs.
Additionally, the importer will change the value provided by “DSS_id” by adding a counter to the end of the value. This is necessary in order to assure a unique identifier for each DSS that is derived from information contained in the SIP descriptor:
external DSS ID = <holding>+<producer><id>.
The external DSS id of multiple independent SIPs must be unique for InfoArchive in order to process them.
In this scenario, the length of the DSS_id value should be less than the maximum allowed length (32 char) so the importer can add the counter as “_1”, “_2” and so on at the end of the value.
Since the InfoArchive Importer does not import the data directly to InfoArchive it does offer a post processing functionality to allow the user to automate the content ingestion to InfoArchive. This can be done by providing a batch file that will be executed by the importer after all objects will have been processed. The path to the batch file can be configured in the importer parameter “targetScript”. Such a script may, for example, start the ingestion process on the InfoArchive server.
When the importer parameter “includeAuditTrails” checked”, the importer will add a list with all audit trail records of the currently processed object to the output XML file. The importer will take the data for the audit trail records from the audit trail migration set that must be assigned to the importer. Therefore, the user has to assign at least two migration sets to the importer: one for the documents and one for the corresponding audit trail records. Each audit trail node in the output XML file will contain all the attributes defined in the audit trail migration set. The default XSLT transformation mechanism can be used to create the needed output structure for the audit trail records.
The default PDI output looks like below:
When the parameter “includeVirtualDocuments” is checked the importer will include for each virtual document it processes all its descendants and add them as a list of child nodes to its output record. Each node will contain the name of the child and the content hash of the primary content (that was calculated by the scanner). The default XSLT transformation mechanism can be used to create the needed output structure for the VD objects.
The PDI file looks like below:
The parameter “includeChildrenVersions” allows specifying if all versions of the children will be included or only the latest version.
There are several limitations that should be taken into consideration when using this feature:
All related objects, i.e. all descendants of a virtual document, must be associated with the same import job in migration-center. This limitation is necessary in order to ensure that all descendant objects of a virtual document are in the transformed and validated state before they are processed by the importer. If a descendant object is not contained in any of the migration sets that are associated with the import job, the migration-center will throw an error for the parent object during the import.
For children, the <file_name> value is taken from the first value of the system rule “content_name”. The “content_name” is the system attribute that defines the content names in the zip.
For children, only the content specified in the first value of "mc_content_location" will be added. If "mc_content_location" is null, the content will be taken from the column "content_location" that stores the path where the document was scanned.
If the same document is part of multiple VDs within the same SIP then its content will be added only one time.
If the size limit for one SIP is exceeded, the importer will throw an error
Delta migration does not work with this feature.
If the parameter “includeChildrenOnce” is checked the VD children are only added to the first imported parent. If is unchecked the children are added to every parent they belong to and they are also added as distinct nodes in the PDI file.
Migration center can ingest the generated ZIP files synchronously over the Webservice into InforArchive 3.2. Therefore the InfoArchive (Holding) must be configured as described in the InfoArchive documentation.
In order to let the importer transfer the files, the parameter “webserviceURL” must be filled. If that is the case the importer will try to reach the Webservice at the start of the import to ensure a connection to the webservices can be established. Once a SIP file is created in the filesystem it will be transferred via Webservice to InfoArchive in a separate Thread. The number of threads that run in parallel can be set with the parameter “numberOfThreads”.
If the transfer is successful the SIP file can be moved to a directory specified by the parameter “moveFilesToFolder”. A SIP file that fails to transfer will be deleted by default unless the parameter “keepUntransferredSIPs” is checked.
wrapper.java.additional.6=-Djava.io.tmpdir=D:/MyFolder/CustomTEMP<sip xmlns="urn:x-emc:ia:schema:sip:1.0">
<dss>
<holding>Shoebox</holding>
<id>IATEST</id>
<pdi_schema>urn:cosmin:en:xsd:Shoebox.1.0</pdi_schema>
<production_date>2008-02-23T11:30:38.000</production_date>
<base_retention_date>2001-02-23T11:30:38.000</base_retention_date>
<producer>MultiContentFS</producer>
<entity>Entity</entity>
<priority>0</priority>
<application>FS</application>
</dss>
<production_date>2017-07-14T16:36:33.616</production_date>
<seqno>1</seqno>
<is_last>true</is_last>
<aiu_count>1</aiu_count>
<page_count>0</page_count>
<pdi_hash algorithm="SHA-256" encoding="base64"> SxssWk1AZVxI2vfKJ3vOtCrKGdZyDA56mGCcQCIjpXk=
</pdi_hash>
<custom>
<attributes>
<attribute name="customAttr1">customValue1</attribute>
<attribute name="customAttr2">customValue2</attribute>
</attributes>
</custom>
</sip><?xml version="1.0" encoding="UTF-8" standalone="no"?>
<type>
<subtype id="1">
<dm_document>
<object_name index="0">Test_acrobat</object_name>
<owner_permit index="0">7</owner_permit>
…
</dm_document>
<audittrails>
<audittrail>
<time_stamp_utc>10.01.2017 09:45:23</time_stamp_utc>
<object_name>Test_acrobat</object_name>
…
</audittrail>
<audittrail>
<time_stamp_utc>10.01.2017 09:45:23</time_stamp_utc>
<object_name>Test_acrobat</object_name>
…
</audittrail>
</audittrails>
</subtype>
</type><documents xmlns="urn:eas-samples:en:xsd:office.1.0">
<document id="1">
<file_name sip_file_name=”1.txt”>1.txt</file_name>
<title>Virtual document 1</title>
<date_created>2014-12-12T15:32.393</date_created>
…
<vdchildren>
<vdchild>
<file_name>Virtual document 11</file_name>
<content_hash>EF56A612895633F3</content_hash>
</vdchild>
<vdchild>
<file_name>Virtual document 12</file_name>
<content_hash>EF56A612895633F3</content_hash>
</vdchild>
…
</vdchildren>
</document>
…
</documents><?xml version="1.0" encoding="UTF-8" standalone="no"?>
<type>
<subtype id="1">
<Shoebox>
<author index="0">BUILTIN\Administrators</author>
<dateModified index="0">2001-02-23T11:30:38.000</dateModified>
<title index="0">false</title>
<sourceLocation index="0">\\vms2\TestData\Filesystem\1 doc</sourceLocation>
<keywords index="0">doc1</keywords>
<contentSize index="0">123</contentSize>
<department index="0">Windows 7</department>
<fileName index="0">doc1.docx</fileName>
<dateCreated index="0">2001-02-23T11:30:38.000</dateCreated>
<format index="0">docx</format>
</Shoebox>
<Shoebox2>
<author index="0">BUILTIN\Administrators</author>
<title index="0">\\vms2\TestData\Filesystem\1 doc</title>
<dateModified index="0">2001-02-23T11:30:38.000</dateModified>
<sourceLocation index="0">false</sourceLocation>
<keywords index="0">doc1</keywords>
<contentSize index="0">123</contentSize>
<department index="0">Windows 7</department>
<fileName index="0">Second Doc.docx</fileName>
<dateCreated index="0">2001-02-23T11:30:38.000</dateCreated>
<format index="0">docx</format>
</Shoebox2>
</subtype>
<subtype id="2">
<Shoebox>
<author index="0">BUILTIN\Administrators</author>
<dateModified index="0">2001-02-23T11:30:38.000</dateModified>
<title index="0">false</title>
<sourceLocation index="0">\\vms2\TestData\Filesystem\1 doc</sourceLocation>
<keywords index="0">doc1</keywords>
<contentSize index="0">123</contentSize>
<department index="0">Windows 7</department>
<fileName index="0">doc1.docx</fileName>
<dateCreated index="0">2001-02-23T11:30:38.000</dateCreated>
<format index="0">docx</format>
</Shoebox>
<Shoebox2>
<author index="0">BUILTIN\Administrators</author>
<title index="0">\\vms2\TestData\Filesystem\1 doc</title>
<dateModified index="0">2001-02-23T11:30:38.000</dateModified>
<sourceLocation index="0">false</sourceLocation>
<keywords index="0">doc1</keywords>
<contentSize index="0">123</contentSize>
<department index="0">Windows 7</department>
<fileName index="0">Second Doc.docx</fileName>
<dateCreated index="0">2001-02-23T11:30:38.000</dateCreated>
<format index="0">docx</format>
</Shoebox2>
</subtype>
</type><?xml version="1.0" encoding="UTF-8"?>
<xs:schema attributeFormDefault="unqualified" elementFormDefault="qualified" targetNamespace="urn:cosmin:en:xsd:Shoebox.1.0"
xmlns:ns1="urn:cosmin:en:xsd:Shoebox.1.0"
xmlns:xs="http://www.w3.org/2001/XMLSchema">
<xs:element name="documents">
<xs:complexType>
<xs:sequence>
<xs:element maxOccurs="unbounded" minOccurs="0" name="document">
<xs:complexType>
<xs:sequence>
<xs:element name="Shoebox" maxOccurs="1">
<xs:complexType>
<xs:sequence>
<xs:element maxOccurs="unbounded" minOccurs="0" name="fileName" type="xs:string"/>
<xs:element name="title" type="xs:string"/>
<xs:element name="dateCreated" type="xs:dateTime"/>
<xs:element name="dateModified" type="xs:dateTime"/>
<xs:element name="contentSize" type="xs:byte"/>
<xs:element name="sourceLocation" type="xs:string"/>
<xs:element name="department" type="xs:string"/>
<xs:element name="keywords">
<xs:complexType>
<xs:sequence>
<xs:element maxOccurs="unbounded" minOccurs="0" name="keyword" type="xs:string"/>
</xs:sequence>
</xs:complexType>
</xs:element>
<xs:element name="format" type="xs:string"/>
<xs:element name="author" type="xs:string"/>
</xs:sequence>
</xs:complexType>
</xs:element>
</xs:sequence>
<xs:attribute name="id" type="xs:byte" use="optional"/>
</xs:complexType>
</xs:element>
</xs:sequence>
</xs:complexType>
</xs:element>
</xs:schema><?xml version="1.0" encoding="utf-8"?>
<xsl:stylesheet version="1.0"
xmlns="urn:cosmin:en:xsd:Shoebox.1.0"
xmlns:xsl="http://www.w3.org/1999/XSL/Transform">
<xsl:output indent="yes" omit-xml-declaration="yes"/>
<xsl:strip-space elements="*"/>
<xsl:template match="node()|@*">
<xsl:copy>
<xsl:apply-templates select="node()|@*"/>
</xsl:copy>
</xsl:template>
<xsl:template match="type">
<xsl:element name="documents">
<xsl:apply-templates select="subtype"/>
</xsl:element>
</xsl:template>
<xsl:template match="subtype">
<xsl:element name="document">
<xsl:attribute name="id">
<xsl:value-of select="@id"/>
</xsl:attribute>
<xsl:apply-templates select="Shoebox"/>
<xsl:apply-templates select="Shoebox2"/>
</xsl:element>
</xsl:template>
<xsl:template match="Shoebox">
<xsl:element name="Shoebox">
<xsl:for-each select="fileName">
<xsl:element name="fileName">
<xsl:value-of select="."/>
</xsl:element>
</xsl:for-each>
<xsl:element name="title">
<xsl:value-of select="title"/>
</xsl:element>
<xsl:element name="dateCreated">
<xsl:value-of select="dateCreated"/>
</xsl:element>
<xsl:element name="dateModified">
<xsl:value-of select="dateModified"/>
</xsl:element>
<xsl:element name="contentSize">
<xsl:value-of select="contentSize"/>
</xsl:element>
<xsl:element name="sourceLocation">
<xsl:value-of select="sourceLocation"/>
</xsl:element>
<xsl:element name="department">
<xsl:value-of select="department"/>
</xsl:element>
<xsl:element name="keywords">
<xsl:for-each select="keywords">
<xsl:element name="keyword">
<xsl:value-of select="."/>
</xsl:element>
</xsl:for-each>
</xsl:element>
<xsl:element name="format">
<xsl:value-of select="format"/>
</xsl:element>
<xsl:element name="author">
<xsl:value-of select="author"/>
</xsl:element>
</xsl:element>
</xsl:template>
</xsl:stylesheet>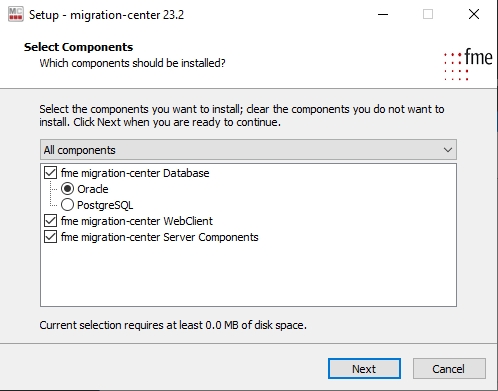
TYPE_ERROR
0
TYPE_FORMULA
1536
TYPE_HIGHLIGHTS
12
TYPE_HTML
21
TYPE_ICON
6
TYPE_INVALID_OR_UNKNOWN
0
TYPE_LS_OBJECT
20
TYPE_MIME_PART
25
TYPE_NOTELINK_LIST
7
TYPE_NOTEREF_LIST
4
TYPE_NUMBER
768
TYPE_NUMBER_RANGE
769
TYPE_OBJECT
3
TYPE_QUERY
15
TYPE_RFC822_TEXT
1282
TYPE_SCHED_LIST
22
TYPE_SEAL
9
TYPE_SEAL_LIST
11
TYPE_SEALDATA
10
TYPE_SIGNATURE
8
TYPE_TEXT
1280
TYPE_TEXT_LIST
1281
TYPE_TIME
1024
TYPE_TIME_RANGE
1025
TYPE_UNAVAILABLE
512
TYPE_USER_DATA
14
TYPE_USERID
1792
TYPE_VIEW_FORMAT
5
TYPE_VIEWMAP_DATASET
18
TYPE_VIEWMAP_LAYOUT
19
TYPE_WORKSHEET_DATA
13

The present document offers a detailed description of the Documentum security enhancements introduced with version 3.2.4 of migration-center.
The additional security features provide means for system administrators to define an additional layer of security between migration-center and Documentum repositories.
Some of the features offered are:
delegating access to users without having to give them superuser privileges and credentials directly on the respective repositories
controlling the type of operation a user is allowed to perform on a given repository (import and/or export)
controlling which paths a user can access to perform the above actions on a given repository
controlling where a user is allowed to export scanned documents to
limit the validity or duration of a security configuration by setting a date until which the configuration is considered valid
encrypting any passwords saved in the security configuration file
The implementation and configuration of the security enhancement features is transparent to end-users working with migration-center. End-users working with migration-center will be notified through on-screen messages if they trigger actions or use configurations which conflict with any enhanced security settings.
Usage of the enhanced security features is also optional. Removing or renaming the main security configuration file will disable the feature and will revert migration-center to its standard behavior when working with Documentum repositories (as described in the and user guides).
The security features as well as this document is targeted specifically at system administrators managing Documentum Content Servers and access to the respective repositories, especially through migration-center.
System requirements are unchanged for the Documentum security enhancements feature. The same requirements as for using migration-center with the Documentum Scanner and Documentum Importer apply. For more information about general system requirements as well as supported Documentum versions and requirements please see the , user guide, and user guide.
The Documentum security enhancements features are implemented as an additional, optional module which integrates with migration-center’s Documentum Scanner and Documentum Importer.
The presence of the Documentum security enhancements module will be detected by migration-center automatically, and if a valid configuration exists the settings within will apply every time a Documentum Scanner or Documentum Importer job is executed.
The Documentum security enhancements module is located in the <migration-center Server Components installation folder>/lib/mc-dctm-adaptor/security-config folder. This folder contains the code package, sample configuration file, and tools used by the feature.
There is one tool for encrypting passwords to be stored in the configuration file, and another tool for validating the configuration file’s structure. The configuration file itself is a human-readable and editable XML file. The tools and configuration file will be described in detail in the following chapters.
The Documentum security enhancements feature is disabled by default and will become active only after a correct configuration file has been created and provided by the system administrator.
Should it be required to disable this feature after it has been configured and is in use, this can be achieved easily using either one of the below approaches:
Rename, move, or delete the <migration-center Server Components installation folder>/lib/mc-dctm-adaptor/security-config folder
Rename, move, or delete the mc-dctm-security-config.xml file located in the <migration-center Server Components installation folder>/lib/mc-dctm-adaptor/security-config folder
As always, consider backing up any files before making changes to them.
Since the Documentum security enhancements feature’s folder (<migration-center Server Components installation folder>/lib/mc-dctm-adaptor/security-config) can contain sensitive information, it is advised to secure this folder using the file system and network security and access policies applicable to such information for the environment where migration-center is deployed in order to prevent unauthorized access.
At the same time the user account used for running the migration-center Jobserver service must be allowed access to this folder, as any Documentum Scanner or Documentum Importer will run in the context of the migration-center Jobserver, thus requiring access to the <migration-center Server Components installation folder>/lib/mc-dctm-adaptor/security-config folder and its contents.
The configuration file controls all aspects of the Documentum security enhancement features. A valid configuration file needs to be provided by the system administrator configuring migration-center for the feature to work. As long as no valid configuration file exists, the feature will be disabled and will have no effect.
Since the exact configuration depends on the customer’s environment, a preconfigured file cannot be delivered with migration-center. Instead a sample file illustrating the structure and parameters available for configuration is delivered and can be used as a starting point for creating a valid configuration. The sample file is named mc-dctm-security-config-sample.xml and is located in the <migration-center Server Components installation folder>/lib/mc-dctm-adaptor/security-config folder.
The sample configuration file can be copied and renamed to mc-dctm-security-config.xml to create the base for the actual configuration file, which will be edited by a system administrator.
The sample configuration file is also listed in section .
The configuration file is a human-readable XML file and can be edited with any text editor, or application providing XML editing capabilities. In order for the configuration file to be valid it will have to conform to XML standards in terms of syntax and encoding, something that should be considered when editing the file using a text editor. Migration-center will validate the file and refuse operation if the file structure or its contents are found to be invalid.
Special characters
Certain special characters need to be escaped according to the XML syntax in order to be entered and interpreted correctly as values. See below a list of these characters:
Encoding
The XML standard allows many different types of encodings to be used XML files. Encodings affect how international characters are interpreted and displayed. It is recommended to use the UTF-8 encoding, which can represent all international characters available today in the UTF character set.
Note that the (mandatory) XML header tag <?xml version="1.0" encoding="UTF-8"?> does not set the encoding, it merely specifies that the current file is supposed to be encoded using UTF-8; the actual encoding used is not directly visible to the user and depends on how the file is saved by the application used to save it after editing. Please consult your text editor’s documentation about saving files using specific encodings, such as UTF-8.
See the official source for more information about XML.
This paragraph describes the structure of the Documentum Enhanced Security configuration file. It will list all available configuration elements, their allowed values and whether the respective parameter is mandatory to be set or not.
A <configuration> block defines an entire configuration block controlling access of one user to a repository. All other parameters which apply to that repository and user must be contained in the same <configuration> block.
Multiple repositories and users can be configured by creating multiple <configuration> blocks in the configuration file.
repository_name is an attribute of a <configuration> element and defines the Documentum repository the current configuration block applies to.
migration_user is an attribute of a <configuration> element and defines the migration user who will be granted access to the repository. This user will need to be configured in any Documentum job (scanner or importer) meant to access the repository defined in repository_name.
action_allowed is an attribute of a <configuration> element and defines what type of action a user is allowed to perform on the repository defined in repository_name. A user may be allowed to scan, import, or perform both actions on the repository.
effective_date is a child element of configuration. effective_date sets a date until which the current configuration is allowed to be executed. If the set date is exceeded when a job is started, the job will not be permitted to execute and the user will be notified about the configuration having expired.
super_user_name is a child element of configuration. super_user_name defines a Documentum superuser which will be used to connect to the repository defined in repository_name. The migration-center user running the job will not need to know the Documentum superuser’s name or password, this will only be known and used internally by migration-center.
super_user_password is a child element of configuration. super_user_password defines the password for the Documentum superuser which will be used to connect to the repository defined in repository_name. The migration-center user running the job will not need to know the Documentum superuser’s name or password, this will only be known and used internally by migration-center.
The password needs to be stored in encrypted form; see for information about how to encrypt the password.
migration_user_password is a child element of configuration. migration_user_password defines the password for the migration user who will be granted access to the repository. This password will need to be configured in any Documentum job (scanner or importer) meant to access the repository defined in repository_name.
The password needs to be stored in encrypted form; see for information about how to encrypt the password.
allowed_paths is a child element of configuration. allowed_paths defines paths the migration user will be allowed to access in the specified Documentum repositories. The allowed_paths element is optional; if this element is omitted, access to all folders will be granted (whether access will actually succeed depends on the respective Documentum repositories permissions of course).
allowed_export_locations is a child element of configuration. allowed_export_locations defines local paths or UNC paths (network shares) where the migration user will be allowed to export content from Documentum repositories. This (these) path(s) will need to be used in the Documentum scanner’s configuration as exportLocation (please see the Documentum Scanner User Guide for more information about the Documentum Scanner and the exportLocation parameter).
path is a child element of allowed_paths or allowed_export_location. It specifies individual Documentum paths (when used with allowed_paths) or local file system paths or UNC paths (network shares) when used with allowed_export_locations.
Passwords must be encrypted when saved to the configuration file. Encryption is performed using the supplied password encryption tool. The password encryption tool is located in the <migration-center Server Components installation folder>/lib/mc-dctm-adaptor/security-config folder and can be executed using encrypt-tool.
Usage:
Enter password
Confirm password
Press [Encrypt] button (password and confirmed password must match in order to proceed)
Password is encrypted and displayed
The configuration file must be a valid XML file. For convenience a verification tool is provided to check the validity of the configuration file against an XML Schema Definition file.
Migration-center will also validate the file internally and refuse operation if the file structure or its contents are found to be invalid.
The configuration file verification tool is located in the <migration-center Server Components installation folder>/lib/mc-dctm-adaptor/security-config folder and can be executed using check-configuration.
Sample output for a valid configuration file
C:\Program Files (x86)\fme AG\migration-center Server Components 3.13\lib\mc-dctm-adaptor\security-config>check-configuration.cmd
********************************
* Configuration OK *
********************************
Sample output for an invalid (corrupted) configuration file
C:\Program Files (x86)\fme AG\migration-center Server Components 3.13\lib\mc-dctm-adaptor\security-config>check-configuration.cmd
********************************
* Configuration FAILED *
********************************
de.fme.mc.common.MCException: An error has occured when loading security configuration: org.xml.sax.SAXParseException; systemId: file:///C:/Program%20Files%20(x86)/fme%20AG/migration-center%20Server%20Components%203.13/lib/mc-dctm-adaptor/security-config/mc-dctm-security-config.xml; lineNumber: 5; columnNumber: 29;
The element type "effective_date" must be terminated by the matching end-tag "</effective_date>".
A sample configuration file is provided in <migration-center Server Components installation folder>/lib/mc-dctm-adaptor/security-config/mc-dctm-security-config-sample.xml.
The contents of this file are also listed below for reference.
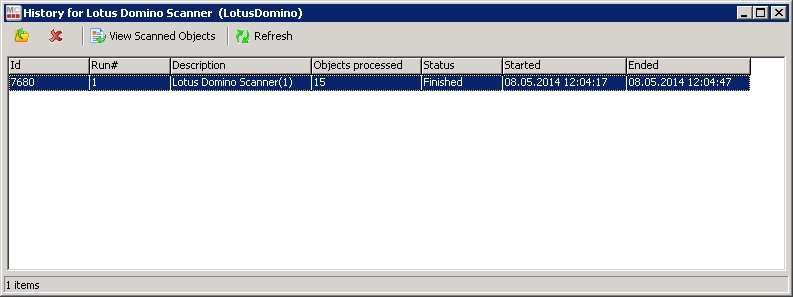
Copy encrypted password
Paste encrypted password in migration_user_password or super_user_password element of configuration file
Character
Escape in XML as
" (quote)
"
' (apostrophe)
'
< (less than)
<
> (greater than)
>
& (ampersand)
&
configuration Properties
Mandatory
yes
Can occur multiple times
yes
Attributes
repository_name
migration_user
action_allowed
Allowed values
None (contains other elements, not value)
Example
<configuration repository_name="repo1" migration_user="external.user" action_allowed="scan">
…
…
…
</configuration>
repository_name Properties
Mandatory
yes
Can occur multiple times
no
Attributes
None (is an attribute)
Allowed values
String representing one valid Document repository name
Example
<configuration repository_name="repo1" migration_user="external.user" action_allowed="scan">
…
…
…
</configuration>
migration_user Properties
Mandatory
yes
Can occur multiple times
no
Attributes
None (is an attribute)
Allowed values
String identifying a migration user
Example
<configuration repository_name="repo1" migration_user="external.user" action_allowed="scan">
…
…
…
</configuration>
action_allowed Properties
Mandatory
yes
Can occur multiple times
no
Attributes
None (is an attribute)
Allowed values
scan
import
both
Example
<configuration repository_name="repo1" migration_user="external.user" action_allowed="scan">
…
…
…
</configuration>
effective_date Properties
Mandatory
yes
Can occur multiple times
no
Attributes
None
Allowed values
Valid date using the format YYYY-MM-DD
Example
<configuration …>
…
<effective_date>2013-12-22</effective_date>
…
</configuration>
super_user_name Properties
Mandatory
yes
Can occur multiple times
no
Attributes
None
Allowed values
String identifying a valid Documentum superuser
Example
<configuration …>
…
<super_user_name>dmadmin</super_user_name>
…
</configuration>
super_user_password Properties
Mandatory
yes
Can occur multiple times
no
Attributes
None
Allowed values
String defining the Documentum superuser’s password (in encrypted form)
Example
<configuration …>
…
<super_user_password>DSzl1hrzj+yYMLOtxR5jlg==</super_user_password>
…
</configuration>
migration_user_password Properties
Mandatory
yes
Can occur multiple times
no
Attributes
None
Allowed values
String defining the migration user’s password (in encrypted form)
Example
<configuration …>
…
<migration_user_password>DSzl1hrzj+yYMLOtxR5jlg==</migration_user_password>
…
</configuration>
allowed_paths Properties
Mandatory
no
Can occur multiple times
no
Attributes
None
Allowed values
Elements of type <path>
Example
<configuration …>
…
<allowed_paths>
<path>/Import</path>
<path>/Public/Documents</path>
<path>/User Cabinets</path>
</allowed_paths>
…
</configuration>
allowed_export_locations Properties
Mandatory
yes when running a Documentum Scanner
not relevant when running a Documentum Importer
Can occur multiple times
no
Attributes
None
Allowed values
Elements of type <path>
Example
<configuration …>
…
<allowed_export_locations>
<path>d:\mc\export</path>
<path>\\server\share\mc export folder</path>
</allowed_export_locations>
…
</configuration>
path Properties
Mandatory
Depends on whether it is used with allowed_paths or allowed_export_locations. Please see the respective elements’ descriptions
Can occur multiple times
yes
Attributes
None
Allowed values
One string per <path> element representing a valid Documentum path (when used with allowed_paths) or local file system path or UNC path (when used with allowed_export_locations)
Example
<configuration …>
…
<allowed_paths>
<path>/Import</path>
<path>/Public/Documents</path>
<path>/User Cabinets</path>
</allowed_paths>
<allowed_export_locations>
<path>d:\mc\export</path>
<path>\\server\share\mc export folder</path>
</allowed_export_locations>
…
</configuration>
<?xml version="1.0" encoding="UTF-8"?>
<security-configuration>
<!-- A configuration should be created for each users that needs to use migration center
to scan or import data from/into Documentum
The attributes repository_name, migration_user and action_allowed are mandatory
and are used to uniquely identify a configuration.
The allowed values for "action_allowed" are: scan, import or both. Both meaning
that the configuration will apply to both scanners and importers.
-->
<configuration repository_name="production" migration_user="John Smith" action_allowed="both">
<!-- Encrypted password of the migration_user. The encryption tool must be used to
get the encrypted password.
Mandatory.
-->
<migration_user_password>NVnP0RwMfTulUrpjOYj0tA==</migration_user_password>
<!-- The date until the configuration is valid.
Mandatory.
-->
<effective_date>2013-11-04</effective_date>
<!-- The super user name that will be used for connecting to Documentum.
Mandatory.
-->
<super_user_name>Administrator</super_user_name>
<!-- Encrypted password of the super userr. The encryption tool must be used to
get the encrypted password.
Mandatory.
-->
<super_user_password>DSzl1hrzj+yYMLOtxR5jlg==</super_user_password>
<!-- Documentum folder and cabinets where the users is allowed to scan from or to import into.
This is optional. If it's not set there is no restriction for the users.
-->
<allowed_paths>
<path>/Cabinet1</path>
<path>Cabinet2/Folder1</path>
</allowed_paths>
<!-- The local folders or shares are the user is allowed to export objects.
This apply only to scanners. The folders configured here should be not
accessible to the migration users in order to protect the exported content
but it should be accessible to the windows user under Jobserver service is running.
This is mandatory for the scanner.
-->
<allowed_export_locations>
<path>\\fileserver\mc_export</path>
<path>d:\export_location</path>
</allowed_export_locations>
</configuration>
</security-configuration>The scanner uses FTP/S to download the content of the documents and their versions from the Veeva Vault environment to the selected export location. This means the content will be exported first from the Veeva Vault to the Veeva FTP server and the Veeva scanner will then download the content files via FTP/S from the Veeva FTP server. So, the necessary outbound ports (i.e. TCP 21 and TCP 56000 – 56100) should be opened in your firewalls as described here:
http://vaulthelp.vod309.com/wordpress/admin-user-help/admin-basics/accessing-your-vaults-ftp-server/
To create a new Veeva Scanner job click on the New Scanner button and select “Veeva” from the adapter type dropdown list. Once the adapter type has been selected, the parameters list will be populated with the Veeva Scanner parameters.
The Properties of an existing scanner can be accessed after creating the scanner by double-clicking the scanner in the list or by selecting the Properties button/menu item from the toolbar/context menu. A description is always displayed at the bottom of the window for the selected parameter.
Multiple scanners can be created for scanning different locations, provided each scanner has a unique name.
The common adaptor parameters are described in Common Parameters.
The configuration parameters available for the Veeva Scanner are described below:
username* Veeva username. It must be a Vault Owner.
password* The user’s password.
server* Veeva Vault fully qualified domain name. Ex: fme-clinical.veevavault.com
proxyServer The name or IP of the proxy server if there is any.
proxyPort The port for the proxy server.
proxyUser The username if required by the proxy server.
proxyPassword The password if required by the proxy server.
documentSelection The parameter contains the conditions, which will be used in the WHERE statement of the VQL. The Vault will validate the conditions. If the string comprises several conditions, you must ensure the intended order between the logical operators. If the parameter is empty, then the entire Veeva Vault will be scanned.
Examples:
type__v=’Your Type’
classification__v=’SOP’
product__v=’00P000000000201’ OR product__v=’00P000000000202’
(study__v=’0ST000000000501’ OR study__v=’0ST000000000503’) AND blinding__v=’Blinded’
batchSize* The batch size representing how many documents to be loaded in a single bulk operation.
scanBinders The flag indicates if the binders should be scanned or not. This parameter will scan just the latest version of each version tree.
scanBinderVersions Flag indicating if all the versions should be scanned or not. If it is checked, every version will be scanned.
maintainBinderIntegrity The flag indicates if the scanner must maintain the binder integrity or not. If it is scanned, all the children will be exported to keep consistency.
exportRenditions This checkbox parameter indicates if the document renditions will be scanned or not.
renditionTypes This parameter indicates which types of renditions will be scanned. If the value is left empty, all the types will be exported. This parameter is repeating and is used just if the exportRenditions is checked.
Examples:
viewable_rendition__v
custom_rendition__c
exportSignaturePages The flag indicates if the Signature Page should be added to the viewable rendition. If checked, the scanner will export the viewable rendition of the documents - when it is in the scope of rendition export - including any eSignature pages. If uncheck, the scanner will export the viewable rendition of the documents - when it is in the scope of rendition export - without any eSignature pages.
exportCrosslinkDocuments This checkbox indicates if the cross-link documents should be scanned or not.
scanAuditTrails This checkbox parameter indicates if the audit trail records of the scanned documents will be scanned as a separate MC object. The audit trail object will have ‘Source_type’ attribute set to Veeva(audittrail) and the ‘audited_obj_id’ will contain the source id of the audited document.
enableDeltaForAuditTrails Flag indicating if the new audit trails should be detected during delta scan even the document was not changed.
skipFtpContentDownload This flag indicates if the content files should be transferred from the FTP staging server. If selected, the contents will remain on the staging server and the scanner will store their FTP paths.
The FTP paths have the following OOTB pattern:
ftp:/u<user-id>/<veeva-job-id>/<doc-id>/<version-identifier>/<doc-name>
Examples:
ftp:/u6236635/23625/423651/2_1/monthly-bill.pdf
useHTTPSContentTransfer This flag indicates if the content files should be transferred from the Veeva Vault to the export location via the REST endpoint. When this box is checked, the scanner will download every content file sequentially via HTTPS.
Note: This feature is much slower, but it will not involve any FTP connection.
downloadFtpContentUsingRest Flag indicating if the content from Staging Folder will be downloaded by using REST API.
This is the recommended way to download the content locally.
Note: Connection to FTPS server is not made so the FTPS ports don't need to be opened.
exportLocation* Folder path. The location where the exported object content should be temporarily saved. It can be a local folder on the same machine with the Job Server or a shared folder on the network. This folder must exist prior to launching the scanner and the user account running the Job Server must have write permission on the folder. migration-center will not create this folder automatically. If the folder does not exist, an appropriate error will be raised and logged. This path must be accessible by both scanner and importer so if they are running on different machines, it should be a shared folder.
ftpMaxNrOfThreads* Maximum number of concurrent threads that Maximum number of concurrent threads that will be used to transfer content from FTP server to local system. The max value allowed by the scanner is 20 but according with Veeva migration best practices it is strongly recommended to use maximum 5 threads.
loggingLevel*
See: .
Parameters marked with an asterisk (*) are mandatory.
There is a configuration file for additional settings for the Veeva Scanner located under the …/lib/mc-veeva-scanner/ folder in the Job Server install location. It has the following properties that can be set:
request_timeout The time in milliseconds the scanner waits for a response after every API call. Default: 600000 ms
client_id_prefix This is the prefix of the Client ID that is passed to every Vault API call. The Client ID is always logged in the report log. For a better identification of the requests (if necessary) the default value should be changed to include the name of the company as described here: https://developer.veevavault.com/docs/#client-id Default: fme-vault-client-migrationcenter
no_of_request_attempts Represents the number of request attempts when the first call fails due to a server error(5xx error code). The REST API call will be executed at least once independent of the parameter value. Default: 2
The Veeva Scanner connects to the Veeva Vault by using the username, password & server name from the configuration. The FTP/S connection is done internally by following the standard instructions computing the FTP username from the server and the user. Additionally, to use the proxy functionality, you have to provide a proxyUser, proxyPassword, proxyPort & proxyServer.
The scanner can export all the versions of a document, as a version tree, together with their rendition files and audit trails if they exist. The scanner will export the documents in batches of provided size using the condition specified in the configuration.
The Veeva Scanner uses a VQL query to determine the documents to be scanned. By leaving the documentSelection parameter empty, the scanner will export all available documents from the entire Vault.
A Crosslink is a document created in one Vault that uses the viewable rendition of another document in another Vault as its source document.
For scanning the crosslink it is necessary to set the exportCrossLinkDocuments checkbox from the scanner configuration. The scanned crosslink object will have isCrosslink attribute set to true and this is how you can separate the documents and crosslinks from each other.
The scanner configuration view contains the exportRenditions parameter, which let you export the renditions. Moreover, you can specify exactly, which rendition files to be exported by specifying the desired types in the renditionTypes parameter.
If the exportRenditions parameter is checked and the ‘renditionTypes parameter contains annotated_version__c, rendition_two__c values, then just these two renditions will be exported.
We are strongly recommending you to use a separate user for the migration project, because the Veeva Vault will generate a new audit trail record for every document for every action (extracting metadata, downloading the document content, etc.) made during the scanning process.
Veeva Scanner allows scanning audit trails for every scanned document as a distinct MC source object. The audit trails will be scanned as ‘Veeva(audittrail)’ objects if the checkbox scanAuditTrails is set. The audited_obj_id attribute contains the source system id of the document that has this audit trail.
The audit trails can be detected by migration-center during the delta scan even if the audited document was not changed if the checkbox enableDeltaForAuditTrails is set.
The Veeva Scanner allows you to extract the binders in such a way that they can be imported in a OpenText Documentum repository as Virtual Documents. The feature is provided by three parameters: scanBinders, scanBinderVersions, maintainBinderIntegrity. On Veeva Vault side, the binders are managed just as the documents, but having the binder__v attribute set to true.
To fully migrate binders to virtual documents, you have to scan them by maintaining their integrity to be able to rebuild them on Documentum side.
The scanner will create a relationship between the binder and its children. Moreover, the scanner supports scanning of nested binders. The relationship will contain all the information required by the Documentum importer.
The Microsoft SharePoint Importer allows migrating documents, folders, list items and lists/libraries to SharePoint 2013, 2016, and 2019 offering following features:
Import documents to Microsoft SharePoint Document Library items
Import folders to Microsoft SharePoint Document Library items
Import list items to Microsoft SharePoint Document Library items
Import lists/libraries to Microsoft SharePoint Sites
Set values for any columns in SharePoint, including user defined columns
Set values for SharePoint specific internal field values
Create documents, folders and list items using standard SharePoint content types or custom content types
Set permissions for individual documents, folders, list items and lists/libraries
Set the folder path and create folders if they don’t exist
Apply Content Types automatically to lists/libraries if they are not applied yet
Delta migration
Import versions (minor or major, automatic enabling of versioning in the targeted document library)
Import files with a size up to 15 GB (depending on the target SP version)
To install the main product components, consult the migration-center Installation Guide document.
The migration-center SharePoint Importer requires installing an additional, separate component besides the main product components. This additional component is able to set system values (such as creation date, modified date, author and editor) as well as taxonomy values for your objects. It is designed to run as a Windows service and needs the .NET Framework 4.7.2 installed on your computer, which is running this service as well as the migration-center Job Server.
This component must be installed in all machines where the migration-center server components is installed.
To install this additional component, it is necessary to run an installation file, which is located within the
SharePoint component folder of your migration-center Job Server installation location, which is by default C:\Program Files (x86)\fme AG\migration-center Server Components <version>\lib\mc-sharepoint-online-importer\CSOM_Service\install. This folder contains the file install.bat, which must be executed with administrative privileges.
After the service is installed you will need to start it manually for the first time, after that the service is configured to start automatically as soon as the computers operating system is loaded.
In case it is necessary to uninstall this component, the file uninstall.bat must be executed.
The SharePoint on-premise importer supports only the following authentication types:
NTLM Windows authentication (authenticationMethod = direct)
AD FS SAML token-based authentication (authenticationMethod = adfs)
Kerberos Windows authentication is currently NOT supported.
Due to restrictions in SharePoint, documents cannot be moved from one Library to another using migration-center once they have been imported. This applies to Version and Update objects.
Moving folders is only supported for SharePoint 2016 and later.
Moving folders is only supported within the same site, i.e. the importer parameter "serverURL" and the system attribute "site" must have the same values for the initial and any update import runs.
Even though some other systems such as Documentum allow editing of older versions, either by replacing metadata, or creating branches, this is not supported by SharePoint. If you have updates to intermediate versions to a version tree that is already imported, the importer will return an error upon trying to import them. The only way to import them is to reset the original version tree and re-import it in the same run with the updates.
Running multiple Job Servers for importing into SharePoint must be done with great care, and each of the Job Servers must NOT import in the same library at the same time. If this occurs, because the job will change library settings concurrently, the versioning of the objects being imported in that library will not be correct.
The SharePoint system has some limitations regarding file names, folder names, and file size. Our SharePoint importer will perform the following validations before a file gets imported to SharePoint (in order to fail fast and avoid unnecessary uploads):
Max. length of a file name: 128 characters
Max. length of a folder name: 128 characters
Invalid leading chars for file name: SPACE, PERIOD
Invalid leading chars for folder name:
Max. length of a file name: 128 characters
Max. length of a folder name: 128 characters
Invalid leading chars for file name: SPACE, PERIOD
Invalid leading chars for folder name:
Max. length of a file name: 400 characters
Max. length of a folder name: 400 characters
Invalid leading chars for file name: SPACE, PERIOD
Invalid leading chars for folder name:
To create a new SharePoint Importer, create a new importer and select SharePoint from the Adapter Type drop-down. Once the adapter type has been selected, the Parameters list will be populated with the parameters specific to the selected adapter type. Mandatory parameters are marked with an *.
The Properties of an existing importer can be accessed after creating the importer by double-clicking the importer in the list or selecting the Properties button/menu item from the toolbar/context menu. A description is always displayed at the bottom of the window for the selected parameter.
Multiple importers can be created for importing to different target locations, provided each importer has a unique name.
The common adaptor parameters are described in .
The configuration parameters available for the SharePoint Importer are described below:
authenticationMethod* Method used for authentication against SharePoint. If your SP is setup to directly authenticate your users, enter "direct" and provide user name and password in the corresponding parameters. If your SP is setup to use ADFS authentication, enter "adfs" and provide values for the user name, password, domain, adfsBaseUrl, adfsEndpoint, and adfsRealm parameters.
serverURL* This is the URL to the root site collection of your SharePoint environment.
adfsBaseUrl ADFS login page URL. Depends on your ADFS configuration. Example: https://adfs.contoso.com
Parameters marked with an asterisk (*) are mandatory.
The following screenshots shows where you can find the necessary values for the "adfsEndpoint" and "adfsRealm" parameters in the Windows AD FS configuration tool:
Starting from migration-center 3.5 the SharePoint importer has the option of checking the integrity of each document’s content after it has been imported. This will be done if the “checkContentIntegrity” parameter is checked and it will verify only documents that have a generated checksum in the Source Attributes.
Currently the only supported checksum algorithm is MD5 with HEX encoding.
Documents targeted at a Microsoft SharePoint Document library will have to be added to a migration set. This migration set must be configured to accept objects of type <source object type>ToSharePoint (document).
Create a new migration set and set the <source object type>ToSharePoint(document) in the Type drop-down. This is set in the -Migration Set Properties- window which appears when creating a new migration set. The type of object can no longer be changed after a migration set has been created.
contentType* Rule setting the content type. Example: Task This value must match existing migration-center object type definitions See .
copyRoleAssignments Specify if roles from the parent object are copied or not. This system rule is necessary only if the system rule roleAssignments is set, otherwise it is not used. By default, this value is set to false.
fileExtension Specify the file extension of the file name that is used to upload the content file to SharePoint. See also section
The same procedure as for documents also applies to links about to be imported to SharePoint Online. For links the object type to select for a migration set would be <source object type>ToSharePoint(link).
SharePoint Online supports documents with the file format ".url". We call these documents "link documents" since they do not have real content but just point to another document in SharePoint Online or to an external web site. The importer will create the necessary content of the link documents on the fly. Thus, the importer will ignore the content of any source object that is imported as a link document because it will import the generated link content instead.
Compared to the Documents migset, the Link migset is missing the fileExtension and mc_content_location system rules and has the following new rules:
url* The target URL of this link document. Can be a URL to another SharePoint document or a URL to an external web site.
Example:
https://contoso.sharepoint.com/sites/MySite/Documents/Test.docx
The same procedure as for documents also applies to folders about to be imported to SharePoint. For folders the object type to select for a migration set would be <source object type>ToSharePoint (folder).
Compared to the Documents migset, the Folder migset is missing the fileExtension, isMajorVersion and mc_content_location system rules, and has no additional ones.
The same procedure as for documents also applies to lists or libraries about to be imported to SharePoint. For lists or libraries the object type to select for a migration set would be <source object type>ToSharePoint (list).
Compared to the Documents migset, the List migset is missing the contentType, fileExtension, isMajorVersion, library, mc_content_location and parentFolder system rules, and has the following additional rules:
baseTemplate* Rule setting the base template for this list. A list of valid values can be found in the .
This value must match existing migration-center object type definitions; see paragraph
title Specify the title of the list or library, which will be created
The same procedure as for documents also applies to list items about to be imported to SharePoint. For list items the object type to select for a migration set would be <source object type>ToSharePoint (listItem).
Compared to the Documents migset, the ListItem migset is missing the fileExtension and mc_content_location system rules, and has the following additional rule:
relationLinkField Rule which sets a list of column names, where to insert links to AttachmentRelation associated with the current object.
In order to associate transformation rules with SharePoint columns, a migration-center object type definition for the respective content type needs to be created. Object type definitions are created in the migration-center client. To create an object type definition, go to Manage/Object Types and create or import a new object type definition. In case your content type contains two or more columns with the same display name, you need to specify the columns internal names as attribute names.
A Microsoft SharePoint content type corresponds to a migration-center object type definition. For the Microsoft SharePoint connector, an object type definition can be specified in four ways, depending on whether a particular SharePoint content type is to be used or not or multiple but different content types using the same name across site collections:
My Content Type describes explicitly a SharePoint content Type named My Content Type defined either in the SharePoint document library or at Site Collection level
@My Document Library describes the SharePoint document library named My Document Library using only columns, which are defined explicitly in the SharePoint document library My Document Library
My Content Type;#Any Custom Value describes a SharePoint content type named My Content Type. Everything after the delimiter ;# will be cut off on importing
Importing lists or libraries into SharePoint is a little bit different than for documents, folders or list items, since the migration-center SharePoint Importer sets Microsoft defined attributes, which are not visible to the user. In order to set those attributes, it is necessary to create object type definitions for each type of list template (see ). The SharePoint Connector is able to set any possible attribute of a list. See for more information about possible attributes.
The SharePoint Importer is able to read values from files. This might be necessary if the length of a string might exceed the maximum length of an Oracle database column, which is 4096 bytes.
To tell the SharePoint Importer reading strings from a text file, the filepath of the file containing the value must be placed within the markup <@MCFILE>filepath</@MCFILE>.
The File Reader does not read values from files for the following attributes: Check-In Comment, Author, Editor, Creation Date, Modified Date.
Example:
Assuming you have a file at path \\scanlocation\temp\1\4a9daccf-5ace-4237-856c-76f3bd3e3165.txt you must type the following string in a rule:
<@MCFILE>\\scanlocation\temp\1\4a9daccf-5ace-4237-856c-76f3bd3e3165.txt</@MCFILE>
On import the SharePoint importer extracts the contents of this file and adds them to the associated target attribute.
The SharePoint Importer is able to modify the filename of a file, which is imported to SharePoint. To set the filename, you must create a target attribute named Name in the object type definition. You can associate any filename (without an extension) for a document. The importer automatically picks the extension of the original file or of the file specified in the rule mc_content_location. If the extension needs to be changed as well, use the system rule fileExtension in order to specify a new file extension. You can also change only the extension of a filename by setting fileExtension and not setting a new filename in the Name attribute.
Example:
Original content location: \\Fileshare\Migration\Scan\566789\content.dat
The SharePoint Importer can set the check-in comment for documents. To set the check-in comment, you must create a target attribute named checkin_comment in the object type definition. You can associate any string to set the check-in comment
The SharePoint Importer can set the author for list items, folders and documents. To set the author, you must create a target attribute named author in the object type definition. The value of this attribute must be the loginname of the user, who shall be set as author.
The SharePoint Importer can set the editor for list items, folders and documents. To set the editor, you must create a target attribute named editor in the object type definition. The value of this attribute must be the loginname of the user, who shall be set as editor.
The SharePoint Importer can set the creation date for list items, folders and documents. To set the creation date, you must create a target attribute named created in the object type definition. The value of this attribute must be any valid date.
The SharePoint Importer can set the modified date for list items, folders and documents. To set the modified date, you must create a target attribute named modified in the object type definition. The value of this attribute must be any valid date.
The SharePoint Importer can set lookup values. If you want to set a lookup value, you can either set the ID of the related item or the title. If you set the title of the document and there is more than one item with the same title in the lookup list, the SharePoint Importer marks your import object as an error, because the lookup item could not be identified unequivocally.
The SharePoint Importer can set URL values. You can define a friendly name as well as the actual URL of the link by concatenating the friendly name with ;# and the actual URL.
Example: migration-center;#http://www.migration-center.com
The SharePoint Importer can set taxonomy values and Migration Center provides two ways to do it. The first possibility is to use the name of the Taxonomy Service Application, a term group name, a term set name and the actual term. Those four values must be concatenated like the following representation:
TaxonomyServiceApplicationName>TermGroupName>TermSetName>TermName
Example: Taxonomy_+poj2l53kslma4==>Group1>TermSet 1>Value
The second possibility is to use the unique identifier of the term within curly brackets {}.
Example: {2e9b53f9-04fe-4abd-bc33-e1410b1a062a}
Multiple values can be set also but the attribute has to be set as a Multi-value Repeating attribute.
In case you receive an error on setting taxonomy values make sure the TaxonomyServiceApplicationName is up to date and valid since Microsoft changes the identifier at certain times.
The performance of the import process is heavily impacted by some specific features, namely autoAdjustVersioning, autoAdjustAttachments, autoAddContentTypes, autoCreateFolders, setting taxonomy values, and setting system attributes like Author, Editor, Created, and Modified.
In case you are importing an update for a major version the increase in processing time can get up to three times compared to a normal document import. Combining all the above-mentioned features over the same document can increase the time for up to four times. Take this into consideration when planning an import as the time might vary based on the above described features.
You will achieve the highest import performance if you perform the appropriate configuration of your SharePoint system before you start the import and disabled the above-mentioned features in the SharePoint importer.
The SharePoint Online Batch importer allows migrating documents and folders to SharePoint Online and OneDrive. Since OneDrive is based on SharePoint Online, you can use the SharePoint Online Batch importer to import documents and folders to OneDrive as well. If we refer to SharePoint Online in the following, this does apply to OneDrive as well in most cases. We will write appropriate notes in case the behavior of the importers differs for OneDrive.
The SharePoint Online Batch importer offers the following features:
Invalid trailing chars for folder name: SPACE, PERIOD
Invalid file or folder names: "AUX", "PRN", "NUL", "CON", "COM0", "COM1", "COM2", "COM3", "COM4", "COM5", "COM6", "COM7", "COM8", "COM9", "LPT0", "LPT1", "LPT2", "LPT3", "LPT4", "LPT5", "LPT6", "LPT7", "LPT8", "LPT9"
Consecutive PERIOD characters are not allowed in file or folder names
The following characters are not allowed in file or folder names: ~ # % & * { } \ : < > ? / | “
Max. length of a file path: 260 characters
Max. size of a file: 2 GB
Max. size of an attachment: 250 MB
Invalid trailing chars for folder name: SPACE, PERIOD
Invalid file or folder names: "AUX", "PRN", "NUL", "CON", "COM0", "COM1", "COM2", "COM3", "COM4", "COM5", "COM6", "COM7", "COM8", "COM9", "LPT0", "LPT1", "LPT2", "LPT3", "LPT4", "LPT5", "LPT6", "LPT7", "LPT8", "LPT9"
The following characters are not allowed in file or folder names: " # % * : < > ? / \ |
Max. length of a file path: 260 characters
Max. size of a file: 10 GB
Max. size of an attachment: 250 MB
Invalid trailing chars for folder name: SPACE, PERIOD
Invalid file or folder names: "AUX", "PRN", "NUL", "CON", "COM0", "COM1", "COM2", "COM3", "COM4", "COM5", "COM6", "COM7", "COM8", "COM9", "LPT0", "LPT1", "LPT2", "LPT3", "LPT4", "LPT5", "LPT6", "LPT7", "LPT8", "LPT9"
The following characters are not allowed in file or folder names: " * : < > ? / \ |
Max. length of a file path: 400 characters
Max. size of a file: 15 GB
Max. size of an attachment: 250 MB
adfsRealm Realm for relying party identifier. Depends on your ADFS configuration. Example: https://sharepoint.contoso.com or urn:sharepoint.contoso.com
username* The SharePoint user on whose behalf the import process will be executed. Should be a SharePoint site administrator. Example: sharepoint\administrator (direct authentication) or [email protected] (ADFS authentication) Note: If you import into a SharePoint sub-site, this user needs Full Control permission on the root site as well!
password* Password of the user specified above
autoAdjustVersioning Enable/Disable whether the lists/libraries should be updated to allow versions imports. Enabled: The importer will update the lists/libraries if needed. Disabled: In case the feature is needed in the import process but not allowed by the target lists/libraries and error will be thrown.
autoAdjustAttachments Enable/Disable whether the lists should be updated to allow attachments imports. Enabled: The importer will update the lists if needed. Disabled: In case the feature is needed in the import process but not allowed by the target lists/libraries and error will be thrown.
autoAddContentTypes Enable/Disable whether the lists/libraries should be updated to allow items with custom content type imports. Enabled: The importer will update the lists if needed. Disabled: In case the feature is needed in the import process but not allowed by the target lists/libraries and error will be thrown.
autoCreateFolders Enable/disable whether folders which do not exist should be created during import. Enabled: the importer created any specified folders automatically. Disabled: no new folders are created, but any existing folders (same path and name) are used. References to non-existing folders throw an error.
proxyURL This is the URL, which defines the location of your proxy to connect to the Internet. This parameter can be left blank if no proxy is used to connect to the internet.
proxyUsername The login of the user, who connects and authenticates on the proxy, which was specified in parameter proxyURL. Example: corporatedomain\username
proxyPassword Password of the proxy user specified above
loggingLevel* See Common Parameters.
library* Specify the name of the library, where to import the current object.
mc_content_location Specify the location of a document’s content file. If not set, the default content location (i.e. where the document has been scanned from) will be used automatically. Set a different path (including filename) if the content has moved since it was scanned, or if content should be substituted with another file.
parentFolder* Rule which sets the path for the current object inside the targeted Document Library item Example: /username/myfolder/folder If the current object shall be imported on root level of the targeted library, specify a forward slash “/”.
roleAssignments Specify role assignments for the current object. If a role definition is assigned to the current object, the migration-center SharePoint Importer breaks the role inheritance. It is possible to specify either a list of users and/or a list of SharePoint groups. If a group is specified, it is necessary, that the targeted SharePoint Group exists in your SharePoint Site. Pattern for setting single users: username;#roledefinitionname Pattern for setting groups: @groupName;#roledefinitionname Example: user;#Read @Contributors;#Contribute
site* Specify the target (sub-) site relative to your site collection, which was specified in the SharePoint Importer connector parameters. If the current object shall be imported on root level of the targeted site collection, specify a forward slash “/”
@My Document Library;#Any Custom Value describes the SharePoint document library named My Document library using only columns, which are defined explicitly in the SharePoint document library My Document Library. Everything after the delimiter ;# will be cut off on importing.
-
MyContent.dat
-
MyContent
MyContent.pdf
-
-
content.pdf
Contains a list of hyperlinks and their descriptions.
Announcements
104
Contains a set of simple announcements.
Contacts
105
Contains a list of contacts used for tracking people in a site.
Events
106
Contains a list of single and recurring events. An events list typically has special views for displaying events on a calendar.
Tasks
107
Contains a list of items that represent completed and pending work items.
DiscussionBoard
108
Contains discussions topics and their replies.
PictureLibrary
109
Contains a library adapted for storing and viewing digital pictures.
DataSources
110
Contains data connection description files. - hidden
XmlForm
115
Contains XML documents. An XML form library can also contain templates for displaying and editing XML files via forms, as well as rules for specifying how XML data is converted to and from list items.
NoCodeWorkflows
117
Contains additional workflow definitions that describe new processes that can be used within lists. These workflow definitions do not contain advanced code-based extensions. - hidden
WorkflowProcess
118
Contains a list used to support execution of custom workflow process actions. - hidden
WebPageLibrary
119
Contains a set of editable Web pages.
CustomGrid
120
Contains a set of list items with a grid-editing view.
WorkflowHistory
140
Contains a set of history items for instances of workflows.
GanttTasks
150
Contains a list of tasks with specialized Gantt views of task data.
IssueTracking
1100
Contains a list of items used to track issues.
Gets or sets a value that specifies the URL of the edit form to use for list items in the list. Clients specify a server-relative URL, and the server returns a site-relative URL.
DefaultNewFormUrl
String
Gets or sets a value that specifies the location of the default new form for the list. Clients specify a server-relative URL, and the server returns a site-relative URL.
Description
String
Gets or sets a value that specifies the description of the list.
Direction
String
Gets or sets a value that specifies the reading order of the list. Returns "NONE", "LTR", or "RTL".
DocumentTemplateUrl
String
Gets or sets a value that specifies the server-relative URL of the document template for the list. Returns a server-relative URL if the base type is DocumentLibrary, otherwise returns null.
DraftVersionVisibility
Number
Gets or sets a value that specifies the minimum permission required to view minor versions and drafts within the list. Represents an SP.DraftVisibilityType value: Reader = 0; Author = 1; Approver = 2.
EnableAttachments
Boolean
Gets or sets a value that specifies whether list item attachments are enabled for the list.
EnableFolderCreation
Boolean
Gets or sets a value that specifies whether new list folders can be added to the list.
EnableMinorVersions
Boolean
Gets or sets a value that specifies whether minor versions are enabled for the list.
EnableModeration
Boolean
Gets or sets a value that specifies whether content approval is enabled for the list.
EnableVersioning
Boolean
Gets or sets a value that specifies whether historical versions of list items and documents can be created in the list.
ForceCheckout
Boolean
Gets or sets a value that indicates whether forced checkout is enabled for the document library.
Hidden
Boolean
Gets or sets a Boolean value that specifies whether the list is hidden. If true, the server sets the OnQuickLaunch property to false.
IrmEnabled
Boolean
IrmExpire
Boolean
IrmReject
Boolean
IsApplicationList
Boolean
Gets or sets a value that specifies a flag that a client application can use to determine whether to display the list.
LastItemModifiedDate
DateTime
Gets a value that specifies the last time a list item, field, or property of the list was modified.
MultipleDataList
Boolean
Gets or sets a value that indicates whether the list in a Meeting Workspace site contains data for multiple meeting instances within the site.
NoCrawl
Boolean
Gets or sets a value that specifies that the crawler must not crawl the list.
OnQuickLaunch
Boolean
Gets or sets a value that specifies whether the list appears on the Quick Launch of the site. If true, the server sets the Hidden property to false.
ValidationFormula
String
Gets or sets a value that specifies the data validation criteria for a list item. Its length must be <= 1023.
ValidationMessage
String
Gets or sets a value that specifies the error message returned when data validation fails for a list item. Its length must be <= 1023.
mc_content_location
Name
fileExtension
Result filename
-
-
-
content.dat
\\Fileshare\Migration\Conversion\invoice.pdf
-
-
invoice.pdf
-
Template Name
Template Identifier
Description
GenericList
100
A basic list which can be adapted for multiple purposes.
DocumentLibrary
101
Contains a list of documents and other files.
Survey
102
Fields on a survey list represent questions that are asked of survey participants. Items in a list represent a set of responses to a particular survey.
Links
Attribute
Type
Description
ContentTypesEnabled
Boolean
Gets or sets a value that specifies whether content types are enabled for the list.
DefaultContentApprovalWorkflowId
String
Gets or sets a value that specifies the default workflow identifier for content approval on the list. Returns an empty GUID if there is no default content approval workflow.
DefaultDisplayFormUrl
String
Gets or sets a value that specifies the location of the default display form for the list. Clients specify a server-relative URL, and the server returns a site-relative URL
DefaultEditFormUrl
MyContent
103
String
Import documents to Microsoft SharePoint Online Document Library items
Import folders to Microsoft SharePoint Online Document Library items
Import link documents (.url files) to Microsoft SharePoint Online Document Library items
Set values for any columns in SharePoint Online, including user defined columns
Set values for SharePoint Online specific internal field values, i.e. author, editor, time created, time last modified
Set the folder path and create folders if they don’t exist
Set role assignments (permissions) on documents and folders
Import versions
Automatic or manual/custom version numbering
Set moderation/approval status on documents
Set Microsoft Information Protection (MIP) Sensitivity Labels on content files prior to uploading them to SPO
Set compliance (retention) labels on folders and documents
The SharePoint Online Batch importer is implemented mainly as a Job Server component but comes with a separate component for communicating with SharePoint Online (we refer to this component as CSOM Service because it uses the Microsoft CSOM API).
The SharePoint Online Batch importer comes with the following features
The importer uses the Azure storage containers provided by SharePoint Online.
The importer only supports
import of documents with metadata (incl. role assignments) and versions,
import of folders with metadata (incl. role assignments) and
import of link documents.
The following column / field types are currently supported by the importer:
User
Text
Integer
When importing documents or folders, the importer will automatically create any subfolders (of default type) needed below the configured base folder if parameter "autoCreateFolder" is set to "true".
The importer only supports setting managed metadata terms (taxonomies) by their ID in the format "{9ca5bcac-b5b5-445c-8dab-3d1c2181bcf2}".
Import into OneDrive was tested with Azure AD app-only principal authentication.
The importer supports importing files with long paths (i.e. longer than 260 characters), but you must enable this feature in the Windows operating system first (see ).
The importer will split the list of documents or folders to import into batches of approximately 250 items using the following rules
All objects must have the same target site & library.
All versions of an item must be contained in the same batch.
A batch should contain a maximum of 250 items.
The content size of the items in a batch should not exceed 250 MB
The second rule can lead to batches with more than 250 objects. The first or last rule can lead to batches with less than 250 objects.
You can only assign site collection groups to user/group fields and role assignments.
Any invalid XML characters in Text and Note field values will be automatically replaced by a '_' character during import. Otherwise the import would fail with an error.
The target of a migration job must be a SharePoint Site Collection. All objects in an import job must be imported into sites / libraries in the site collection specified in the importer definition.
Delta migration is not supported by the SharePoint Online Migration API and thus this feature is not available with the SharePoint Online Batch Importer. If you need the delta migration feature, please use our SharePoint Online Importer, which supports this feature.
If you set the system rule “declareAsRecord” to “true” for an object, the importer will declare the object as a record if the target library is a Records Library - no matter how the records management is configured for that library. If you set "declareAsRecord" to "false" for an object, the import will not declare the object as record, even if automatic records declaration is enabled for that library.
Due to the asynchronous nature of the SharePoint Migration API
The progress indicator in the migration-center client works currently only on a per batch level, i.e. if you import only one batch, the progress jumps from 0% to 100% when that batch was imported. Future versions of the importer may provide a more granular progress indicator.
The migration-center database might not reflect the actual import state of the objects in the migset. For example, it might happen that objects get imported but are still marked as Validated or Error in the migration-center database. For technical details please see
Due to the per batch functionality of the importer, if a batch contains one or more errors, the entire batch will not be imported and all documents will be set to the error state, even those that do not contain actual errors. In order to identify the objects causing the error please consult the import run logs and the . Once the problem objects are fixed or removed from the migration set the import will be successful.
If a target site has the Document ID feature enabled: The document ID will be populated for the files imported via the migration API as well – just that it will happen asynchronously. So the DocId might be missing right after the import, but it will be populated within 24hrs (when the backend job runs).
Due to a limitation in the SPO Bulk Import API, the importer allows you to set values for choice/multi-choice fields that are not in the list of available values - even if the "fill-in" option is disabled. If you want to ensure that only allowed values are set, please use a mapping list in the transformation rules for the choice/multi-choice fields.
When trying to import a broken version tree, the import fails for all documents (even the ones that had a correct version tree) with an error status (#57099).
When setting a compliance label on a folder, all children of that folder will get the same label if no compliance label is specified for them.
When importing objects with mandatory attributes in SPO the objects will be imported and no error will be thrown even when the mandatory attributes were not set in migration-center. This is important to note as the SharePoint Online Importer, which needs to be used for delta migrations, will throw errors on import if mandatory attributes are not set.
One way to work around this limitation is to set these attributes as mandatory in the Object Type created inside migration-center. This way any empty mandatory attributes will throw errors during the Validation step.
Users cannot be set to custom "Person or Group" attributes (but Group names can be set). System attributes like Author or Editor can contains Users.
The moderation comment cannot be set, even though it is configured in the corresponding system rule. This is a Microsoft issue in the SharePoint Migration API
The migration-center SharePoint Online Batch Importer requires installing an additional component.
This additional component needs the .NET Framework 4.7.2 installed and it’s designed to run as a Windows service and must be installed on all machines where the a Job Server is installed.
To install this additional component, it is necessary to run an installation file, which is located within the SharePoint folder in the Jobserver instal: ...\lib\mc-spo-batch-importer\CSOM_Service\install
To install the service run the install.bat file using administrative privileges. You need to start it manually after the install. Afterwards the service is configured to start automatically at system startup.
When running the CSOM service with a domain account you might need to grant access to the account by running the following command:
netsh http add urlacl url=http://+:57097/ user=<your user>
<your user> might be in the format domain\username or [email protected]
To uninstall the service run the uninstall.bat file using administrative privileges.
Before uninstalling the Jobserver component, the CSOM service must be uninstalled as described here.
The app-only principal authentication used by the importer calls the following HTTPS endpoints. Please ensure that the job server machine has access to those endpoints:
<tenant name>.sharepoint.com:443
accounts.accesscontrol.windows.net:443
The importer supports only app-principal authentication for connecting to SharePoint Online. The app-principal authentication comes in two flavors:
Azure AD app-only principal authentication Requires full control access for the migration-center application on your SharePoint Online tenant. This includes full control on ALL site collections of your tenant.
SharePoint app-only principal authentication Can be set to restrict the access of the migration-center application to certain site collections or sites.
The migration-center SharePoint Online Importer supports Azure AD app-only authentication. This is the authentication method for background processes accessing SharePoint Online recommended by Microsoft. When using SharePoint Online you can define applications in Azure AD and these applications can be granted permissions to your SharePoint Online tenant.
Please follow these steps in order to setup your migration-center application in your Azure AD.
The information in this chapter is based on the following Microsoft guidelines: https://docs.microsoft.com/en-us/sharepoint/dev/solution-guidance/security-apponly-azuread
In Azure AD when doing App-Only you typically use a certificate to request access: anyone having the certificate and its private key can use the app and the permissions granted to the app. The below steps walk you through the setup of this model.
You are now ready to configure the Azure AD Application for invoking SharePoint Online with an App-Only access token. To do that, you must create and configure a self-signed X.509 certificate, which will be used to authenticate your migration-center Application against Azure AD, while requesting the App-Only access token. First you must create the self-signed X.509 Certificate, which can be created using the makecert.exe tool that is available in the Windows SDK or through a provided PowerShell script which does not have a dependency to makecert. Using the PowerShell script is the preferred method and is explained in this chapter.
To create a self-signed certificate with this script, which you can find in the <job server folder>\lib\mc-spo-batch-importer\scripts folder:
.\Create-SelfSignedCertificate.ps1 -CommonName "MyCompanyName" -StartDate 2020-07-01 -EndDate 2022-06-30
You will be asked to give a password to encrypt your private key, and both the .PFX file and .CER file will be exported to the current folder.
Next step is registering an Azure AD application in the Azure Active Directory tenant that is linked to your Office 365 tenant. To do that, open the Office 365 Admin Center (https://admin.microsoft.com) using the account of a user member of the Tenant Global Admins group. Click on the "Azure Active Directory" link that is available under the "Admin centers" group in the left-side tree view of the Office 365 Admin Center. In the new browser's tab that will be opened you will find the Microsoft Azure portal (https://portal.azure.com/). If it is the first time that you access the Azure portal with your account, you will have to register a new Azure subscription, providing some information and a credit card for any payment need. But don't worry, in order to play with Azure AD and to register an Office 365 Application you will not pay anything. In fact, those are free capabilities. Once having access to the Azure portal, select the "Azure Active Directory" section and choose the option "App registrations". See the next figure for further details.
In the "App registrations" tab you will find the list of Azure AD applications registered in your tenant. Click the "New registration" button in the upper left part of the blade. Next, provide a name for your application, e.g. “migration-center” and click on "Register" at the bottom of the blade.
Once the application has been created copy the "Application (client) ID" as you’ll need it later.
Now click on "API permissions" in the left menu bar and click on the "Add a permission" button. A new blade will appear. Here you choose the permissions that are required by migration-center. Choose i.e.:
Microsoft APIs
SharePoint
Application permissions
Sites
Sites.FullControl.All
TermStore
TermStore.Read.All
User
User.Read.All
Graph
Application permissions
Sites
Sites.FullControl.All
Click on the blue "Add permissions" button at the bottom to add the permissions to your application. The "Application permissions" are those granted to the migration-center application when running as App Only.
Next step is “connecting” the certificate you created earlier to the application. Click on "Certificates & secrets" in the left menu bar. Click on the "Upload certificate" button, select the .CER file you generated earlier and click on "Add" to upload it.
The “Sites.FullControl.All” application permission requires admin consent in a tenant before it can be used. In order to do this, click on "API permissions" in the left menu again. At the bottom you will see a section "Grand consent". Click on the "Grand admin consent for" button and confirm the action by clicking on the "Yes" button that appears at the top.
In order to use Azure AD app-only principal authentication with the SharePoint Online Batch importer you need to fill in the following importer parameters with the information you gathered in the steps above:
Configuration parameters
Values
appClientId
The ID of the migration-center Azure AD application.
appCertificatePath
The full path to the certificate .PFX file, which you have generated when setting up the Azure AD application.
appCertificatePassword
The password to read the certificate specified in appCertificatePath.
SharePoint app-only authentication allows you to grant fine granular access permissions on your SharePoint Online tenant for the migration-center application.
The information in this chapter is based on the following guidelines from Microsoft: https://docs.microsoft.com/en-us/sharepoint/dev/solution-guidance/security-apponly-azureacs https://docs.microsoft.com/en-us/sharepoint/dev/sp-add-ins/add-in-permissions-in-sharepoint
In Azure AD when doing App-Only you typically use a certificate to request access: anyone having the certificate and its private key can use the app and the permissions granted to the app. The below steps walk you through the setup of this model.
You are now ready to configure the Azure AD Application for invoking SharePoint Online with an App-Only access token. To do that, you must create and configure a self-signed X.509 certificate, which will be used to authenticate your migration-center Application against Azure AD, while requesting the App-Only access token. First you must create the self-signed X.509 Certificate, which can be created by using the makecert.exe tool that is available in the Windows SDK or through a provided PowerShell script which does not have a dependency to makecert. Using the PowerShell script is the preferred method and is explained in this chapter.
To create a self-signed certificate with this script, which you can find in the <job server folder>\lib\mc-spo-batch-importer\scripts folder:
.\Create-SelfSignedCertificate.ps1 -CommonName "MyCompanyName" -StartDate 2020-07-01 -EndDate 2022-06-30
You will be asked to give a password to encrypt your private key, and both the .PFX file and .CER file will be exported to the current folder.
Next step is registering an Azure AD application in the Azure Active Directory tenant that is linked to your Office 365 tenant. To do that, open the Office 365 Admin Center (https://admin.microsoft.com) using the account of a user member of the Tenant Global Admins group. Click on the "Azure Active Directory" link that is available under the "Admin centers" group in the left-side tree view of the Office 365 Admin Center. In the new browser's tab that will be opened you will find the Microsoft Azure portal (https://portal.azure.com/). If it is the first time that you access the Azure portal with your account, you will have to register a new Azure subscription, providing some information and a credit card for any payment need. But don't worry, in order to play with Azure AD and to register an Office 365 Application you will not pay anything. In fact, those are free capabilities. Once having access to the Azure portal, select the "Azure Active Directory" section and choose the option "App registrations". See the next figure for further details.
In the "App registrations" tab you will find the list of Azure AD applications registered in your tenant. Click the "New registration" button in the upper left part of the blade. Next, provide a name for your application, e.g. “migration-center” and click on "Register" at the bottom of the blade.
Next step is “connecting” the certificate you created earlier to the application. Click on "Certificates & secrets" in the left menu bar. Click on the "Upload certificate" button, select the .CER file you generated earlier and click on "Add" to upload it.
After that, you need to create a secret key. Click on “New client secret” to generate a new secret key. Give it an appropriate description, e.g. “migration-center” and choose an expiration period that matches your migration project time frame. Click on “Add” to create the key.
Store the retrieved information (client id and client secret) since you'll need this later! Please safeguard the created client id/secret combination as would it be your administrator account. Using this client id/secret one can read/update all data in your SharePoint Online environment!
Next step is granting permissions to the newly created principal in SharePoint Online.
If you want to grant tenant scoped permissions this granting can only be done via the “appinv.aspx” page on the tenant administration site. If your tenant URL is https://contoso-admin.sharepoint.com, you can reach this site via https://contoso-admin.sharepoint.com/_layouts/15/appinv.aspx.
If you want to grant site collection scoped permissions, open the “appinv.aspx” on the specific site collection, e.g. https://contoso.sharepoint.com/sites/mysite/_layouts/15/appinv.aspx.
Once the page is loaded add your client id and look up the created principal by pressing the "Lookup" button:
Please enter “www.migration-center.com” in field “App Domain” and “https://www.migration-center.com” in field “Redirect URL”.
To grant permissions, you'll need to provide the permission XML that describes the needed permissions. The migration-center application will always need the “FullControl” permission. Use the following permission XML for granting tenant scoped permissions:
Use this permission XML for granting site collection scoped permissions:
When you click on “Create” you'll be presented with a permission consent dialog. Press “Trust It” to grant the permissions:
Please safeguard the created client id/secret combination as would it be your administrator account. Using these one can read/update all data in your SharePoint Online environment!
In order to use SharePoint app-only principal authentication with the SharePoint Online importer you need to fill in the following importer parameters with the information you gathered in the steps above:
Configuration parameters
Values
appClientId
The ID of the SharePoint application you have created.
appClientSecret
The client secret, which you have generated when setting up the SharePoint application.
To create a new SharePoint Online Batch Importer, go to -Importers- and press the [New] button. Then select the Adapter Type "SPOnline Batch".
The common adaptor parameters are described in Common Parameters.
The configuration parameters available for the SharePoint Online Batch Importer are described below:
tenantName* The name of your SharePoint Online Tenant Example: Contoso
siteCollectionUrl* The URL of your target site collection. See SubSite vs SiteCollection for details. Examples: https://contoso.sharepoint.com/sites/MySite https://contoso-my.sharepoint.com (for OneDrive)
appClientId* The ID of either the migration-center Azure AD application or the SharePoint application. Example: ab187da0-c04d-4f82-9f43-51f41c0a3bf0 See: Authentication.
appCertificatePath* The full path to the certificate .PFX file, which you have generated when setting up the Azure AD application. Example: D:\migration-center\config\azure-ad-app-cert.pfx See: .
appCertificatePassword The password to read the certificate specified in appCertificatePath. See: .
appClientSecret The client secret, which you have generated when setting up the SharePoint application. See: .
proxyServer This is the URL, which defines the location of your proxy to connect to the Internet. Example. http://proxy.local:3128
proxyUsername The login of the user, who connects and authenticates on the proxy, which was specified in parameter proxyServer. Example: corporatedomain\username
proxyPassword Password of the proxy user specified above.
autoCreateFolder* If set the importer will automatically create the folder strcture needed for importing the object.
autoVersioning* Sets whether version numbers should be generated automatically by the importer. Enabled: The importer will generate consecutive version numbers for the versions of a document based on the versioning setting of the target library. Disabled: The user must provide appropriate version numbers for the documents using the "s__versionNumber" system attribute.
mipConfigFile Full path to the Microsoft Information Protection (MIP) configuration file, which contains additional settings for setting sensitivity labels on the content files to import. Example: C:\migration-center\mip.config See:
numberOfThreads* Number of batches that shall be imported in parallel. Default: 8
loggingLevel* See: .
Parameters marked with an asterisk (*) are mandatory.
In order to import documents, you need to create a migration set with a processing type of “<Source>ToSPOnlineBatch(document)”.
After you have selected the objects to import from the file scans, you need to configure the migration set’s transformation rules. A migration set with a target type of “SPOnlineBatch(document)” has the following system attributes, which primarily determine the content type, name and location of the documents.
mc_content_location Specify the location of a document’s content file. If not set, the default content location (i.e. where the document has been scanned from) will be used automatically. Set a different path (including filename) if the content has moved since it was scanned, or if content should be substituted with another file.
s__complianceTag Rule for setting the compliance tag for the folder. Example: INVOICE See: Compliance Labels.
s__contentType* Rule for setting the SharePoint content type of the document. This value must match an existing migration-center object type definition and of course a content type in the target SharePoint document library.
s__createdBy Name of the user who created the document. The value must be a unique username. Example: [email protected]
s__createdDate Sets the date and time when the document was created.
s__declareAsRecord Flag indicating if the document should be declared as a record. Record declaration will only work if SharePoint Online is the target (and not OneDrive), the target library is a Records Library and manual record declaration is enabled in the library.
s__library* Specify the title of the target library. Note: For import into a personal OneDrive use Documents as library
s__moderationStatus Sets the moderation / approval status of the document. Must be one of the following values (either the status names or their numerical value): 0 or Approved
1 or Denied 2 or Pending 3 or Draft
4 or Scheduled
s__moderationStatusComment Sets the moderation / approval status comment of the document.
s__modifiedBy Name of the user who last modified the document. The value must be a unique username. Example: [email protected]
s__modifiedDate Date and time when the document was last modified.
s__name* The name of the document including its file extension. Example: My Document.docx
s__parentFolder* The parent folder of the document. Example: /folder/subfolder
s__roleAssignments Specify role assignments for the current object. If a role definition is assigned to the current object, the migration-center SharePoint Importer breaks the role inheritance. It is possible to specify either a list of users and/or a list of SharePoint groups. If a group is specified, it is necessary, that the targeted SharePoint Group exists in your SharePoint Site. Pattern for setting single users: username;#roledefinitionname Pattern for setting groups: @groupName;#roledefinitionname Example: user;#Read @Contributors;#Contribute
s__sensitivityLabel Name of the sensitivity label to apply on the content file of the document.
Example: Confidential
Note: When applying sensitivity labels, you also need to specify the path to an additional MIP configuration file. See: .
s__site* Specify the target (sub-)site for the document.
Example: My Site or My Site/My SubSite
For OneDrive: use /personal/<your personal site> Example: /personal/donald_duck_onmicrosoft_com
s__versionNumber Sets the version number of the document. Must be in the format: x.y Example: 1.0
Mandatory if importer parameter "autoVersioning" is set to "false".
Specified value will be ignored if parameter "autoVersioning" is set to "true".
SharePoint Online supports documents with the file format ".url". We call these documents "link documents" since they do not have real content but just point to another document in SharePoint Online or to an external web site. The importer will create the necessary content of the link documents on the fly and save them in the following folder: <mc log folder>/SPOnline Batch Importer/<job run id>/link_files. Thus, the importer will ignore the content of any source object that is imported as a link document because it will import the generated link content instead.
In order to import link documents, you need to create a migration set with a processing type of “<Source>ToSPOnlineBatch(link)”.
After you have selected the objects to import from the file scans, you need to configure the migration set’s transformation rules. A migration set with a target type of “SPOnlineBatch(link)” has the following system attributes, which primarily determine the content type, name and URL of the linked documents or web site respectively.
Compared to the Documents migset, the Link migset is missing the mc_content_location, s__complianceTag, s__declareAsRecord, s__moderationStatus, s__moderationStatusComment, s__sensitivityLabel system rules and has the following new rules:
s__url* The target URL of this link document. Can be a URL to another SharePoint document or a URL to an external web site.
Example:
https://contoso.sharepoint.com/sites/MySite/Documents/Test.docx
In order to import folders, you need to create a migration set with a processing type of “<Source>ToSPOnlineBatch(folder)”.
After you have selected the objects to import from the file scans, you need to configure the migration set’s transformation rules.
A migration set with a target type of “SPOnlineBatch(folder)” has the following system attributes, which primarily determine the content type, name and location of the folders.
Compared to the Documents migset, the Folder migset is missing the mc_content_location, s__declareAsRecord, s__moderationStatus, s__moderationStatusComment, s__sensitivityLabel and s__versionNumber system rules, and has no additional ones.
The SharePoint Online importer supports applying Microsoft Information Protection (MIP) sensitivity labels on the content files before they get uploaded to SharePoint Online. To learn more about sensitivity labels, please see https://docs.microsoft.com/en-us/microsoft-365/compliance/sensitivity-labels?view=o365-worldwide.
The MIP software development kit provided by Microsoft that we use to apply the sensitivity labels on the content files requires you to register an application in your Azure AD. You could use the same app as in Azure AD app-only principal authentication or setup a separate application as described here: https://docs.microsoft.com/en-us/information-protection/develop/setup-configure-mip#register-a-client-application-with-azure-active-directory
You need to create a client secret for your registered application and configure the following access permissions:
The Microsoft MIP SDK also needs the VC++ runtime installed on the job server machine to work properly. You might get a LoadLibrary failed for: [C:\fme AG\migration-center Server Components 3.15\lib\mc-sharepointonline-importer\MIPService\x86\mip_dotnet.dll] error if the VC++ runtime is missing and you want to apply sensitivity labels on your documents.
For your convenience, we provide the VC++ runtime installers in the lib\mc-sharepointonline-importer\MIPService\VC_Redistributables folder of your MC job server installation. Which variant to install (i.e. x86 or x64) depends on your .NET configuration. Usually you should install the x86 VC++ runtime (even on a x64 system). If that does not work, you should install the x64 variant.
The SharePoint Online Batch importer requires you to provide several configuration parameters in a XML configuration file. You can find a template configuration file (template-mip.config) in the lib\mc-spo-batch-importer folder of your migration-center job server installation.
Create a copy of the template file, fill in the required information from your Azure AD app that you had created in the previous step, and enter the full path to your config file in the mipConfigFile parameter of your SharePoint Online Batch importer. The result should look similar to the following:
We provide a Java based command line tool for encryption, which you must use to encrypt the Azure.App.Secret value before you put it in the configuration file. To encrypt the secret, proceed as follows:
Open a command line window on the job server machine.
Switch to the migration-center Server Components <version>\lib\mc-core folder, e.g. migration-center Server Components 3.16\lib\mc-core
Run the following command: java -cp mc-common-<version>.jar de.fme.mc.common.encryption.CmdTool
The tool will ask for the text to encrypt. Enter or paste the secret value and press enter.
The tool will output the encrypted text. Copy and paste it into the configuration file.
Compliance labels are managed in the MS 365 compliance center, which you can access with the following URL: https://compliance.microsoft.com/
For more details about creating and publishing compliance labels, please see https://docs.microsoft.com/en-us/microsoft-365/compliance/create-apply-retention-labels?view=o365-worldwide
You can assign any label that is published for the target SharePoint site to the folders and documents in a migration set. The migration-center provides a new system rule for setting compliance labels:
s__complianceTag
If you want to set a label on a document or folder, it is mandatory to specify the label name in the "s__complianceTag" system rule.
The importer will check before importing the object if the specified label is available in the target site and throw an error if it is not in the list of available labels.
This chapter will give you an overview of the importer’s operating principle.
Each SharePoint Online Batch Importer job will go through the following steps:
Split the list of objects to import into batches of approximately 250 objects.
For each batch repeat
Generate the XML files (e.g. Manifest.xml etc.) necessary for submitting the batch to the SharePoint Migration API.
Upload XML files and content files of the batch to an Azure BLOB container storage.
Submit the import batch to the SharePoint platform as a migration job.
Monitor the progress of the migration job.
When the migration job has finished, verify that all objects submitted for import were successfully imported by retrieving them by ID and save the result of the verification back to the migration-center database.
Depending on your job configuration, several batches are imported in parallel (see “numberOfThreads” parameter in the import job configuration).
The SharePoint Online Batch Importer will store the following information for imported objects in the MC database, which will allow you to trace an imported object back to the corresponding source object.
Attribute in MC database
Value
ID_IN_TARGET_SYSTEM
String that consists of the following components:
<list item id>|<library guid>[|<version number>]
The version number component is optional. These information will allow you to uniquely identify the imported object in the target system.
Example values:
387088|d69e991b-d488-49bb-b739-858669e60b19|1.0
384956|d69e991b-d488-49bb-b739-858669e60b19
OBJECT_INFO1
Server relative URL to the object.
Example values:
/teams/bu6/TestLibrary/Test
/teams/bu6/TestLibrary/Test/Document.txt
Note: OBJECT_INFO1 is an internal column in the SOURCE_OBJECTS table and not visible in the MC client.
Please note that the URLs in the OBJECT_INFO1 attribute will only be valid for the latest version in a version tree because SharePoint uses different URLs for latest versions and old versions.
For example, if the document from the example above had two versions 1.0 and 2.0, both values in OBJECT_INFO1 would be:
/teams/bu6/TestLibrary/Test/Document.txt
But the correct URL for version 1.0 would be: /teams/bu6/TestLibrary/_vti_history/512/Test/Document.txt
The SharePoint Import Migration API requires the following XML files for each import batch:
ExportSettings.XML
LookupListMap.XML
Manifest.XML
Requirements.XML
RootObjectMap.XML
SystemData.XML
UserGroupMap.XML
ViewFormsList.XML
For more details on those files, please see https://docs.microsoft.com/en-us/sharepoint/dev/apis/migration-api-overview#import-package-structure
The siteCollectionUrl parameter in the importer requires the URL of a SiteCollection, not a SubSite.
SiteCollections have their own permissions and access. Consider the following two SiteCollections:
https://contoso.sharepoint.com https://contoso.sharepoint.com/sites/MySite
If the appClientID was created for https://contoso.sharepoint.com/sites/MySite but in the importer siteCollectionUrl you are setting https://contoso.sharepoint.com you will receive a 401 Unauthorized error.
Go to the site you are trying to import into, select Site Contents and then Site Settings.
If you see the Site Collection Administration groups with all relevant links as in the image below then it means you are on a site collection.
If you see the Site Collection Administration with a single link saying Go to top level site settings as in the image below then you are on subsite.
Additional log files generated by the SharePoint Online Batch Importer can be found in the Server Components installation folder of the machine where the job was run, e.g. …\fme AG\migration-center Server Components <Version>\logs\SPOnline Batch Importer\<job run id>
You can find the following files in the <job run id> folder:
The import-job.log contains detailed information about the job run and can be used to investigate import issues.
The generated manifest files for each batch in the <batch number>/manifest sub-folder.
The log files generated by SharePoint Online for each batch in the <batch-number>/spo-logs sub-folder.
The content files generated for link documents in the <batch number>/link_files sub-folder.
<AppPermissionRequests AllowAppOnlyPolicy="true">
<AppPermissionRequest Scope="http://sharepoint/content/tenant" Right="FullControl" />
<AppPermissionRequest Scope="http://sharepoint/taxonomy" Right="Read" />
</AppPermissionRequests><AppPermissionRequests AllowAppOnlyPolicy="true">
<AppPermissionRequest Scope="http://sharepoint/content/sitecollection" Right="FullControl" />
<AppPermissionRequest Scope="http://sharepoint/taxonomy" Right="Read" />
</AppPermissionRequests><?xml version="1.0" encoding="utf-8"?>
<configuration>
<appSettings>
<!-- Azure App Settings -->
<add key="Azure.App.Id" value="<YOUR AZURE APP ID>" />
<add key="Azure.App.Name" value="<YOUR AZURE APP NAME>"/>
<add key="Azure.App.Version" value="1.0.0"/>
<add key="Azure.App.Secret" value="<YOUR ENCRYPTED AZURE APP SECRET>"/>
<add key="Azure.App.RedirectUri" value="<YOUR AZURE APP REDIRECT URL>"/>
<add key="Azure.Tenant.Domain" value="<YOUR AZURE TENANT DOMAIN>"/>
<!-- Optional: Use a temporary folder to store the labeled files. If empty, the labeled files will be placed next to their originals. -->
<add key="Labeling.Temp.Folder" value="<OPTIONAL PATH TO LABELED CONTENT FOLDER>"/>
<!-- File name format for the labeled files. The placeholders {id}, {cnt}, and {ext} will be replaced -->
<!-- by job run id, document counter, and original file extension at runtime. -->
<add key="Labeling.Filename.Format" value="lbld_{id}_{cnt}{ext}"/>
</appSettings>
</configuration><?xml version="1.0" encoding="utf-8"?>
<configuration>
<appSettings>
<!-- Azure App Settings -->
<add key="Azure.App.Id" value="91583618-eb95-4ae9-8f9e-c5259491f66d" />
<add key="Azure.App.Name" value="miptest"/>
<add key="Azure.App.Version" value="1.0.0"/>
<add key="Azure.App.Secret" value="0;#75+wbxpdQ0c=;#pp39p7v4QA57VKiP0NNcnuX/FEk2FiE8iD4PrJnysfLuDbNra2xsFHA2K9wAKG8z"/>
<add key="Azure.App.RedirectUri" value="miptest://authorize"/>
<add key="Azure.Tenant.Domain" value="migrationcenter.onmicrosoft.com"/>
<!-- Optional: Use a temporary folder to store the labeled files. If empty, the labeled files will be placed next to their originals. -->
<add key="Labeling.Temp.Folder" value="C:\Temp\sensitivity labeled docs"/>
<!-- File name format for the labeled files. The placeholders {id}, {cnt}, and {ext} will be replaced -->
<!-- by job run id, document counter, and original file extension at runtime. -->
<add key="Labeling.Filename.Format" value="lbld_{id}_{cnt}{ext}"/>
</appSettings>
</configuration>Number
Choice and MultiChoice
Lookup
Note
DateTime
Boolean
TaxonomyFieldType


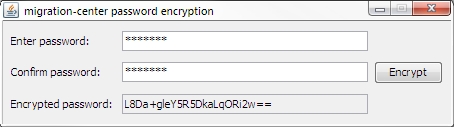
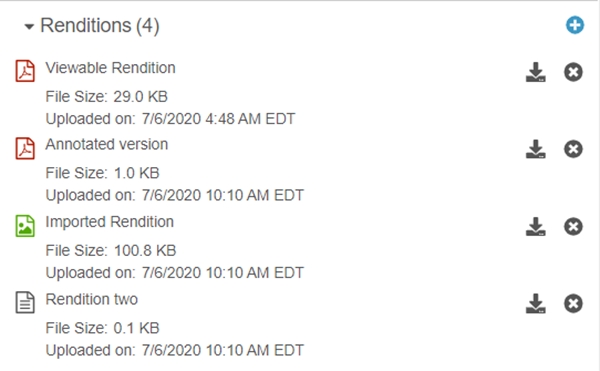
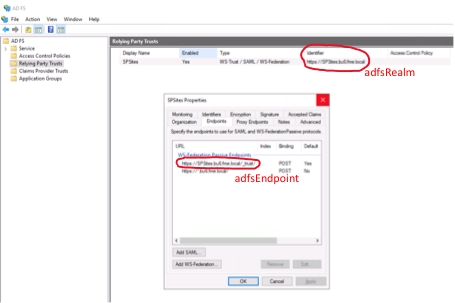
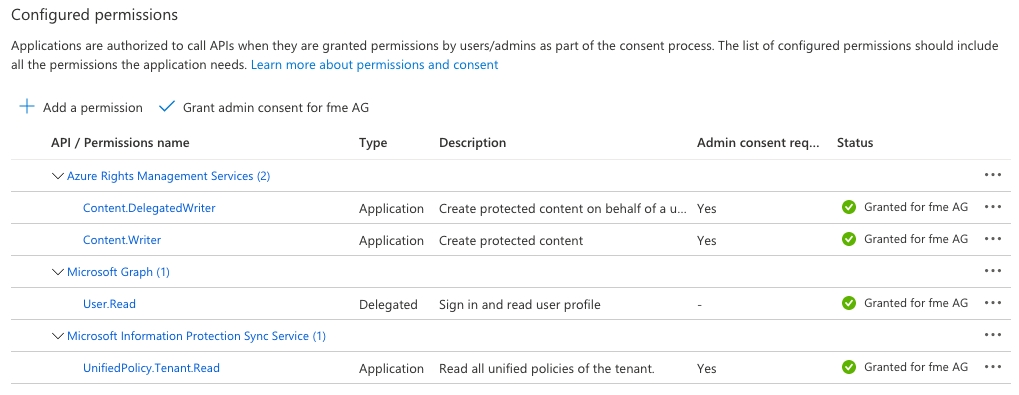
The Documentum InPlace importer takes the objects processed in migration-center and imports them back in a Documentum repository. Documentum InPlace importer works together only with Documentum scanner.
Documentum InPlace adaptor supports a limited amount of Documentum features such as changing the object types of the documents, changing the links of the documents and changing the attributes. Changing object’s relations is not supported, neither is changing the Virtual documents or Audit trails.
The supported Documentum Content Server versions are 5.3 – 20.2, including service packs. For accessing a Documentum repository Documentum Foundation Classes 5.3 or newer is required. Any combinations of DFC versions and Content Server versions supported by EMC Documentum are also supported by migration-center’s Documentum InPlace Importer, but it is recommended to use the DFC version matching the version of the Content Server targeted for import. The DFC must be installed and configured on every machine where migration-center Server Components is deployed.
Starting from version 3.9 of migration-center additional configurations need to be made for the Documentum connector to be able to locate Documentum Foundation Classes. This is done by modifying the dfc.conf file, located in the Job Server installation folder.
There are two settings inside the file that by default match the paths of a standard DFC install. One needs to have the path for the config folder of DFC and the other needs the path to the dctm.jar.
Example:
If the DFC version used by the migration-center Jobserver is not compatible with the Java version or the Content Server version it is connecting to, errors might be encountered when running a Documentum connector.
When encountering the following error, the first thing to check is the DFC - Java - DCTM compatibility matrixes.
As Documentum InPlace does not alter the content of migrated documents, the parameter skipContent should be checked in the Documentum scanner’s configuration.
For more details regarding the scanner please check user guide.
To create a new Documentum InPlace Importer job, specify the respective adapter type in the importer’s Properties window – from the list of available connectors, “DocumentumInPlace” must be selected. Once the adapter type has been selected, the Parameters list will be populated with the parameters specific to the selected adapter type, in this case the Documentum.
The Properties window of an importer can be accessed by double-clicking an importer in the list, by selecting the Properties button from the toolbar or from the context menu.
The common adaptor parameters are described in .
The configuration parameters available for the Documentum InPlace importer are described below:
username* Username for connecting to the target repository. A user account with super user privileges must be used to support the full Documentum functionality offered by migration-center.
password* The user’s password.
repository* Name of the target repository. The target repository must be accessible from the machine where the selected Job Server is running.
moveContentOnly
Parameters marked with an asterisk (*) are mandatory.
Changing the types of the documents is possible with the Documentum InPlace Importer, by setting the value of the r_object_type attribute to a new type. In order to update the target type of the document, the new target type needs to be created beforehand in migration-center in Manage > Object types section and the attributes need to be associated in the Associations tab of the Transformation rules window.
migration-center Client does not connect directly to any source or target system to extract information about r_object_type thus object type definitions can be exported from Documentum to a CSV file which in turn can be imported to migration-center Object Types definition window.
DqMan is recommended to connect to Documentum to extract the object type definition. DqMan is an administration Tool for EMC Documentum supporting DQL queries and API commands and much more. dqMan can be purchased at . Other comparable administration tools can also be used, provided they can output a compatible CSV file or generate some similar output, which can be processed to match the required format using other tools.
Start dqMan and connect to the target DOCUMENTUM repository. dqMan normally starts with the interface for working with DQL selected by default. Press the [DQL] button in the toolbar if not already selected.
In the “DQL Query” box, paste the following command and replace dm_document with the targeted object type: select distinct t.attr_name, t.attr_type, '0' as min_length, t.attr_length, t.attr_repeating, a.not_null as mandatory from dm_type t, dmi_dd_attr_info a where t.name=a.type_name and t.attr_name=a.attr_name and t.name='dm_document' enable(row_based); Press the [Run] button.
Click somewhere in the “Results” box. Use {CTRL+A} to select all. Right-click to open the context menu and choose <Export to> <CSV>.
The attributes of documents can be updated, with the values provided by the user, through the associations tab.
Removing a value for an attribute is possible by not providing a value for that attribute and associating it.
The attributes r_creation_date and r_creator_name cannot be modified, however r_modify_date and r_modifier can.
In order to set the r_modify_date and r_modifier attributes they need to have the values associated in Associations section. If the attributes r_modify_date and r_modifier are not set, the current date and current user will be set to the documents.
Permissions can be assigned to documents by setting and associating the attributes group_permit, world_permit and owner_permit. For setting ACLs, the attributes acl_domain and acl_name must be used. The user must set either *_permit attributes or acl_* attributes. If both*_permit attributes or acl_* attributes are configured to be migrated together the *_permit attributes will override the permissions set by the acl_* attributes. Because Documentum will not throw an error in such a case migration-center will not be able to tell that the acl_* attributes have been overridden and as such it will not report an error either, considering that all attributes have been set correctly.
For changing the links of the documents, dcmt_obj_link rule for system attribute is used. The rule is multi value thus a document can be linked in multiple locations.
If the dctm_obj_links attribute is set, the old links of the documents will be replaced with the new links.
If the dctm_obj_links attribute is not set, the links will not be updated, and the document will be linked in the original location.
As other migration-center paths, InPlace Importer has some predefined system attributes:
dctm_obj_link this must be filled with the links where the objects should be placed.
r_object_type must be set to a valid Documentum object type. This is normally “dm_document” but custom object types are supported as well.
The importer allows moving the content from the actual storage to another storage. This can be done by setting the target storage name in the attribute “a_storage_type”. When this attribute is set, the importer will use the MIGRATE_CONTENT server method for moving the content to the specified storage. The importer parameters allow you to specify if the renditions or checked out content will be moved and if the content will be removed from the original storage. For more details regarding these configurations see .
In case of any error that may occur during the content movement a generic error is logged in the importer run log but another log with the root cause of the error is created on the content server in the location specified in the importer parameter “moveContentLogFile”.
If the storage name specified in the rule “a_storage_type” is the same as the storage where content is already stored, the importer will just mark the object as being successfully processed, so no error or warning is logged in this case.
This list displays which Documentum attributes can be associated with a migration-center transformation rule.
Custom object types:
Introduction
The Veeva Importer is one of the target connectors available in migration-center starting with version 3.7. It takes the objects processed in migration-center and imports them into a Veeva Vault. Currently, for every supported Veeva Vault, there is a specific importer type:
Clinical: Clinical Importer
Quality: Quality Importer
RIM: RIM Importer
Currently, the Veeva Connector uses version 22.3 of the Veeva REST API.
The objectsOrder feature requires that all the object_name values present in the migset are set in the parameter, otherwise the order will be decided by the importer. The values must also be present in Veeva Vault. If a value that is not present in Veeva Vault is set, the importer will not throw an error. (#59981, #59980)
Setting version labels directly as minor or major does not work for binders. (#53160) (see for workaround)
No error reported when setting values to Inactive Fields in Veeva Importer (#50880)
The importer uses FTP to upload the content of the documents and their versions to the Veeva Vault environment. This means the content will be uploaded first to the Veeva FTP server, so the necessary outbound ports (i.e. 21 and 56000 – 56100) should be opened in your firewalls as described here:
Before starting the ingestion into Veeva Vault you should inform Vault Product Support about this by filling this form:
You should use the form 3 business days in advance of any migration and at least one week in advance of any significant migration. A significant migration includes over 10,000 office documents, 1,000 large documents (like video) or 500,000 object records.
In addition, if Migration is being run during “off hours” for the Vault’s location, or weekends, you should ensure that Vault Product Support is aware of requested activity.
To create a new Veeva Clinical Importer job click on the New Importer button and select “Veeva Clinical” from the adapter type dropdown list. Once the adapter type has been selected, the parameters list will be populated with the Veeva parameters. The other types of Veeva Importer can be created in a similar way by selecting the corresponding adapter type.
The Properties window of an importer can be accessed by double-clicking an importer in the list or selecting the Properties button or entry from the toolbar or context menu.
The common adaptor parameters are described in .
The configuration parameters available for the Veeva Importer are described below:
username* Veeva username. It must be a Vault Owner.
password* The user’s password.
server* Veeva Vault name. Ex: fme-clinical.veevavault.com
proxyServer The name or IP of the proxy server if there is any.
Parameters marked with an asterisk (*) are mandatory.
For configuring some additional parameters that will apply to all importers runs, a configuration file (config.properties) provided in the folder …\lib\mc-veeva-importer.
The following settings are available:
client_id_prefix This is the prefix of the Client ID that is passed to every Vault API call. The Client ID is always logged in the report log. For a better identification of the requests (if necessary) the default value should be changed to include the name of the company as described here: Default value = fme-vault-client-migrationcenter
request_timeout The time in milliseconds the importer waits for response after every API call. Default value = 60000
no_of_request_attempts Represents the number of request attempts when the first call fails due to a server error(5xx error code). The REST API call will be executed at least once independent of the parameter value. Default: 2
For applying the changes in the config.properties file the Job Server needs to be restarted.
Vault Objects are part of the application data model in Veeva Vault. Vault Objects are usually configured to be referenced in the document fields. For example, the Product document field corresponds to the Product object and is associated with all document types.
Veeva Importer allows importing object records from any supported source system to any supported Veeva Vault. For that, a migset of type “<Source>toVeeva<type>(object)” must be created. Ex: Veeva Quality Importer works with migsets of type “<Source>toVeevaQuality(object)”.
The following rules for system attributes are available when importing objects:
name__v It must be set with the name of the object being imported. For some objects the “name__v” field is configured to be generated automatically by Veeva Vault when object is created. Usually, “name__v” is configured to be unique so if duplicated values are provided to the importer the affected objects fail to import.
object_name* The name of the object. Example: study__v, study_country__v
target_type* The name of the migration-center internal object type that is used in the association. Example: veeva-quality-object
Any editable object fields can be set using the normal transformation rules.
On Delta Migration, the existing attachments of an object will be replaced with those that are set on the "attachments" system attribute otherwise, the object will keep its attachments.
Veeva importer allows importing documents from any supported source system to any supported Veeva Vault. For that, a migset of type “<Source>toVeevaClinical(document)” / “<Source>toVeevaQuality(document)” / “<Source>toVeevaRIM(document)” must be created.
Importing documents with multiple versions is supported by Veeva importer. The structure of the versions tree is generated by the scanners of the systems that support this feature and provide means to extract it. The order of the versions in Veeva Vault is set through the system rules: major_version_number_v and minor_version_number__v.
The following rules for system attributes are available when importing documents:
type__v* The Type from the Veeva Document Types tree
subtype__v The SubType from the Veeva Document Types tree
classification__v The Classification from the Veeva Document Types tree
external_id__v Rule used for sepcial Delta Migration behavior. See: .
When importing documents using the Veeva importer you have the option of migrating existing renditions adding different content as renditions. This is done using the two system rules available in the migset: ”mc_rendition_paths” and ”mc_rendition_types”. Each of these two rules can have multiple values and you need to set the same number of values for both rules. Doing otherwise will cause the importer to throw an error.
If the parameter skipUploadToFTP is not checked then the ”mc_rendition_paths” rule will need to contain a path on the filesystem to the content just like for the ”mc_content_location” attribute otherwise, the rule will contain the FTP path of the desired content.
The ”mc_rendition_type” will need to specify the name of the rendition type from Veeva. The specific types of renditions available are specified in the document type definition in Veeva.
Veeva Importer allows importing "dm_relation" objects scanned by Documentum Scanner as Veeva Vault relations. The internal name of Veeva Vault relations that will be created should be configured in the configurations file "relations-mapping.properties" located in the jobserver folder ./lib/mc-veeva-importer.
If the source relation name contains space characters they will need to be escaped with a forward slash ("\ ") or by using the unicode character for space ("\u0020").
The relations will be imported after all documents and versions are imported. If a document part of a relation could not be imported, the relation will not be imported so the document being parent in the relation will be moved in status "Partially Imported". The documents in the status "Partially Imported" can be submitted to the importer again but their relations will be imported only after the documents being children in the relations are imported.
More information about how relations are working in the Veeva Vault can be found here: .
Binders allow users to organize and group documents in a flexible structure. Binders are comprised of sections, which can nest to build a hierarchical structure, and links to documents in Vault.
Veeva importer allows you to import Virtual Documents scanned from Documentum as Binders in any supported Veeva Vault. For that a migset of type “DctmtoVeeva<type>(binder)” must be created.
The following features are currently supported:
Create binders by preserving the hierarchical structure of the Virtual Document
Importing Virtual Documents version as Binder versions
Preserving version binding (implicit and symbolic) for documents and binders
Import the content of the Virtual Document as the first child of the Binder OR import the content as an attachment if
When importing Virtual Documents as Binders all normal documents that are referenced by the Virtual Documents should be imported before or together with the binders (in the same importer run). Unless allowIncompleteBinders is used, in which case binders can be imported partially without the child documents.
Setting version labels as minor or major does not work for binders!
The following rules for system attributes are available when importing binders:
type__v* The Type from the Veeva Document Types tree
subtype__v The SubType from the Veeva Document Types tree
classification__v The Classification from the Veeva Document Types tree
lifecycle__v* Should be set with the name of the lifecycle where the document will be attached.
When importing Documentum Virtual Documents as Veeva Vault Binders, the binder components can be bound to a specific version. When checking “preserveVersionBinding” in the importer configuration, the binder components are bound to the same version as they are bound in Virtual Documents in Documentum. The components will be bound to the latest version in Veeva Vault in the following cases:
The version binding is not specified in the “version_label” attribute of the “dmr_containment” object in the Documentum
The version binding is specified in Documentum but “preserveVersionBinding” was not enabled in the importer.
You can set the binder version status or the version number by specifying user actions that will perform the necessary changes.
A Document Lifecycle in Veeva (which is also used on binders) has certain States. On each state there can be configured one or several User Actions and Entry Actions.
The User Actions can be used to change the document to another state (among other things). When a document or binder enters this new Lifecycle state, the Entry Actions defined for that state will trigger. These entry actions can be configured to also change the version of the binder to a major or minor one.
Therefore to change set a binder version to major or minor you need to set a User Action that changes to a new state which has the Entry Action that sets the version:
A user action or a chain of user actions can be specified by using the system rule "user_actions". The value from name__v field will be used in the migset configuration. Example: change_to_third__c
The system rules "status__v", "major_version_number__v" and "minor_version_number__v" will be used just for the root version of the binder. Otherwise, the status will be set to the default one configured in the document lifecycle and the binder number will be computed based on the configuration made on the Vault.
The user actions will be executed in sequence. The binder will be created having the initial state of the document lifecycle, in this case, it is the Draft state. This state has a change_to_second__c user action that will be executed first and the binder will be moved to the status Second State. The new state now has a user action named change_to_third__c which is executed next and binder is moved to Third State.
If a user action fails due to any error, the entire binder version will fail to import and be reverted from Veeva.
Creating binders with sections is possible by specifying a template name that contains sections. The documents can be imported to sections by setting the “parent_section” system rule in the migset containing the normal documents. In case of hierarchical sections, the sections will be defined separated by slash “/”. Ex: Section1/Section1.1/Section1.1.1
Veeva RIM Importer allows you to import Submission Archives in RIM Vault. For that, a migset of type “DctmtoVeevaRIM(submission)” must be created. The importer does not create the submission definition but import submission archives to existing submission. The zip file to be imported must contain the “Submission” folder and “Application” folder.
The following rules for system attributes are available when importing RIM Submissios:
application_number Application number the submission belongs to
submission__v The submission name
submission_file_path The path to the zip file containing the submission archive. If the skipUploadToFTP parameter is set in the connector definition then the connector will suppose that this parameter contains the FTP path of the zip file.
There is a known limitation regarding setting classification elements when the Veeva Vault configuration contains elements with the same label on the same level. In other words, Veeva platform allows you to have, for example, 2 types with the same label and different names (My Type - my_type__c, My Type - my_type1__c). In order to prevent any issue, we strongly recommend the type, subtype and classification elements to be unique.
When performing a job with the Veeva importer you must specify the “target_type” and the type/subtype/classification for the documents. Due to how the Veeva document types are structured, the object type definition in migration-center will act as a container for all the necessary target attributes from Veeva. Therefore the object type definition will be set for the ”target_type” system rule, but the actual type of the document will be defined by the values set for the type__v / subtype__v / classification__v system rules.
Depending on which type of Veeva Vault you are importing into (Clinical, Quality or RIM) there are several attributes which are mandatory, and you will need to associate transformation rules with valid values, as follows:
Clinical: product__v, study__v, blinding__v
Quality: country__v, owning_department__v, owning_facility__v
RIM: none
The values for these attributes need to be the actual label value and not the internal name or id (i.e. “Base Doc Lifecycle” instead of “clinical_doc_lifecycle__c”. This applies to all of the attributes mentioned above.
Each document type in Veeva can have one or multiple Lifecycles associated with it. When importing a document of a certain type you need to specify, using the ”lifecycle__v” attribute, which of the available lifecycles must be set for the document.
To find out or modify the available lifecycles for a specific type you need to navigate in Veeva to the Admin section -> Configuration tab -> Document Types and open the specific type you are interested in.
From the same Configuration section you will find Document Lifecycles, here you can select a lifecycle and see the specific lifecycle states which you can set for the ”status__v” attribute.
The available permissions for a specific document are specified by the lifecycle which is attached to that document. To see what available permissions there are, you need to go to the Admin interface -> Configuration -> Document Lifecycles then select the lifecycle and go to the tab Roles. These are the permissions you will be able to set with the Veeva Importer if you attach this particular lifecycle to the document you are importing.
The format is the following:
{Role_name}.{USERS or GROUPS}=username1,username2,…
Example:
[email protected],[email protected]
mc_custom_role__c.groups=approver_group__c
In Veeva a Document or an Object can have an attribute (field) that references other Veeva objects.
In Veeva these references are made by using the ID of the referenced object. But when you import with migration-center you need to use the name__v value to find the reference object by default. This is because, in most cases, the ID of the object is unknown during a migration.
To change this behavior and use other attribute values to reference objects, you can configure an attribute mapping file and set it in the attributeMappingLocation parameter.
The format of the mapping in the file depends on whether you are specifying Document or Object fields:
Consider you are importing Documents in Veeva that have a field named owning_department__v that references objects of type department__v.
To make the Veeva Importer find Department objects based on the Department Number/Code (number__v) instead of the default name__v, the attribute mapping file must contain the following line:
Now, in migration-center, for the owning_department__v attribute you can assign values that represent the number__v of a Department object and the importer will properly find and reference the object.
The general rule looks like this:
When importing Objects instead of Documents, the format is similar, but you need to also specify the object type name in the left side.
Consider you are importing an Object of type example_object__c which has a field named object_field__c that references objects of type ref_example_object.
To make the Veeva find these ref_example_object by their global_id__sys instead of the name, the attribute mapping file needs to contain the following line:
The general rule looks like this:
The new fields used to reference the objects need to be defined as unique in the Object definition otherwise the lookup functionality may not work properly.
The migration-center allows the user to filter the possible values that can be set to a document or object field. It is possible to use multiple fields to get the desired value for the attribute that references a master data object.
In addition to the structure for document or object attributes, the following structure should be added:
The "and" keyword is added in case of usage of multiple fields.
For example, when setting the “country__v” document field, the user may want to set in migration-center the country abbreviation value and he wants to enforce using only "country__v" active objects. In this case, the following line should be added in the configuration file:
If you want to set the "product_type__v" field which refers to a Controlled Vocabulary object when importing Submission objects and you want to ensure that only the controlled vocabulary objects of "Submission Type" are taken into consideration then the following line should be added in the configuration file:
The system rule “attachments” allows the user to import attachments for the documents. It should be set with the fully qualified paths of the attachments.
If a document has two or more attachments with the same name but different content, the importer will create multiple versions for the same attachment.
Objects that have changed in the source system since the last scan are scanned as update objects. Whether an object in a migration set is an update or not can be seen by checking the value of the Is_update column – if it’s 1, the current object is an update to a previously scanned object (the base object). An update object cannot be imported unless its base object has been imported previously.
Currently, update objects are processed by Veeva importer with the following limitations:
Only document and object updates can be imported. The updates for Binders are reported as errors by the importer
Only metadata is updated for the documents. The content, renditions, permissions and classifications are not updated.
New versions of documents are fully supported
New fields can be added by an update to existing Veeva Objects
Beside the delta mechanism described above, the importer allows importing new versions to documents based on “external_id__v” system rule. If that’s set, the importer will behave in the following way:
A document with the same external id exists in the vault
The importer adds the document being imported as a new version to the existing document. The new version can only be imported if a version with the same major and minor value doesn’t already exists.
A document with the same external id cannot be found in the vault
Object names must be unique. The importer will report an error if an update tries to change the name of the object to an existing one.
autoCreateFolders This option will be used for letting the importer automatically create any missing folders that are part of “dctm_obj_link” or “r_folder_path”. Use this option to have migration-center re-create a folder structure at the target repository during import. If the target repository already has a fixed/predefined folder structure and creating new folders is not desired, deselect this option
defaultFolderType The Documentum folder type name used when automatically creating the missing object links. If left empty, “dm_folder” will be used as default type.
moveRenditionContent Flag indicating if renditions will be moved to the new storage. If checked, all renditions and primary content are moved otherwise only the primary content is moved.
moveCheckoutContent Flag indicating if checkout documents will be moved to new storage. If not checked, the importer will throw an error if a document is checked out.
removeOriginalContent Flag indicating if the content will be removed from the original storage. If checked, the content is removed from the original storage, otherwise the content remains there.
moveContentLogFile The file path on the content server where the log related to move content operations will be saved. The folder must exist on the content server. If it does not exist, the log will not be created at all. A value must be set when move content feature is activated by the setting of attribute “a_storage_type”.
numberOfThreads The number threads that will be used for importing objects. Maximum allowed is 20.
loggingLevel* See Common Parameters.
The extracted object type template is now ready to be imported to migration-center 3.x as described in the chapter Object Types (or object type template definitions) in the migration-center Client User Guide
a_archive
Boolean
0
No
No
a_category
String
64
No
Yes
a_compound_architecture
String
16
No
No
a_content_type
String
32
No
Yes
a_controlling_app
String
32
No
No
a_effective_date
DateTime
0
Yes
No
a_effective_flag
String
8
Yes
No
a_effective_label
String
32
Yes
No
a_expiration_date
DateTime
0
Yes
No
a_extended_properties
String
32
Yes
No
a_full_text
Boolean
0
No
No
a_is_hidden
Boolean
0
No
Yes
a_is_signed
Boolean
0
No
No
a_is_template
Boolean
0
No
Yes
a_last_review_date
DateTime
0
No
No
a_link_resolved
Boolean
0
No
No
a_publish_formats
String
32
Yes
No
a_retention_date
DateTime
0
No
No
a_special_app
String
32
No
No
a_status
String
16
No
Yes
a_storage_type
String
32
No
No
acl_domain
String
32
No
Yes
acl_name
String
32
No
Yes
authors
String
48
Yes
Yes
group_name
String
32
No
Yes
group_permit
Number
0
No
Yes
i_antecedent_id
ID
0
No
No
i_branch_cnt
Number
0
No
No
i_cabinet_id
ID
0
No
No
i_chronicle_id
ID
0
No
No
i_contents_id
ID
0
No
No
i_direct_dsc
Boolean
0
No
No
i_folder_id
ID
0
Yes
No
i_has_folder
Boolean
0
No
No
i_is_deleted
Boolean
0
No
No
i_is_reference
Boolean
0
No
No
i_is_replica
Boolean
0
No
No
i_latest_flag
Boolean
0
No
No
i_partition
Number
0
No
No
i_reference_cnt
Number
0
No
No
i_retain_until
DateTime
0
No
No
i_retainer_id
ID
0
Yes
No
i_vstamp
Number
0
No
No
keywords
String
48
Yes
Yes
language_code
String
5
No
Yes
log_entry
String
120
No
No
object_name
String
255
No
Yes
owner_name
String
32
No
Yes
owner_permit
Number
0
No
Yes
r_access_date
DateTime
0
No
No
r_alias_set_id
ID
0
No
No
r_aspect_name
String
64
Yes
No
r_assembled_from_id
ID
0
No
No
r_component_label
String
32
Yes
No
r_composite_id
ID
0
Yes
No
r_composite_label
String
32
Yes
No
r_content_size
Number
0
No
No
r_creation_date
DateTime
0
No
Yes
r_creator_name
String
32
No
Yes
r_current_state
Number
0
No
Yes
r_frozen_flag
Boolean
0
No
No
r_frzn_assembly_cnt
Number
0
No
No
r_full_content_size
Double
0
No
No
r_has_events
Boolean
0
No
No
r_has_frzn_assembly
Boolean
0
No
No
r_immutable_flag
Boolean
0
No
No
r_is_public
Boolean
0
No
Yes
r_is_virtual_doc
Number
0
No
Yes
r_link_cnt
Number
0
No
No
r_link_high_cnt
Number
0
No
No
r_lock_date
DateTime
0
No
No
r_lock_machine
String
80
No
No
r_lock_owner
String
32
No
No
r_modifier
String
32
No
Yes
r_modify_date
DateTime
0
No
Yes
r_object_type
String
32
No
Yes
r_order_no
Number
0
Yes
No
r_page_cnt
Number
0
No
No
r_policy_id
ID
0
No
No
r_resume_state
Number
0
No
No
r_version_label
String
32
Yes
Yes
resolution_label
String
32
No
Yes
subject
String
192
No
Yes
title
String
400
No
Yes
world_permit
Number
0
No
Yes
<custom_attribute_dateTime>
DateTime
-
-
Yes
<custom_attribute_double>
Double
-
-
Yes
<custom_attribute_ID>
ID
-
-
No
<custom_attribute_boolean>
Boolean
-
-
Yes
dm_document
Attribute Name
Type
Length
Is Repeating
Association Possible
a_application_type
String
32
No
Attribute Name
Type
Length
Is Repeating
Association Possible
<custom_attribute_number>
Number
-
-
Yes
<custom_attribute_string>
String
-
-
Yes
Yes
wrapper.java.classpath.dfcConfig=C:/Documentum/config
wrapper.java.classpath.dfcDctmJar=C:/Program Files/Documentum/dctm.jarThe job could not be executed! ERROR: java.lang.Exception: java.lang.NullPointerExceptionNo error reported when setting permissions not in the selected lifecycle in Veeva Importer (#50939)
Binders are put in batches differently than documents as follows:
without preserveVersionBinding: 1 batch for ALL root binders and then no batching for the rest of binder versions
with preserveVersionBinding: All binder objects are imported in a single batch
In a multi-value picklist attribute, you can set values that contain commas (,) only by enclosing the value in quotes i.e. value,1 -> "value,1"
https://hawq.apache.org/docs/userguide/2.3.0.0-incubating/datamgmt/load/g-escaping-in-csv-formatted-files.html
proxyPort The port for the proxy server.
proxyUser The username if required by the proxy server.
proxyPassword The password if required by the proxy server.
attributeMappingLocation The path of the configuration file that will be used for setting the references to the existing master data objects when importing documents. See Attribute mapping
preserveVersionBinding Indicates if the version binding will be preserved when importing virtual documents from Documentum as binders in Veeva Vault. See Binders for more details.
importRelations Indicates if relations between documents will imported. If checked, the relations between the documents being imported will be imported as well. If not checked the relations will not be imported. They can be imported in another run by assigning the same migsets to the importer.
batchSize* The number of documents or versions that will be imported in a single bulk operation.
useFtpServer When checked the content is uploaded to Staging Folder by using FTPS protocol. When not checked the content is uploaded to Staging Folder by using REST API calls. The recommended way is to leave it unchecked
skipUploadToFTP If not checked, the importer will copy the documents content to the FTP server during import from the location where they have been exported by the scanner. If checked, the importer presumes the documents content was copied to the FTP server prior starting the import. In this case all paths of the content in the system rules mc_content_location, mc_rendition_paths, attachments or submissionFilePath must be set with the corresponding paths on the FTP server.
bypassObjectValidationRules If checked it allows importing invalid values for fields or missing mandatory values
allowIncompleteBinders If checked binders with children that are not or cannot be imported, will be imported partially. Please note that incomplete binders might not fixed later because older versions of binders are immutable in Veeva Vault
importBinderContentAsAttachment If checked, the content of the VD to be imported as binder, will be added as an attachment to the binder version. The attachment name will be <object_name>_versionNumber.
ftpMaxNumberOfThreads* Maximum number of concurrent threads used to transfer content to the FTPS server. The max value is 20 but according with Veeva migration best practices it is strongly recommended to use maximum 5 threads.
objectsOrder The names of objects in the import order. If is not filled then the importer will compute the order automatically. Example: test_object_1__c,test_object_2__c The test_object_1__c will be imported first and the objects of type test_object_2__c will be imported only after all objects of type test_object_1__c have been imported.
loggingLevel* See: Common Parameters.
If the parameter skipUploadToFTP is checked, you must provide the FTP paths to the files.
file_extension User for:
setting the extension of the imported document in case the source content does not have any extension in the filesystem.
overriding the existing extension from the source content on the filesystem
is_deleted When set to True the importer will delete the that specific version after import. This is useful when importing from source systems that with obsolete or broken versions.
lifecycle__v* The name of the lifecycle that should be attached to the document.
status__v* The name of the lifecycle status
major_version_number__v* Rule for indicating the major version number
minor_version_number__v* Rule for indicating the minor version number
mc_content_location Optional rule for importing the content from another location than the one exported by the scanner. If the skipUploadToFTP parameter is checked in the connector definition then the connector will suppose that this parameter contains the FTP path for every document.
mc_rendition_paths Path on the filesystem or FTP where the renditions are located. Must be the same number of values as mc_rendition_types. See Renditions.
mc_rendition_types The rendition type from the available Veeva types for the specified document type. Must be the same number of values as mc_rendition_paths.
name__v The name of the document
parent_section Used for specifying the section names in the binders where the documents will be imported.
permissions Allows setting permissions for the imported document. The format is the following: {Role_name}.{USERS or GROUPS}=username1,username2,… Example: [email protected],[email protected] mc_custom_role__c.groups=approver_group__c
attachments Should be set with the file paths of the attachments to set for the current document. If the parameter skipUploadToFTP is not checked then the values should contain the paths on the filesystem to the files otherwise, the rule will contain the FTP paths of the attachment files.
target_type* The name of the object type from the migration-center’s object type definitions. Ex: veeva-rim-document
Create binders based on a template so the sections are generated as they are defined in the template
Setting binder permissions
status__v* The name of the lifecycle status
major_version_number__v Rule for indicating the major version number (does not work for binders)
minor_version_number__v Rule for indicating the minor version number (does not work for binders)
mc_content_location Optional rule for importing the content from another location than the one exported by the scanner. If the skipUploadToFTP parameter is checked in the connector definition then the connector will suppose that this parameter contains the FTP path of the file.
name__v The name of the document
permissions Allows setting permissions for the imported document. The format is the following: {Role_name}.{USERS or GROUPS}=username1,username2,… Example: [email protected],[email protected] mc_custom_role__c.groups=approver_group__c
template_name The name of the template the Binder will be created from. Leave it empty to create the binder from scratch.
target_type* The name of the object type from the migration-center’s object type definitions. Ex: veeva-clinical-document
user_actions Allows settings a user action or a chain of user actions to change the version number or the status. The name of the user action will be used.
If the document being imported is a root version (level_in_version_tree = 0) then a new document is created.
If the document being imported is not a root version (level_in_version_tree > 0) then the documents fail to import, and an appropriate error message is logged.
DctmRelation=supporting_documents__cowning_department__v=department__v,number__v<document_field_name>=<referenced_object_name>,<object_lookup_field>object_field__c.example_object__c=ref_example_object,global_id__sys<object_field_name>.<object_name>=<ref_object_name>,<object_lookup_field>where <object_field_1>=<field_value_1>where <object_field_1>=<field_value_1> and <object_field_2>=<field_value_2> and <obejct_field_3>=<object_field_3>country__v=country__v,abbreviation__c where status__v='active__v'product_type__v.submission__v=controlled_vocabulary__rim,name__v where controlled_vocabulary_type__rim='submission_type__rim'The Microsoft SharePoint Online Importer allows migrating documents, folders, list items and lists/libraries to SharePoint Online offering following features:
Import documents to Microsoft SharePoint Online Document Library items
Import URL / Link documents
Import folders to Microsoft SharePoint Online Document Library items
Import list items to Microsoft SharePoint Online Document Library items
Import lists/libraries to Microsoft SharePoint Online Sites
Set values for any columns in SharePoint Online, including user defined columns
Set values for SharePoint Online specific internal field values
Create documents, folders and list items using standard SharePoint Online content types or custom content types
Set permissions for individual documents, folders, list items and lists/libraries
Set the folder path and create folders if they don’t exist
Apply Content Types automatically to lists/libraries if they are not applied yet
Delta migration
Import versions (minor or major, automatic enabling of versioning in the targeted document library)
Import files with a size up to 250 GB
Set Microsoft Information Protection (MIP) Sensitivity Labels on content files prior to uploading them to SPO
The SharePoint Importer is implemented mainly as a Job Server component but comes with a separate component for setting SharePoint Online specific internal field values, which can be installed optionally and if necessary.
The SharePoint Importer is implemented mainly as a Job Server component but comes with a separate component for setting SharePoint Online specific internal field values, which can be installed optionally and if necessary.
Due to restrictions in SharePoint, documents cannot be moved from one Library to another using migration-center once they have been imported. This applies to Version and Update objects.
Moving folders is only supported within the same site, i.e. the importer parameter "siteName" and the system attribute "site" must have the same values for the initial and any update import runs.
Even though some other systems such as Documentum allow editing of older versions, either by replacing metadata, or creating branches, this is not supported by SharePoint. If you have updates to intermediate versions to a version tree that is already imported, the importer will return an error upon trying to import them. The only way to import them is to reset the original version tree and re-import it in the same run with the updates.
Running multiple Job Servers for importing into SharePoint must be done with great care, and each of the Job Servers must NOT import in the same library at the same time. If this occurs, because the job will change library settings concurrently, the versioning of the objects being imported in that library will not be correct.
The SharePoint Online system has some limitations regarding file names, folder names, and file size. Our SharePoint Online importer will perform the following validations before a file gets imported to SharePoint Online (in order to fail fast and avoid unnecessary uploads):
Max. length of a file name: 400 characters
Max. length of a folder name: 400 characters
Invalid leading chars for file or folder name: SPACE
Invalid trailing chars for file or folder name: SPACE, PERIOD
Some fields in the list item associated with a document might be overwritten by the SharePoint document property promotion. To avoid that, it is recommended to disable document property promotion for the website during the migration as described here:
The migration-center SharePoint Online Importer requires installing an additional component.
This additional component needs the .NET Framework 4.7.2 installed and it’s designed to run as a Windows service and must be installed on all machines where the a Job Server is installed.
To install this additional component, it is necessary to run an installation file, which is located within the SharePoint folder in the Jobserver instal: ...\lib\mc-sharepointonline-importer\CSOM_Service\install
To install the service run the install.bat file using administrative privileges. You need to start it manually after the install. Afterwards the service is configured to start automatically at system startup.
When running the CSOM service with a domain account you might need to grant access to the account by running the following command:
netsh http add urlacl url=http://+:57096/ user=<your user>
<your user> might be in the format domain\username or [email protected]
To uninstall the service run the uninstall.bat file using administrative privileges.
Before uninstalling the Jobserver component, the CSOM service must be uninstalled as described here.
The app-only principal authentication used by the importer calls the following HTTPS endpoints. Please ensure that the job server machine has access to those endpoints:
<tenant name>.sharepoint.com:443
accounts.accesscontrol.windows.net:443
The importer supports only app-principal authentication for connecting to SharePoint Online. The app-principal authentication comes in two flavors:
Azure AD app-only principal authentication Requires full control access for the migration-center application on your SharePoint Online tenant. This includes full control on ALL site collections of your tenant.
SharePoint app-only principal authentication Can be set to restrict the access of the migration-center application to certain site collections or sites.
The migration-center SharePoint Online Importer supports Azure AD app-only authentication. This is the authentication method for background processes accessing SharePoint Online recommended by Microsoft. When using SharePoint Online you can define applications in Azure AD and these applications can be granted permissions to your SharePoint Online tenant.
Please follow these steps in order to setup your migration-center application in your Azure AD.
The information in this chapter is based on the following Microsoft guidelines:
In Azure AD when doing App-Only you typically use a certificate to request access: anyone having the certificate and its private key can use the app and the permissions granted to the app. The below steps walk you through the setup of this model.
You are now ready to configure the Azure AD Application for invoking SharePoint Online with an App-Only access token. To do that, you must create and configure a self-signed X.509 certificate, which will be used to authenticate your migration-center Application against Azure AD, while requesting the App-Only access token. First you must create the self-signed X.509 Certificate, which can be created using the makecert.exe tool that is available in the Windows SDK or through a provided PowerShell script which does not have a dependency to makecert. Using the PowerShell script is the preferred method and is explained in this chapter.
To create a self-signed certificate with this script, which you can find in the <job server folder>\lib\mc-spo-batch-importer\scripts folder:
.\Create-SelfSignedCertificate.ps1 -CommonName "MyCompanyName" -StartDate 2020-07-01 -EndDate 2022-06-30
You will be asked to give a password to encrypt your private key, and both the .PFX file and .CER file will be exported to the current folder.
Next step is registering an Azure AD application in the Azure Active Directory tenant that is linked to your Office 365 tenant. To do that, open the Office 365 Admin Center () using the account of a user member of the Tenant Global Admins group. Click on the "Azure Active Directory" link that is available under the "Admin centers" group in the left-side tree view of the Office 365 Admin Center. In the new browser's tab that will be opened you will find the Microsoft Azure portal (https://portal.azure.com/). If it is the first time that you access the Azure portal with your account, you will have to register a new Azure subscription, providing some information and a credit card for any payment need. But don't worry, in order to play with Azure AD and to register an Office 365 Application you will not pay anything. In fact, those are free capabilities. Once having access to the Azure portal, select the "Azure Active Directory" section and choose the option "App registrations". See the next figure for further details.
In the "App registrations" tab you will find the list of Azure AD applications registered in your tenant. Click the "New registration" button in the upper left part of the blade. Next, provide a name for your application, e.g. “migration-center” and click on "Register" at the bottom of the blade.
Once the application has been created copy the "Application (client) ID" as you’ll need it later.
Now click on "API permissions" in the left menu bar and click on the "Add a permission" button. A new blade will appear. Here you choose the permissions that are required by migration-center. Choose i.e.:
Microsoft APIs
SharePoint
Application permissions
Click on the blue "Add permissions" button at the bottom to add the permissions to your application. The "Application permissions" are those granted to the migration-center application when running as App Only.
Next step is “connecting” the certificate you created earlier to the application. Click on "Certificates & secrets" in the left menu bar. Click on the "Upload certificate" button, select the .CER file you generated earlier and click on "Add" to upload it.
The “Sites.FullControl.All” application permission requires admin consent in a tenant before it can be used. In order to do this, click on "API permissions" in the left menu again. At the bottom you will see a section "Grand consent". Click on the "Grand admin consent for" button and confirm the action by clicking on the "Yes" button that appears at the top.
In order to use Azure AD app-only principal authentication with the SharePoint Online Batch importer you need to fill in the following importer parameters with the information you gathered in the steps above:
SharePoint app-only authentication allows you to grant fine granular access permissions on your SharePoint Online tenant for the migration-center application.
The information in this chapter is based on the following guidelines from Microsoft:
In Azure AD when doing App-Only you typically use a certificate to request access: anyone having the certificate and its private key can use the app and the permissions granted to the app. The below steps walk you through the setup of this model.
You are now ready to configure the Azure AD Application for invoking SharePoint Online with an App-Only access token. To do that, you must create and configure a self-signed X.509 certificate, which will be used to authenticate your migration-center Application against Azure AD, while requesting the App-Only access token. First you must create the self-signed X.509 Certificate, which can be created by using the makecert.exe tool that is available in the Windows SDK or through a provided PowerShell script which does not have a dependency to makecert. Using the PowerShell script is the preferred method and is explained in this chapter.
To create a self-signed certificate with this script, which you can find in the <job server folder>\lib\mc-spo-batch-importer\scripts folder:
.\Create-SelfSignedCertificate.ps1 -CommonName "MyCompanyName" -StartDate 2020-07-01 -EndDate 2022-06-30
You will be asked to give a password to encrypt your private key, and both the .PFX file and .CER file will be exported to the current folder.
Next step is registering an Azure AD application in the Azure Active Directory tenant that is linked to your Office 365 tenant. To do that, open the Office 365 Admin Center () using the account of a user member of the Tenant Global Admins group. Click on the "Azure Active Directory" link that is available under the "Admin centers" group in the left-side tree view of the Office 365 Admin Center. In the new browser's tab that will be opened you will find the Microsoft Azure portal (https://portal.azure.com/). If it is the first time that you access the Azure portal with your account, you will have to register a new Azure subscription, providing some information and a credit card for any payment need. But don't worry, in order to play with Azure AD and to register an Office 365 Application you will not pay anything. In fact, those are free capabilities. Once having access to the Azure portal, select the "Azure Active Directory" section and choose the option "App registrations". See the next figure for further details.
In the "App registrations" tab you will find the list of Azure AD applications registered in your tenant. Click the "New registration" button in the upper left part of the blade. Next, provide a name for your application, e.g. “migration-center” and click on "Register" at the bottom of the blade.
Next step is “connecting” the certificate you created earlier to the application. Click on "Certificates & secrets" in the left menu bar. Click on the "Upload certificate" button, select the .CER file you generated earlier and click on "Add" to upload it.
After that, you need to create a secret key. Click on “New client secret” to generate a new secret key. Give it an appropriate description, e.g. “migration-center” and choose an expiration period that matches your migration project time frame. Click on “Add” to create the key.
Store the retrieved information (client id and client secret) since you'll need this later! Please safeguard the created client id/secret combination as would it be your administrator account. Using this client id/secret one can read/update all data in your SharePoint Online environment!
Next step is granting permissions to the newly created principal in SharePoint Online.
If you want to grant tenant scoped permissions this granting can only be done via the “appinv.aspx” page on the tenant administration site. If your tenant URL is https://contoso-admin.sharepoint.com, you can reach this site via https://contoso-admin.sharepoint.com/_layouts/15/appinv.aspx.
If you want to grant site collection scoped permissions, open the “appinv.aspx” on the specific site collection, e.g. https://contoso.sharepoint.com/sites/mysite/_layouts/15/appinv.aspx.
Once the page is loaded add your client id and look up the created principal by pressing the "Lookup" button:
Please enter “www.migration-center.com” in field “App Domain” and “https://www.migration-center.com” in field “Redirect URL”.
To grant permissions, you'll need to provide the permission XML that describes the needed permissions. The migration-center application will always need the “FullControl” permission. Use the following permission XML for granting tenant scoped permissions:
Use this permission XML for granting site collection scoped permissions:
When you click on “Create” you'll be presented with a permission consent dialog. Press “Trust It” to grant the permissions:
Please safeguard the created client id/secret combination as would it be your administrator account. Using these one can read/update all data in your SharePoint Online environment!
In order to use SharePoint app-only principal authentication with the SharePoint Online importer you need to fill in the following importer parameters with the information you gathered in the steps above:
To create a new SharePoint Online Importer, create a new importer and select SharePoint Online from the Adapter Type drop-down. Once the adapter type has been selected, the Parameters list will be populated with the parameters specific to the selected adapter type. Mandatory parameters are marked with an *.
The Properties of an existing importer can be accessed after creating the importer by double-clicking the importer in the list or selecting the Properties button/menu item from the toolbar/context menu. A description is always displayed at the bottom of the window for the selected parameter.
Multiple importers can be created for importing to different target locations, provided each importer has a unique name.
The common adaptor parameters are described in .
The configuration parameters available for the SharePoint Online Importer are described below:
tenantName* The name of your SharePoint Online Tenant Example: Contoso
tenantUrl* The URL of your SharePoint Online Tenant Example: https://contoso.sharepoint.com
siteName* The path to your target site collection for the import. Example: /sites/My Site
appClientId
Parameters marked with an asterisk (*) are mandatory.
Starting from migration-center 3.5 the SharePoint Online importer has the option of checking the integrity of each document’s content after it has been imported. This will be done if the “checkContentIntegrity” parameter is checked and it will verify only documents that have a generated checksum in the Source Attributes.
Currently the only supported checksum algorithm is MD5 with HEX encoding.
Documents targeted at a Microsoft SharePoint Online Document library will have to be added to a migration set. This migration set must be configured to accept objects of type <source object type>ToSPOnline(document).
Create a new migration set and set the <source object type>ToSPOnline(document) in the Type drop-down. This is set in the -Migration Set Properties- window which appears when creating a new migration set. The type of object can no longer be changed after a migration set has been created.
contentType* Rule setting the content type. Example: Task This value must match existing migration-center object type definitions See .
copyRoleAssignments Specify if roles from the parent object are copied or not. This system rule is necessary only if the system rule roleAssignments is set, otherwise it is not used. By default, this value is set to false.
fileExtension Specify the file extension of the file name that is used to upload the content file to SharePoint. See also section
The same procedure as for documents also applies to links about to be imported to SharePoint Online. For links the object type to select for a migration set would be <source object type>ToSharePoint(link).
SharePoint Online supports documents with the file format ".url". We call these documents "link documents" since they do not have real content but just point to another document in SharePoint Online or to an external web site. The importer will create the necessary content of the link documents on the fly. Thus, the importer will ignore the content of any source object that is imported as a link document because it will import the generated link content instead.
Compared to the Documents migset, the Link migset is missing the fileExtension and mc_content_location system rules and has the following new rules:
url* The target URL of this link document. Can be a URL to another SharePoint document or a URL to an external web site.
Example:
https://contoso.sharepoint.com/sites/MySite/Documents/Test.docx
The same procedure as for documents also applies to folders about to be imported to SharePoint. For folders the object type to select for a migration set would be <source object type>ToSharePoint (folder).
Compared to the Documents migset, the Folder migset is missing the fileExtension, isMajorVersion and mc_content_location system rules, and has no additional ones.
The same procedure as for documents also applies to lists or libraries about to be imported to SharePoint. For lists or libraries the object type to select for a migration set would be <source object type>ToSharePoint (list).
Compared to the Documents migset, the List migset is missing the contentType, fileExtension, isMajorVersion, library, mc_content_location and parentFolder system rules, and has the following additional rules:
baseTemplate* Rule setting the base template for this list. A list of valid values can be found in the .
This value must match existing migration-center object type definitions; see paragraph
title Specify the title of the list or library, which will be created
The same procedure as for documents also applies to list items about to be imported to SharePoint. For list items the object type to select for a migration set would be <source object type>ToSharePoint (listItem).
Compared to the Documents migset, the ListItem migset is missing the fileExtension and mc_content_location system rules, and has the following additional rule:
relationLinkField Rule which sets a list of column names, where to insert links to AttachmentRelation associated with the current object.
In order to associate transformation rules with SharePoint Online columns, a migration-center object type definition for the respective content type needs to be created. Object type definitions are created in the migration-center client. To create an object type definition, go to Manage/Object Types and create or import a new object type definition. In case your content type contains two or more columns with the same display name, you need to specify the columns internal names as attribute names.
A Microsoft SharePoint Online content type corresponds to a migration-center object type definition. For the Microsoft SharePoint Online connector, an object type definition can be specified in four ways, depending on whether a particular SharePoint Online content type is to be used or not or multiple but different content types using the same name across site collections:
My Content Type describes explicitly a SharePoint Online content Type named My Content Type defined either in the SharePoint document library or at Site Collection level
@My Document Library describes the SharePoint Online document library named My Document Library using only columns, which are defined explicitly in the SharePoint Online document library My Document Library
My Content Type;#Any Custom Value describes a SharePoint Online content type named My Content Type. Everything after the delimiter ;# will be cut off on importing
Importing lists or libraries into SharePoint Online is a little bit different than for documents, folders or list items, since the migration-center SharePoint Online Importer sets Microsoft defined attributes, which are not visible to the user. In order to set those attributes, it is necessary to create object type definitions for each type of list template (see ). The SharePoint Online Connector is able to set any possible attribute of a list. See for more information about possible attributes.
The SharePoint Importer is able to read values from files. This might be necessary if the length of a string might exceed the maximum length of an Oracle database column, which is 4096 bytes.
To tell the SharePoint Importer reading strings from a text file, the filepath of the file containing the value must be placed within the markup <@MCFILE>filepath</@MCFILE>.
The File Reader does not read values from files for the following attributes: Check-In Comment, Author, Editor, Creation Date, Modified Date.
Example:
Assuming you have a file at path \\scanlocation\temp\1\4a9daccf-5ace-4237-856c-76f3bd3e3165.txt you must type the following string in a rule:
<@MCFILE>\\scanlocation\temp\1\4a9daccf-5ace-4237-856c-76f3bd3e3165.txt</@MCFILE>
On import the SharePoint importer extracts the contents of this file and adds them to the associated target attribute.
The SharePoint Online Importer is able to modify the filename of a file, which is imported to SharePoint Online. To set the filename, you must create a target attribute named Name in the object type definition. You can associate any filename (without an extension) for a document. The importer automatically picks the extension of the original file or the file specified in rule mc_content_location. If the extension needs to be changed as well, use the system rule fileExtension in order to specify a new file extension. You can also change only the extension of a filename by setting fileExtension and not setting a new filename in the Name attribute.
Example:
Original content location: \\Fileshare\Migration\Scan\566789\content.dat
The SharePoint Importer can set the check-in comment for documents. To set the check-in comment, you must create a target attribute named checkin_comment in the object type definition. You can associate any string to set the check-in comment
The SharePoint Importer can set the author for list items, folders and documents. To set the author, you must create a target attribute named author in the object type definition. The value of this attribute must be the loginname of the user, who shall be set as author.
The SharePoint Importer can set the editor for list items, folders and documents. To set the editor, you must create a target attribute named editor in the object type definition. The value of this attribute must be the loginname of the user, who shall be set as editor.
The SharePoint Importer can set the creation date for list items, folders and documents. To set the creation date, you must create a target attribute named created in the object type definition. The value of this attribute must be any valid date.
The SharePoint Importer can set the modified date for list items, folders and documents. To set the modified date, you must create a target attribute named modified in the object type definition. The value of this attribute must be any valid date.
The SharePoint Importer can set lookup values. If you want to set a lookup value, you can either set the ID of the related item or the title. If you set the title of the document and there is more than one item with the same title in the lookup list, the SharePoint Importer marks your import object as an error, because the lookup item could not be identified unequivocally.
The SharePoint Importer can set URL values. You can define a friendly name as well as the actual URL of the link by concatenating the friendly name with ;# and the actual URL.
Example: migration-center;#http://www.migration-center.com
The SharePoint Importer can set taxonomy values and Migration Center provides two ways to do it. The first possibility is to use the name of the Taxonomy Service Application, a term group name, a term set name and the actual term. Those four values must be concatenated like the following representation:
TaxonomyServiceApplicationName>TermGroupName>TermSetName>TermName
Example: Taxonomy_+poj2l53kslma4==>Group1>TermSet 1>Value
The second possibility is to use the unique identifier of the term within curly brackets {}.
Example: {2e9b53f9-04fe-4abd-bc33-e1410b1a062a}
Multiple values can be set also but the attribute has to be set as a Multi-value Repeating attribute.
In case you receive an error on setting taxonomy values make sure the TaxonomyServiceApplicationName is up to date and valid since Microsoft changes the identifier at certain times.
The SharePoint Online importer supports applying Microsoft Information Protection (MIP) sensitivity labels on the content files before they get uploaded to SharePoint Online. To learn more about sensitivity labels, please see .
The MIP software development kit provided by Microsoft that we use to apply the sensitivity labels on the content files requires you to register an application in your Azure AD. You could use the same app as in or setup a separate application as described here:
You need to create a client secret for your registered application and configure the following access permissions:
The Microsoft MIP SDK also needs the VC++ runtime installed on the job server machine to work properly. You might get a LoadLibrary failed for: [C:\fme AG\migration-center Server Components 3.15\lib\mc-sharepointonline-importer\MIPService\x86\mip_dotnet.dll] error if the VC++ runtime is missing and you want to apply sensitivity labels on your documents.
For your convenience, we provide the VC++ runtime installers in the lib\mc-sharepointonline-importer\MIPService\VC_Redistributables folder of your MC job server installation. Which variant to install (i.e. x86 or x64) depends on your .NET configuration. Usually you should install the x86 VC++ runtime (even on a x64 system). If that does not work, you should install the x64 variant.
The SharePoint Online classic importer requires you to provide several configuration parameters in a XML configuration file. You can find a template configuration file (template-service.config) in the lib\mc-sharepointonline-importer folder of your migration-center job server installation.
Create a copy of the template file, fill in the required information from your Azure AD app that you had created in the previous step, and enter the full path to your config file in the mipServiceConfigFile parameter of your SharePoint Online importer. The result should look similar to the following:
We provide a Java based command line tool for encryption, which you must use to encrypt the Azure.App.Secret value before you put it in the configuration file. To encrypt the secret, proceed as follows:
Open a command line window on the job server machine.
Switch to the migration-center Server Components <version>\lib\mc-core folder, e.g. migration-center Server Components 3.16\lib\mc-core
Run the following command: java -cp mc-common-<version>.jar de.fme.mc.common.encryption.CmdTool
The performance of the import process is heavily impacted by some specific features, namely autoAdjustVersioning, autoAdjustAttachments, autoAddContentTypes, autoCreateFolders, setting taxonomy values, and setting system attributes like Author, Editor, Created, and Modified.
In case you are importing an update for a major version the increase can get up to three times compared to a normal document import. Combining all the above-mentioned features over the same document can increase the time for up to four times. Take this into consideration when planning an import as the time might vary based on the above described features.
You will achieve the highest import performance if you perform the appropriate configuration of your SharePoint Online system before you start the import and disabled the above-mentioned features in the SharePoint Online importer.
Invalid file or folder names: "AUX", "PRN", "NUL", "CON", "COM0", "COM1", "COM2", "COM3", "COM4", "COM5", "COM6", "COM7", "COM8", "COM9", "LPT0", "LPT1", "LPT2", "LPT3", "LPT4", "LPT5", "LPT6", "LPT7", "LPT8", "LPT9"
The following characters are not allowed in file or folder names: " * : < > ? / \ |
Max. length of a file path: 400 characters
Max. size of a file: 250 GB
Max. size of an attachment: 250 MB
Sites
Sites.FullControl.All
TermStore
TermStore.Read.All
User
User.Read.All
Graph
Application permissions
Sites
Sites.FullControl.All
appCertificatePath The full path to the certificate .PFX file, which you have generated when setting up the Azure AD application. Example: D:\migration-center\config\azure-ad-app-cert.pfx See: Authentication.
appCertificatePassword The password to read the certificate specified in appCertificatePath. See: Authentication.
appClientSecret The client secret, which you have generated when setting up the SharePoint application. See: Authentication.
autoAdjustVersioning If set the importer will update the library settings to allow versions imports.
autoAdjustAttachments If set the importer will update the library settings to allow attachments imports.
autoAddContentTypes If set the importer will update the library settings to allow items with custom content type imports.
autoCreateFolders If set the importer will automatically create the folder strcture needed for importing the object.
proxyURL This is the URL, which defines the location of your proxy to connect to the Internet. This parameter can be left blank if no proxy is used to connect to the internet. Example: http://proxy.local:3128
proxyUsername The login of the user, who connects and authenticates on the proxy, which was specified in parameter proxyURL. Example: corporatedomain\username
proxyPassword Password of the proxy user specified above
checkContentIntegrity If checked the importer will check the integrity of each document that has a checksum generated by the scanner, by downloading a copy of the content after the import and comparing the two checksums. See: Content Integrity Check.
mipServiceConfigFile Full path to the MIP service configuration file. See: MIP sensitivity labels. Example: c:\migration-center\my-mipservice.config
loggingLevel* See: Common Parameters.
library* Specify the name of the library, where to import the current object.
mc_content_location Specify the location of a document’s content file. If not set, the default content location (i.e. where the document has been scanned from) will be used automatically. Set a different path (including filename) if the content has moved since it was scanned, or if content should be substituted with another file.
parentFolder* Rule which sets the path for the current object inside the targeted Document Library item Example: /username/myfolder/folder If the current object shall be imported on root level of the targeted library, specify a forward slash “/”.
roleAssignments Specify role assignments for the current object. If a role definition is assigned to the current object, the migration-center SharePoint Importer breaks the role inheritance. It is possible to specify either a list of users and/or a list of SharePoint groups. If a group is specified, it is necessary, that the targeted SharePoint Group exists in your SharePoint Site. Pattern for setting single users: username;#roledefinitionname Pattern for setting groups: @groupName;#roledefinitionname Example: user;#Read @Contributors;#Contribute
sensitivityLabel Name of the MIP sensitivity label to apply. See: https://docs.microsoft.com/en-us/microsoft-365/compliance/sensitivity-labels?view=o365-worldwide for more details.
site* Specify the target (sub-) site relative to your site collection, which was specified in the SharePoint Importer connector parameters. If the current object shall be imported on root level of the targeted site collection, specify a forward slash “/”
@My Document Library;#Any Custom Value describes the SharePoint Online document library named My Document library using only columns, which are defined explicitly in the SharePoint Online document library My Document Library. Everything after the delimiter ;# will be cut off on importing.
MyContent.dat
-
MyContent
MyContent.pdf
-
-
content.pdf
The tool will ask for the text to encrypt. Enter or paste the secret value and press enter.
The tool will output the encrypted text. Copy and paste it into the configuration file.
Contains a list of hyperlinks and their descriptions.
Announcements
104
Contains a set of simple announcements.
Contacts
105
Contains a list of contacts used for tracking people in a site.
Events
106
Contains a list of single and recurring events. An events list typically has special views for displaying events on a calendar.
Tasks
107
Contains a list of items that represent completed and pending work items.
DiscussionBoard
108
Contains discussions topics and their replies.
PictureLibrary
109
Contains a library adapted for storing and viewing digital pictures.
DataSources
110
Contains data connection description files. - hidden
XmlForm
115
Contains XML documents. An XML form library can also contain templates for displaying and editing XML files via forms, as well as rules for specifying how XML data is converted to and from list items.
NoCodeWorkflows
117
Contains additional workflow definitions that describe new processes that can be used within lists. These workflow definitions do not contain advanced code-based extensions. - hidden
WorkflowProcess
118
Contains a list used to support execution of custom workflow process actions. - hidden
WebPageLibrary
119
Contains a set of editable Web pages.
CustomGrid
120
Contains a set of list items with a grid-editing view.
WorkflowHistory
140
Contains a set of history items for instances of workflows.
GanttTasks
150
Contains a list of tasks with specialized Gantt views of task data.
IssueTracking
1100
Contains a list of items used to track issues.
Gets or sets a value that specifies the URL of the edit form to use for list items in the list. Clients specify a server-relative URL, and the server returns a site-relative URL.
DefaultNewFormUrl
String
Gets or sets a value that specifies the location of the default new form for the list. Clients specify a server-relative URL, and the server returns a site-relative URL.
Description
String
Gets or sets a value that specifies the description of the list.
Direction
String
Gets or sets a value that specifies the reading order of the list. Returns "NONE", "LTR", or "RTL".
DocumentTemplateUrl
String
Gets or sets a value that specifies the server-relative URL of the document template for the list. Returns a server-relative URL if the base type is DocumentLibrary, otherwise returns null.
DraftVersionVisibility
Number
Gets or sets a value that specifies the minimum permission required to view minor versions and drafts within the list. Represents an SP.DraftVisibilityType value: Reader = 0; Author = 1; Approver = 2.
EnableAttachments
Boolean
Gets or sets a value that specifies whether list item attachments are enabled for the list.
EnableFolderCreation
Boolean
Gets or sets a value that specifies whether new list folders can be added to the list.
EnableMinorVersions
Boolean
Gets or sets a value that specifies whether minor versions are enabled for the list.
EnableModeration
Boolean
Gets or sets a value that specifies whether content approval is enabled for the list.
EnableVersioning
Boolean
Gets or sets a value that specifies whether historical versions of list items and documents can be created in the list.
ForceCheckout
Boolean
Gets or sets a value that indicates whether forced checkout is enabled for the document library.
Hidden
Boolean
Gets or sets a Boolean value that specifies whether the list is hidden. If true, the server sets the OnQuickLaunch property to false.
IrmEnabled
Boolean
IrmExpire
Boolean
IrmReject
Boolean
IsApplicationList
Boolean
Gets or sets a value that specifies a flag that a client application can use to determine whether to display the list.
LastItemModifiedDate
DateTime
Gets a value that specifies the last time a list item, field, or property of the list was modified.
MultipleDataList
Boolean
Gets or sets a value that indicates whether the list in a Meeting Workspace site contains data for multiple meeting instances within the site.
NoCrawl
Boolean
Gets or sets a value that specifies that the crawler must not crawl the list.
OnQuickLaunch
Boolean
Gets or sets a value that specifies whether the list appears on the Quick Launch of the site. If true, the server sets the Hidden property to false.
ValidationFormula
String
Gets or sets a value that specifies the data validation criteria for a list item. Its length must be <= 1023.
ValidationMessage
String
Gets or sets a value that specifies the error message returned when data validation fails for a list item. Its length must be <= 1023.
Configuration parameters
Values
appClientId
The ID of the migration-center Azure AD application.
appCertificatePath
The full path to the certificate .PFX file, which you have generated when setting up the Azure AD application.
appCertificatePassword
The password to read the certificate specified in appCertificatePath.
Configuration parameters
Values
appClientId
The ID of the SharePoint application you have created.
appClientSecret
The client secret, which you have generated when setting up the SharePoint application.
mc_content_location
Name
fileExtension
Result filename
-
-
-
content.dat
\\Fileshare\Migration\Conversion\invoice.pdf
-
-
invoice.pdf
-
MyContent
Template Name
Template Identifier
Description
GenericList
100
A basic list which can be adapted for multiple purposes.
DocumentLibrary
101
Contains a list of documents and other files.
Survey
102
Fields on a survey list represent questions that are asked of survey participants. Items in a list represent a set of responses to a particular survey.
Links
Attribute
Type
Description
ContentTypesEnabled
Boolean
Gets or sets a value that specifies whether content types are enabled for the list.
DefaultContentApprovalWorkflowId
String
Gets or sets a value that specifies the default workflow identifier for content approval on the list. Returns an empty GUID if there is no default content approval workflow.
DefaultDisplayFormUrl
String
Gets or sets a value that specifies the location of the default display form for the list. Clients specify a server-relative URL, and the server returns a site-relative URL
DefaultEditFormUrl
-
103
String
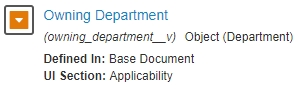
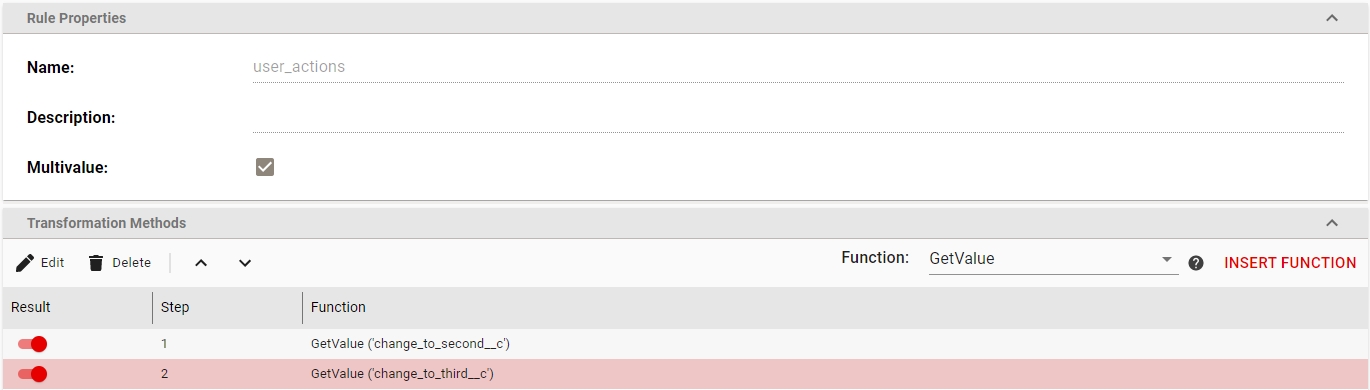

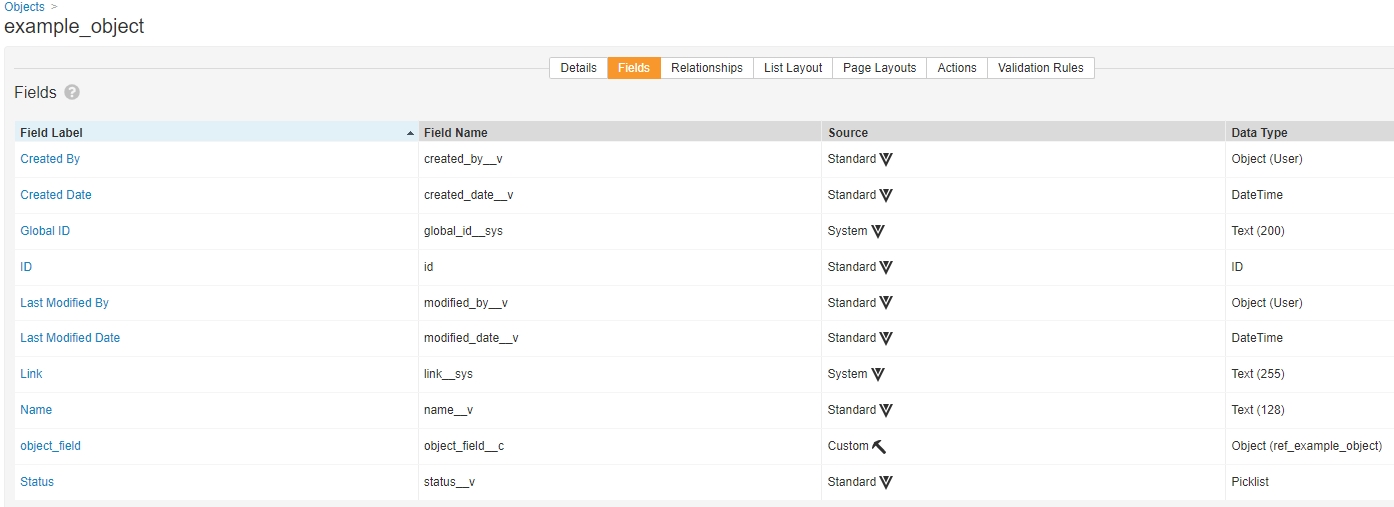
<AppPermissionRequests AllowAppOnlyPolicy="true">
<AppPermissionRequest Scope="http://sharepoint/content/tenant" Right="FullControl" />
<AppPermissionRequest Scope="http://sharepoint/taxonomy" Right="Read" />
</AppPermissionRequests><AppPermissionRequests AllowAppOnlyPolicy="true">
<AppPermissionRequest Scope="http://sharepoint/content/sitecollection" Right="FullControl" />
<AppPermissionRequest Scope="http://sharepoint/taxonomy" Right="Read" />
</AppPermissionRequests><?xml version="1.0" encoding="utf-8"?>
<configuration>
<appSettings>
<!-- Azure App Settings -->
<add key="Azure.App.Id" value="<YOUR AZURE APP ID>" />
<add key="Azure.App.Name" value="<YOUR AZURE APP NAME>"/>
<add key="Azure.App.Version" value="1.0.0"/>
<add key="Azure.App.Secret" value="<YOUR ENCRYPTED AZURE APP SECRET>"/>
<add key="Azure.App.RedirectUri" value="<YOUR AZURE APP REDIRECT URL>"/>
<add key="Azure.Tenant.Domain" value="<YOUR AZURE TENANT DOMAIN>"/>
<!-- Optional: Use a temporary folder to store the labeled files. If empty, the labeled files will be placed next to their originals. -->
<add key="Labeling.Temp.Folder" value="<OPTIONAL PATH TO LABELED CONTENT FOLDER>"/>
<!-- File name prefix for the labeled files. -->
<add key="Labeling.File.Prefix" value="lbld__"/>
</appSettings>
</configuration><?xml version="1.0" encoding="utf-8"?>
<configuration>
<appSettings>
<!-- Azure App Settings -->
<add key="Azure.App.Id" value="91583618-eb95-4ae9-8f9e-c5259491f66d" />
<add key="Azure.App.Name" value="miptest"/>
<add key="Azure.App.Version" value="1.0.0"/>
<add key="Azure.App.Secret" value="0;#75+wbxpdQ0c=;#pp39p7v4QA57VKiP0NNcnuX/FEk2FiE8iD4PrJnysfLuDbNra2xsFHA2K9wAKG8z"/>
<add key="Azure.App.RedirectUri" value="miptest://authorize"/>
<add key="Azure.Tenant.Domain" value="migrationcenter.onmicrosoft.com"/>
<!-- Optional: Use a temporary folder to store the labeled files. If empty, the labeled files will be placed next to their originals. -->
<add key="Labeling.Temp.Folder" value="C:\Temp\sensitivity labeled docs"/>
<!-- File name prefix for the labeled files. -->
<add key="Labeling.File.Prefix" value="lbld__"/>
</appSettings>
</configuration>
The migration-center WebClient is a new component introduced in version 22.1.0 and serves to replace the Desktop Client in order to provide a better experience and add new features and improvements in the coming versions. It is delivered as a customized Tomcat that is installed as a windows service. The WebClient is currently compatible with Google Chrome and Microsoft Edge.
Scanner is the term used in migration-center for an input connector. It is used to read the data that needs processing into migration-center and is the first step in a migration project.
Importer is the term used for an output connector used as the last step of the migration process. It takes care of importing the objects processed in migration-center into the target system.
Scanners or importers have a unique name, a set of configuration parameters and an optional description. They work as a job that can be run at any time and can be executed repeatedly.
Scanners and importers are created, configured, started and monitored through migration-center WebClient but the corresponding processes are executed by migration-center Job Server.
For every run a detailed history and log file are created.
A complete history is available for any Scanner or Importer job from the Scan Runs / Import Runs window.
This section displays a list of all runs for the selected job together with additional information, such as the number of processed objects, the status, the start and ending time.
Double clicking an entry or clicking the Logs icon on the toolbar opens the log file created by that run. The log file contains more information about the run of the selected job:
Version information of the migration-center Server Components the job was run with
The parameters the job was run with
Execution Summary that contains the total number of objects processed, the number of documents and folders scanned or imported, the count of warnings and errors that occurred during runtime.
To connect to a migration-center database, open the WebClient URL address in the browser: https://<server-name>/mc-web-client/login
Connection Select one of the available connections to the server from the list. If no connections are available or if you want to modify an existing one, click Manage connections.
Manage connections You can create, modify and delete a connection and you can also refresh the list of existing connections.
To create a connection, click the Add Connection + button and then, in the New Database Connection dialog box, type your Connection Name, Database Type, Host, Port number and Service Name. When finished, click CREATE.
To modify an existing connection, select the desired connection, click the Edit Connection button and modify the Connection Name, Database Type, Host, Port number and Service Name accordingly. When finished, click Save
Return to the Sign in page either by double clicking the desired connection, by right-clicking the desired connection and selecting Log in using this connection or by clicking the Back < button on the buttons bar and then logging in.
User name Type your username (default fmemc).
Password Type your password (default migration123).
When finished, click SIGN IN.
To log out of migration-center WebClient, click Log Out on the sidebar.
You can easily navigate through the migration-center WebClient sections using the sidebar on the left, as follows:
To run a migration, first you need to create a Job Server definition. You can do so in the section.
Then, you need to:
Additionally, you can:
To monitor running migration jobs, click the Jobs icon on the sidebar.
Here you can select a job and Pause , Start or Stop it using the buttons in the toolbar. You can also filter the list using the Column Selector and Search field in the top right of the page.
If the Jobserver is restarted while a job is running or paused, the job run will still be marked as such in the database, but it will no longer exist in the Jobserver. To restart the job you just need to Stop it first and start it again from the WebClient.
You need to create, configure and run a scanner in order to connect to a source system.
To create a scanner, click the Scanners icon on the sidebar, click the Add Scanner + icon on the toolbar and then configure the parameters.
To modify a scanner, select the desired Scanner and either right-click it and then select Edit Scanner on the context menu, or click the Edit icon on the toolbar.
To copy a scanner, select the desired Scanner and either right-click it and then select Copy Scanner on the context menu, or click on the Copy icon on the toolbar. When finished, click SAVE.
To delete an existing Scanner, select the desired Scanner and either right-click it and click Delete Scanner on the context menu, or click the Delete icon on the toolbar. Then, in the Confirm Delete dialog box, click DELETE.
Deleting a Scanner will also delete and remove all its associated Source Objects from the migration-center database.
In the DETAILS tab, give your scanner a meaningful Name, then select the Type of connector from the list. Then, depending on the selected connector type, the Parameters section will be populated with the connector's specific configuration parameters.
Next, in the Location field, select the Job Server where your Scanner be executed when you run it. Optionally type a meaningful Description for your scanner.
When finished, click either:
SAVE - if you plan to run the scan later;
SAVE & RUN - to save and run the scanner immediately, in which case you will be prompted to enter a description for this run in the Enter Job Run Description dialog box. By default the run description is the name of the scanner and the number of which run it is.
To view the history of your scanner, click the SCAN RUNS tab of a scanner.
To view a Scan Run Log select the desired scan run and either right-click it and select Download Scan Run Logs, or on the Log icon in the toolbar or by double clicking the entry.
To view the Scanned Objects of a Scan Run select the desired scan run and either right-click and select Show Scan Run Objects or click the Source Objects icon in the toolbar.
To delete a Scan Run select the desired scan run and either right-click it and select Delete Scan Run or click the Delete icon in the toolbar.
When you delete a scan run, all the objects belonging to that run will be deleted and removed from the migration-center database.
You can view the metadata of the extracted documents for the entire scanner by clicking the SOURCE OBJECTS tab.
You can also do this by selecting your scanner in the Scanners view and either right-click and select Source Objects or click the Source Objects icon in the toolbar.
The first columns from Id to Import date are internal migration-center columns and the rest represent an attribute from your source system.
You can change the number of rows on a page and navigate between pages using the bottom toolbar.
To Customize the displayed columns, click on the Customize Columns button in the toolbar. You will be presented with a list of all existing columns from which you can choose which will be displayed. By default, all columns are displayed.
To Export objects as CSV, click on the Export objects as CSV button in the toolbar. This will export all the object metadata present in the Scanner as a CSV file.
To view the Attributes of an object, click on the object and then on the View Attributes button in the toolbar. This will open a view that contains all the attributes of that specific object.
To view the Relations of an object, click on the object and then on the View Relations button in the toolbar. This will open a view that contains all the relations and their details for a specific object.
To refresh the objects list, click on the Refresh Objects button in the toolbar.
To Filter objects based on a specific attribute, use the dropdown to the right of the toolbar. This will enable you to select one of the attributes of your objects and then search for values in that attribute.
The Filter on the Object Tables is different than the ones in the main tables. Here the search is done in the database and it uses exact match.
You can use the following wildcards on the object table filters:
% (percent symbol) - match any number of characters
A migration set, or migset for short, is a grouping of Source Objects on which a set of transformation rules are applied which generates Target Objects.
To create a Migset, click on the Migsets icon in the sidebar and on the buttons bar click the Add MigSet + button.
To modify a Migset, select the desired Migset and either right-click it and then select Edit Migset on the context menu, or click the Edit icon on the toolbar. When finished, click SAVE.
To copy a Migset, select the desired Migset and either right-click it and then select Copy Migset on the context menu, or click on the Copy icon on the toolbar. When finished, click SAVE.
To delete a Migset, select the desired Migset and either right-click it and click Delete Migset on the context menu, or click the Delete icon the toolbar. Then, in the Confirm Delete dialog box, click DELETE.
To Apply Transformation on a migset you can use the Transform button . This will start a background process of processing all Transformation Rules on each Source Object in order to generate the new metadata on the Target Objects.
To Reset Transformation on a migset you can use the Reset button . In the confirmation dialog you have a checkbox if you want to Reset Imported Objects (by default only objects in status Transformed, Validated and Error are reset).
Resetting imported objects will break the ability to do Delta Migrations for those objects in the future (scanning and importing updates to the already migrated objects).
Therefore this is NOT recommended unless you plan on deleting them from the Target System and re-importing them.
Splitting a migset is a new feature added in the new migration-center WebClient. It allows you to create copies of the selected migset and split its objects equally among them. After clicking on the Split Migset button you can select the number of migsets to split it in. An approximation of the number of objects per migset after the split is displayed. Click on the SPLIT button and confirm to start the process.
In the PROPERTIES tab, in the DETAILS subtab, give your MigSet a meaningful Name and optionally a Description.
In the Type dropdown, select the Source to Target system migset type (i.e. FileSystemToDCTM). Once selected, the list of all scan runs that match the Source part of the migset type are displayed under the Available list.
To select objects in a migset, double-click an entry in the list of Available scan runs or select one and use the down arrow button to add it to the list of Selected scan runs.
You can also filter which objects are included in the MigSet by using the EXCLUSIONS and the ADVANCED FILTERS subtabs.
In the EXCLUSIONS subtab, objects are excluded from your MigSet by choosing which attribute values should be excluded. To do so, select the desired attribute under Available attributes and use the < > arrow buttons to exclude the values.
In the ADVANCED FILTERS subtab, you can create rule based filters using operators. Select a Source Attribute, Operator, Values and Connector, the click on ADD to include them. You can also delete rule filters.
You can check your selection by going to the OBJECT PREVIEW subtab.
In the OBJECT PREVIEW subtab, you can see a preview of the filtered objects.
When finished, click the LOCK OBJECTS button to add the selected objects to your MigSet. This means that these objects will be locked in this migset and cannot be used in another one. Then, in the Confirm Object Selection dialog box, click Yes.
Transformation Rules define how metadata from Source Objects is used to generate new metadata for Target Objects by using Transformation Functions. A transformation rule is equivalent to a Target Attribute after transformation.
To add a Transformation Rule click on the Plus icon then set a Name and optionally a Description.
To copy a Transformation Rule select the rules and click on the Copy icon .
To delete a Transformation Rule select the rules and click on the Delete icon .
To copy rules between migsets select the rules and click on the Copy to Clipboard icon . Then open the Rules section of the migset where you want to paste the rules and click on the Paste from Clipboard icon . You can paste as many times as needed.
Snippet Rules are rules whose value can be used as a step in any other normal rule.
To set a Rule as a Snippet check Snippet checkbox in the Rule Properies.
To use a Rule Snippet insert a GetSnippetRuleValue function and enter the name of the Snippet Rule you want to use.
Snippet rules cannot use the GetSnippetRuleValue function.
A transformation rule can have multiple transformation functions. They can take source attributes, static strings or even previous functions as the input value and provide an output value.
See page for a list of all available functions.
To add a Transformation Function:
Select the Transformation Rule you want to add a function to.
Under Transformation Methods, select the desired transformation Function you want to use and click on INSERT FUNCTION.
Fill the function parameters in the popup (the parameters vary depending on the function).
To get a description of the function or its parameters you can hover your mouse over the info icon
Multi-value Transformation Rules
Attributes from a source object can be Single Value or Multi Value (Repeating). A Transformation Rule can process both these kinds of attributes, but if the rule itself is not marked as MultiValue using the checkbox in the Rule Properties it will return only the last processed value.
A transformation function can process All values or only the value at a specific index of a repeating attribute.
After making a Transformation Rule into a multi value one, you can also return multiple functions as separate repeating values using the Result toggle.
A transformation rule can be debugged by taking a sample source object and us its metadata to see the results of each step in the rule.
Get the ID of an object whose metadata will be used for debugging the rule.
Select the rule you wish to debug.
Enter the Object ID in the text field next to the DEBUG RULE button.
Click the DEBUG RULE button.
Double clicking on the Debug Value of a step opens the value in a dialog window for better viewing.
Debug values does not take into account if your rule is single or multivalue.
Ex: in a single value rule, repeating values will be displayed at the last step when using Debug, but only the first value of the repeating values will end up in the transformation.
Generate Rules
For migrations where a simple transformation rule is needed for each or most source attributes you can use the Generate Rules feature by clicking on the button. This will create a Transformation Rule for each Source Attribute with the same name and with a GetValue() function for each specific attribute in it. This is very useful in migrations where the Source and Target systems are of the same type.
Using the generate rules feature will delete any existing transformation rules and changes will be saved automatically after the confirmation dialog.
Other Features
You can Export the entire transformation model using the Export to XML icon .
You can Import previously exported transformation model using the Import from XML icon .
You can Copy the transformation model from another migset using the Copy Transformation Model icon .
You can also Transform or Reset the objects of this migset without returning to the list of migsets.
Limitation: If you import new rules into a Migset that already has transformed objects, the attribute names and values will not be displayed correctly in the Objects views.
You need to reset and transform the objects again to get the new metadata displayed correctly.
The migset mapping lists function in the same way as regular mapping lists except they are usable only in the migset they belong to.
Fore more details please see the main section.
Transformation Rules are not automatically used when importing an object. They need to be associated to a Target Attribute of an Object Type in the Associations subtab of the migset.
Each Migset has a target type system rule that determines to which type an object will be associated with. This rule differs depending on the migset type. For example for any ...ToDCTM migset the rule is r_object_type.
To add an Object Type, select one from the dropdown list and click the Add button .
To add an Association, select the object type, then the transformation rule and target attribute you want to associate, and click on the green Add button .
Alternatively you can Auto Associate transformation rules and target attributes that have the same name, by using the button. This is the recommended way.
You can view the source attributes of the objects in the MigSet by clicking the SOURCE OBJECTS tab.
The first columns from Id to Import date are internal migration-center columns and the rest represent an attribute from your source system.
You can change the number of rows on a page and navigate between pages using the bottom toolbar.
To Customize the displayed columns, click on the Customize Columns button in the toolbar. You will be presented with a list of all existing columns from which you can choose which will be displayed. By default, all columns are displayed.
To Export objects as CSV, click on the Export objects as CSV button in the toolbar. This will export all the object metadata as a CSV file.
To view the Attributes of an object, click on the object and then on the View Attributes button in the toolbar. This will open a view that contains all the attributes of that specific object.
To view the Relations of an object, click on the object and then on the View Relations button in the toolbar. This will open a view that contains all the relations and their details for a specific object.
To refresh the objects list, click on the Refresh Objects button in the toolbar.
To filter objects based on a specific attribute, use the dropdown to the right of the toolbar. This will enable you to select one of the attributes of your objects and then search for values in that attribute.
To filter objects by a specific value, select the cell containing the value by which to filter and then click on the Filter by value button in the toolbar. This will set the current column as the selected one in the filter and set the cell text as the filter value.
The Filter on the Object Tables is different than the ones in the main tables. Here the search is done in the database and it uses exact match.
You can use the following wildcards on the object table filters:
% (percent symbol) - match any number of characters
To Remove objects from the migset, you can select one or multiple objects using the checkboxes to the left of the table. Once you have your selection, press the Remove from Migset button in the toolbar or in the context menu.
You can view the attributes generated by the transformation rules of the objects in the Migset by clicking the TARGET OBJECTS tab.
Please see the section for features common to all Objects Views, including Target Objects.
To manually edit the attributes of an object, press the Edit Attributes button in the toolbar or in the context menu. This will open a view that will allow you to edit individual object attributes.
To Reset Transformation for one or more objects, select the required object/s and press the Reset button in the toolbar or in the context menu. The object will be reset to its Unprocessed state.
To Filter objects based on their status, use the Statuses checkboxes in the bottom toolbar.
You can view the objects that encountered errors during the Transform, Validate or Import phases in the MigSet by clicking the ERROR OBJECTS tab.
You can Reset all error objects by clicking the Reset All icon .
The Error Objects tab has features present in the and tab.
Importers will connect to the Target System, take the selected MigSet with Validated Objects and import them. You can monitor the progress in the Importer run history or directly in the MigSets view.
To create an importer, click the Importers icon on the sidebar and then click the Add icon on the buttons bar and then configure the parameters.
To modify an importer, select the desired Importer and either right-click it and then select Edit Importer on the context menu, or click the Edit icon on the toolbar.
To copy an importer, select the desired Importer and either right-click it and then select Copy Importer on the context menu, or click on the Copy icon on the toolbar. When finished, click SAVE.
To delete an existing importer, select the desired Importer and either right-click it and click Delete Importer on the context menu, or click the Delete icon on the toolbar. Then, in the Confirm Delete dialog box, click DELETE.
In the DETAILS tab, give your Importer a meaningful Name, type or select the Importer Type from the list and complete the needed Parameters.
Next, in the Location field, select the Job Server where your Importer be executed when you run it. Optionally type a meaningful Description for your scanner.
In the SELECTION tab, under AVAILABLE MIGSETS you can see MigSets with validated objects that match your target destination: for example, for an OpenText importer, only MigSets with the type ...ToOpenText will be displayed. Double-click the desired MigSet to add it to the ASSIGNED MIGSETS list to be migrated. Note that only validated objects or error objects that previously failed an import will be processed.
When finished, click either:
SAVE - if you plan to run the import later;
SAVE & RUN - to save and run the import immediately, in which case you will be prompted to enter a description for this run in the Enter Job Run Description dialog box. By default the run description is the name of the importer and the number of which run it is.
To view the history of your importer, click the IMPORT RUNS tab of an importer.
To view an Import Run Log select the desired import run and either right-click it and select Download Import Run Logs, or on the Log icon in the toolbar or by double clicking the entry.
Delta Migration is a feature of migration-center that allows you to migrate updates made to documents that have already been scanned and newly created documents that were not scanned yet.
This feature is possible using most available connectors.
Check the user guide for your connector to confirm if it is capable of delta migration and to see if there are any pre-requisites or limitations.
You need to have the initial batch of objects scanned, transformed and imported successfully. In the target system the imported objects need to be present.
The original MigSet/s must not be changed by resetting or unlocking the objects or by deleting the MigSet. If this happens, update objects cannot be imported.
You can start a delta migration by running either the same original scanner or any scanner that will pick up already scanned objects. If these objects have been modified since the original scan, they will be scanned again as an update object, otherwise they will be ignored. New objects, that were not scanned before will be scanned normally.
Update objects can be identified by having the is_update attribute value set to 1 or True.
Since the original MigSet needs to be left untouched with all objects intact, and the delta migset needs the same rules, the best way to do this is to create a copy of the original migset.
Transform the migset used for the Delta Migration, as you would normally.
The Delta MigSet can be selected in the same Importer used for the original import, or in any other importer as required.
The Delta Import will create all new objects normally and it will locate already imported objects in the target system and update their metadata and content as needed.
To delete an Import Run select the desired import run and either right-click it and select Delete Import Run or click the Delete icon in the toolbar.
The Scheduler feature only works with migration-center running on an Oracle database.
A Scheduler is used to automate an end to end migration and is useful when needing to make regular delta scans and imports for a Source System that changes often.
The workflow of a Scheduler is as follows:
It will run the selected Scanner
If there are objects in the Scan Run, it will create a copy of the selected Migset, assign the Scan Run to it and Transform the objects
If there are Validated Objects after the transformation, it will assign the migset to the Importer and run it.
To create a Scheduler click on the Schedulers icon in the sidebar and on the Add icon . See the following instructions on how to configure the rest of the Scheduler configuration.
To modify a Scheduler, select it and either right-click it and then select Edit Scheduler on the context menu, or click the Edit button on the toolbar. When finished, click SAVE.
To delete an Scheduler, select it and either right-click it and click Delete Scheduler on the context menu, or click the Delete button on the toolbar. Then, in the confirmation dialog box, click DELETE.
To run a Scheduler the Database Server also needs to access the Jobserver configured for the Scanner and Importer on the selected Port. The reason being that the Oracle Database will start the jobs directly.
In the CONFIGURATION tab, configure the Details of your scanner, such as Name, Description and whether you want to set the scheduler to Active.
Next, select the Scanner, MigSet and Importer by clicking the respective buttons. The list of Migsets will be filtered to match the selected Scanner type and the list of Importers will be filtered to match the selected Migset type.
In the FREQUENCY tab, configure the Start Date when this scheduler will be running from and either the End Date or the number of runs after which it will stop.
In the Interval section configure a timeslot and the Frequency at which the Scheduler will start.
In the Email Report section you can set an Email Address where the scheduler will send reports and whether you want the report send in case of Success or in case of Error. You also need to have an SMTP Server to use for sending the email reports.
In the IMPORTED OBJECTS tab, you can see the list of objects imported by your scheduler.
In the ERROR OBJECTS tab, you can see the list of errors that may have occurred during the scheduled migration. When finished, click Save on the top right corner.
In the HISTORY tab, you can see all the runs of the selected Scheduler.
To delete a Scheduler Run select it and click on the Delete icon . Click on DELETE if you want to also delete the scan run, migset and import run along with all the imported objects. Or click on JUST THE RUN to delete only the Scheduler Run from history.
To view the Imported Objects or Error Objects, select a run and click on their respective icons.
Here you can view the list of Imported Objects for the selected Scheduler Run.
The Imported Objects view features are common among the other Object Views. Please see for details.
Here you can view the list of Error Objects for the selected Scheduler Run.
The Error Objects view features are common among the other Object Views. Please see for details.
The Dashboard is a new feature added to the WebClient which provides reports on the objects present in your migration-center Database.
The Migration Status tab of the Dashboard presents the total number of objects in your Database, divided between the 4 states: Unprocessed, In Progress, Errors and Imported.
From the dropdown menu on the left you can chose to display Numbers or Percentages on your graph.
The toolbar to the right allows you to change the type of the chart, offering a Pie Chart , Bar Chart and Donut Chart .
The chart of your choosing can then be exported as a SVG, PNG or CSV file using the drop down menu to the right.
The Object Distribution tab provides more detailed reporting for specific source object types or specific Scanners.
The chart on the left shows the scanned object distribution yearly, while the chart on the right shows the scanned objects distribution monthly for a selected year.
To load all data of a source object type, first selected the required type from the Source Type dropdown and then press Load Data.
To load the data of a specific scanner, after selecting the required Source Type, press the Select Scanner button.
To select the required year period, from the toolbar of the first chart, press Zoom In or Zoom Out or press Selection Zoom to drag-select the needed years.
To return the chart to its default state press the Reset Zoom button.
To export the charts, press the Export to SVG, PNG or CSV for the respective chart.
You can search for any Source / Target Object in the Object Search section using values of Internal, Source or Target attributes.
When searching by Internal Attributes, you can select the Attribute name from a dropdown of predefined attributes. Afterwards enter the Value by which you want to search.
When searching by either Source Attributes or Target Attribtues you have to manually enter the Attribute Name. Afterwards enter the Value by which you want to search.
When searching by Target Attributes, you can only use the Target Object Type Name that a rule is associated to. You cannot seach by rules that are not associated to any target object.
Start the search by clicking the Search button.
Stop the search by clicking the Cancel button that appears when a search is in progress.
All searches are run in the background. You can leave the Object Search section after starting a search and return to at a later time to check if it's finished.
When a search query finishes, results start loading in the Objects table.
You can nagivate to each of the Scanner, Scan Run, Migset, Importer and Import Run configurations that the object is contained in, by clicking on the ID value in the row of the object.
You can view the Source Attributes and Target Attribtues (if they exist) of each object by selecting an object and clicking on the following icons in the toolbar or by right clicking an object and selecting the View Source Attributes or View Target Attributes entries in the context menu.
When viewing Target Attributes, only the ones that are associated to a Target Object Type will show up. To view all migset target attributes, go to the migset the object is in.
The Object History view is a list of all Scan or Import operations that an object has gone through, along with the the Job Run ID, Source ID and Target ID.
To open the view click on the collapsed header on the bottom of the screen. You can also resize it by dragging the space between the two tables.
To load the history of a specific object just select it in the results table.
To view the History Attributes of a specific operation right click it and select the View History Attributes entry in the context menu. These attributes will be either Source or Target depending on the type of the operation.
A Job Server definition is needed to run jobs like scanning or importing documents.
To create a Job Server definition, click the Configure button on the sidebar, in the JOB SERVERS tab click the Add icon on the buttons bar and then configure the Job Server parameters in the Create dialog box.
Enter a Name, Location (where a Job Server is installed), Port (9700 by default) and a Description (optional) for your Job Server definition. When finished, click CREATE.
To modify an existing Job Server, select the desired Job Server and either right-click it and then select Edit Job Server on the context menu, or click the Edit button on the buttons bar. Then, in the Edit dialog box, configure the parameters accordingly. When finished, click SAVE.
To delete an existing Job Server, select the desired Job Server and either right-click it and click Delete Job Server on the context menu, or click the Delete button on the buttons bar. Then, in the Confirm Delete dialog box, click DELETE.
Object Types in migration-center are a representation of a document or other objects in a Target System where you are importing. They are used in the Associations section of a migset and any object needs to be associated to at lest one Object Type to be able to Transform, Validate and Import it.
To create an Object Type click the Configure button on the sidebar, in the OBJECT TYPES tab and click on the Add icon . Enter a Name and an optional Description, then click on the SAVE button.
To delete an Object Type select the Object Type and click on the Delete icon . Confirm the action in the confirmation dialog.
To copy an Object Type select the Object Type and click on the Copy icon in the toolbar. Then click on the SAVE button.
To export an Object Type to CSV select the Object Type and click on the Export icon .
To import an Object Type from CSV click on the Import icon and select the CSV file. Set the desired Name of the newly imported Object Type and click on the OK button.
Only CSV files using comma "," as separator are supported. See the CSV "RFC 4180" specification.
The attributes of an object type need to match the attributes or fields in the target system in Name and Type. If the attributes do not accurately represent the target system this can result in object values passing validation and causing errors during the Import phase.
To add a new Attribute select the Object Type, then click on the Add Attribute button. Set the attribute Name, Type (String, Number, Date or Boolean), Minimum and Maximum length allowed for the values of this attribute, if it allows Repeating values or not and if it is Required (mandatory to have a value). You can also set a Regular Expression to determine specific formats that the values are allowed to have.
To delete an Attribute select the Object Type and click on the Red X icon of the attribute you want to delete. When finished click on SAVE.
A Mapping List is a collection of key - value pairs that can be used in Transformation Rules using the MapValue() function.
To create a Mapping List click the Configure button on the sidebar, in the MAPPING LIST tab and click on the Add icon . Enter a Name and click on the SAVE button.
To copy a Mapping List select the desired mapping list and click on the Copy icon in the toolbar.
To delete a Mapping List select the desired mapping list and click on the Delete icon in the toolbar.
Checking Exact Match makes the mapping list match key values only if they are exactly the same.
Using Exact Match unchecked will result in the mapValue and mutliColumnMapValue functions to match source strings that contain the key in the mapping list as a substring.
Partial matches do not work the other way around. A source string "sample" in a mapValue function will not match a mapping list key with the value "Test sample 1".
Checking Case Sensitive makes the mapping list match key values only if the case matches. Otherwise matches will be made regardless of case.
To add a new entry manually click on the Add Value button , enter the values for the Key and the Value columns. When finished click on SAVE.
To paste entries first copy values either from an Excel table or from a text file that has the values tab separated, then click on the Paste Values icon . When finished click on SAVE.
To export entries to a CSV select the mapping list and click on the Export to CSV icon .
To import entries from CSV create or select a mapping list, click on the Import to CSV icon , Drag and Drop the CSV file, check the Overwrite existing entries option if you want existing entries with the same key as an imported one to be replaced, then click on Upload. After the import is finished you will receive a message with the number of successfully imported entries and a list of any error entries, if there are any. If the number of errors exceeds 1000, the import is canceled.
Only CSV files using comma "," as separator are supported. See the CSV "RFC 4180" specification.
To delete an entry select the mapping list and click on the Red X icon of the entry you want to delete. When finished click on SAVE.
To delete all entries select the mapping list and click on the Clear Values icon on the mapping list values toolbar. When finished click on SAVE.
The Multi Column Mapping List is a new feature usable only with the migration-center WebClient.
To make a mapping list Multi Column create or select a mapping list, click on the Customize Columns iconand add up to 10 Value Columns. Afterwards enter or import your entries as you would normally. When finished click on SAVE.
To use a regular Mapping List, in the transformation rule select the MapValue() function. Set the value to be matched with the values in the Key column, select the Mapping List you want to use and whether or not you want the function to report a transformation error when a value is not matched.
To use a Multi Column Mapping List, in the transformation rule select the MultiColumnMapValue() function. Set the first parameters as you would for a regular mapping list and also specify the name of which Value column you want the function to return when finding a match.
Here you can enter a new License key for the migration-center database installation you are currently connected to.
Entering a license key with different migration paths, will NOT update the list of available Connector or Migset types.
The About section provide information on your current installation as follows:
Version of migration-center components: UI version, API version and Database version.
The Java version that is running the WebClient Apache Tomcat.
The Oracle version of the migration-center Database that you are currently connected to.
Licence Information: Licensed to and Licence validity.
To delete a connection, select the desired connection, click the Delete Connection button and then, in the confirmation message, click DELETE.
Importers
Create and configure importers that take migration sets with validated objects and imports them in a target system.
Schedulers
Create schedulers that run automated end to end migrations at regular intervals.
Dashboard
View graphs and analyze the status of the entire migration.
Configure
Create and manage Job Server definitions, Object Types and Mapping Lists. You can also renew your license and view information in the About section.
Help
Go to the documentation page relevant to the section you are currently in.
Log out
Disconnect from the current migration-center database.
The value for each step is calculated based on the metadata of the selected object and displayed in the Debug Values column.
If Email Report is set it will send the email as configured, when the import ends.
Jobs
Start, stop or pause running jobs. This section also displays running scan and import jobs. Along with the description, the run number, start/end date.
Scanners
Create and configure scanners that connect to a source systems and extract documents and metadata as migration-center objects.
MigSets
Split the scanned objects into migration sets and define all the transformation rules and generate the target objects ready for import.


The Documentum Importer takes the objects processed in migration-center and imports them into a Documentum repository. As a change in migration-center 3.2, the Documentum scanner and importer are no longer tied to one another – any other importer can now import data scanned with the Documentum Scanner and the Documentum Importer can import data scanned by any other scanner. Starting from version 3.2.9, it supports objects derived from dm_sysobjects.
The supported Documentum Content Server versions are 5.3 – 21.4, including service packs. For accessing a Documentum repository Documentum Foundation Classes 5.3 or newer is required. Any combinations of DFC versions and Content Server versions supported by OpenText Documentum are also supported by migration-center’s Documentum Importer, but it is recommended to use the DFC version matching the version of the Content Server targeted for import. The DFC must be installed and configured on every machine where migration-center Server Components is deployed.
Starting with version 3.2.8, migration center supports Documentum ECS (Elastic Cloud Storage). Nevertheless, the documents cannot be imported to ECS if retention policy is configured in the CA store.
Documentum importer imports every individual document or version within a DFC transaction. This is required to ensure the consistency of the imported objects since IDfSysObject.save() might be called multiple times for a document or version. The TBOs that are attached to the document types are triggered during the import. Therefore, the DFC limitations regarding transactions applies to the TBOs. The most common limitation is that you cannot perform any of the following methods that manage objects in a lifecycle: attach, promote, demote, suspend, and resume. In case of having custom TBOs the Documentum Content Sever Fundamental guide should be checked for a complete list of operations that are not allowed in the transaction.
Starting from version 3.9 of migration-center additional configurations need to be made for the Documentum connector to be able to locate Documentum Foundation Classes. This is done by modifying the dfc.conf file, located in the Job Server installation folder.
There are two settings inside the file that by default match the paths of a standard DFC install. One needs to have the path for the config folder of DFC and the other needs the path to the dctm.jar.
Example:
If the DFC version used by the migration-center Jobserver is not compatible with the Java version or the Content Server version it is connecting to, errors might be encountered when running a Documentum connector.
When encountering the following error, the first thing to check is the DFC - Java - DCTM compatibility matrixes.
To create a new Documentum Importer job, specify the respective adapter type in the importer’s Properties window – from the list of available connectors “Documentum” must be selected. Once the adapter type has been selected, the Parameters list will be populated with the parameters specific to the selected adapter type, in this case the Documentum.
The Properties window of an importer can be accessed by double-clicking an importer in the list, by selecting the Properties button from the toolbar or from the context menu.
The common adaptor parameters are described in .
The configuration parameters available for the Documentum importer are described below:
username* Username for connecting to the target repository. A user with superuser privileges is required. Superuser privilege is required to set some internal attributes that cannot be set by a normal user: i_reference_cnt, i_folder_id, r_creator_name, r_creation_date, r_modifier, r_modify_date and some other i_ and r_ attributes. It is also required to assure the check-out / check-in on any object and for setting the onwer_name of the imported objects.
Parameters marked with an asterisk (*) are mandatory.
There are two ways to create Documentum folders with the importer:
Documents Migration set: When creating a new migration set choose the <source type>ToDctm(document) type – this will create migration set containing documents targeted at Documentum. Use the “autoCreateFolders” setting (checked) from the Documentum Importer configuration to generate the folder structure based on the “dctm_obj_link” values assigned by the transformation rules. No attributes or permissions can be set on the created folders.
Folder Migration set: When creating a new migration set choose the <source type>ToDctm(folder) type – this will create migration set containing folders targeted at Documentum. Now only the scanner runs containing folder objects will be displayed on the |Filescan Selection| tab. Note that the number of objects contained in the displayed scanner runs now indicates folders and not documents, which is why the number on display (folders) can be different from the total number of objects processed by the scan (if it contains other types of objects besides folders). When creating transformation rules for the migration set, keep in mind that folder-only migration sets have folder-specific attributes to work with, in this case attributes specifically targeted at Documentum folder objects. You can set permissions and attributes for the imported folders.
Important aspects to consider when importing folder migration set:
The attributes “object_name” and “r_folder_path” are key attributes for folders in Documentum. If these attributes are transformed without taking into consideration how these objects build into a tree structure, it may no longer be possible to reconstruct the folder tree. This is not due to migration-center, but rather because of the nature of folders being arranged in a tree structure which does create dependencies between the individual objects.In Documentum the “r_folder_path” attribute contains the path(s) to the current folder, as well as the folder itself at the end of the path (e.g. /cabinet/folder_one/folder_two/current_folder), while “object_name” contains only the folder name (e.g. current_folder). To make it easier for the user to change a folder name, migration-center prioritizes the “object_name” attribute over the “r_folder_path” attribute; therefore changing “object_name” from current_folder to folder_three for example will propagate this change to the objects’ “r_folder_path” attribute and create the folder /cabinet/folder_one/folder_two/folder_three without the user having to change the “r_folder_path” attribute to match. This only applies to the last part of the path, which represents the current folder, and not to other parts of the path. Those can also be modified using the provided transformation functions, but migration-center does not provide any automations to make sure the information generated in that case is correct.
The importer parameter “autoCreateFolders” applies to both documents migration set and folder migration set.
Versions (and branches) are supported by the Documentum Importer, including custom version labels. The structure of the versions tree is generated by the scanners of the systems that support this feature and provide means to extract it. Although the version tree is immutable (i.e. the ordering of the objects relative to their antecedents cannot be changed) the version description (essentially the Documentum “r_version_label”) can be changed using the transformation rules prior to import.
Permissions or ACLs can be set to documents and folders by creating transformation rules for the specific attributes. The attributes group_permit, world_permit and owner_permit can be used to set granulated permissions. For setting ACLs, the attributes acl_domain and acl_name must be used. The user must set either *_permit attributes or acl_* attributes. If both*_permit attributes or acl_* attributes are configured to be migrated together the *_permit attributes will override the permissions set by the acl_* attributes. Because Documentum will not throw an error in such a case migration-center will not be able to tell that the acl_* attributes have been overridden and as such it will not report an error either considering that all attributes have been set correctly.
If the group_permit, world_permit, owner_permit AND acl_domain, acl_name attributes are configured to be migrated together the *_permit attributes will override the permissions set by the acl_* attributes. This is due to Documentum’s inner workings and not migration-center. Also, Documentum will not throw an error in such a case, which makes it impossible for migrationcenter to tell that the acl_* attributes have been overridden and as such it will not report an error either, considering that all attributes have been set correctly. It is advised to use either the *_permit attributes OR the acl_* attributes in the same rule set in order to set permissions.
Renditions are supported by the Documentum Importer. The needed information for this process is typically generated during scan by the Documentum Scanner or other scanners supporting systems where rendition information or other similar features can be extracted. Should rendition information not be obtainable using a particular scanner, or if the respective source system doesn’t have renditions at all, it is still possible to add files as renditions to objects during the transformation process. The renditions of an object can be controlled through the migration-center system attribute called “dctm_obj_rendition”. This attribute appears in the “Rules for system attributes” area of the Transformation Rules window. If the object contains at least one rendition in addition to the main content, the source attribute “dctm_obj_rendition” will be available for use in transformation rules. To keep the renditions for an object and migrate them as they are, the system attribute “dctm_obj_rendition” must be set to contain one single transformation function: GetValue(dctm_obj_rendition[all]). This will reference the path of the files where the corresponding renditions have been exported to; the Importer will pick up the content from this location and add them as renditions to the respective documents.
It is possible to add/remove individual renditions to/from objects by using the provided transformation functions. This can prove useful if renditions generated by third party software need to be appended during migration. These renditions can be saved to files in any location which is accessible to the Job Server where the import will be run from. The paths to these files can be specified as values for the “dctm_obj_rendition” attribute. A good practice for being able to assign such third-party renditions to the respective objects is to name the files with the objects’ id and use the format name as the extension. This way the “dctm_obj_rendition” attributes’ values can be built easily to match external rendition files to respective Documentum documents.
Other properties of renditions are also available to be set by the user through a series of rendition-related system attribute which are available automatically in any Migration set targeting a Documentum system:
dctm_obj_rendition Specify a file on disk (full path) to be used as the content of that particular rendition
dctm_obj_rendition_format Specify a valid Documentum format to be set for the rendition Leave empty to let Documentum decide the format automatically based on the extension of the file specified in dctm_obj_rendition (if the extension is not known to Documentum the rendition’s format will be unknown) Will be ignored if dctm_obj_rendition is not set
dctm_obj_rendition_modifier Specify a page modifier to be set for the rendition. Any string can be set (must conform to Documentum’s page_modifier attribute, as that’s where the value would end up) Leave empty if you don’t want to set any page modifiers for renditions. Will be ignored if dctm_obj_rendition is not set
Relations are supported by Documentum Importer. They can currently be generated only by the Documentum Scanner, but technically it is possible to customize any scanner to compute the necessary information if similar data or close to Documentum relations can be extracted from their source systems.
Relations cannot be altered using transformation rules; migration-center will manage them automatically if the appropriate options in the scanner and importer have been selected. A connection between the parent object and its relations must always exist and can be viewed in migration-center by right-clicking on the object in any view of a migration set and selecting <View Relations> from the context menu. A grid with all the relations of the selected object will be displayed together with their associated metadata, such as relation name, child object, etc.
In order for the importer to use this feature the option importRelations from its configuration must be checked. Based on the settings of the importer it is possible to import objects and relations together or separately. This feature enables you to attach relations to already imported objects.
Importing a relation will fail if its child object is not present at the import location. This is not to be considered a fatal error. Since the relation is connected to the parent object, the parent object itself will be imported successfully and marked as “Partially Imported”, indicating it has one or more relations which could not be imported (because the respective child object could not be found). After the child object gets imported, the import for the parent object can be repeated. The already imported parent object will not be touched, but its missing relation(s) will now be created and connected to the child object. Once all relations have been successfully created, the parent object’s status will change from “Partially imported” to “Imported”, indicating a fully migrated object, including all its relations. Should some objects remain in a “Partially imported” state because the child objects the relation depends on are not migrated for a reason, then the objects can remain in this state and this state can be considered a final state equivalent to “imported”. The “Partially imported” state does not have any adverse effects on the current or future migrations even if these depend on the respective objects.
The virtual documents data is stored in the migration-center database as a special type of relation. Please view the above chapter for more details about the behavior of this type of data.
In order to rebuild the structure of the virtual documents the importRelations setting must be checked in the Documentum Importer configuration.
This special type of relation is based on the “dmr_containment” information; in order for the data to be compatible with the importer you will need specific information as you see below to be created by the source scanner.
Audit Trails can be scanned using the Documentum Scanner (see the user guide for more information about scanning audit trails), added to a Documentum Audit Trail migration set and imported using the Documentum Importer. This type of migration sets is subject to the exact same migration procedure as Documentum documents and folders. They can be imported together with the document and folder migration sets with which they are related to or on their own after the required document and folder objects have been imported.
It is not possible to import any audit trail if the actual object it belongs to hasn’t been migrated.
Importing audit trails is controlled in the Documentum Importer via the importAuditTrails parameter (disabled by default).
A typical workflow for migrating audit trails consists of the following main steps:
Scan folders/documents with Documentum Scanner by having “exportAuditTrail” flag activated. The scanning process will create tree kind of distinct objects in migration-center: Documentum(folder), Documentum(document) and Documentum(audittrail).
Assign the Documentum(audittrail) objects to a DctmToDctm(audittrail) migset(s) and follow the regular migration-center workflow to promote the objects through transformation rules to a “Validated” state required for the objects to be imported.
Import audit trails objects using Documentum Importer by assigning the respective migset(s) to a Documentum Importer job with the
In order to prepare audit trail for import, first create a migset containing audit trail objects (more than one migset containing audit trails can be created, just like for documents or folders). For a migset to work with audit trails, the type of object must be set “DctmToDctm(audittrail)” accordingly. After setting the migset type to “DctmToDctm(audittrail)” the | Filescan | tab will display only scans which contain Documentum audit trail objects. Any of these can be added/removed to/from the migration set as usual.
Transformation rules allow setting values for the attributes audit trail entries on import to the target system. Values can be simply carried over unchanged from the source attributes, or they can be transformed using the available transformation functions. All attributes that can be set and associated are defined in the target type “dm_audittrail”.
As with other migration-center objects, audit trail objects have some predefined system attributes:
audited_object_id this should be filled with the corresponding value that comes from source system. No transformation or mapping is necessary because the importer will translate that id into the corresponding id in target repository.
r_object_type must be set to a valid Documentum audit trail object type. This is normally “dm_audittrail” but custom audit trails object types are supported as well.
The following audit trail attributes don’t need to be set through the transformation rules because they are automatically taken from the corresponding audited object in target system: chronicle_id, version_label, object_type.
All other “dm_audittrail” attributesthat refer to the audited object (acl_domain, acl_name, audited_obj_vstamp, controlling_app, time_stamp, etc) can be set either to the values that come from the source repository or not set at all, case in which the importer will set the corresponding values by taking them from the audited object located in the target repository.
The source attributes “attribute_list” and “attribute_list_old” may appear as multi-value in migration-center. This is because their values may exceed the maximum size of a value allowed in migration-center (4000 bytes), case in which migration-center handles such an attribute as a multi-value attribute internally. The user doesn’t need to take any action to handle such attributes; the importer knows how to process and set these values correctly in Documentum.
Working with rules and associations is core product functionality and is described in detail in the .
Assigning Documentum aspects to document and folder objects is supported by Documentum Importer. One or multiple aspects can be assigned to any document or folder object during transformation.
Documentum aspects are handled just like regular Documentum object types in migration-center. This means aspects need to be defined as a migration-center object type first before being available for use during transformation
During transformation, aspects are assigned just like actual object types to Documentum objects using the r_object_type system rule; the r_object_type system rule has been modified to accept multiple values for Documentum documents and folders, thus allowing multiple aspects to be specified
Note: the first value of r_object_type needs to reference an actual object type (i.e. dm_document or a subtype thereof), while any other values of r_object_type will be interpreted as references to aspects which need to be attached to the current object.
As with actual object types, all references to aspects will need to be valid in order for the object to be imported successfully. Trying to set invalid aspects or aspect attributes will cause the object to fail on import.
As with an actual object type, transformation rules used to generate values for attributes defined through aspects will need to be associated with the respective aspect types and attributes – again, just use aspects as if they were actual object types while on the Associations page of the Transformation Rules window.
Important note on updating previously imported objects with aspects:
The Documentum importer has the ability to configure the behavior to attach the imported objects to a specific lifecycle. This ability refers only to attaching a lifecycle to a state that allows attaching to it and does not include the Promote, Demote, Suspend or Resume actions of the lifecycle.
When the connector is configured to attach the lifecycle the transformation rules should contain the r_policy_id attribute that should have as value a valid lifecycle id from the target repository and also the state attribute r_current_state that should have as value a valid lifecycle state number (a state that allows attaching the lifecycle to it).
To be able to overwrite some attribute changes made by lifecycle when attaching the document, the connector allows to configure a list of attributes that will be set again with the values set in the transformation rules after the lifecycle is attached, to make sure the values of those attributes are the ones coming from the migration set.
For importing annotations that have been scanned by Documentum Scanner the “importRelations” parameter must be enabled.
The corresponding “dm_note” objects have been imported prior or together with the parent documents in order for the DM_ANNOTATE relations to be imported.
The Documentum importer has the ability to import the comments on documents and folders (dmc_comment) by enabling “importComments” (default is unchecked). When enabled, the comments scanned by the Documentum scanner will be create and attached to the imported documents and folders in the target repository.
The pre-condition of a correct comments migration is that the users that created the comment objects and their group names from the source system need to exist in the target repository as well. This is necessary to be able to import the same permission access to the comment owners as in the source system.
The importer is also able to import updates of comments (see below Note on pre-condition) in a delta migration import.
If creating a comment fails for any reason, the error will be reported as warning in the importer log. The affected document or folder is set to the status “Partially Imported” in the migset. Since it is not possible to resume importing failed comments, after fixing the root cause of the error, the affected documents need to be reset in the migset, destroyed from repository (only if they are not updates) and imported again.
Objects that have changed in the source system since the last scan are scanned as update objects. Whether an object in a migration set is an update or not can be seen by checking the value of the Is_update column – if it’s 1, the current object is an update to a previously scanned object (the base object). An update object cannot be imported unless its base object has been imported previously.
Depending on the source systems the object come from, the method of obtaining the update information will differ but the objects behavior will stay the same once scanned. See the documentation of the scanners in case you need more information about the supported updates and how they are detected.
migration-center Client, which is used to set up transformation and validation rules does not connect directly to any source or target system to extract this information. Object type definitions can be exported from the respective systems to a CSV file which in turn can be imported to migration-center.
One tool to easily accomplish this for Documentum object types is dqMan, which is used in the following steps to illustrate the process. dqMan is an administration Tool for EMC Documentum supporting DQL queries and API commands and much more. dqMan can be purchased at . Other comparable administration tools can also be used, provided they can output a compatible CSV file or generate some similar output which can be processed to match the required format using other tools.
Start dqMan and connect to the target DOCUMENTUM repository. dqMan normally starts with the interface for working with DQL selected by default. Press the [DQL] button in the toolbar if not already selected.
In the “DQL Query” -box paste the following command and replace dm_document with the targeted object type: select distinct t.attr_name, t.attr_type, '0' as min_length, t.attr_length, t.attr_repeating, a.not_null as mandatory from dm_type t, dmi_dd_attr_info a where t.name=a.type_name and t.attr_name=a.attr_name and t.name='dm_document' enable(row_based); Press the [Run] button.
Click somewhere in the “Results” box. Use {CTRL+A} to select all. Right-click to open the context menu and choose <Export to> <CSV>.
The Content Validation functionality is based on checksums (an MD5 hash) computed for the document’s contents during scan (by the Scanner itself) and after import (by the Importer). The two checksums are then compared - for any given piece of content its checksums from before and after the migration should be identical.
If the two checksums differ in any way, this is an indication that the content has been corrupted/modified during/after migration. Modifications can happen on purpose or simply by user error and can usually be traced back based on the r_modifier and r_modify_date attributes of the affected object. Actual data corruption rarely happens and is usually due to software and/or hardware errors on the systems involved during content transfer or storage.
Validating content is always performed after the content has been imported to the target repository, thus adding another step to the migration process. Accordingly, using this feature may significantly increase import time due to having to read back every piece of content for every document and compute its checksum in order to compare it against the initial checksum computer during scan.
This feature is controlled through the checkContentIntegrity parameter in the Documentum Importer (disabled by default).
The mc_content_location attribute can be used to import the content of the document from another place than the location where the scanner exported the document. It should be set with a valid file path. If it is not set, the content will be picked up from the original location. Useful when the content was moved or copied to other location than the initial one. If its value is set to “nocontent”, contentless documents will be imported. For importing primary content with multiple pages, the attribute mc_content_location can be set with multiple content paths so the importer will create a page for every given content.
The Documentum Content Validation also supports renditions in addition to a document’s main content. Renditions are processed automatically if found and do not require further configuration by the user.
There is one limitation that applies to renditions though: since the Content Validation functionality is based on a checksum computed initially during scan (before the migration), renditions are supported only if scanned from a Documentum repository using the Documentum Scanner. Currently this is the only scanner aware of calculating the required checksums for renditions. Other scanners, even though they may provide metadata pointing to other content files, which may become renditions during import, do not handle the content directly and therefore do not compute the checksum at scan time needed by the Content Validation to be compared against the imported content’s checksum.
When the rendition has different pages, those will be also imported on specific rendition page.
Each job run of the importer generates along with its log a rollback script that can be used to remove all the imported data from the target system. This feature can be very useful in the testing phase to clear the resulting items or even in production in case the user wants to correct the imported data and redo the import.
The name of the rollback script is build based on the following formula:
<Importer name>(<run number>)_<script generation date time>_ rollback_script.api
Its location is the same as the logs location:
<Server components installation folder>/logs/DCTM-Importer/
Composed by a series of Documentum API commands that will remove in the proper order the items created in the import process, the script should look similar to the following example:
You can run it with any applications that supports Documentum API scripting this includes the fme dqMan application and the IAPI tool from Documentum.
This list displays which Documentum attributes can be associated with a migration-center transformation rule.
Custom object types:
the end
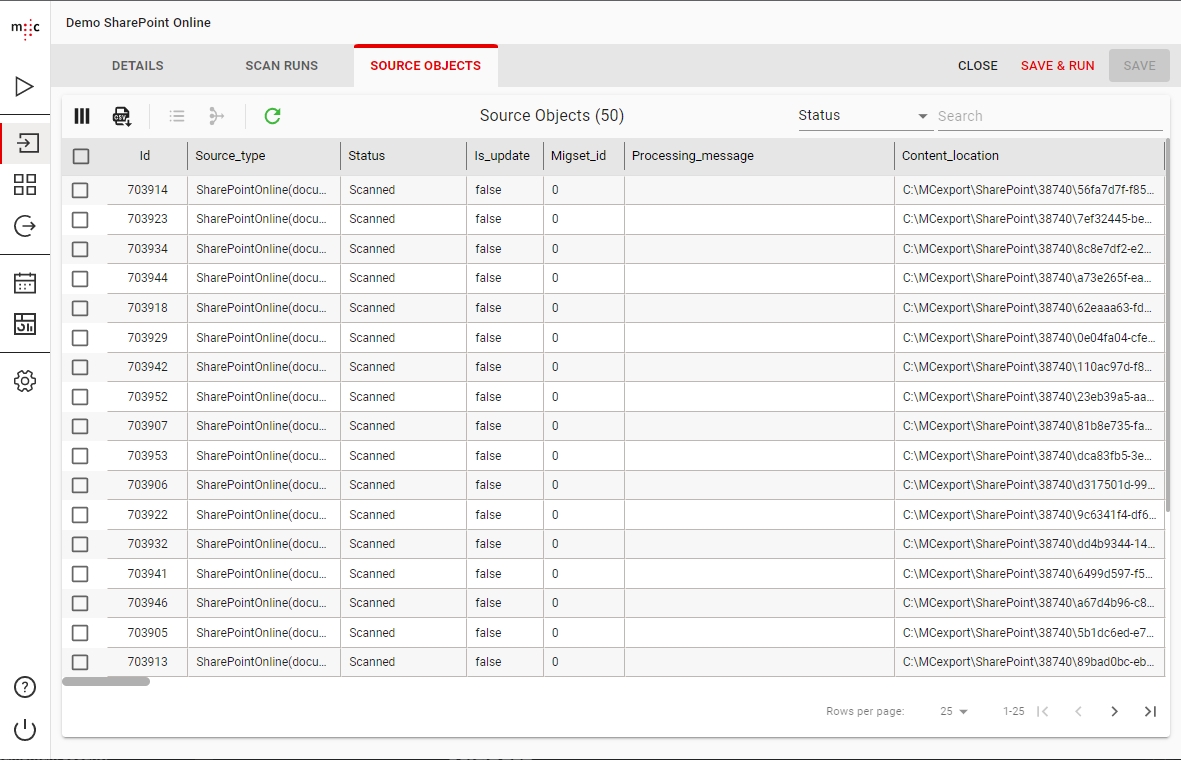
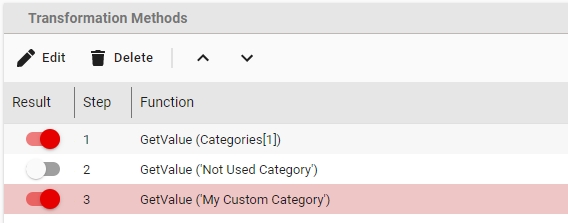
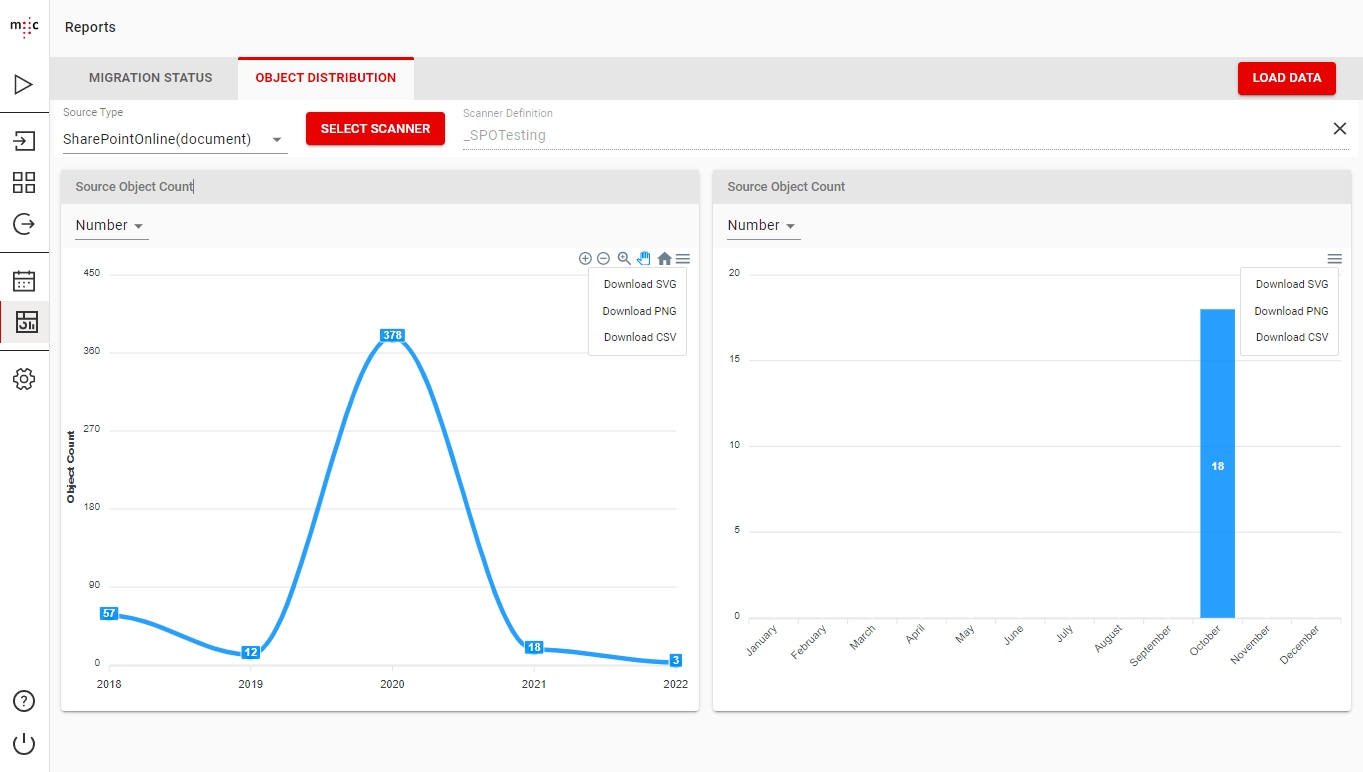
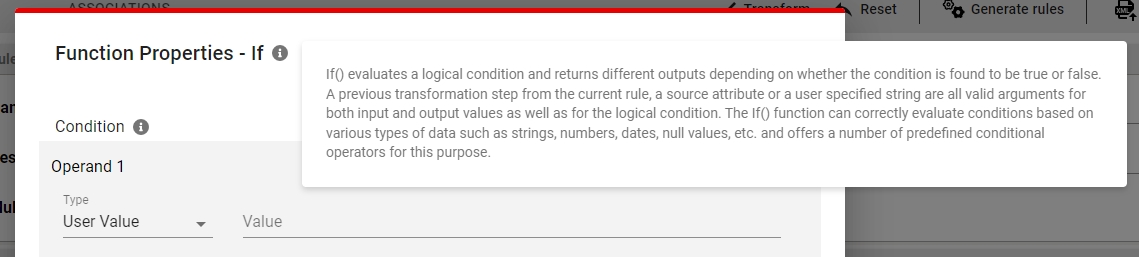
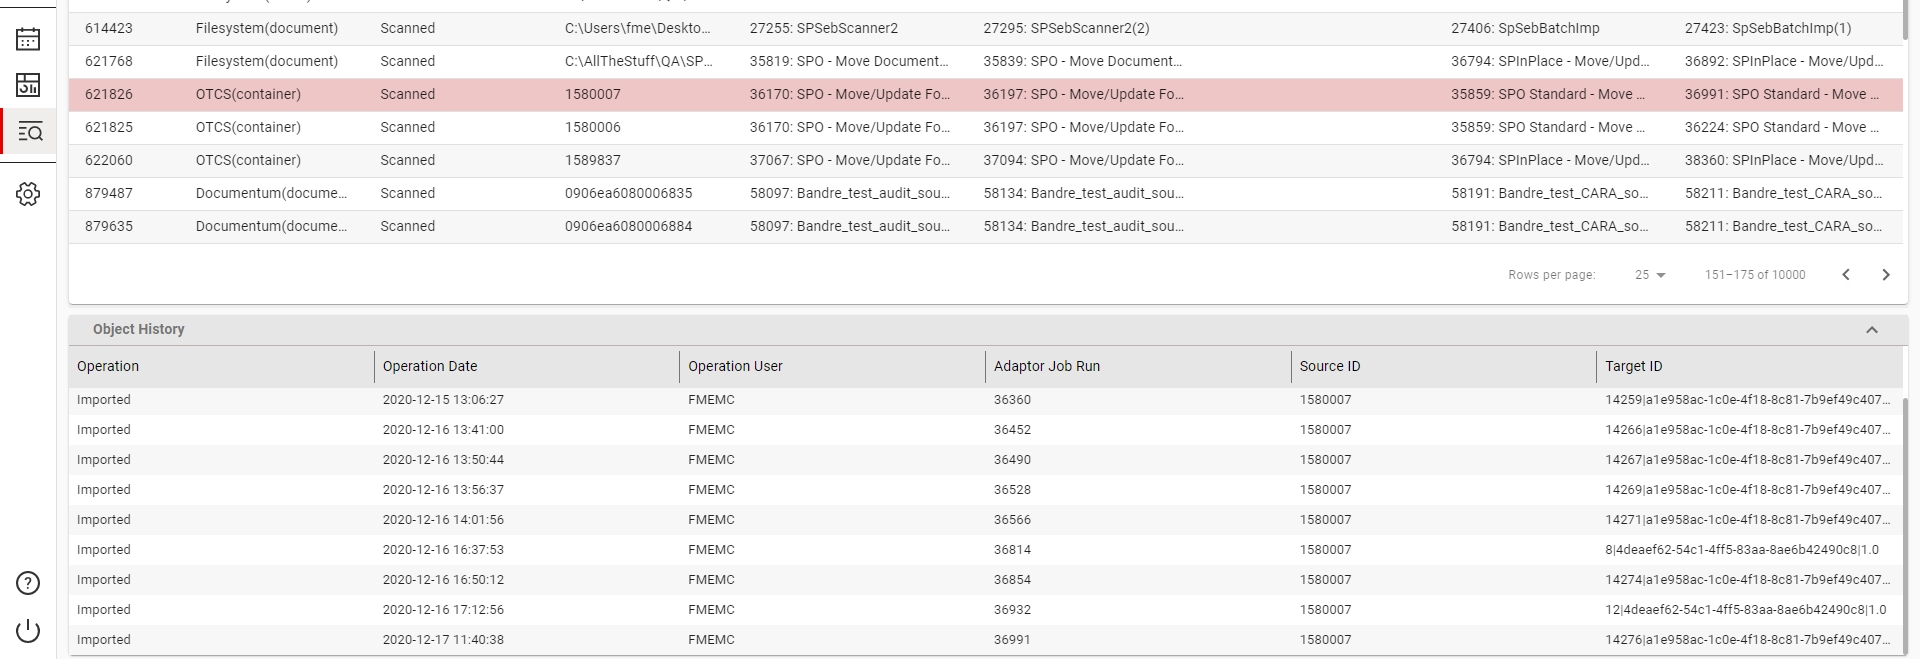
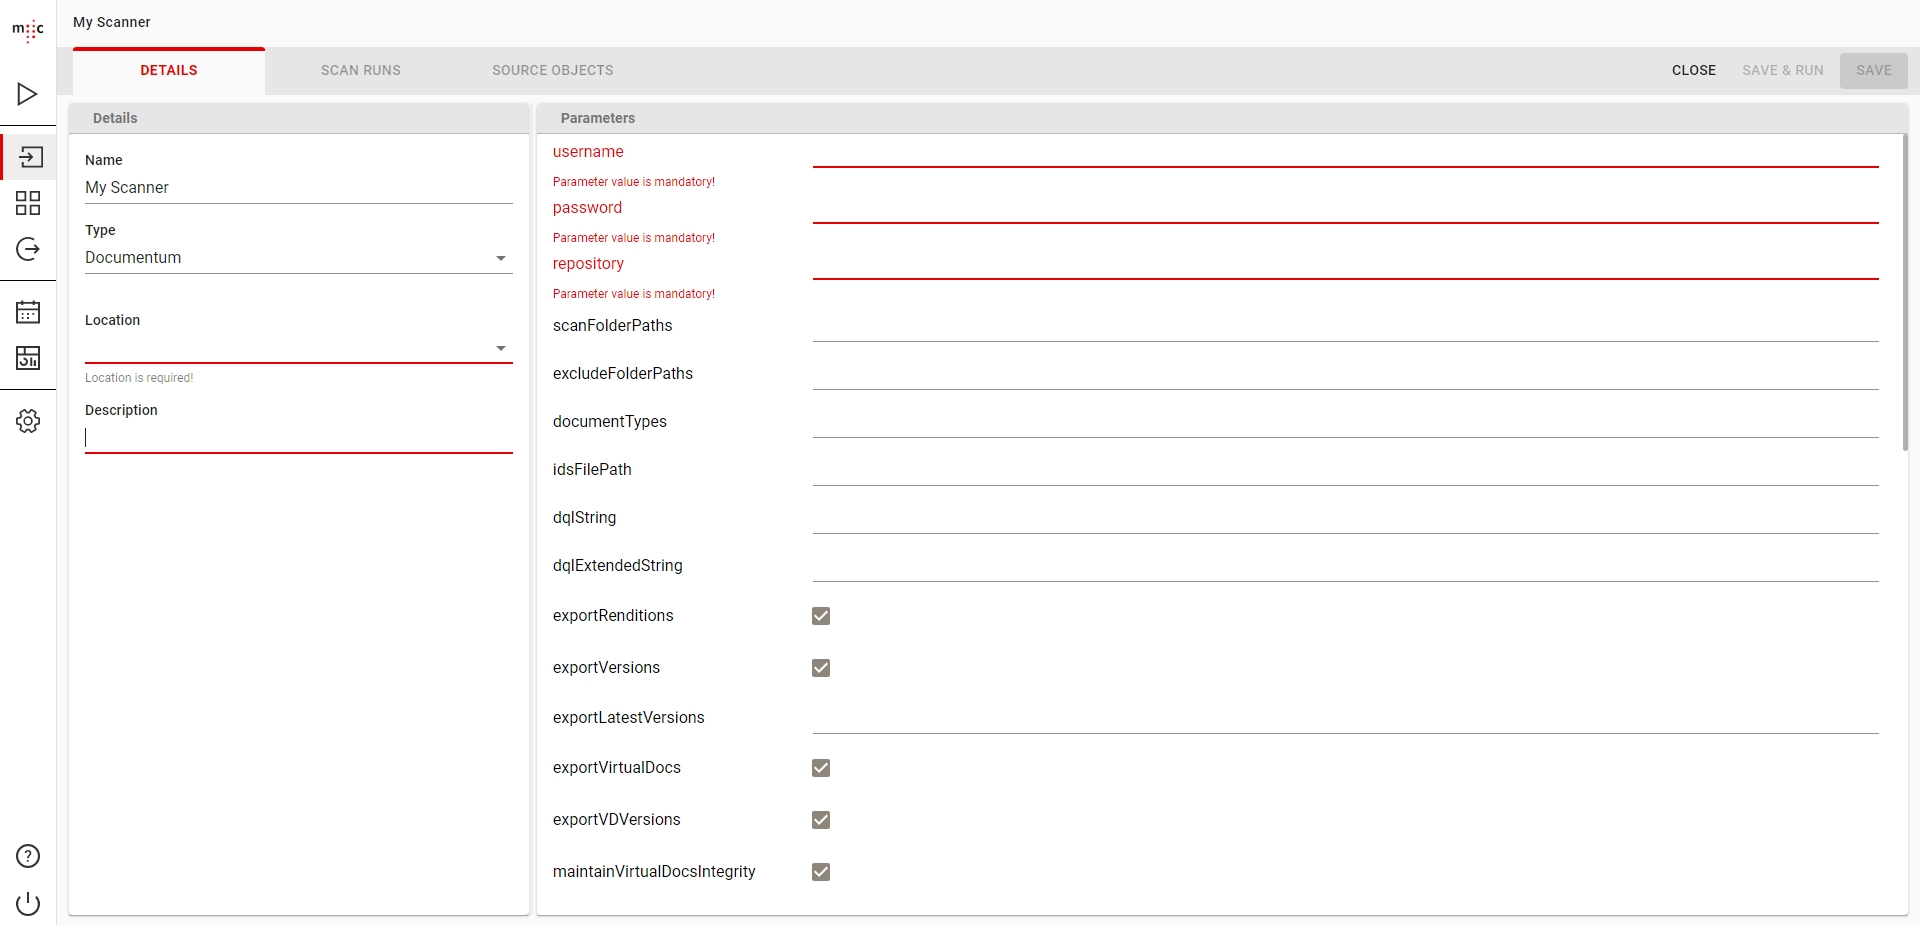
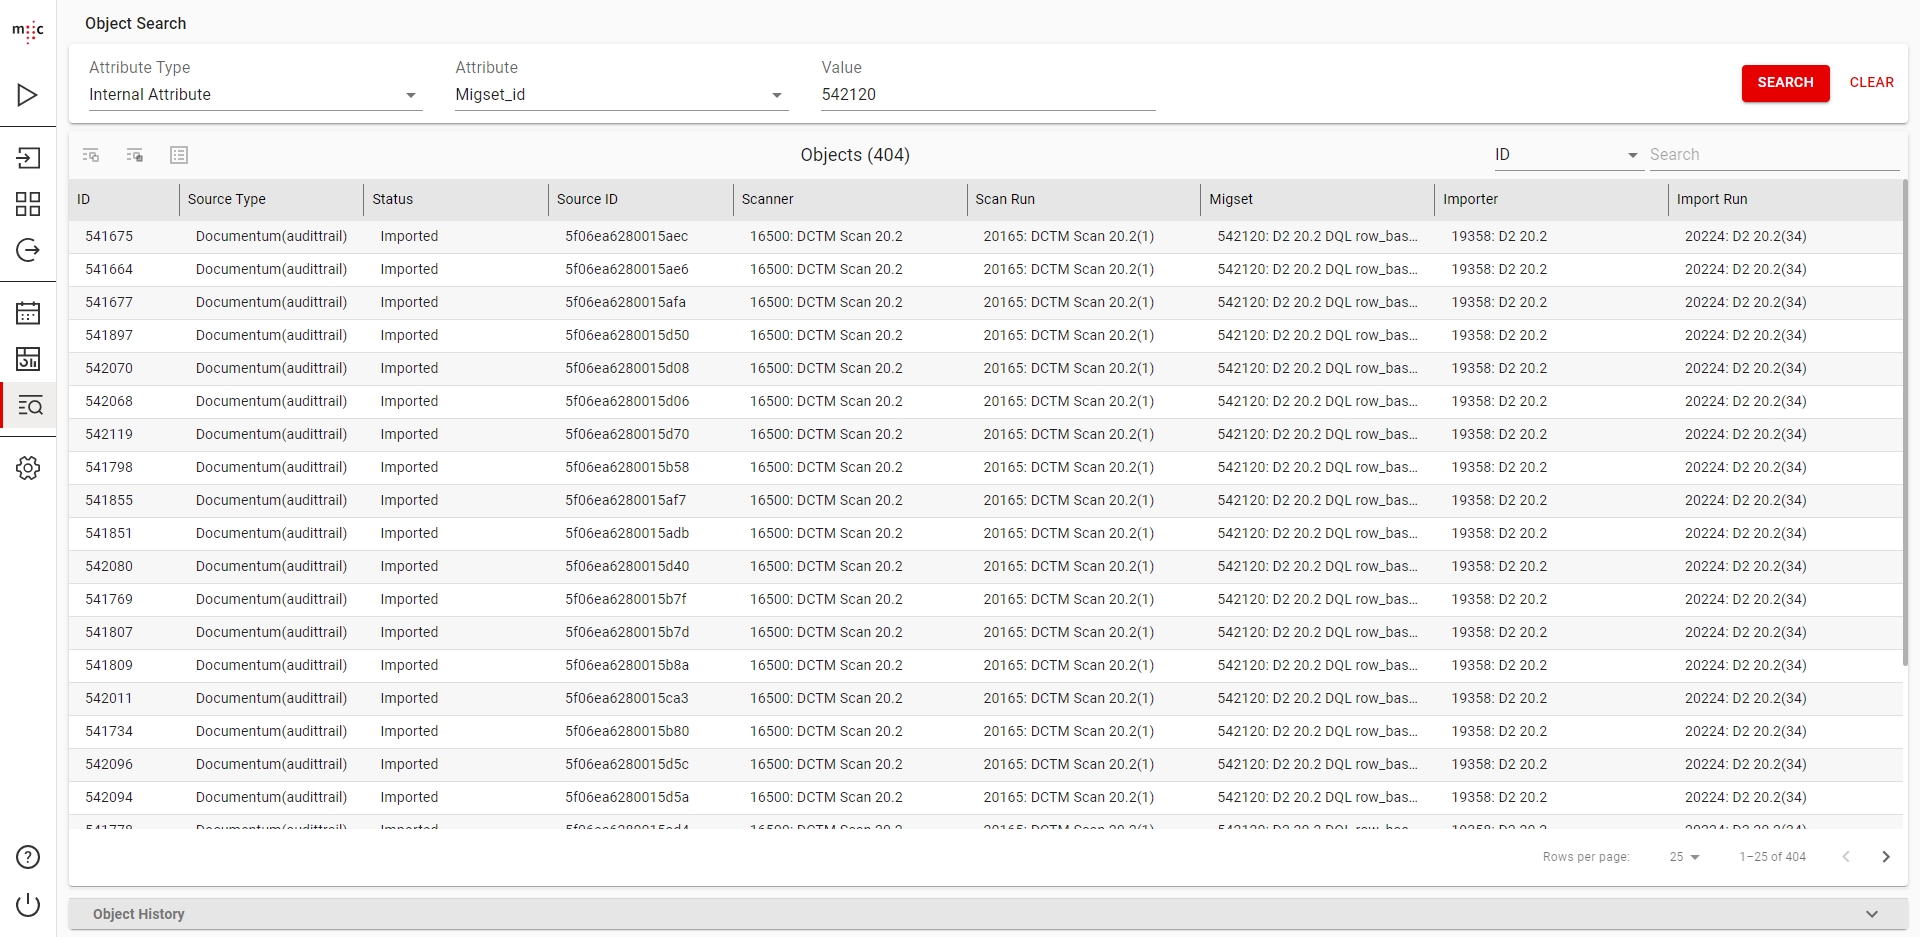
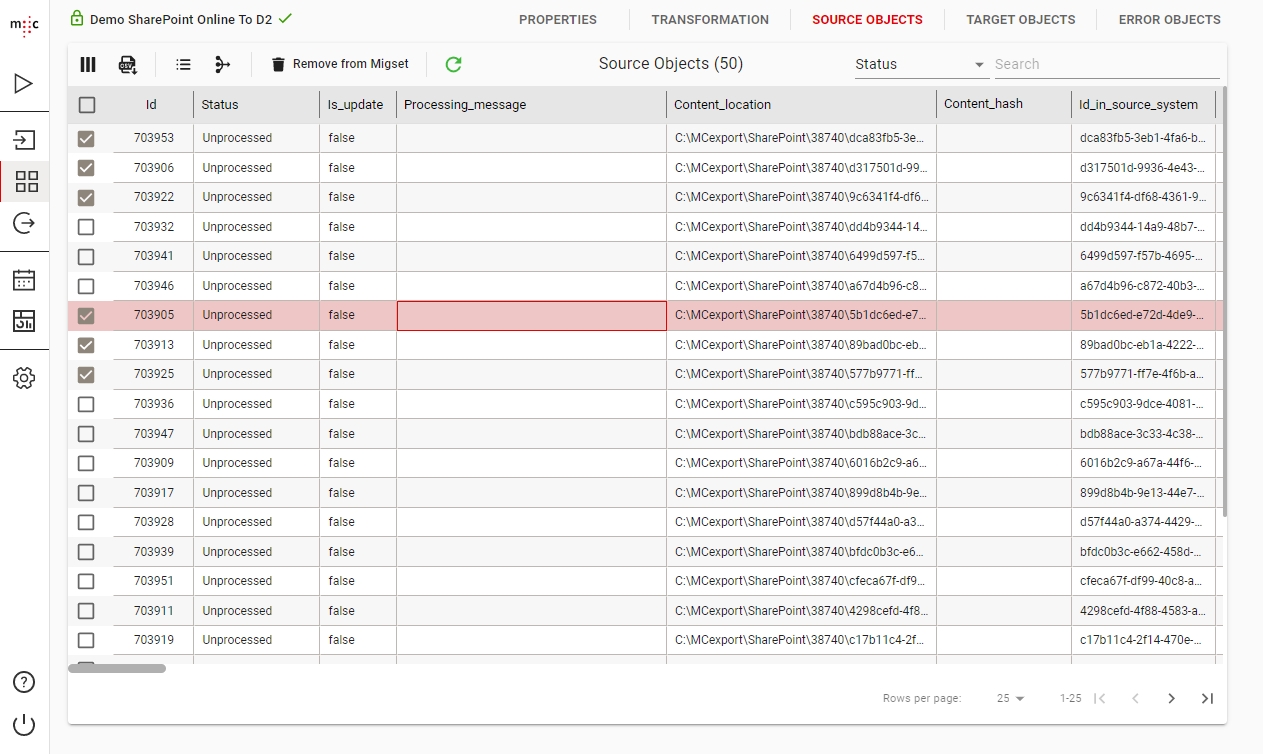
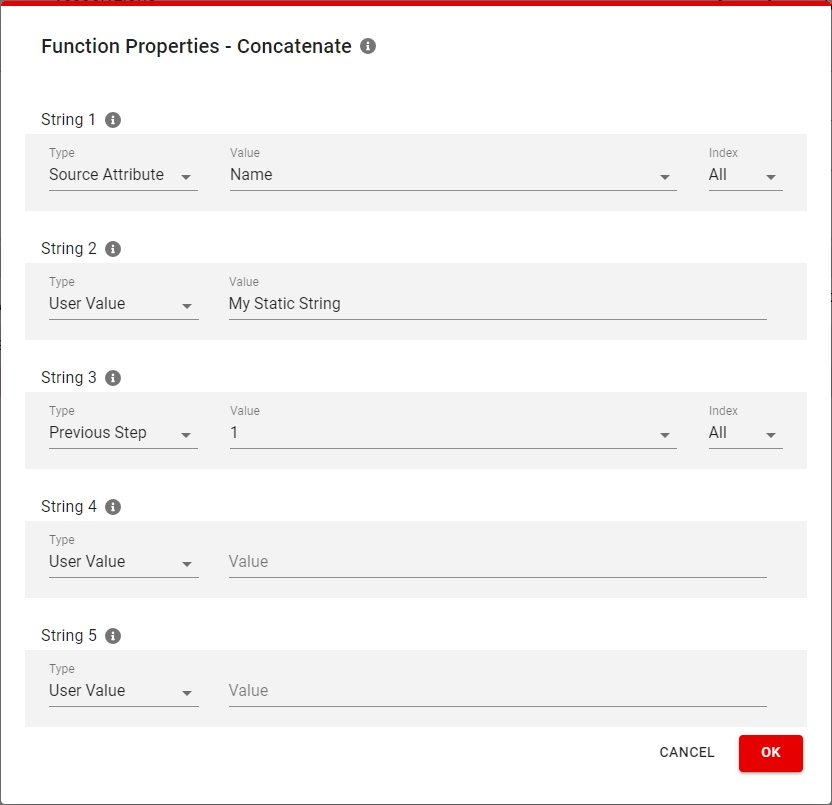
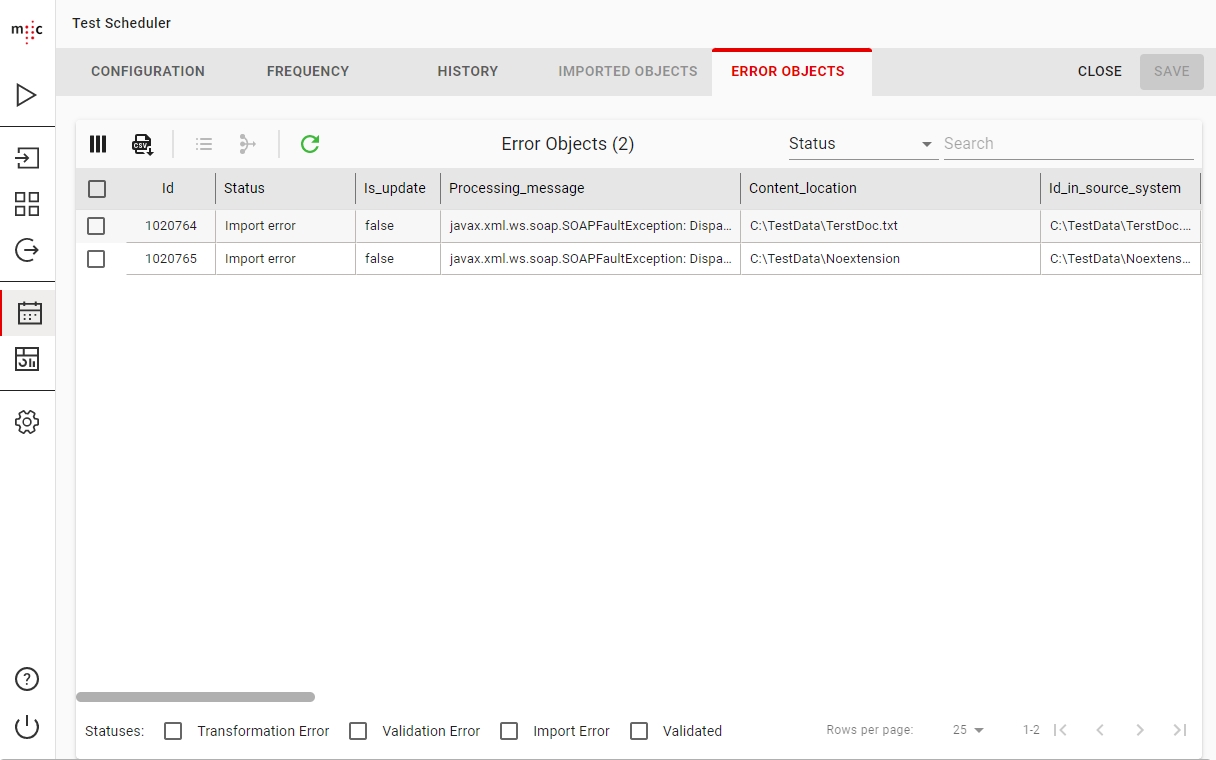
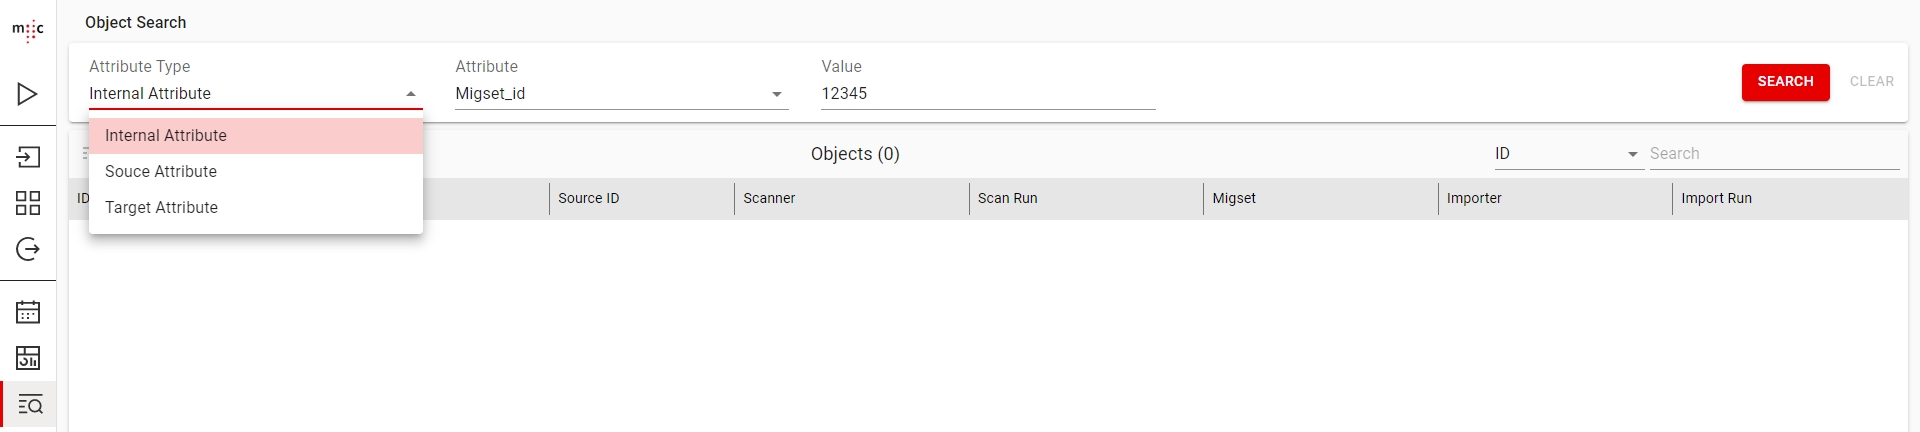
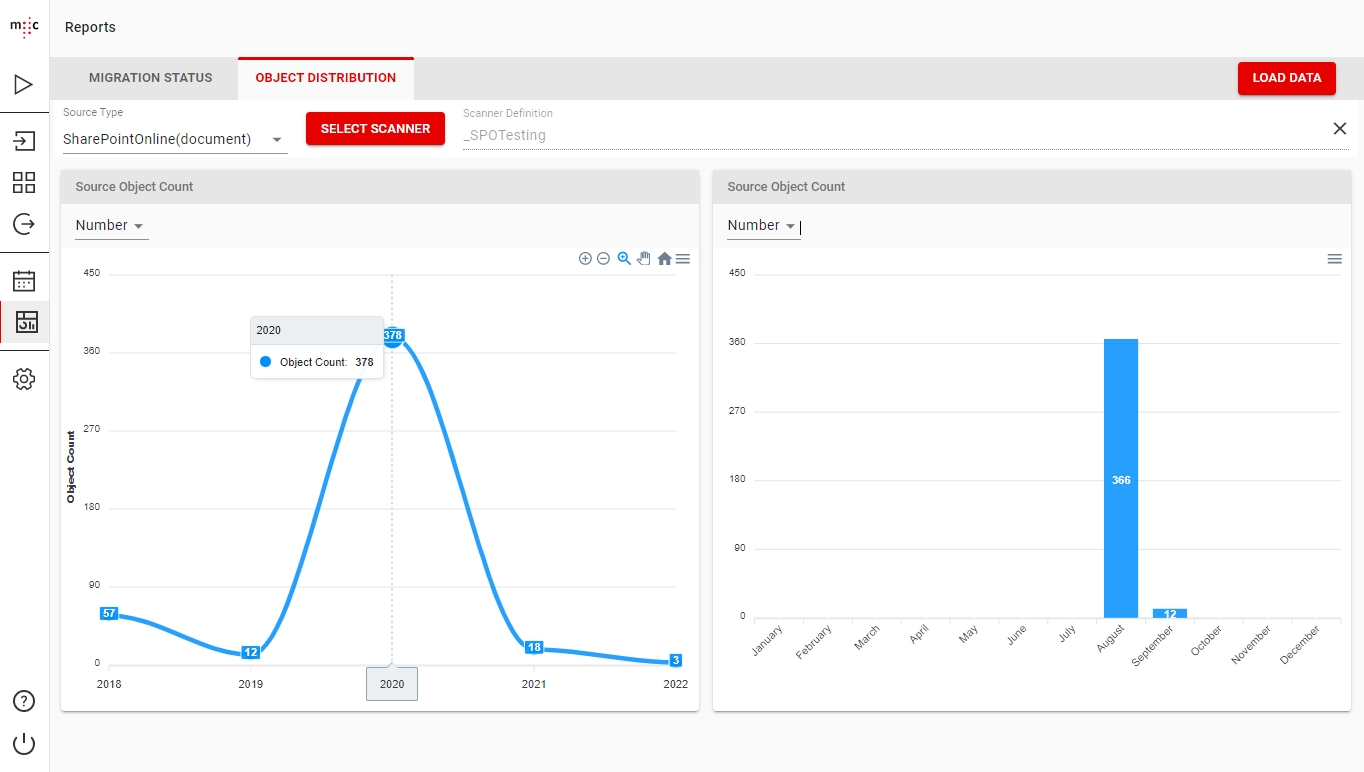
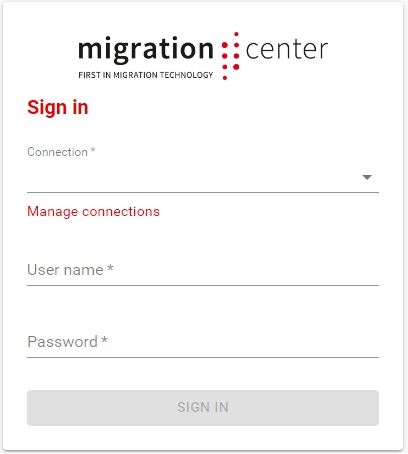
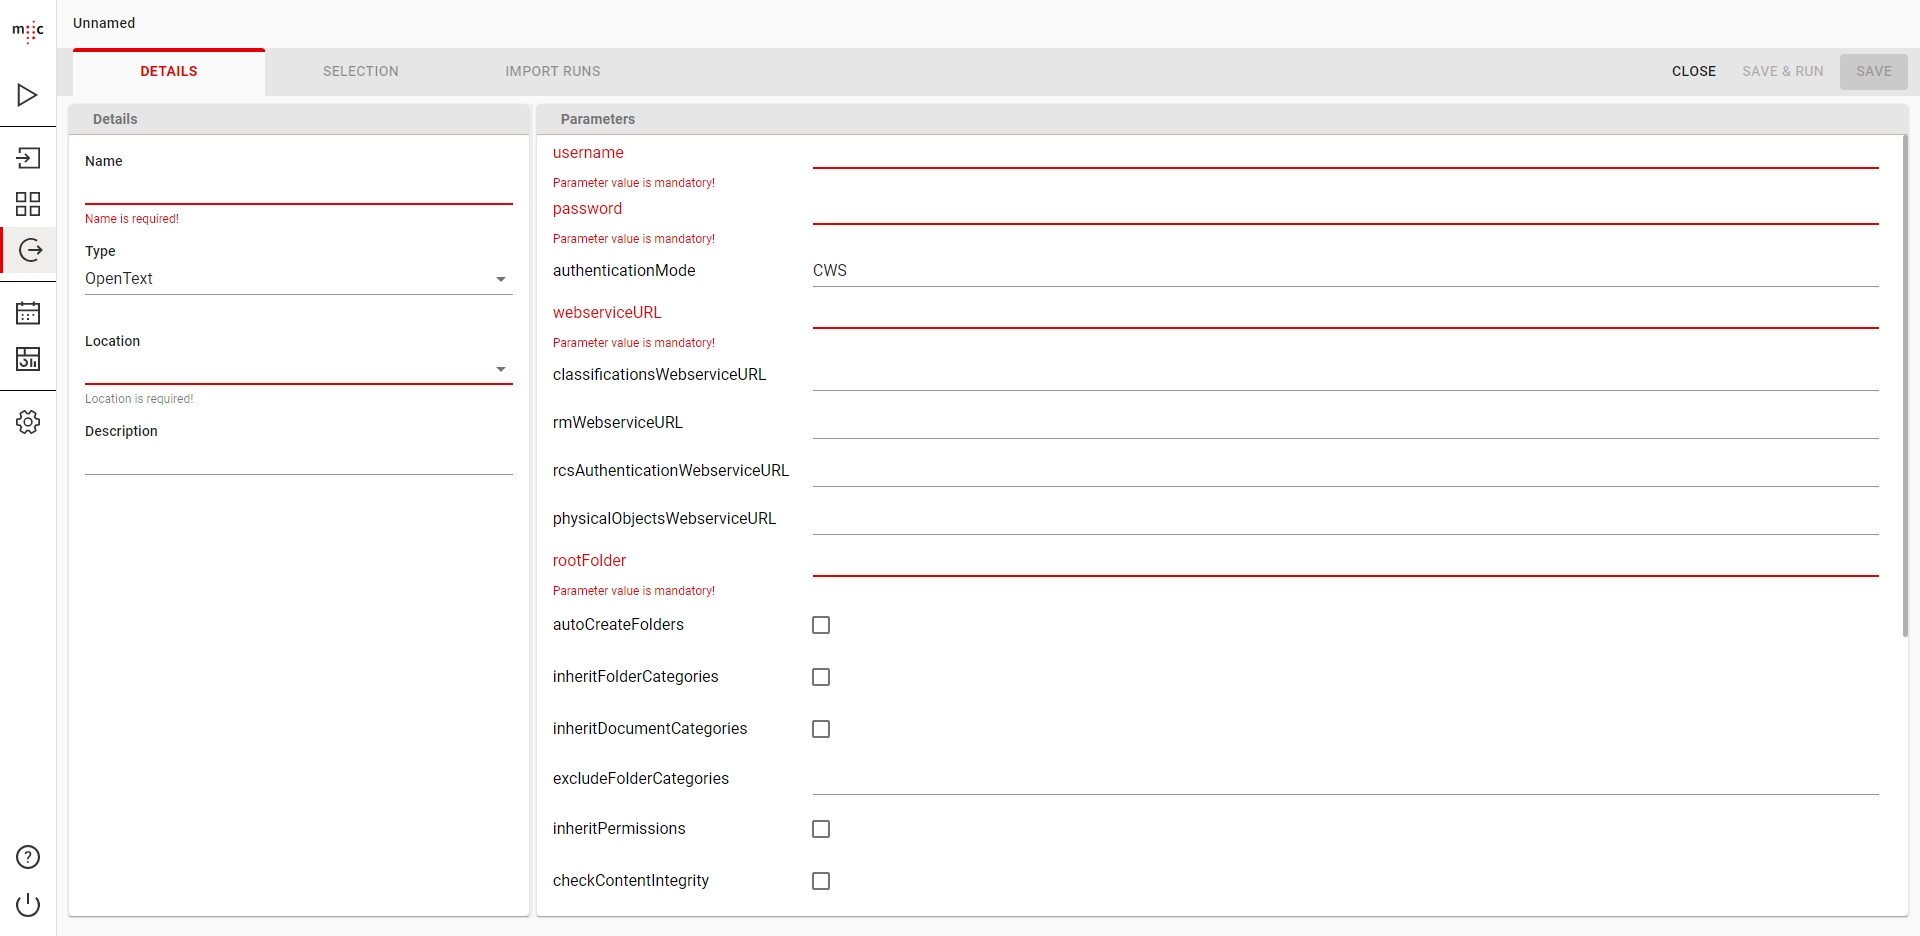

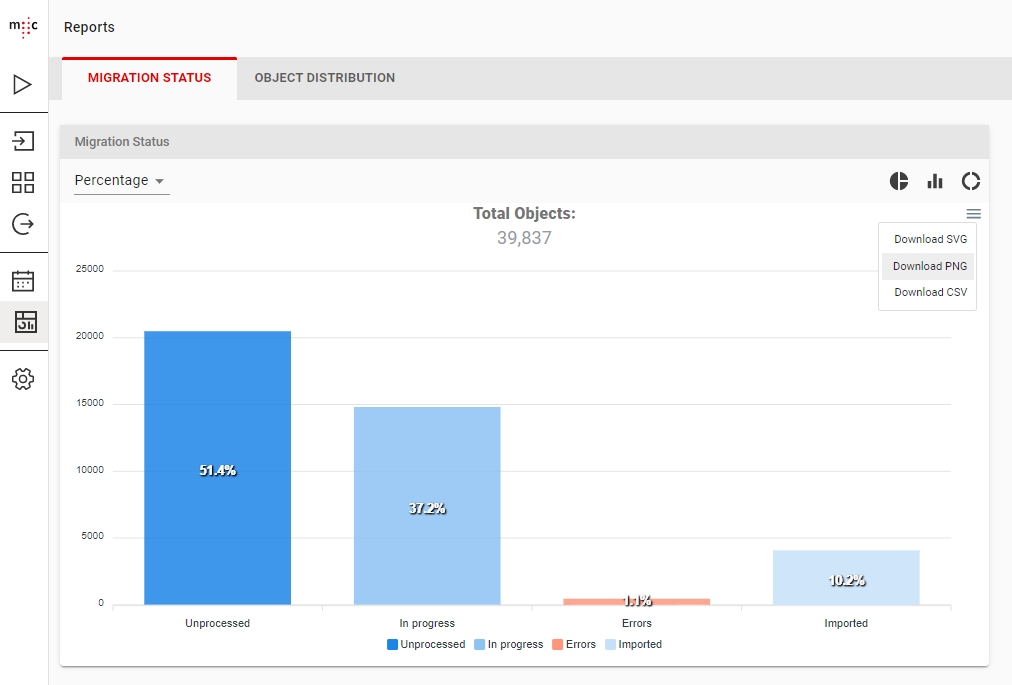
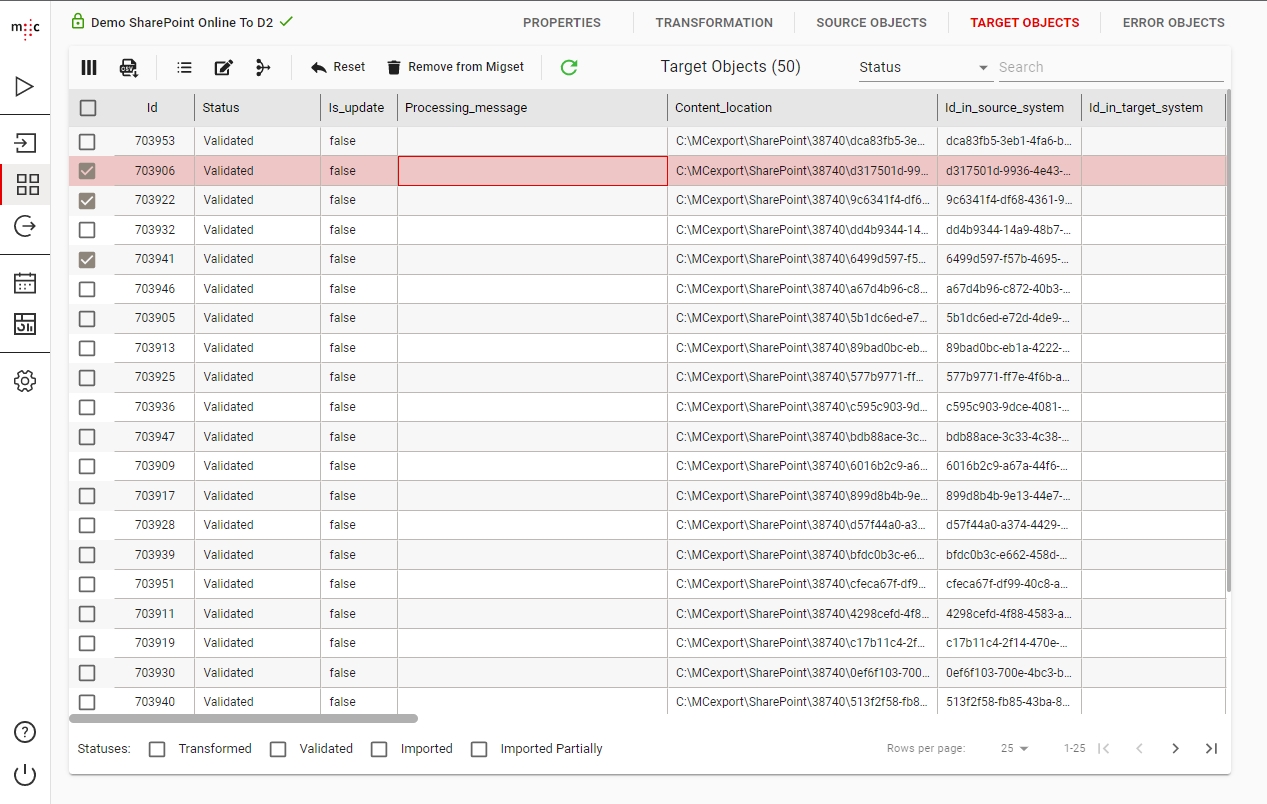
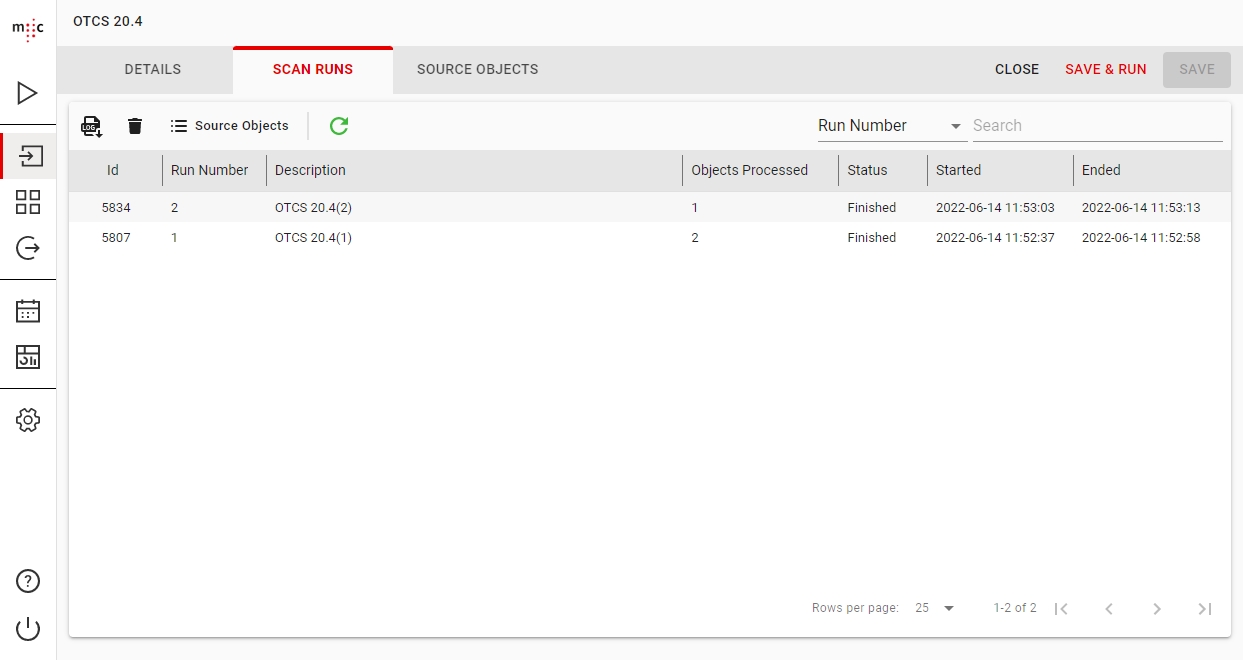
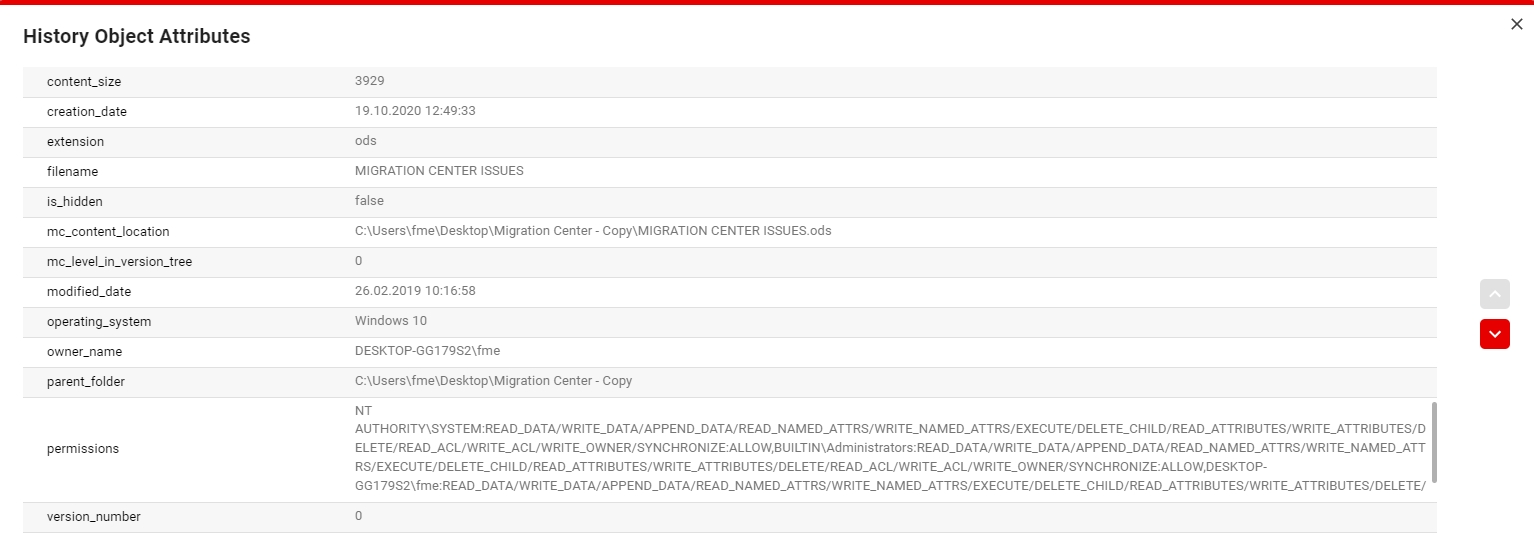
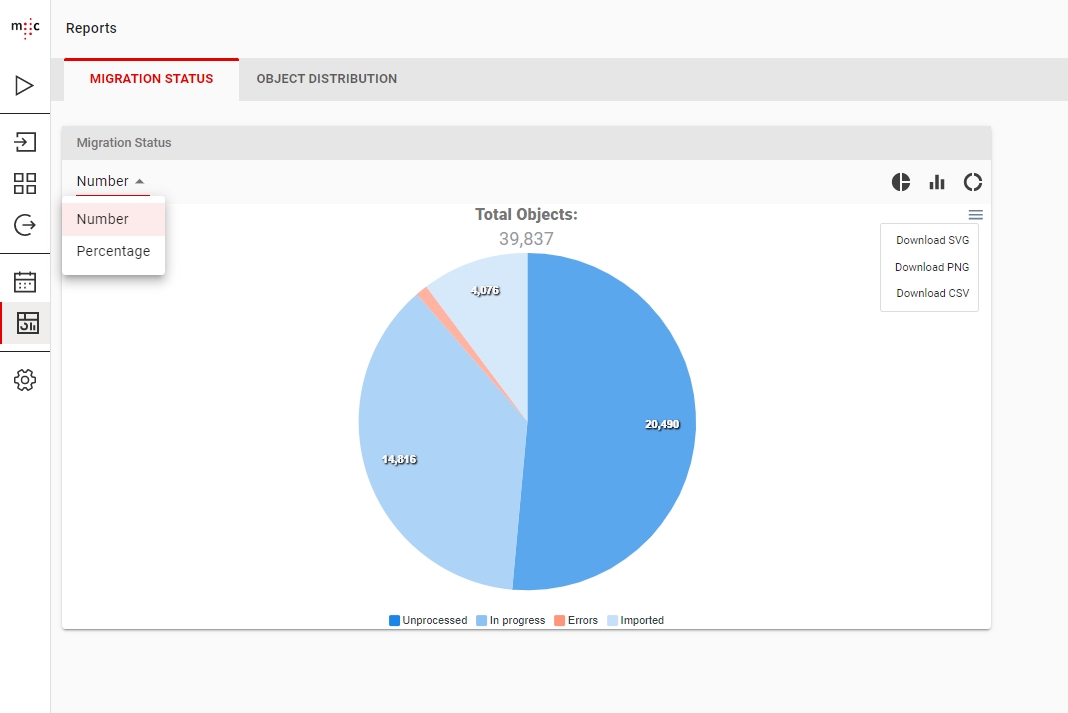
repository* Name of the target repository. The target repository must be accessible from the machine where the selected Job Server is running.
importObjects Selected by default; if NOT checked, documents and folders will NOT be imported. The reason for NOT importing folders and documents is to allow importing only relations between already imported folders/documents.
importRelations Determines whether to import relations between objects. In this case a relation means both “dm_relations” and “dmr_containment” objects. Hint: Depending on project requirements and possibilities, it can make sense to import folders and documents first and add relations between these objects in a second migration step. For such a two-step approach the importer can be configured accordingly using the importObjects and importRelations parameters. It is possible to select both options at the same time as well and import everything in a single step is the migration data is organized suitably. It doesn’t make sense, however, to deselect both options.
importComments Flag indicating if the document's comments will be imported.
importAuditTrails Determines whether “Documentum(audittrail)” migsets are imported or not. If the setting is false, any Documentum(audit trail) migsets added to the Importer will be ignored (but can be imported later, after enabling this option)
numberOfThreads The number threads that will be used for importing objects. Maximum allowed is 20.
importLocation The path inside the target repository where objects are to be imported. It must be a valid Documentum path. This path will be appended in front of each “dctm_obj_link” (for documents) and “r_folder_path” (for folders) before linking objects if both the importLocation parameter and the “dctm_obj_link/r_folder_path” attribute values are set. If the attributes mentioned previously already contain a full path, the importLocation parameter does not need to be filled.
autoCreateFolders This option will be used for letting the importer automatically create any missing folders that are part of “dctm_obj_link” or “r_folder_path”. Use this option to have migration-center re-create a folder structure at the target repository during import. If the target repository already has a fixed/predefined folder structure and creating new folders is not desired, deselect this option
checkContentIntegrity If enabled will check compare the checksums of imported objects with the checksum computed during scan time. Objects with a different checksum will be treated as errors. May significantly increase import time due to having to read back every document and compute its checksum after import.
ignoreRenditionErrors Determines whether errors affecting individual renditions will also trigger an error for the object the rendition belongs to or not
Checked - renditions with errors will be reported as warnings; the objects and other renditions will be imported normally
Unchecked - renditions with errors will cause the entire object, including other renditions, to fail on import. The object will be transitioned to the "Import error" status and will not be imported.
defaultFolderType The Documentum folder type name used when automatically creating the missing object links. If left empty, “dm_folder” will be used as default type.
attachLifecycle This option will be used for instruction the importer to apply lifecycle (use in combination use transformation attributes: r_policy_id and r_current_state)
setAttributesAfterLifecycle Repeating String. Optional configuration used when attachLifecycle is checked to specify the comma separated list of attributes which will be set again after attaching the document to the lifecycle (to override possible changes).
loggingLevel* See Common Parameters.
When importing folder migration set, in case an existing folder structure is already in place an error will be thrown for the folder objects that exist already. It is not possible to avoid this behavior unless you skip them manually by removing them from the migset or putting them in an invalid state for import.
dctm_obj_rendition_page The page number where the rendition is linked. A repeating attribute to allow multiple values. Used for multiple page content. Leave empty if you don’t want to set any page for renditions. Will be ignored if dctm_obj_rendition is not set
dctm_obj_rendition_storage Specify a valid Documentum filestore where the rendition’s content file will be stored. Leave empty to store the rendition file in Documentum’s default filestore. Will be ignored if dctm_obj_rendition is not set
The extracted object type template is now ready to be imported to migration-center 3.x as described in the chapter Object Types (or object type template definitions) in the migration-center Client User Guide
a_archive
Boolean
0
No
No
a_category
String
64
No
Yes
a_compound_architecture
String
16
No
No
a_content_type
String
32
No
Yes
a_controlling_app
String
32
No
No
a_effective_date
DateTime
0
Yes
No
a_effective_flag
String
8
Yes
No
a_effective_label
String
32
Yes
No
a_expiration_date
DateTime
0
Yes
No
a_extended_properties
String
32
Yes
No
a_full_text
Boolean
0
No
No
a_is_hidden
Boolean
0
No
Yes
a_is_signed
Boolean
0
No
No
a_is_template
Boolean
0
No
Yes
a_last_review_date
DateTime
0
No
No
a_link_resolved
Boolean
0
No
No
a_publish_formats
String
32
Yes
No
a_retention_date
DateTime
0
No
No
a_special_app
String
32
No
No
a_status
String
16
No
Yes
a_storage_type
String
32
No
No
acl_domain
String
32
No
Yes
acl_name
String
32
No
Yes
authors
String
48
Yes
Yes
group_name
String
32
No
Yes
group_permit
Number
0
No
Yes
i_antecedent_id
ID
0
No
No
i_branch_cnt
Number
0
No
No
i_cabinet_id
ID
0
No
No
i_chronicle_id
ID
0
No
No
i_contents_id
ID
0
No
No
i_direct_dsc
Boolean
0
No
No
i_folder_id
ID
0
Yes
No
i_has_folder
Boolean
0
No
No
i_is_deleted
Boolean
0
No
No
i_is_reference
Boolean
0
No
No
i_is_replica
Boolean
0
No
No
i_latest_flag
Boolean
0
No
No
i_partition
Number
0
No
No
i_reference_cnt
Number
0
No
No
i_retain_until
DateTime
0
No
No
i_retainer_id
ID
0
Yes
No
i_vstamp
Number
0
No
No
keywords
String
48
Yes
Yes
language_code
String
5
No
Yes
log_entry
String
120
No
No
object_name
String
255
No
Yes
owner_name
String
32
No
Yes
owner_permit
Number
0
No
Yes
r_access_date
DateTime
0
No
No
r_alias_set_id
ID
0
No
No
r_aspect_name
String
64
Yes
No
r_assembled_from_id
ID
0
No
No
r_component_label
String
32
Yes
No
r_composite_id
ID
0
Yes
No
r_composite_label
String
32
Yes
No
r_content_size
Number
0
No
No
r_creation_date
DateTime
0
No
Yes
r_creator_name
String
32
No
Yes
r_current_state
Number
0
No
Yes
r_frozen_flag
Boolean
0
No
No
r_frzn_assembly_cnt
Number
0
No
No
r_full_content_size
Double
0
No
No
r_has_events
Boolean
0
No
No
r_has_frzn_assembly
Boolean
0
No
No
r_immutable_flag
Boolean
0
No
No
r_is_public
Boolean
0
No
Yes
r_is_virtual_doc
Number
0
No
Yes
r_link_cnt
Number
0
No
No
r_link_high_cnt
Number
0
No
No
r_lock_date
DateTime
0
No
No
r_lock_machine
String
80
No
No
r_lock_owner
String
32
No
No
r_modifier
String
32
No
Yes
r_modify_date
DateTime
0
No
Yes
r_object_type
String
32
No
Yes
r_order_no
Number
0
Yes
No
r_page_cnt
Number
0
No
No
r_policy_id
ID
0
No
No
r_resume_state
Number
0
No
No
r_version_label
String
32
Yes
Yes
resolution_label
String
32
No
Yes
subject
String
192
No
Yes
title
String
400
No
Yes
world_permit
Number
0
No
Yes
<custom_attribute_dateTime>
DateTime
-
-
Yes
<custom_attribute_double>
Double
-
-
Yes
<custom_attribute_ID>
ID
-
-
No
<custom_attribute_boolean>
Boolean
-
-
Yes
dm_document
Attribute Name
Type
Length
Is Repeating
Association Possible
a_application_type
String
32
No
Attribute Name
Type
Length
Is Repeating
Association Possible
<custom_attribute_number>
Number
-
-
Yes
<custom_attribute_string>
String
-
-
Yes
Yes
wrapper.java.classpath.dfcConfig=C:/Documentum/config
wrapper.java.classpath.dfcDctmJar=C:/Program Files/Documentum/dctm.jarThe job could not be executed! ERROR: java.lang.Exception: java.lang.NullPointerException//Links:
//Virtual Document Components:
//Relations:
//Documents:
destroy,c,090000138001ab99,1
destroy,c,090000138001ab96,1
destroy,c,090000138001ab77,1
destroy,c,090000138001ab94,1
//Folders:
destroy,c,0c0000138001ab5b,1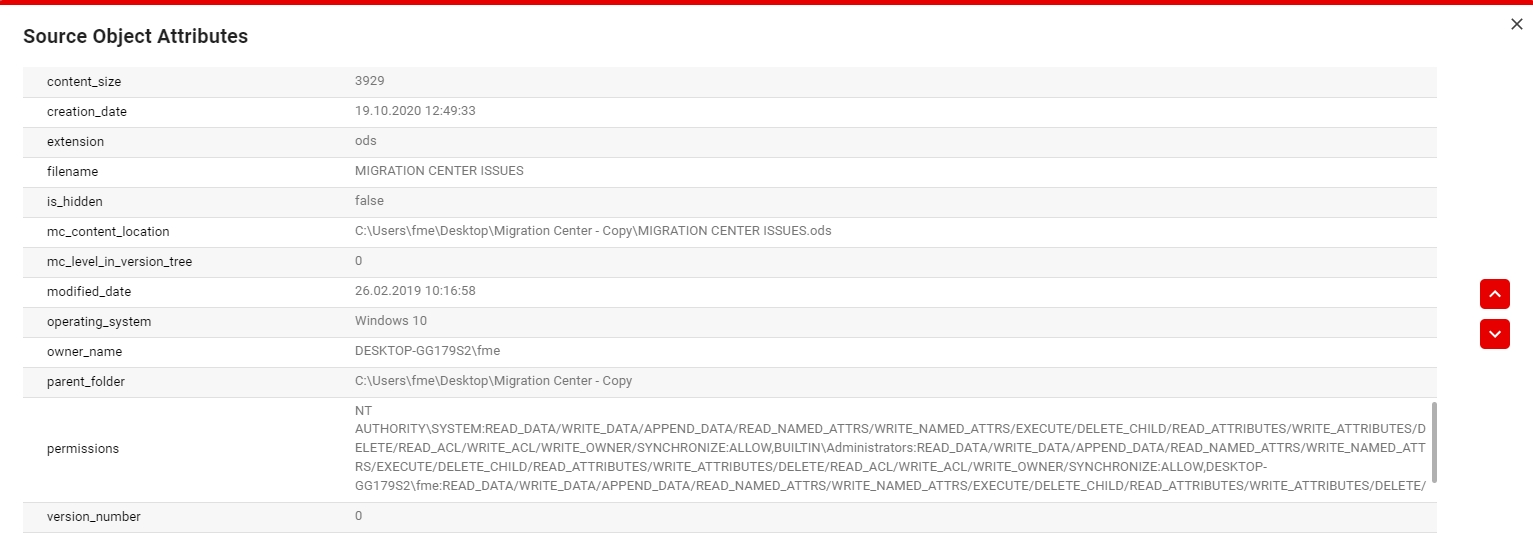
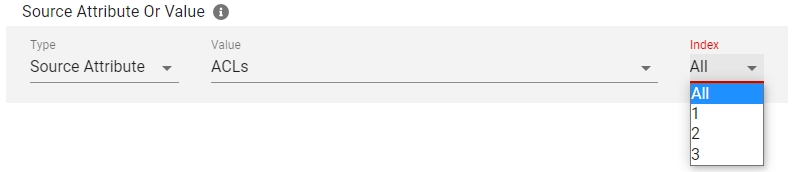
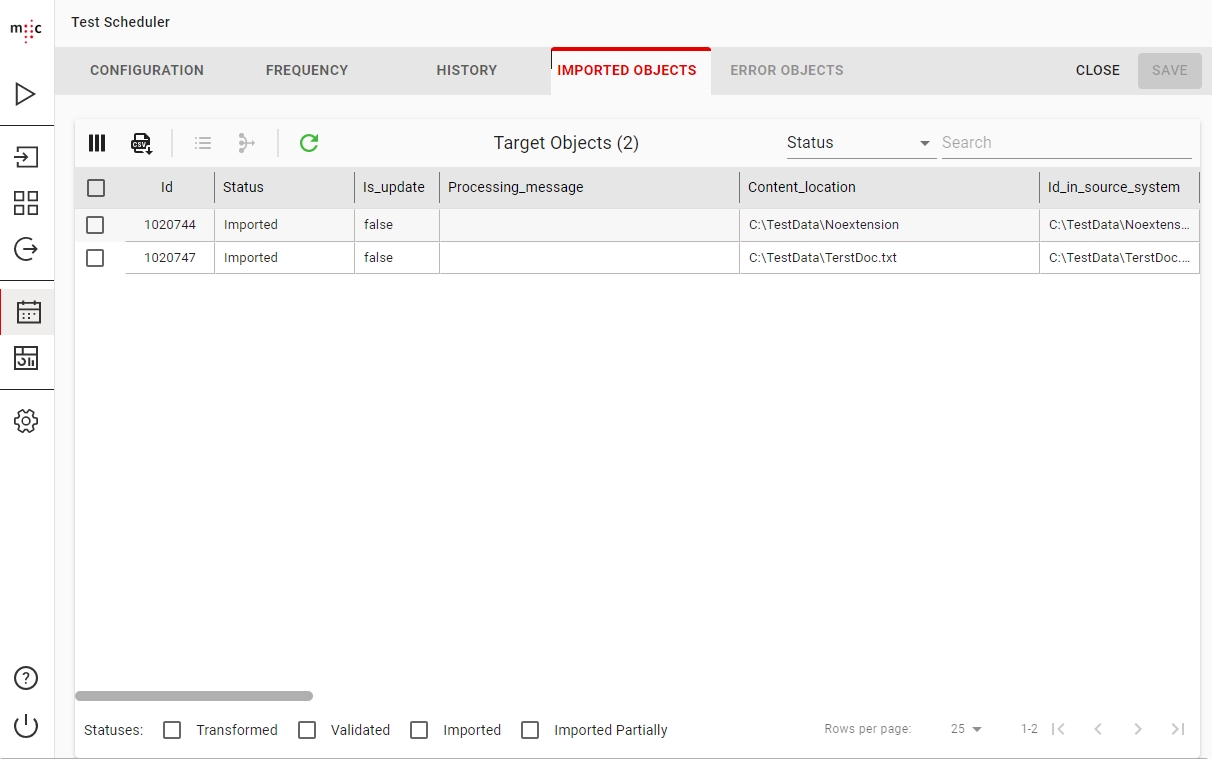
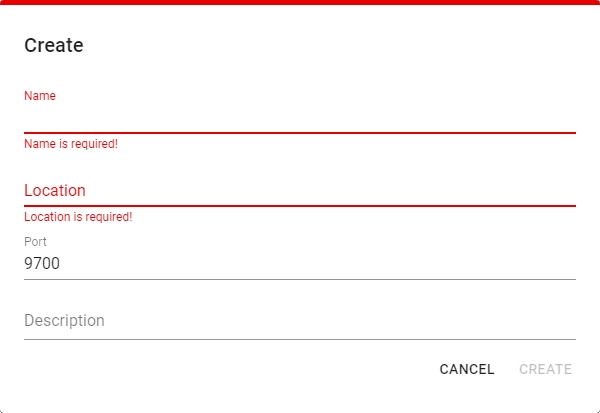
This section provides information about the third party open source libraries used in the migration-center core and its connectors. Provided bellow are the library names, the license under which they are being used and links to the specific version being used.
Apache 2.0
Apache Commons Lang
Apache 2.0
The Apache Commons CSV
Apache 2.0
Apache POI
Apache 2.0
Apache POI API Based On OPC and OOXML Schemas
Apache 2.0
Streaming Excel reader
Apache 2.0
Database
SpringFramework Core
Apache 2.0
SpringFramework Beans
Apache 2.0
SpringFramework JDBC
Apache 2.0
SpringFramework Transaction
Apache 2.0
Commons Database Connection Pooling
Apache 2.0
Commons Lang
Apache 2.0
Apache Commons Logging
Apache 2.0
Commons Object Pooling Library
Apache 2.0
Apache Commons Collections
Apache 2.0
Documentum
OpenPDF
LGPL 3.0 MPL 2.0
Domino
Apache Commons Digester3
Apache 2.0
Jackons Core
Apache 2.0
Jackson Annotations
Apache 2.0
Jackson Databind
Apache 2.0
SLF4J
MIT
Filesystem
Apache Tika
Apache 2.0
Opentext (OTCS)
Apache Commons Lang
Apache 2.0
Outlook
This connector does not use any third party open source libraries.
Sharepoint
Apache Commons Lang
Apache 2.0
Gson
Apache 2.0
Joda Time
Apache 2.0
jcifs
LGPL 2.1
1.3.18
Sharepoint Online
Apache Commons Lang
Apache 2.0
Gson
Apache 2.0
JSON
JSON
Veeva
Apache Commons Lang
Apache 2.0
Apache Commons Collections
Apache 2.0
Apache Commons CSV
Apache 2.0
Documentum
OpenPDF
LGPL 3.0 MPL 2.0
Filesystem
Apache Tika
Apache 2.0
Generis Cara
Apache Commons Lang
Apache 2.0
Apache Commons Net
Apache 2.0
Apache Commons Validator
Apache 2.0
Apache Commons Collections
Apache 2.0
Jackson Annotations
Apache 2.0
Jackson Core
Apache 2.0
Jackson Databind
Apache 2.0
Jackson Datatype: JDK8
Apache 2.0
Jackson Datatype: JSR310
Apache 2.0
Spring Core
Apache 2.0
Spring Context
Apache 2.0
Spring WebSocket
Apache 2.0
Spring Messaging
Apache 2.0
SSHv2
Apache 2.0
SnakeYAML
Apache 2.0
Tyrus Standalone Client
CDDL 1.1 GPL 2.0
Hyland OnBase
Apache Commons IO
Apache 2.0
Apache Commons Collections
Apache 2.0
Apache Commons Lang
Apache 2.0
dom4j
InfoArchie
Xalan Java Serializer
Apache 2.0
Xalan-Java
Apache 2.0
XML APIs
Apache 2.0
W3C
Apache Commons Codec
Apache 2.0
Apache Commons Text
Apache 2.0
Apache Commons Lang
Apache 2.0
Apache Commons Collections
Apache 2.0
Apache Commons IO
Apache 2.0
JAX WS RI
EDL 1.0
JAX-WS (JSR 224) API
CDDL
GPL 2.0
Opentext (OTCS)
Apache Commons Lang
Apache 2.0
Sharepoint
Apache Commons Codec
Apache 2.0
Apache Commons IO
Apache 2.0
Apache Commons Lang
Apache 2.0
Apache Commons Text
Apache 2.0
Apache Commons Logging
Apache 2.0
Apache HttpComponents Client Fluent
Apache 2.0
Gson
Apache 2.0
Apache HttpComponents Client
Apache 2.0
Apache HttpComponents HttpClient - Cache
Apache 2.0
Apache HttpComponents HttpClient - MIME
Apache 2.0
Apache HttpComponents Core
Apache 2.0
Joda Time
Apache 2.0
Sharepoint Online Batch
Guava
Apache 2.0
Avro
Apache 2.0
Gson
Apache 2.0
Json
Apache 2.0
Apache Commons Lang
Apache 2.0
Apache Commons Collections
Apache 2.0
Sparta Trackwise
Apache Commons Collections
Apache 2.0
Apache Commons CSV
Apache 2.0
Apache Commons Lang
Apache 2.0
Spring Framework: Mock
Apache 2.0
Gson
Apache 2.0
Json
JSON
Veeva
Spring Boot Starter Integration
Apache 2.0
Spring Web
Apache 2.0
Apache Commons Lang
Apache 2.0
Apache Commons IO
Apache 2.0
Apache Commons Collections
Apache 2.0
Apache 2.0
Apache Commons Collections
Apache 2.0
Logback Classic
EPL 1.0 / LGPL 2.1
Junit Jupiter API
EPL 2.0
Junit Jupiter
EPL 2.0
Webclient - Rest Api
Project Lombok
MIT
Apache Commons Text
Apache 2.0
Apache Commons Lang
Apache 2.0
Apache Commons Collections
Apache 2.0
Logback Classic
EPL 1.0 / LGPL 2.1
Junit Jupiter API
EPL 2.0
Junit Jupiter
EPL 2.0
Spring Context
Apache 2.0
Spring Boot Starter Test
Apache 2.0
Spring Boot Starter Web
Apache 2.0
Spring Boot Starter Security
Apache 2.0
Spring Boot Starter Jpa
Apache 2.0
Spring Boot Starter Validation
Apache 2.0
Apache Commons CSV
Apache 2.0
Apache Commons IO
Apache 2.0
Spring Boot Starter Actuator
Apache 2.0
Google Guava
Apache 2.0
Springdoc Openapi UI
Apache 2.0
JSON Web Token Support For The Jvm
Apache 2.0
Jackson Dataformat XML
Apache 2.0
ModelMapper Jackson Extension
Apache 2.0
Jackson Databind
Apache 2.0
Webclient - Database
Project Lombok
Apache 2.0
Apache Commons Text
Apache 2.0
Apache Commons Lang
Apache 2.0
Apache Commons Collections
Apache 2.0
Logback Classic
EPL 1.0 / LGPL 2.1
Junit Jupiter API
EPL 2.0
Junit Jupiter
EPL 2.0
HikariCP
Apache 2.0
h2database
EPL 1.0 / MPL 2.0
Project: json Path
Apache 2.0
Micrometer Registry Prometheus
Apache 2.0
Google Guava
Apache 2.0
Ojdbc8
Oracle Free Use Terms and Conditions ()
Spring Context
Apache 2.0
Spring Boot Starter Web
Apache 2.0
Springdoc OpenApi UI
Apache 2.0
Apache HttpClient
Apache 2.0
JSON Web Token Support For The Jvm
Apache 2.0
Jackson Dataformat XML
Apache 2.0
ModelMapper Jackson Extension
Apache 2.0
Spring Boot Starter Security
Apache 2.0
Spring Boot Starter Data Jpa
Apache 2.0
Spring Boot Starter Aop
Apache 2.0
Spring Boot Starter Tomcat
Apache 2.0
Jackson Databind
Apache 2.0
Apache Commons Codec
Apache 2.0
Apache Commons Lang
Apache 2.0
Apache Commons Collections
Apache 2.0
Apache Commons IO
Apache 2.0
Apache Commons CSV
Apache 2.0
Apache HttpComponents Client
Apache 2.0
Gson
Apache 2.0
JSON
JSON
jni4net
GPL 3.0 MIT
Oracle JDBC Driver
Oracle License Agreement https://www.oracle.com/downloads/licenses/distribution-license.html
Spring JDBC
Apache 2.0
Spring Boot Starter
Apache 2.0
Spring Web
Apache 2.0
Spring Boot Starter Integration
Apache 2.0
Logback-Classic module
EPL 1.0
LGPL 2.1
Delphi Cryptography Package
MIT License
YAJSW
Apache 2.0
Alfresco
This connector contains no third party open source libraries.
CSV/Excel
Alfresco
This connector contains no third party open source libraries.
D2
Webclient - Core
Project Lombok
MIT
Apache Commons Text
Apache 2.0
Apache Commons IO
D2 SDK and its dependencies
Apache Commons Lang
General
Show migset name and migset id in the importer run report (#68918)
New Azure Blob Storage Importer (#67191)
Imports documents with content
Sets system metadata on documents
Sets custom metadata on documents
Box Importer
Create folders and metadata (#68813)
Optimize / reduce the number of REST API calls (#68775)
Validate dropdown values before submitting the request to Box (#68774)
Cara Importer
Add support for Cara 5.9 (#68919)
Add support for setting sequence_no (#68777)
Partially import the documents that fails because of invalid object references (#68905)
Exchange Scanner
Add support for Exchange 365 (#68960)
OpenText Content Server Importer
Add support for importing into OpenText Content Server 23.3 (#68834)
WebClient
Copy rules from migset (#68954)
Filter by Value (#68783)
Reset all Error Objects (#68784)
Database
multivalueRemoveDuplicates incorrect on null / empty values (#69237)
Alfresco Importer
Setting null values for aspect attributes may remove other attribute values from the aspect (#69487)
Box Importer
Created and Modified attributes not set on folders (#69471)
Cara Importer
When importing Updates and Original objs in the same migset original objs stay validated (#69404)
migration-center 23.2 supports running on a PostgreSQL database!
All the components work as expected on a postgres database, with the following not supported features:
Scheduler feature
Web Client
Improve migset load / save performance (#67260)
Improve WebClient UI stability when during CRUD operations (#67053)
Various small UI improvements
OTCS Scanner
Infinite cycle when scanning business workspaces (#66943)
SharePoint Online Batch Importer
Box Importer
The \ character is not recognized as folder path separator as is / (#68448)
Importing to existent folder with autoCreateFolders false throws exception (#68449)
Jobserver
Remove .gz archiving from rolling policy for Jobserver logback logs (#65728)
Alfresco Adapters
MC Database:
ORA-22813: operand value exceeds system limits (#65106)
Alfresco Importer
WebClient
Global Object Search button is active when no search parameters are set (#65531)
OTCS Scanner
General
Desktop Client has been retired. The new WebClient, introduced in version 22.1, is now the only UI available.
Database:
Database:
Removed duplicate attribute country__v in veeva quality document object type (#63361)
Job Server:
Alfresco Importer:
Aspect/Type with no attributes is not set (#64266)
Veeva Importer:
This release brings the new migration-center Web Client component to replace the existing Desktop Client. It comes with all the existing features as well as a few new ones:
MultiColumn mapping lists
Better handling of the migset configurations
Copy / paste transformation rules
Search / filter in most tables and lists
The feature is not available in this release of the WebClient. It will be enhanced and provided in the next release.
The dependency on Oracle Client was removed by providing a new Database installer that connects via JDBC and by using the new WebClient.
The versioning was changed this release from the previous incremental versioning to a calendar versioning system.
General
New migration-center Web Client (#54598)
New Database Installer that does not require Oracle Client (#60785)
Added support for Oracle 21c.
Documentum Scanner
The values of attribute_list in Audit trails are scanned in reverse order (#61134)
Mapping relations in Documentum scanner does not work (#62588)
General issues:
OpenText Scanner
Invalid characters makes OTCS scanner initializer to stop with error (#62332)
SharePoint Scanner
WebClient issues:
Deleting on freshly created and saved Object Type is not performed (#62576)
Pressing the logout button causes the token to be deleted even if the user decides not to log out (#62548)
Migset openSubTab url namings are not accurate for Properties tab (#62545)
Saving a copy of a migset while being on Transformations tab does not replace the url (#62541)
This release contains the following fixes and updates:
Updated spring libraries for potential vulnerability CVE-2022-22965 (#61574)
Fixed error when setting user attributes to "Guest" user using the SharePoint Online Batch Importer (#60948)
Updating from version 3.17 Update 3 requires replacing only the Jobserver component.
Remember to reinstall the CSOM service as well for the SharePoint Online Batch Importer as described .
This release is a collection of cumulative fixes that have been done since version 3.17 Update 2.
Veeva Importer:
Importing submission to Veeva RIM with skipUploadContent throws error but import is successful (#60418)
Importing submission with skipUploadContent checked does not work (#60306)
Generis Cara Importer:
Add support for importing relations (#59664)
Add support for setting rendition identifier(#60027)
Generis Cara Importer:
When binding relations by version label, no error is thrown when incorrect or missing version label mapping is provided(#60093)
Importing a base document and one update (as result of delta scan) results in unpredictable behavior(#60118)
Veeva Importer:
Multi-threading for upload content process (#59158)
Upload content using File Staging REST API (#59680)
Added object type order when importing Veeva Objects (#59085)
General:
Removed SQLJUTL package dependency which caused errors on certain Oracle DBs (#59700)
SharePoint Online Importer:
InfoArchvie Importer:
Using Java 8 when generating large PDI files may result in incorrect values in the PDI file (#59214)
Veeva Importer:
The Auto Classification Module has been removed and replaced with the Amazon Comprehend Enrich Scanner.
Existing configurations of the Auto Classification Module will no longer work with the 3.17 Jobserver.
General:
Transformation function getDataFromSql can return multiple values (#535420)
Hyland OnBase Importer
General:
Scheduler next run date not calculated correctly (#58845)
Cara Importer:
Cara Importer:
Asynchronous Indexing not setting index on documents (#59574)
SharePoint Online Scanner:
Since 3.16, the following adapters will no longer be supported:
eRoom Scanner
Exchange Removal Scanner
General
Add support for Java 11 for all adapters (#53313)
Add new transformation function: GetInternalAttributeValue (#57376)
CSV/Excel Scanner
Cells that have nothing but are scanned as null (#57228)
Documentum Importer
Veeva Scanner
The binder relations are scanned even if the children documents are not (#56230)
SharePoint Online Batch Importer
General
Migrate OT shortcuts and URLs to SPO link documents (#55974)
New TrackWise Digital importer available (#53977)
Improve the performance of the mapping list transformations (#56913)
File System Scanner
content_location and mc_content_location not updated when using moveFilesToFolder (#56471)
Metadata files are not moved when moveFileToFolder is checked (#56488)
Veeva Scanner
The binder relations are scanned even if the children documents are not (#56230)
InfoArchive Importer
General
Add Veeva Scanner that exports documents and binders from Veeva Vault (#54569)
Migrate OpenText shortcuts and URLs to SPO link documents (#55974)
Veeva Importer
Duplicate values are not supported for object_type__v attribute in RIM Vault (#55664)
Veeva Scanner
The renditions for already scanned objects is exported to disk in some cases (#56283)
The binder relations are scanned even if the children documents are not (#56230)
CSV - Excel Scanner:
Added support for scanning repeating attributes (#54993)
InfoArchive Importer:
OTCS Importer:
Fixed record date not being set in opentext_rm_classification (#55431)
SharePoint Online Batch Importer:
Alfresco Scanner:
Scan doc with versions edited online while autoVersion false, but had autoVersion switched to true afterwards has wrong version content (#55983)
CSV - Excel Scanner:
Veeva Importer
New feature: Import documents using existing content from FTP server (#55303)
New feature: Add support for importing relations (#54991)
SharePoint Online Importer (Batch)
Update objects not marked as processed/imported (#55058)
Veeva Importer
General / logging
The installer does not update the location of the Job Server's log files. So if you do not want to use the default location for log files, which is <Job Server Home>/logs, you need to manually update the log file location in the <Job Server Home>/lib/mc-core/logback.xml configuration file (#54732)
Starting with version 3.13 Update 2, the SharePoint Online Importer does only support app-only principal authentication and no user name / password authentication. Please ensure that this will work for you before you upgrade your existing installation!
Alfresco Scanner
New feature: Scan only last "n" versions (#54289)
New feature: Scan multiple sites (#54291)
D2 Importer
OpenText Scanner
NPE occurs using excludeFolderPaths (#54326)
Wildcards do not work in the root folder (#54329)
Set attributes are not scanned if the name is longer than 100 chars (#54589)
General / logging
The installer does not update the location of the Job Server's log files. So if you do not want to use the default location for log files, which is <Job Server Home>/logs, you need to manually update the log file location in the <Job Server Home>/lib/mc-core/logback.xml configuration file (#54732)
D2 Importer
PowerShell tools:
Support multiple scan run IDs when creating migration sets (#54263)
SharePoint Online importer:
OpenText importer: Wrong values for date attribute during physical objects import (#54255)
OpenText scanner:
NPE occurs using excludeFolderPaths (#54326)
New SharePoint Online Batch Importer (#52665)
Add “removeDuplicate” transformation function (#53528)
Add support for Oracle 19c (#52930)
Add support for Oracle JDK 11 & OpenJDK 11 (#53313)
Fix typo in transformation function “ConverDateTimezones” (#53136)
“GetDateFromString” transformation function returns null in some cases (#53164)
Job server installation on Linux outdated in Installation Guide (#53714)
OpenText Importer became laggy during impersonation after a certain number of requests (#53180)
OTCS Scanner
Scanning Project objects as OTCS(container) with metadata (#52932)
Save version information as source attributes (#52292)
Support wildcards in folder paths (#52360)
Unresolved document file path in ScanRunExtractor (#52876)
Filesystem importer writes invalid XML characters to metadata XML file (#52909)
Missing dependency packages in AC module installer (#52935)
Error validating classification when subtypes not unique (#52945)
In Veeva Importer setting Binder version labels as major/minor does not work (#53160)
In Veeva Importer document updates with empty values for attributes that were not empty does not delete existing value (#53229)
In OTCS Scanner user fields that were deleted from a category are scanned as IDs (#52982)
New SharePoint Online Scanner (#52409)
Made OTCS scanner more robust to errors (#52361)
Imptoved OTCS scanner job run log output (#52365)
FileSystem Importer now applies XSL transformation on whole unified metadata XML file (#52394)
Fixed bug in Filesystem Importer where attributes with no value were not being exported in XML metadata file (#52479)
Fixed OTCS Scanner not scanning documents under folder inside nested projects (#52809)
Fixed SPOnline importer bug when importing folders with a “%” in the name (#52857)
Fixed SPOnline importer not refreshing token when all objects of a large import fail (#52775)
SharePoint Online Scanner might receive timeout error from SharePoint Online when scanning libraries with more than 5000 documents (#52865)
Added support for Oracle database version 18c (#51451)
Added support for migrating Veeva Vault Objects (#52136)
Added support for version 16.x for the OpenText scanner (#50340)
Added support for D2 versions 16.4 and 16.5 (#50972, #51530)
Fixed bug in DCTM adapters when calculating multi page content (#50442)
Fixed bug in SharePoint scanner when scanning SP 2013+ on Windows Server (#51088)
Fixed error messages bigger than 2000 characters not being saved in the database (#52357)
SharePoint Importer, fixed the following bugs:
Some new features and enhancements in Domino Scanner
New scanner parameter "excludedAttributeTypes"
Default for scanner parameter "exportCompositeItems" now "0"
Domino Scanner: Extracted floating point numbers truncated/rounded to integer value
Domino Scanner: Attributes of type "NumberRange" were not exported
OpenText CS scanner: some logging improvements
OpenText CS scanner: Fix scanning subprojects
Add support for importing attachments to Veeva Vault.
Added support for scanning nested compound documents in OTCS Scanner
Added support for scanning the Nickname attribute for folders and documents in OTCS Scanner
Added Proxy support for ADFS Authentication in SharePoint Importer
Added support for filtering Scanners and Importers in MC Client
Fixed OTCS Scanner bug not scanning dates properly sometimes
Fixed OTCS Scanner "Member Type not valid" error message
Fixed OTCS Scanner nullPointerException when trying to get the owner name in specific cases
Fixed OTCS Scanner nullPointerException when trying to scan certain Workspaces
Replaced Tanuki service wrapper with YAJSW (#51159)
Added support for Java 64-bit (#51163)
Added support for OpenJDK 8 (#51156)
New CSV / Excel Scanner (#50343)
Fixed bug when pulling content for updates with the Database scanner (#51142)
Fixed error message in OTCS log (#51619)
Fixed SharePoint Online importer too short path length limitation (#51491)
Fixed SharePoint not resuming properly after pausing job for long time (#51492)
Documentum Scanner: Added option to scan only the latest version of a VD (#51019)
OTCS Importer: Added support for importing Virtual Documents as Compound Documents (#51008)
New transformation functions: GetDataFromSQL() and Length() (#50997, #50999)
Database Scanner: New Delta migration feature (#50477)
Fixed error in D2 Importer when property pages contained tabs with visibility conditions (#50987)
Removed unneeded jar file from D2 importer folder (#51073)
The Jobserver now requires Java 8. Java 7 is not anymore supported.
New Veeva Vault importer
Extended OpenText importer to import physical items (#50282)
Changed the way of setting RM Classifications in OpenText importer (#50842).
Delta migration issue after upgrading from 3.2.5 or older (#50571)
Importing not allowed items in the physical item container is permitted (#50978)
RM classifications for physical objects are not removed during delta (#50979)
Physical objects properties of type date are not updated during delta migration (#50980)
Veeva importer may fail to start, if DFC is installed on the same machine (#50981)
New OpenText In-Place Adapter (#49994)
Updated Tika library to version 1.17 for Filesystem scanner (#49258)
OTCS scanner is now able to scan Business Workspaces (#49994)
SharePoint Importer is now able to change the extension of files (#50142)
Fixed issue with saving migsets when plsql_optimize_level was set to 3 (#49160)
Fixed issue with exporting BLOB content from a Firebird database (#49197)
Fixed error in Documentum In-Place adapter with linking into inexistent folderpath (#49217)
Fixed nullPointerException in SharePoint Importer when using proxy (#49232)
D2 Importer does not validate values for Editable ComboBox if they are not in the dictionary (#49115)
D2 Importer does not validate Enabled and Visibility properties if they have no condition attached to them (#50327)
Running IA Importer with values “16.x” for the InfoArchiveVersion parameter throws error (#50388)
Alfresco scanner now supports Alfresco 5.2 (#49977)
Database scanner now supports multi-content Blob/Clob (#49260)
Added support for scanning and importing xCP comments for folders (#49245)
Added support for Documentum Content Server 16.4 (#49243)
Fixed bug in the Alfresco importer rollback scripts (#49251)
Fixed delta scan issue when only main object metadata changed (#50052)
Fixed issue with description length in OTCS importer (#50118)
Fixed error when setting subterm under non available term in SharePoint Online taxonomies (#49978)
Added comprehensive content hashing with different hashing algorithms and encodings for the following Scanners Documentum, SharePoint, Database and Filesystem (#11636)
Filesystem Importer: XML Metadata file now contains elements for all null and blank attributes (#11606)
InfoArchive Importer: migrating Documentum AuditTrails is now supported (#11610)
Fixed objects not being scanned when reading permissions failed in Filesystem Scanner (#11779)
Fixed table key lookup query being case sensitive in OpenText Importer (#11772)
Fixed length limitation for Table Key Lookup attributes in OpenText Importer (#11777)
Fixed setting attribute values from a different object to a category that has multiple rows when using multiple threads in OpenText Importer (#11797)
Sharepoint Scanner:
Added support for SharePoint 2016 (#10999)
Added support for CAML queries (#11629)
Added support for scanning SharePoint internal attributes (#11653)
Fixed applyD2RulesByOwner error message when using multiple threads in D2 (#11597)
Fixed some renditions being scanned twice in Documentum scanner (#11740)
Fixed wrong file path in log for Filesystem importer (#11469)
Fixed date values not being properly converted to XML format in some cases for InfoArchive importer (#11672)
New Documentum In-Place Adapter (#11490)
Alfresco Importer now supports Alfresco 5.2 (#10772)
Documentum Importer - added support for CS 7.3 (#9927)
D2 Importer
OpenText Importer: fixed java heap space error when importing large size renditions. (#11426)
OpenText Importer: fixed the authentication cookie refreshment for impersonated user (#11396)
OpenText Scanner: fixed out of memory error when scanning objects with size larger than 20MB (#11393)
OpenText Scanner: fixed out of memory error when scanning objects with size larger than 8GB (#11434)
Multi-threaded import using applyD2RulesByOwner fails for some objects in D2 Importer
Remaining issues from the main release 3.2 to 3.2.8 Update 2 also apply to release 3.2.8 Update 3 unless noted otherwise.
Add support for migrating to DCM 6.7 (Documentum Compliance Manager).
Remaining issues from the main release 3.2 to 3.2.8 Update 2 also apply to release 3.2.8 Update 3 unless noted otherwise.
Added support for xCP comments in Documentum Scanner and Documentum Importer (#10886)
Added support for “dm_note” objects in Documentum Scanner and Documentum Importer (#10887)
Added support for multi-page content in Documentum Scanner, Documentum Importer and D2 Importer (#11271)
Added support for extracting content from BLOB / CLOB column types in the Database Scanner (#10899)
Fixed logging the version of the OpenText Importer in the run log (#11322)
Fixed setting the version description attribute in OpenText Importer (#11270)
Documentum scanner/importer: The scanned/imported “dm_note” objects are not counted in the job run report (#11391)
DQLs that have enable(row_based) are not processed correctly in the D2 Importer (#11390)
Remaining issues from the main release 3.2 to 3.2.8 Update 1 also apply to release 3.2.8 Update 2 unless noted otherwise
New OpenText scanner: supports scanning documents, compound documents and folders from OpenText repositories version 9.7.1, 10.0 and 10.5. Specific OpenText features are supported like scanning categories, classification, permissions and shortcuts.
Several bug fixes regarding validating DQL queries and Taxonomies when using property pages in D2 Importer.
Added support for D2 LSS (Life Sciences Solution) version 4.1 (#9990)
Added multi-threading capabilities to the D2 importer (#10107)
Added support for Alfresco version 5.1 (#10354)
Added support for OpenText Content Server version 16.0 (#9937)
Alfresco Scanner: fixed scanning duplicates on delta scanning a new version for documents created directly in the Alfresco Share interface (#10013)
InfoArchvie Importer: fixed nullPointer exception when importing objects without content (#10746)
Filesystem Importer: fixed logging message when setting owner fails (#10326)
D2 Importer:
importing version updates with CURRENT not set to latest version fails (#10784)
the CURRENT label is always set to the latest version when applying Lifecycle (#10686)
Improved Sharepoint and Sharepoint Online Importers performance when setting Taxonomies and internal attributes. (#10423)
Improved Sharepoint Importer Error Reporting in certain cases. (#10299)
Remaining issues from the main release 3.2 to 3.2.7 Update 3 also apply to release 3.2.7 Update 4 unless noted otherwise
Documentum Importer can attach now documents to a given lifecycle.
FirstDoc importer: Fix a java.lang.ClassCastException error when importing to FDQM module
FirstDoc importer: Fix importing versions when there is an attribute count difference in the repeating group between create SDL and document definition SDL.
Remaining issues from the main release 3.2 to 3.2.7 Update 2 also apply to release 3.2.7 Update 3 unless noted otherwise.
D2 Importer now supports only D2 version 4.6. The older D2 versions are only supported by the previous versions of migration-center
OpenText Importer now supports creating OpenText Compound Documents
OpenText Importer now supports importing renditions
IBM Domino Scanner:
Documentum Scanner: Scanning version trees having versions of multiple object types
OpenText Importer: Error messages concerting a single attribute do not have the attribute name
OpenText Importer: Categories not being set if no associations are made for it
Sharepoint Scanner: Documents with paths longer than 260 characters failed to be scanned
Running a SP scanner with incorrect credentials on a Sharepoint with anonymous authentication enabled, does not show errors.
Remaining issues from the main release 3.2 to 3.2.7 Update 1 also apply to release 3.2.7 Update 2 unless noted otherwise.
Alfrecso scanner now supports scanning version check-in comments
Alfresco importer now supports importing version check-in comments
Documentum adapter supports scanning/importing version trees with different object types in them
InfoArchive importer officially supported on the Linux jobserver
InfoArchive Importer:
fixed text inside SIP xml files generated without indent
fixed ZIP files not being rolled back when there is not enough memory on disk
DocumentumNCC scanner: null pointer exception when scanning documents without content
InfoArchive importer: SIPs are imported successfully but marked as failed when moveFilesToFolder does not have write permissions
OpenText Importer: Error messages concerting a single attribute do not have the attribute name
OpenText Importer: Categories are not set if no associations are made for it
New OpenText importer: supports importing documents and folders to OpenText repositories version 10.0 and 10.5. Specific OpenText features are supported like setting categories, classification, permissions, shortcuts to the imported documents and folders.
New SharePoint Scanner: supports the scan of SharePoint 2007, 2010 and 2013. Supports scanning documents, folders, listitems, lists and document libraries. Replaces the old scanner which has been retired.
New SharePoint Importer: supports SharePoint 2010 and 2013 and uses REST API. Support import of documents, folders, listitems, lists and document libraries.
Alfresco scanner and importer:
Fixed a NullPointerException when scanning documents with aspects from Alfresco.
Fixed the value of the content location attribute when scanning documents with skipping content.
OpenText Importer: The modified date of created folders (set by the importer) is overwritten by the content server when new documents are added to the folder.
Remaining issues from the main release 3.2 to 3.2.6 also apply to release 3.2.7 unless noted otherwise.
SharePoint Legacy Importer: The Logging system on the SharePoint side is not reusable after a forced restart. The SharePoint Importer uses much more memory then the previous version. Document sets cannot be created in a library with versioning disabled.
Added support for Oracle Database 12c.
Added support for Documentum 7.2.
Added support for Windows Server 2012, Windows 8 / 8.1.
New InfoArchive Importer: supports the import of data generated by any scanner to InfoArchive enterprise archiving platform.
Sharepoint importer:
Fixed updating minor versions of documents.
Fixed updating documents when “ForceCheckout” flag is set to true in the library.
migration-center 3.2.6 requires now Java Runtime Environment 1.7.0_09 or later. It will not work with older java versions.
In Documentum 7.x the max allowed length for owner_name, r_modifier, r_creator_name was changed from 32 to 255 char. In MC the default provided types (dm_document, dm_folder, dm_audit_trail) still have the old limit of 32 char.
Filesystem Importer does not allow more than 255 characters for the “content_target_file_path” system rule.
SharePoint Online Importer: When importing large files into a SharePoint Online document library the import might fail due to a 30 minutes timeout defined by Microsoft. (Bug# 8043)
SharePoint Online Importer: Documents that have the attribute is update set to true are not overwritten during import, but a new version is created on import. Document Sets cannot be created in a library with versioning disabled. (Bug #7904)
Sharepoint Online Importer: The importer does not set the “Author” field of a document, if only the “Author” attribute has a rule associated to it. The user must associate rules to both the “Author” and “Editor” attribute for them to be set. (Bug #8629)
SharePoint on Premise supports: new object types Sites, Document Sets; custom sites for individual imported objects; non-consecutive versioning for documents.
SharePoint Online Importer: internal properties like ‘Modified’, ‘Modified by’, ‘Created’ and ‘Created by’ are properly updating now.
SharePoint Online Importer: removed limitations of the number of items supported during import in the target library.
SharePoint Online Importer: internal name of the taxonomy terms are correctly used.
IBM Domino Scanner:
The scanner requires that the temporary directory for the user running MC Job Server Service exists and that the user can write to this directory. If the directory does either not exist or the user does not have write permission to the directory, the creation of temporary files during document and attachment extraction will fail. The logfile will show error messages like
„INFO | jvm 1 | 2014/10/02 12:06:26 | 12:06:26,850 ERROR [Job 1351] com.think_e_solutions.application.documentdirectory… - java.io.IOException: The system cannot find the path specified“.
To work around this issue, make sure the temporary folder exists and the user has write permission for this folder. If the MC Job Server is started manually as a normal user then the “Temp” folder should be C:\Users\Username\AppData\Local\Temp. Therefore, if the MC Job Server is run as a service by the Local System account, the folder is one of the following:
For the 32bits version of Windows: C:\Windows\System32\config\systemprofile\AppData\Local\Temp
For the 64bits version of Windows:
C:\Windows\SysWOW64\config\systemprofile\AppData\Local\Temp
New IBM Domino Scanner: supports scanning emails and documents from IBM Domino/Notes
New Sharepoint Online Importer: supports importing Lists, List Items, Documents and folders in Sharepoint Online
Eroom scanner: Multiple erooms can be scanned now with a single scanner configuration
Scheduler: Fix a special case when the scheduler run hangs in status “Scanner running”
Documentum Importer: Fix a “NullPointerException” when importing VDRelation updates
IBM Domino Scanner:
The scanner requires that the temporary directory for the user running MC Job Server Service exists and that the user can write to this directory. If the directory does either not exist or the user does not have write permission to the directory, the creation of temporary files during document and attachment extraction will fail. The logfile will show error messages like
„INFO | jvm 1 | 2014/10/02 12:06:26 | 12:06:26,850 ERROR [Job 1351] com.think_e_solutions.application.documentdirectory… - java.io.IOException: The system cannot find the path specified“.
To work around this issue, make sure the temporary folder exists and the user has write permission for this folder. If the MC Job Server is started manually as a normal user then the “Temp” folder should be C:\Users\Username\AppData\Local\Temp. Therefore, if the MC Job Server is run as a service by the Local System account, the folder is one of the following:
For the 32bits version of Windows: C:\Windows\System32\config\systemprofile\AppData\Local\Temp
For the 64bits version of Windows:
C:\Windows\SysWOW64\config\systemprofile\AppData\Local\Temp
Outlook scanner:
Extract the email address of the following recipients: To, CC and BCC
Extract the number of attachments in the source attribute: AttachmentsCount
Documentum Scanner and Importer: now support the migration of aspects attached to documents and/or folders. Documentum CS and DFC 6.x or higher required.
New Documentum No Content Copy (“NCC”) Scanner and Importer: these customized variants of the regular Documentum adapters allow for fast metadata-only migration between Documentum, while preserving the references to content files. You can move or copy the content files separately at any point during or after the migration.
Documentation: fixed several errata in SharePoint Scanner and Importer User Guides in filenames, paths and URLs used throughout the respective documents
eRoom Scanner: fixed the mc_content_location system rule not appearing for documents scanned from eRoom, thus preventing changes to the content file’s location to be made for import if needed
migration-center Client: fixed issue with import of mapping lists containing keys differing only in character case. Now these are imported and treated as distinct values correctly.
SharePoint Importer: The ID that is stored after a successful import of an object in id_in_target_system changed from target list specific ID to global unique ID (GUID). This change maintains compatibility with data scanned using mc 3.2.4 U1 and U2 that still uses the list specific ID
MC Client: Importing a mapping list containing identical keys will silently skip the existing key. Solution: verify mapping lists before importing them to migration-center in order to remove or rename identical keys, mapping lists must always have unique keys.
File System Scanner: added new option to move successfully scanned files to a local path or UNC network path specified by the user. See the migration-center File System Scanner User Guide for more information on the new moveFilesToFolder parameter.
Installer: added option to specify location of log files during installation of migration-center Server Components. Log files were stored in the installation folder’s logs subfolder by default, now any valid local or UNC network path can be specified for storing the log files generated by migration-center during runtime. See the migration-center Installation Guide for more information about installing migration-center Server Components.
Database: removed dependency on Oracle SYS.UTL_TCP and SYS.UTL_SMTP packages for performing manual/regular migration activities. Note the scheduler still requires these packages in order to function, but it is now possible to use all other features of migration-center except the scheduler without the need to have access granted to these Oracle system packages.
SharePoint Importer: Support for importing folder objects (content type Folder and custom subtypes inheriting from Folder)
SharePoint Importer: Support for creating link objects (content type Link to a Document and custom subtypes inheriting from Link to a Document) (see the SharePoint Importer User Guide for more information)
Documentum Scanner: added “exportLatestVersions” to control the number of latest versions to scan (see the Documentum Scanner User Guide for more information)
SharePoint Scanner: fixed an issue causing a "Object reference not set to an instance of an object." error during scan with certain configurations of Date and Time and Yes/No columns
New Documentum D2 Importer*: currently supports D2 4.1, including D2 specific features such as autonaming, autolinking, rule based security, applying rules based on the document’s owner. etc.
New SharePoint Scanner*: currently supports SharePoint versions 2007/2010/2013, extraction of Document Libraries, exclusion of selected Content Types or file types, checksum generation for verifying content integrity after import, etc.
New Documentum DCM Importer*: currently supports DCM 5.3, including DCM specific features such as document classes, creating controlled documents, applying autonaming rules, setting specific lifecycle states and associated attributes for imported documents. etc.
*New adapters must be purchased separately.
Scheduler: fixed an issue where a 24-hour time set was converted to 12-hour time
Scheduler: fixed an issue where the hourly interval was not taken into account if the scheduler was configured to run on a minutely or hourly basis
Documentum Scanner: fixed issue where the “scanNullAttributes” parameter’s functionality was reversed with regard to the parameter’s actual setting in the UI
SharePoint Importer now integrates with SharePoint as a SharePoint Solution instead of the separate service component it used up to mc 3.2.3. This changes the requirements and deployment procedures for this adapter. These are described in the mc 3.2.4 SharePoint Importer User Guide
Database: Privilege “CREATE ANY JOB” is no longer required, “CREATE JOB” is now sufficient
SharePoint Scanner only scans complete Document Library items and cannot scan individual folders currently
SharePoint Importer only supports versioning using contiguous numbering
Scheduler: setting a time interval (the hours during which the scheduler is allowed to run) for a scheduler configured to run on a minutely or hourly basis will not be reflected correctly in the “Next run date” displayed. The scheduler will run as configured, the issue affects only the display of next run date.
Remaining issues from the main release 3.2 to 3.2.3 also apply to release 3.2.4 unless noted otherwise.
New Microsoft Outlook Scanner – scan specified folders of a user’s mailbox from Outlook 2007-2010, including messages and their properties, choose to exclude particular subfolders or properties, etc. See the migration-center 3.2.3 – Outlook Scanner User Guide document for more information about this new adapter. As with all adapters, the Microsoft Outlook Scanner is available for purchase separately.
FirstDoc Importer now officially supports FirstDoc versions 6.3 and 6.4 (R&D)
Documentum Importer now supports setting rendition page modifiers and rendition file storage locations through transformation rules.
eRoom Scanner: fixed an issue leading to out of memory errors when scanning large files (several hundred megabytes each)
eRoom Scanner: fixed an issue with the skipContent parameter not working properly in some cases
Filesystem Scanner: fixed an issue where the scanner could fail to scan files equal to or larger than 4GB in size
Documentum Scanner & Importer: Changed handling of rendition page modifiers (now exposed as a dedicated system attribute that can be set using transformation rules). See the “migration-center 3.2.3 – Documentum Importer User Guide” document for more information about this feature and how it may affects renditions scanned using older versions of the Documentum Scanner.
eRoom Scanner: changed naming of files extracted by the scanner to the mc storage location. This has been done in order to line up the eRoom Scanner’s behavior with the rest of mc’s scanner’s, which all use an object ID rather than actual filenames for the extracted content. This should not affect the regular workflow of a migration from eRoom, as all changes are handled internally by mc and are not exposed to the user (nor does or did the user need to interact with said files at any time).
The FirstDoc Importer cannot set Documentum system attributes such as creation and modify dates, creator and modifier user names, the i_is_deleted attribute, and so on. Setting these attributes is only supported using the Documentum Importer.
If a source attribute has the same name as one of migration-center’s internally used columns, the Client will display the value of the migration-center internal attribute for the source attribute as well. This occurs in Source Objects view. The issue also persists in the data exported to a CSV file if the CSV export is performed from Source Objects view. Other views or the View Attributes window will display the correct value of the respective source attribute.
Remaining issues for the main release 3.2 also apply to release 3.2.3 unless noted otherwise.
Documentum Content Validation – checks content integrity of documents migrated to a Documentum repository by verifying an MD5 checksum of content files before and after the import. From a Documentum source both primary content and renditions can be checked, for other sources only the primary content is supported. The feature is available as an option in the Documentum Importer. See the migration-center 3.2.2 – Documentum Importer User Guide document for more information about this feature.
Documentum Audit Trails – the Documentum adapters now support the migration of audit trails. The Documentum Scanner can scan the audit trails of any folders and documents within the scanner’s scope. Audit trail objects can then be added to an Audit Trail migset and processed just like documents and folders. Finally, audit trails can be imported using the Documentum Importer. The new options available in the Documentum adapters for controlling and configuring the migration of audit trails are described in the migration-center 3.2.2 – Documentum Scanner User Guide and migration-center 3.2.2 – Documentum Importer User Guide respectively.
Documentum Importer: Fixed an issue where importing an update to a Microsoft Word 8.0-2003 document would set the wrong format for the updated document (a_content_type was set to “doc” instead of “msw8” previously)
Documentum Importer: Fixed an issue with importing Filesystem objects to Documentum when user defined version labels were set in transformation rules. Depending on how the labels were set, documents could end up all having CURRENT labels set, or having no CURRENT labels at all. Now the most recently imported version is always set as CURRENT, regardless of the CURRENT label set in Transformation Rules.
Transformation Engine: Fixed an issue where Validating a migration set would validate objects that have been already validated again, which didn’t make sense.
FirstDoc Importer: Changed handling of application number from regulatory dictionary to work around issue where duplicate application numbers are used. See the migration-center 3.2.2 – FirstDoc Importer User Guide document for more information about this feature.
Documentum Content Validation relies on a checksum computed during scan to compare the checksum it computes after import against. Currently only the Documentum and Filesystem Scanner have the option of computing the required checksum during scan (Documentum Scanner: main content and renditions; Filesystem Scanner: only main content). Scanners for other source systems could of course be extended to also compute a checksum during scan time which the Documentum Content Validator could use.
The SharePoint Importer and the FirstDoc Importer cannot function together due to some conflicting Java methods. Workaround: use only one of the adapters on a given machine by deleting the other adapter’s folder from the migration-center Server Components libs subfolder.
Same issues as for the main release 3.2 also apply to release 3.2.2
As a major feature, migration-center 3.2 provides several new adapters for various source and target systems, listed below. The interaction between scanners and importers has also been reworked, so now scanners and importers are no longer required to exist in pairs in order to work together. Instead, any scanner/importer exists as a generic, standalone adapter that can be used in combination with any other available scanner/importer, allowing for any combination of source and target systems possible using the available adapters.
The adapters available for migration-center 3.2 are:
Documentum Scanner
eRoom Scanner
Filesystem Scanner
Database Scanner
Filesystem-Documentum adapters have been discontinued and replaced by generic Filesystem and Documentum adapters respectively. The new adapters perform the same while at the same time allowing interaction between any scanner and importer.
Consult the individual adapters’ User Guide documents for detailed information regarding supported functionalities and systems.
migration-center 3.2 now requires the Java Runtime Environment 1.6 It will not work with older versions.
Filesystem-Documentum Scanner has been replaced by generic Filesystem Scanner which generates content able to be migrated using Documentum Importer or other importers to the respective target systems
Documentum Scanner is no longer connected to the Documentum Importer and generates content able to be migrated using other importers as well
Documentum Scanner: fixed an isolated issue where a particular combination of scanner parameters, source attribute values and objects without content would prevent such objects from being scanned
Documentum Importer: fixed an issue where adding a new version of a document with less values for a repeating attribute than the previous version had for the same repeating attribute would keep the previous version’s repeating attribute values which exceeded the number of attribute values present in the currently added version
Documentum Importer: fixed an issue where an underscore character (“_”) in a rendition file’s path was interpreted as a page modifier separator, leading to unexpected errors. Now the “_” character’s role as a page modifier separator correctly applies to a rendition’s filename only, not its entire path
Database: installation of the Oracle database schema can only be performed with the “sys” user
Database: multiple mc database schemata are not supported on the same database instance
Database installer: avoid running the database installer from folder locations containing “(“ or “)” characters in the path
Documentum Features: Cabinets: dm_cabinet objects currently cannot be represented as individual objects in mc, hence mc cannot store or set specific attributes for cabinets eitheri
Documentum Importer: During runtime, the importer creates a registered table for internal use; this table will be not deleted after the import process has finished because it might be used by other importers running concurrently on other Jobservers. Since an importer job running on one Jobserver does not know about any importers that may be running on other Jobservers, it cannot tell whether it is safe to delete the table, which is why it is left in place. This registered table does not store actual data; it acts as a view to data already stored by Documentum. It is safe to remove this registered table once the migration project is finished. The following query is used to create the registered table: register table dm_dbo.dm_sysobject_s (r_object_id char(16), r_modify_date DATE, r_modifier char(32), r_creator_name char(32))
Documentum Scanner: if several scanners are running concurrently and are scanning overlapping locations (e.g. due to objects being linked into multiple locations), a scanner might detect an object scanned earlier by another scanner as an update, although nothing has changed about that object. This has been observed in combination with relations attached to the objects. This will result in some redundant object appearing as updates while they are in fact the same, but apart from this the final result of the migration is not affected in any way. The redundant objects will be handled like regular objects/updates and imported accordingly.
Database update from previous versions: as a result of the update process increasing the default size for attribute fields to 4000 bytes (up from the previous 2000 bytes), Oracle’s internal data alignment structures may fragment. This can result in a performance drop of up to 20% when working with updated data (apparent when transforming/validating/resetting). A clean installation is not affected, neither is new data which is added to an updated database, because in these cases the new data will be properly aligned to the new 4000 byte sized fields as it is added to the database.
Sets blob index tags
Transformation rules clipboard can be pasted any number of times (#68785)
Remove dependency on ENV variables in REST API (#68642)
Improve Object Type section performance (#69074)
Improve Object Type stability during CRUD operations (#68781)
Improve UI performance of Adapters input (#68655)
Box Importer
Object Type name is being sent in all lowercase characters (#68978)
Cara Importer
First line in relation_config.properties is ignored (#68907)
Empty lines when logging level is 2 (#68916)
Cara file path too long error (#67864)
Setting an ID field which is binded to the LATEST version fails (#67060)
Indexing documents is applied when indexDocuments is not checked (#68906)
Audittrail attribute_list and attribute_old_list are not migrated (#69106)
Internal attribute “title” is not set (#66927)
Veeva Importer
The character \ is not visible in Veeva (#68811)
Import fails if one attribute value finish with "\" (#68812)
WebClient
Blank page when current connection was deleted in another session (#68988)
Error when filtering migset target or error objects in PostgreSQL (#69621)
Retrieving error objects fails on Postgres when rule is associated in two objects types (#69511)
Migset mapping lists incorrectly shown in new migsets after importing migset from file (#69014)
Add association button enables when switching between object types (#64272)
Copying a mapping list duplicates all entries after clicking on an entry and then away (#69228)
Previous step not correctly displayed in IF function (#69163)
WebClient
Refreshing source objects after filtering value on column with upper case letters fails (#69629)
Object filtering fails on Postgres if value contains backslash "\" (#69575)
Function with attribute that no longer exists does not change when setting first entry of new existing attribute list (#69713)
Documentum NCC adapter
Job Server
Remove unused log4j 1.x with vulnerability from mc-database-adapter (#68606)
CSV / Excel Scanner
Upgrade CSV/Excel scanner Apache POI to 5.2.3 (#67399)
SharePoint Online Importer
Increase upload file size limit to 250 GB (#68607)
Box Importer
Box importer improvements (#67364)
Validate the content integrity based on the calculated SHA1 checksum (#66631)
Update to SDK 4.2.1 and use App Authentication (#66632)
Veeva Importer
Relations with source_version_specific and target_version_specific are not imported correctly (#66460)
Veeva Scanner
No objects are scanned if the selection document vql contains "&" (#67243)
Web Client
UTF8 characters are not correctly exported to CSV from Objects Views (#68456)
Adding or pasting new rules before the rules are loaded, results in the new rule disappearing (#64941)
Migset section sends multiple transfomation requests which results in inconsisstent TR loading (#66449)
Refreshing or accessing via URL the Migset Object Preview results in blank screen (#66804)
Migset type dropdown is not disabled when copying a migset (#67320)
Changing selected row immediately after delete will change selection after delete finishes (#66988)
Getting exclusion attribtue values fails when attribtue name contains slash (#67082)
Previously used object table filters remain in requests after leaving and revisiting the UI (#67311)
The existing adapter can be save with empty value for mandatory parameter (#66613)
Tables are cached when switching MC databases (#60127)
Clicking Cancel in customize columns resets all columns to checked (#66204)
Creating a new rule doesn't deselect previously selected rule (#67487)
Adaptors cache is not refreshed when adding new adapter or parameters or when switching databases (#60180)
Saving a copy of a migset while being on Transformations tab does not replace the url (#62541)
Objects table filter has only visible columns available for filtering (#66451)
Associations are copied and removed from previous migset when importing migset config on the same DB (#68463)
Invalid migset splitting when selected objects contain both version trees and objects without versions (#66992)
Split Migset does not work with Audi Trails (#66454)
Migset UI corrupted after creating a new migset, saving and then editing again (#66807)
Migset exclusions modifies the displayed attribute names (#66836)
Object Preview returns 0 objects when using like(String) advanced filter (#66839)
D2 Importer
Added Support for D2 22.4 (#64123)
Documentum Adapters
Added support for Documentum 22.4
Cara Importer
Added support for setting creation date for the content and renditions (#64721)
OTCS Adapters
Added support for OTCS 22.4 (#65052, #66584)
Scan records management data and clasifications (#65048)
Veeva Importer
Upgrade Veeva API to the latest version 22.3 (#65726)
Make by bypassing validation rules and reference constraints optional (#65529)
WebClient
Tomcat Upgrade to latest stable version (#65733)
Added stop button for migset background processing (#65735)
New Object Search functionality (#57500)
Extract object to csv only with visible columns (#65724)
Allow returning empty values from mapping list (#66052)
Cannot import obj with aspect that has no attributes (#65606)
Alfresco Scanner
Scanners sets cm:versionType incorrectly for scanned versions (#64237)
Cara Importer
Setting null values for repeating attributes may not work properly (#65736)
Importing structure updates makes the previous last version not be a structure anymore (#63179)
Database Scanner
Database scanner is not case sensitive when scanning IDs (#65648)
Documentum Importer
When i_vstamp > 999999 the object cannot be scanned (#64399)
SharePoint Online Importer
Importer throws No Method Found error when CSOM component is used (#66132)
Importer does not throw error when importing missing mandatory attributes if managed metadata is also set (#66177)
People/Groups field cannot be set on another site collection than the ones from root site collection (#65146)
Empty file cannot be imported using spo importer (#65155)
Importer does not set Modified By (Editor) attribute (#64811)
The type SP.ListItemEntityCollection does not support HTTP DELETE method. error when auto creating folders (#65526)
The type SP.ListItemEntityCollection does not support HTTP DELETE method. error when importing into folders with special characters (#65533)
SharePoint Online Batch Importer
Importer reaches deadlock on throttle when auto creating/checking folder (#66199)
Some errors are not set in processing_message field (#62883)
The error message "Object was NOT found in verification step!" is not self explanatory (#62884)
SPO Batch Importer does not throw error when importing objects missing required attributes (#63335)
SharePoint Online Importer + Batch Importer
Multiple lines of text attribute should show multivalue attributes on multiple lines (#64597)
Veeva Importer
Missing mandatory attribute still throws error even when inactive for Veeva Objects (#64682)
Veeva importer cannot create the root folder (#64411)
NPE is thrown when the returned value from attribute map is null (#64432)
WebClient
View Attributes Dialog does not update table (#65656)
Import mapping list values from CSV always sets "Exact Match" to 0 in DB (#65878)
Mapping list is removed from migset when importing values from CSV (#65884)
Run adapter button disables after a run until response is received (#64319)
CTRL + Click multi selection does not include the already selected row (#64264)
MultiColumnMapValue is not working when using index all for value to be mapped (#65948)
Condition parameters in "if" function do not handle "all" and "any" index properly (#64938)
Params that do not allow All show All when switching from User Value or Source Attribute to Previous Step in a multivalue rule (#65498)
Function parameter index does not take into account Rule Multivalue check (#64156)
View Attributes from Scheduler Imported/Error Objects not working (#64978)
InfoArchive Importer
InfoArchive Importer leaves xml file in Temp when running out of disk space (#66241)
Alfresco:
Add support Alfresco 7.1 (#60998)
Add support Alfresco 7.2 (#63427)
Cara Importer:
Add support for custom attributes in Cara audit trails (#63368)
Add support for Cara 5.7 (#63175)
OnBase Importer:
Allows the user to set the document date (#62716)
OTCS\Scanner:
Scan projects specific metadata (#64390)
Add support for OpenText CS 21.4 (#61431)
SharePoint Online Importer (Batch):
Add source type to the imported documents (#63881)
Veeva Importer:
Adapt the client ID format for the best practice (#62331)
Import VD content as binder attachment (#63367)
Veeva importer should allow setting binder permissions (#63364)
Veeva importer allows importing major an minor versions of binders (#63365)
Veeva importer should allow importing incomplete binders (#63366)
Improve performance when importing binders with preserveVersionBinding (#63586)
Web Client:
Upgrade WebClient to Material UI v5 (#63369)
Address Security Concerns (#64385)
Various changes and improvements of the UI
Cara Importer:
Cara relation not imported with the message Child object '...' not found (#62754)
Cara importer does not check immutable, is_template and status attributes (#62793)
Cara performance issue when importing structures (#63044)
InfoArchive Importer:
Invalid zips created when running multiple importers in parallel (#64206)
OTCS Importer:
Import does not work with ACL with empty permissions (#61354)
From Date attribute is set to the import date even when null (#63739)
OTCS Scanner:
When having insufficient permissions, an error is thrown and documents are not scanned (#63222)
SharePoint Online Importer (Batch):
SPO- Comparison method violates its general contract (#63185)
SharePoint Online Batch Importer does not work via Proxy with Authentication (#62976)
SharePoint Online Importer (REST):
SharePoint Online importer does not work via Proxy with Authentication (#63010)
Mandatory managed metadata attributes throw error when importing with SPO Standard importer (#64221)
SP appClientSecret is not recognized when ends with = (#63923)
SharePoint Online Scanner:
CAML query not working on SPO Scanner (#59597)
SharePoint throws timeout error occasionally when scanning libraries with large number of documents (#52865)
Veeva Importer:
Veeva adapters freeze when an exception is thrown when uploading the content (#62244)
Updating documents does not work from 3.15upd1 (#62986)
Veeva importer hangs when the connection with Veeva Vault is lost (#63593)
Setting document_number__v does not work on binders (#62870)
Setting Status does not work on first version of binder (#62875)
Veeva attachments are always linked to the last version (#62880)
Web Client:
Object Type attribute change not detected when selected with click + drag outside of section (#64199)
Associations are not removed when deleting a rule that was already associated and saved in the DB (#64201)
Delete Mapping List Value does not work properly (#63764)
TR Step error and warning messages are not displayed (#63920)
Deleting new rules that aren't saved but are associated, causes migset error when saving (#64218)
Newline character can be entered in the name field of certain objects (#63944)
Misleading error on importing CSV with wrong format (#63962)
Object Type row can't be deleted after a saving an edit (#63999)
Duplicated transformation rules do not appear in associations rule list (#64011)
Sorting by date columns has reverse order and does not handle empty values properly (#64020)
Some relation columns are hidden (#64086)
User can delete previously selected runs from different scanner/importer (#62909)
Reset objects from migset has no confirmation dialog (#62982)
Copy Pasting system rules with overwrite does not work as expected (#62999)
Step stays stuck pointing to previous step that is now no longer valid. (#63075)
Double clicking on mapping list values causes the values to disappear or change cell (#61493)
Mapping list input field for Value columns gets selected only after several clicks (#61699)
Red and Yellow Transformation Rules and Steps have no Highlight color when selected (#62057)
Selecting objects in new migset with no name results in "migset with id 0 cannot be found error" (#62288)
Importing Configuration in wrong migset type changes system rules (#62518)
Pressing the logout button causes the token to be deleted even if the user decides not to log out (#62548)
Deleting a freshly created and saved Object Type is not performed (#62576)
JDBC connection string does not work in some cases (#62742)
IF function not saved properly when using PreviousStep (#62765)
Existing exclude filter from migset copy for new set of documents shows duplicates (#62844)
"Reset imported items" remains checked sometimes (#62845)
Setting binder permissions with an Auto Managed Group results in warning (#63032)
Error message is to generic when setting group to role that supports only users (#63033)
Split migset feature
Export mapping lists and object types
New column with total objects per scanner (all runs)
Analytics / insights capabilities
Documentum Importer
Added support for Documentum 21.4 (#60237)
Documentum Scanner
Added ability to filter scanned relations (#58806)
Allow scanning a list of ids from a file (#59324)
Allow providing dqlString with a length > 4000 characters (#60183)
D2 Importer
Added support for D2 21.4 (#60236)
Added mapping of virtual document version binding labels in D2 importer (#52032)
OpenText Scanner and Importer
Added support scanning and importing projects (#61647)
Veeva Importer
Delete the documents with a specific attribute set to true (#60692)
Alfresco Scanner
Allow excluding source attributes (#61956)
D2 validation skipped in some cases: - when property page contains a label that has a value assistance - when property page contains a combo field that are not linked to a property and have "Auto Select Single value list" checked (#60874)
Database Scanner
Database scanner remove some characters from filenames when exporting content (#61073)
Database scanner null pointer (#62181)
Database scanner null pointer when object with parent is scanned before parent(#62264)
Database scanner throws "no versions returned!" errors on valid data (#62627)
Make key values in query configuration file case insensitive (#60509)
OpenText Importer
Importing compound docs updates with missing parent, results in nullPointerException (#55316)
Import does not work with ACL with empty permissions (#61354)
OpenText Scanner
No objects scanned when rootFolderIds <> "2000" and scanFolderPaths = "/" (#59292)
OpenText scanner initializer authenticates too many times (#62301)
SharePoint Batch Importer
Importing documents failed because the local xorHash is not the same with the one computed on SharePoint (#61262)
Could not find SPO time zone with description '(UTC-05:00) Eastern Time (US and Canada) (#61267)
Filesystem Scanner
FS scanner error logging not working correctly (#61051)
Veeva Importer
Cannot import objects with a field that refers to itself (#61472)
Veeva Importer
Setting value with ',' to a picklist attribute which allows multi-value throws exception (#62501)
Map relation names containing spaces does not work as expected (#62657)
D2 Importer
No error is thrown when virtual document version binding label is set to CURRENT and no child has CURRENT label (#60497)
Migration Status UI changes when changing tabs (#62472)
Multi-value type rule for FileSystem scanner results in multi-value target_type system rule after upgrade to 22.1 (#62464)
Object distribution: scanner definition can be selected without selecting type first (#62354)
Selecting objects in new migset with no name results in "migset with id 0 cannot be found error" (#62288)
Length limitations are not imposed in all fields causing ISE when saving (#62254)
Very long names for Transformation rules cause the whole view to scroll (#62250)
Red and Yellow Transformation Rules and Steps have no Highlight color when selected (#62057)
Red Transformation Rules are not updated after Selecting / Deselecting objects (#62046)
Select Objects has incorrect behavior after selecting objects when filters cause no objects to be selected (#62043)
Multi Column mapping lists are deleted by the Delphi Client (#62022)
Mapping list input field for Value columns gets selected only after several clicks (#61699)
CTRL+A does not work on View Value dialog (#61676)
Delay when editing the name of a mapping list with many rows loaded (#61614)
Columns are ignored if CSV has more columns than mapping list (#61520)
Double clicking on mapping list values causes the values to disappear or change cell (#61493)
Closing too many notifications takes too long (#60887)
Moving selection from an object type attribute to the other is considered a change (#60883)
WebClient Uninstaller does not remove some files and environment variables (#60665)
Validate objects feature was removed from WebClient and creates confusion (#60568)
Migset saving has delay which can create unexpected behaviors (#60204)
There is a small delay between dropdown close and being able to select another field (#60203)
Adaptors definitions are not refreshed when adding new adapter in Database (#60180)
Tables are cached when switching MC databases (#60127)
Resizing columns in Scanner/Migset/Importers behaves strangely (#57265)
Setting object_type__v attribute throws NullPointerException (#60659)
Updating objects throws an error (#60571)
The version tree is not correctly scanned when the minor version is greater than 9 (#60957)
Submission response is not parsed correctly (#60780)
Veeva Scanner:
Veeva scanner continue working on background after stop (#60805)
SharePoint Online Scanner:
Scanning objects throws an error when parsing the creation date (#60751)
An SQL Exception is thrown when the attribute value is greater than the limit (#60208)
The build sometimes is compiled for 32 bit platform (#60211)
The total number of objects displayed in summary is not correct (#60205)
D2 Importer:
NullPointerException when importing VD relation updates (#60470)
Dctm Importer (NCC)
Updating content on Documnetum NCC with ECS does not work properly (#60795)
Updated to use API 21.2 (#59343)
Veeva Scanner:
Multi-threading for download content process (#59158)
Retrieving inactive dictionary value from Veeva (#59516)
Scan new audit trails in Delta scan (#59641)
Download the content from FTP by using REST API (#59160)
Updated to use API 21.2 (#59684)
Setting object_name values that don't exist in Veeva in objectOrder does not throw error (#59980)
Set custom metadata
Import document revisions
Delta migration (only for metadata)
Amazon Comprehend Enrich Scanner
Enrich documents metadata based on the content
Language detection
Extract entities (standard and custom)
Support custom classifiers
Filesystem Scanner:
Make versioning case insensitive (#58656)
Documentum Scanner:
Allow more flexible queries for selecting documents to be scanned (#58345)
Create counter for already scanned objects in the execution summary (#58907)
Export documents with content_location pointing to the path in the storage (#54317)
Cara Importer:
Import audit trails from Documentum as audit trails objects (#58797)
Index the imported documents (#59513)
Fix nonintuitive error message when required content or rendition attributes are not set (#58608)
CSV-Excel Scanner:
Fix scanning CSV with UTF8 - BOM with first column used as ID (#54010)
Veeva Importer:
Fix max length for system rules (#59046)
Attributes mapping does not work properly when the object_type__v is not the same as the object that is imported (#57383)
Veeva Scanner:
Binder relations are scanned even if the child documents are not (#56230)
SharePoint Online Importer:
Temp file is deleted early if HTML error is thrown (#58869)
OpenText Content Server Importer:
Importing compound documents doesn't fail when folder with same name already exists (#52038)
D2 Importer:
Repeating default values are not set correctly (#58692)
DCM Importer
FirstDoc Importer
Legacy SharePoint Importer
These adapters will no longer work with the 3.16 Jobserver after upgrading existing migration-center environments to 3.16.
Cara Importer (NEW)
Add support for checksum verification (#57744)
Add support for importing VDs (#57756)
Add support for proxy communication (#58057)
Add support for uploading content using REST (#58169)
D2 InPlace Adapter (NEW)
D2 Auto-Naming functionality (#57662)
D2 Auto-Linking functionality (#57663)
D2 Auto-Security functionality (#57664)
Validate attributes values based on D2 dictionaries (#57666)
Apply D2 rules based on a document’s owner (#57667)
CSV/Excel Scanner
Add support for delta migration on CSV/Excel scanner (#56911)
D2 Importer
Add support for D2 20.4 (#55909)
Database Scanner
Improve performance when scanning data from a single query (#56714)
Documentum Importer/Scanner
Add support for DCTM server 20.4 (#55904)
Filesystem Scanner
Add support for scanning paths provided in a text file (#57073)
Specify folders to exclude as relative paths (#57074)
Enhance explicit versioning to new versions to existing ones during delta scan(#58563)
InfoArchive Importer
Add support for InfoArchive 20.4 (#55912)
Add support for generating huge PDI files (#56912)
Opentext Content Server Scanner/Importer
Add support for OpenText Content Server 20.4 (#55901)
SharePoint Online Batch Importer
Set retention policy labels (#56114)
Set sensitivity labels (#57086)
Add support for QuickXorHash (needed for files > 15 GB) (#57226)
Opentext Content Server Importer
The job status is not properly set when occurring OutOfMemory error (#57022)
SharePoint Online Batch Importer
MIP Service fails to load DLL (#58038)
Veeva Scanner
The temporary location is not cleared up after the scan run (#57853)
Veeva Importer
Validation errors are not cleared after each validated document (#57206)
Submissions cannot be imported when having more than 200 applications (#58062)
Database Scanner
The summary is not completely accurate when using a single query (#58228)
InfoArchive Importer
The first version of child doc remains validated when includeChildrenVersions is set to false and includeChildrenOnce is set to true (#57766)
Veeva Importer
Attributes mapping does not work properly when the object_type__v is not the same as the object that is imported (#57383)
Opentext Content Server Importer
NPE when importing documents with no content (#58288)
SharePoint Online Batch Importer
Improve robustness of verification step (#55898)
Allow import into multiple sites (#56043)
Save imported object URL in object_info1 column (#56113)
SharePoint Online Scanner
App-Only authentication in SPO scanner (#54259)
Veeva Scanner
Automatic resume after daily API limit was exceeded (#56898)
'null' added to path when importing to root folder (#56603)
Move folder not working in SPO importer (#56703)
Veeva Importer
Document with auto-generated name __v cannot be imported (#56684)
Error when importing doc with empty string in attachments and skipUploadToFTP (#56826)
Veeva Scanner
The rendition for already scanned objects is exported to disk in some cases (#56283)
Proxy configuration ignored for HTTP requests (#56566)
Running scanners in parallel fails with error (#56763)
SharePoint Online Batch Importer
When trying to import a broken version tree, the import fails for all documents (even the ones that had a correct version tree) with an error status (#57099)
SharePoint On-Prem Importer
Moving folders fails with 'File not found' error (#57111)
Export all folder paths of all folders where a document is linked (#55486)
OpenText Scanner
Add the URL/path of the original object to the scanned shortcut (#56206)
Allow users to configure a list of workspaces/root nodes to be scanned (#55899)
Scan URLs as OpenText(object) type so they can be imported to other systems (ex: SharePoint Online) (#56001)
SharePoint Online Importer
Add support for setting sensitivity label for importing documents (#55645)
Veeva Importer
Enable Migration Mode programmatically for the imported objects so Migration Mode is not necessary to be enabled on the vault level (#55493)
OutOfMemory exception might be thrown by InforArchive importer when generating very large SIP file (#55698)
OTCS Scanner:
Added support for scanning CAD documents as regular documents (#55900)
SharePoint Online Batch Importer:
Added support for setting approval status on documents (#54990)
Added support for setting version numbering (#55505)
Added support for setting Lookup field type (#55521)
Veeva Importer:
Added support for delta migration of Veeva objects (#54928)
Added support for importing attachments for Veeva Objects (#55535)
Core Database:
Added additional multi-value transformation functions (#55424)
Fixed import failing verification (#55574)
Fixed import failing into library with deep path (#55745)
SharePoint Online Importer:
Fixed import failing into site collection URL with spaces (#55571)
Fixed not being able to assign AD group (#55796)
Fixed error on folder update (#55870)
Veeva Importer:
Objects are not rolled back if attachment was set on objects that do not support attachments (#55939)
Documentum NCC Importer:
Delta migration for the multi-page content does not work properly when a new page is added to the primary content (#55739)
New feature: Allow assignment of any valid SP user (#55219)
Support for OneDrive (#54262)
Filesystem Scanner
New feature: Perform transformation of source object XML files before processing (#54776)
SharePoint Importer
Folder and document get created although a column cannot be set (#55001)
SPO importer fails setting lookup column with a NULL value (#55140)
CSOM Processor fails with 401 Unauthorized error if a job ran longer than 24 hours (#55323)
Opentext Scanner
Keywords system rule is limited to 255 characters for Physical Objects migset (#55341)
Support for D2 20.2
Documentum Scanner / Importer
Support for Documentum Server 20.2
OpenText Importer
Support for OpenText Content Server 20.2
OpenText Scanner
New feature: Scan shortcuts as distinct MC objects (#53710)
New feature: Scan any folder subtype objects (#53711)
SharePoint Online Importer (Classic)
New feature: Add user-agent traffic decoration (#52837)
SharePoint Online Importer (Batch)
New feature: Importing role assignments (#54440)
Tools
New tool to export document type definitions from Veeva available (#51539)
SharePoint Online Importer (Batch)
SPO batch importer checks wrong content location (#54568)
SPO batch importer throws error when importing large folder hierarchy (#54574)
NPE for objects with NULL value in levelInVersionTree in SPO batch importer (#54637)
SharePoint Importer
Wrong max length limit for parentFolder system attribute when importing to SP 2019 (#54592)
Support for importing to D2 4.1, 4.5, and 4.6 was removed
OpenText Scanner
Using binders in the parameters "scanFolderPaths" and "excludeFolderPaths" is not supported (#54963)
SharePoint Online Bulk importer:
Add mc_content_location in migset rules (#54182)
Support for app-only principal authentication with SharePoint permissions (#54277)
SharePoint Online scanner:
Add scanLatestVersionOnly feature (#5615)
Add includeFolders and excludeFolders parameters (#53706)
SharePoint (Online) importer: Automatically added content type not added to cache (#54420)
SharePoint scanner: Permissions & User fields contain ambiguous username instead of login name (#54240)
Add support for Oracle JDK 13 & OpenJDK 13 (#52492)
Add support IA 16.7 (#52910)
Added support for Alfresco 6.2.0 for Alfresco scanner and importer (#54108)
Alfresco scanner and importer now require java 1.8 or later
Documentum Scanner
Scan complete document audit trail and save it as rendition to the current document version (#52846)
OpenText Importer
Assign objects to Physical Object Box with a dedicate system rule (#52748)
SharePoint importer
Support valid filename characters on SharePoint on-prem (#53304)
Documentum In-Place
Implement move content feature in Documentum In-Place adapter (#53518)
No error or warning when importing two renditions of the same type with OpenText Importer (#53124)
The underlying connection was closed: An unexpected error occurred on a send in SharePoint Importer (#53099)
Could not get SharePoint X-RequestDigest error message when space character in site collection name (#53190)
SharePoint Importer should log error immediately if required fields are missing (#53844)
HTTP 503 Server Unavailable Error when downloading large content files with SharePoint Online Scanner (#53673)
Fix “Member ID is not valid” in OpenText scanner (#53482)
Fix setting empty Vault Object reference in Veeva importer (#53573)
Show number of warnings in job run report summary (#52845)
Scan user field with username instead of user id (#52847)
Objects scanned from inside projects now contain full parentFolder path (#52960)
Revised OpenText Adapter User Manuals (#52550)
Veeva Importer
Re-authentication mechanism in case of session timeout (#52822)
Pause and retry mechanism to handle burst and daily API limits (#52823)
Support version binding when importing Veeva Vault binders (#52091)
Delta Migration of objects in Veeva Importer (#53037)
Added support for Alfresco 6.1.1 in Alfresco Importer (#53008)
Added support for annotations in D2 Importer (#53018)
Documentum scanner now supports dqlExtendedString returning repeating values (#52587)
Added Support for SP 2019 in SP Importer (#52870)
Auto-Classification Module
Functionality to split dataset into training and test data (#52660)
Removing of library under GPL license (#52853)
Classification Process Logging (#52855)
Veeva Importer now supports importing Documentum documents as renditions of a specific type to a Veeva Vault document (#52090)
Added switch for lifecycle error handling in D2 Importer (#50991)
Updated the IBM Domino Scanner (#49173)
Improved database security by changing default password (#51112)
Improved performance of filesystem importer copy operation (#52320)
Enhanced the RepeatingToSingleValue function to not throw exception when length exceeds 4000 bytes (#51798)
Added missing file and folder name checks in the SP and SPO importer user guides (#52076)
Updated linux Jobserver with new YAJSW wrapper (#52347)
Box.net Importer, added the following features:
Import custom metadata (#50312)
Import tags (#50314)
Import comments (#50315)
Import tasks (#50316)
Add collaborators to the imported documents (#50602)
import taking a long time when content_location points to folder (#52115)
Importer not starting if adfsBaseURL contains trailing slash (#51941)
DEBUG messages getting logged despite log level ERROR in log4j (#52082)
Added debug log messages for queue building missing in SP importer (#52084)
Exception not caught when reverting import action (#52216)
Importer hanging when encountering an exception in RefreshDigest method (#52238)
Improved Retry handling (#52270)
Error when importing into site with %20 in the name (#52272)
autoCreateFolders always enabled (#52305)
NullPointerException in file upload when SPOnline throttling occurs (#52325)
64bit support (based on IBM Domino); 32bit support remains unchanged (based on IBM Notes)
InfoArchive Importer: provide a better way for importing email attachments scanned from IBM Domino
Veeva Vault Importer: Fix setting status_v for the root version
Veeva Vault Importer: Fix importing VD relations that have order_no with decimals.
Veeva Vault Importer: Fix a null pointer exception when logging some results
CSV/Excel Scanner: Fix setting the internal processing type of the scanner
Sharepoint Importer: Fix importing documents having # and % in the name
Sharepoint Importer: Fix importing folder with two consecutive dots (..) in the name
Sharepoint Importer: Fix token expiration after 24 hours.
Fixed SharePoint Importer bug autoCreateFolders not working for values with leading slash
Fixed SharePoint failing authentication with invalid XML chars in use name or password
Added Content Hash Calculation feature to OTCS scanner (#50736)
Added support for java web service in OTCS Scanner (#51389)
Added support for importing RIM submissions to Veeva Vault (#51208)
Added support for importing Documentum Virtual Documents as Binders in Veeva Vault (#51188)
Added support for setting references to existing master data objects in Veeva Vault (#51151)
Added support for ADFS authentication in SPO Importer (#51414)
Added new Transformation function for time-zone conversions (#51480)
Changed behavior of setting the file extension for the SharePoint Importer (#51503)
Documentum Importer: Extended waiting time for operations queue to finish (#50995)
No error reported when setting values to Inactive Fields in Veeva Importer (#50880)
No error reported when setting values to fields that are not in the Type / Subtype / Classification used in Veeva Importer (#50871)
No error reported when setting permissions not in the selected lifecycle in Veeva Importer (#50939)
D2 Importer validates the Enabled, Visible and Mandatory conditions in a Property Page (#50235)
D2 Importer marks documents as Partially Imported when failing to apply a lifecycle action (#50274)
Fixed bug in Documentum audit trail rollback scripts (#49943)
Fixed nullPointerException in Alfresco Importer (#50027)
Fixed error when scanning documents in “Projects” with OTCS Scanner (#50130)
Fixed individual version creator not being scanned in OTCS scanner (#50273)
Fixed missing supported versions for Oracle and DFC in the Installation Guide (#50275)
Fixed DQL Validation for $repeatingvalue placeholder in D2 Importer (#50278)
Added support for InfoArchive 16.3 (#49244)
OTCS importer now supports folders of type email_folder types in OpenText Content Server (#49257)
OTCS scanner now supports scanning documents and emails from Email folders (#49995)
OTCS scanner now supports OTDS authentication (#50134)
Added checksum verification feature for OpenText Content Server Importer (#49250)
Added support for Oracle 12c Release 2 (#49259)
Fixed job getting stuck when connection to SharePoint server is lost during import (#50026)
Fixed error when importing filename with apostrophe or plus sign in SharePoint (#49087, #49151)
Fixed error when importing SharePoint lists with certain settings (#49975)
Fixed rollback not being performed when a importing certain versions fails in SharePoint (#49974)
Fixed bug where document gets overwritten when old version moved to folder with a different document of the same name in SharePoint (#4661)
OpenText Importer: migrating opentext_email objects is now supported (#11670)
SharePoint Online Importer: added content integrity checking feature for imported Documents (#8296)
SharePoint Scanner: scanning entire version trees as a single migration-center object is now supported (#11641)
New system attributes are now available in transformation rules for all adapters (#11941)
Improved logging for OpenText Importer (#11781)
Fixed issue where the initializer thread was still running in the background when a job was being stopped manually (#11739)
Fixed not being able to delete certain Scheduler runs that took more than 2 seconds to delete (#11889)
Added support for scanning only current version in eRoom scanner (#11649)
Filesystem Scanner:
mc_content_location and original_location are now available in transformation rules when using moveFilesToFolder (#11474)
Added parameter for specifying the date format for extracting extended metadata with unusual format (#11673)
Added possibility of scanning permissions (#11720)
Upgraded to latest version of Tika Libraries (#11693)
Added support for InfoArchive 4.1 and 4.2 (#10325)
Added support for migrating SharePoint folders and List Items into InfoArchive (#11639)
OpenText importer:
now support inheriting folder categories when importing folders (#11674)
now support inheriting permissions (#11631)
now supports setting null values for popup / dropdown attributes (#11550)
Fixed contentless documents failing when ‘nocontent’ is specified in InfoArchive importer (#11656)
Fixed missing parent_object_id when scanning delta versions in OTCS Scanner (#11750)
Fixed importing documents that have date table key lookup attribute failing in OTCS Importer (#11576)
Fixed error when scanning uncommon managed metadata in SharePoint scanner (#11621)
Fixed only latest content exported for each version of a document in SharePoint scanner (#11657)
Fixed exportLocation parameter description when using local path in SharePoint scanner (#11568)
Fixed error when scanning documents with non-mandatory but empty taxonomy field in SharePoint scanner (#11652)
Fixed lookup attributes not being scanned at all in SharePoint scanner (#11655)
Improved OTCS scanner documentation (#11667)
Corrected version labels in Installation Guide (#11622)
Fixed Linux Jobserver classpath values (#11690)
Added support for D2 version 4.7 (#10777)
Changed D2 DQL and Taxonomy validation to be done by the D2 API (#10317)
Added information regarding folder migrating options in the D2 Importer User Guide (#10754)
InfoArchive Importer
Added support for multiple content files per AIU (#8877)
Added support for multiple Object Types (#8877)
Added support for Custom Attributes inside the eas_sip.xml file (#9405)
Added support for calculating the PDI file checksum with SHA-256 and base64 encoding (#11418)
OTCS Scanner is now able to export rendition types (#11419)
OTCS Importer now supports Extended Attributes Model (#11424)
SharePoint Importer now does extra check to avoid overwriting existing content with the same List Item ID when trying to move content to different libraries (#11465)
Added warning regarding using multiple Jobservers with Sharepoint Importer (#11459)
Sharepoint Importer: fixed updates to intermediate version being applied to the latest version (#11458)
Sharepoint Importer: fixed a case that caused the importer to not finish (#10338)
D2 Importer: Fixed validation for certain DQLs containing placeholders (#10318)
D2 Importer: Fixed validation of certain taxonomies (#11549)
Fixed a jar conflict between OpenText Importer and Sharepoint Scanner (#11487)
Added support for SharePoint 2016 (#9925)
Improved SharePoint Online Importer performance when applying internal attributes and taxonomies (#10314)
Added support for InfoArchive 4.0 (#9926)
Added support for Documentum ECS (Elastic Cloud Storage) (#9783)
SharePoint Scanner: fixed job finishing successfully with incorrect credentials (#9939)
MC Client: fixed description for RepeatingToSingle transformation function (#10291)
D2 importer does not work with D2 4.5 or 4.1 when Jobserver runs on Java version 1.8 (#10384)
Large attribute values can now be split into chunks of maximum 4000 bytes
Added custom attributes: "attachmentItemName" - name of item that an attachments was attached to in the original Domino document, "attachmentName" - name of the attachment in the original document and "$dominoNoteID$" - NoteID of the document in the database that it originates from.
InfoArchive importer now supports ingestion via InfoArchive Webservices
OpenText Importer now supports inheriting categories from folders
OpenText Importer now supports setting values for attributes grouped within a Set attribute
fixed impersonate user not working as expected
fixed importer not working when DFC not installed
Sharepoint Scanner: Documents with paths longer than 260 characters fail to be scanned
Remaining issues from the main release 3.2 to 3.2.7 also apply to release 3.2.7 Update 1 unless noted otherwise.
Retired the previous SharePoint Importer as SharePoint Legacy: new installations will not have it. Updated installations will have it under the name of SharePoint Legacy.
SharePoint Online Importer supports now documents, folders, listitems, lists and document libraries. Relations can be imported now as attachments for listitems.
D2 importer supports now creating folders based on the paths provided to documents.
Alfresco importer supports now the Alfresco 5.0.
Alfresco scanner and importer: categories and tags are exported and imported using the values displayed in the interface instead of using internal ids.
Fixed importing a new document version when the first link was modified compared with the previous version.
Improve the message description of several errors that may happen when importing updates and versions.
Documentum scanner:
Fixed a query error when scanning a repository having DB2 as database.
Fixed scanning version tree having multiple types.
Fixed the content location for the documents without format.
Box importer:
Fixed setting “content_created_at” and “content_modified_at” to the imported files.
Filesystem scanner:
Fixed out of memory when scanning more than 1 million of files
Fixed the case when scanning multiple folders like: <some folder path>\FName|<some folder path>\FName with Space. In the previous version the second folder was ignored without any error message.
Report properly the invalid paths when scanning multiple folders.
Fixed a possible performance issue when scanning extended metadata.
Filesystem importer:
Fixed a NullPointerException when setting “modified_date” without setting the “creation_date”
Fixed the case when the target file was overwritten by the metadata file when they were having the same name.
SharePoint Online importer:
Fixed updates imported as new versions.
Fixed import fails only with major version enabled.
Fixed null pointer exception when setting empty “Group or Person” or “Hyperlink” column.
Fixed items created for failed jobs are now rolled-back where possible.
Fixed running with invalid credentials does not set the error status.
Fixed proper log messages are set now for multiple attribute setting errors.
Eroom scanner
The “er:Path” attribute does not contains the file name anymore.
Database
Allow installing migration-center on a non-CDB Oracle 12c instance.
Fixed the throwing two errors when upgrading from version 3.2.5 or older. This was the case when filesystem importer was not licensed.
Client
Fixed installing the client on Window 8 and Windows 2012 server. No manual registry configuration is required.
New Alfresco Scanner: supports scanning documents, folders, custom lists and list items from an Alfresco repository.
New Microsoft Exchange scanner: supports scanning emails from different accounts using an account that has delegate access to the other ones.
New Exchange Removal adapter: supports deleting emails in the source system that have been imported from Microsoft Exchange.
Documentum Importer supports multithreaded processing for improved performance.
Filesystem Importer supports setting the creator name, creation date and modify date to the imported file.
Enhance the flexibility of generating metadata files in Filesystem Importer.
Support of Jobserver components installation on Linux. Note that not all adapters are available on Linux
The Oracle package SYS.SQLJUTL is not needed anymore by migration-center.
Fixed importer trying to delete inexistent dummy versions.
Fixed the reporting of some incorrect error messages.
Sharepoint Online importer:
Fixed setting the attribute “Title” for contact items.
Fixed the reporting of some incorrect error messages.
Filesystem Importer:
Fix a null pointer exception when setting invalid path to “unifiedMetadataPath”.
Fix moving renditions when “moveFiles” is enabled in the importer.
Sharepoint on Premise Importer: Importing documents without any specified version label results in an error. (Bug #8186)
Documentum Importer: Importing multiple updates of the same document that is part of a version tree containing branches may fail if using multiple threads. That is an extreme case since in the process of delta migration the object updates are migrated incrementally. (Bug #8175)
InfoArchive Importer: When the “targetDirectory” runs out of disk space during the zip creation, the importer fails as expected, but the zip file is not rolled back (deleted). (Bug #8758)
Alfresco Importer: Certain errors that may occur during import are not descriptive enough. (Bug #8715)
Alfresco Importer: Updating a document will result in an error if the first link of the base object needs to be removed by the update. (Bug #8717)
Alfresco Scanner: Running an Alfresco Scanner with the parameter “exportContent” unchecked results in invalid values set for the “content_location” attribute. (Bug# 8603)
Alfresco Scanner: Running two scanners in parallel on the same location can result in duplicate objects being created. (Bug #8365)
Filesystem Scanner: Folders will be ignored if multiple folder paths that begin with the same letters are used as a multivalue for the scanFolderPath (Bug #8601)
Remaining issues from the main release 3.2 to 3.2.5 also apply to release 3.2.6 unless noted otherwise.
Database Scanner: fixed Unexpected error occurred during content integrity checking message when migrating data scanned with the Database Scanner to target systems with importers supporting the content integrity check feature, which the Database Scanner itself does not support.
File System Scanner: Extended metadata containing values longer than 4000 bytes no longer errors out. Instead, the values are truncated to the max 4000 bytes supported by mc.
File System Scanner: fixed extraction of creation date and owner for files with paths longer than 260 characters
Scheduler: fixed Oracle error when interval for a scheduler was set to “Month”
Updated SharePoint Importer: now implemented as a SharePoint Solution (just like the new SharePoint Scanner), simplifying deployment and improving performance, reliability and error resilience
Updated SharePoint Importer with content integrity check feature (comparison of checksums computed during scan and import)
Updated Documentum Importer: now supports importing to Documentum 7 repositories
Updated box Importer: now works with the box API version 2.0 for improved performance and reliability; verification of content integrity can now be performed during import based on checksums computed by the importer and box respectively
Updated Documentum Scanner: now supports scanning Documentum 4i repositories (via DFC 5.3)
New parameter for Documentum Importer to toggle whether errors affecting individual renditions should be treated as warnings or errors affecting the entire document, thus preventing it from being imported (set to ignore errors and treat as warnings by default for compatibility with previous versions)
New parameter for Filesystem Scanner to ignore hidden files (false by default)
Documentation: added new document “migration-center Database Administrator’s Guide” detailing database installation requirements (privileges, packages, etc.) and procedures for deploying mc in environments where the regular database setup cannot be run, and the database must be prepared manually by a DBA for installing the mc schema
Filesystem Importer: fixed an issue causing errors when importing renditions for a selection of documents if some objects had renditions and others didn’t
FirstDoc Importer: fixed an issue with setting version labels in a particular case (Superseded 1.0 – Obsolete 1.1)
FirstDoc Importer: fixed an issue trying to delete already deleted relations
FirstDoc Importer: fixed objects no being rolled back in case errors occur during saving content
FirstDoc Importer: fixed objects not being rolled back in case errors occur during updating of ACLs and links
Documentation: minor corrections and additions in various documents
The Documentum Scanner has a new option, allowing an additional DQL statement to be executed for every object within the scope of the scan. This allows additional information to be collected for each object from sources other than the document’s properties. Other database tables (registered tables) for example can be queried using this option. See the migration-center 3.2.2 – Documentum Scanner User Guide for more information.
The Filesystem Scanner can now build versions from additional attributes (as long as these attributes can supply the required information. Two attributes per object are required for the feature to work, which can be named arbitrarily and can be defined in the fme metadata files associated with each content file. The attributes to be used as version identifier and version number by the scanner can be specified through additional options available in the Filesystem Scanner. See the migration-center 3.2.2 – Filesystem Scanner User Guide for more information.
The SharePoint Importer can now update previously imported objects (if the objects had been modified in the source and scanned as updates)
Scheduler: fixed issues where a Scheduler would stop working after several hundred runs and required to be stopped and restarted manually, or report a run as having finished with errors although there were none.
SharePoint Importer: Fixed an issue with the SharePoint Importer where it would set values of multiline columns as literal HTML code sometimes.
SharePoint Importer: Fixed an issue where during import the Comment column was set to value “Version checked in by migration-center” automatically.
Box Importer: improved performance and reliability when importing large files (several hundred MB)
Box Importer: fixed issue where the progress would indicate 100% for the entire duration of a large file being uploaded, with no actual progress being visible to the user
Box Importer: fixed an issue where the max number of threads allowed is set for the importer and wrong credentials are entered – this caused connections to the database to be opened but not closed, exceeding the maximum number of connections allowed by the database after some time.
Documentum Importer
Filesystem Importer
Box Importer
Alfresco Importer
SharePoint Importer
FirstDoc Importer
Documentum Importer: improved performance for importing large numbers of Virtual Documents by up to 15% by skipping some unneeded processing
Documentum Scanner: content files are now written to the export location by using the Windows/DOS extension corresponding to the respective formats instead of the Documentum format name used previously. This is necessary to facilitate interaction between the Documentum Scanner and various importers targeted at other content management systems that rely on the Windows/DOS extension to work properly.
Documentum Scanner has a new “skipContent” parameter - enabling it skips extraction of the actual content, thus saving time during scan. The feature is intended to be used for testing or other special purposes; not recommended to enable for production use.
Filesystem Scanner can now detect changes to external metadata files as well instead of just the main content file and can add the updated metadata as an update to the object. This is useful for scenarios where the content is expected to change less frequently than the external metadata files.
Filesystem Scanner now also supports reading external metadata for folders, providing the same functionalities as for file metadata.
Filesystem Scanner has a new “ignoreAttributes” parameter – this allows defining a list of unwanted attributes that should be ignored during scan. This mostly applies to attributes coming from external metadata files of from extended metadata from the files’ contents
Filesystem Scanner has a new “ignoreWarnings” parameter – this allows scanning documents even if some of their metadata (owner or creation date) cannot be extracted or if the external metadata file is missing. Use only if that kind of information is not critical for the migration, and/or would otherwise cause too many files to be skipped.
Client/Transformation Engine: system attributes are no longer available to be associated on the “Associations” page of the “Transformation Rules” window. These are used automatically by the respective importers and did not need to be associated anyway
Client/Transformation Engine: set default rule to be pre-selected in the “Get type name from” drop-down list on the “Associations” page for all the different object types (user can of course change the selection if desired)
Documentum Importer: fixed an issue where the CURRENT version label was not updated correctly in case an object and updates of that object were imported together
Documentum Importer: fixed an issue where updating folder objects during import would not clear empty attributes in case those attributes had values different from null before the update.
Filesystem Scanner: fixed an issue where the modification date for folders would not be scanned
Filesystem Scanner: removed “content location” value for folder objects added previously by scanner since folders do not have content of their own. This does not influence functionality.
Filesystem Scanner: fixed error extracting extended metadata from PDF files
Filesystem Scanner: fixed some discrepancies with object counts in log files when scanning updated objects
Transformation engine: a multi-value rule is now validated against the multi-value setting of the attribute it is associated with, so trying to set multiple values for an attribute defined as single value for example will now throw a validation error.
Client: fixed an issue where the Object History feature did not return results at all under certain circumstances
Client: fixed multiple minor issues related to focusing and scrolling in various grids/lists
Documentum Features: Cabinets: mc cannot migrate empty cabinets (i.e. dm_cabinet objects with no other objects linked to it) for reasons stated abovei
Documentum Features: Relations: support for migrating dm_relation type objects is limited to relations between dm_document and dm_folder type objects (and their respective subtypes)i
Documentum Features: Virtual documents: the snapshot feature of virtual documents is not supportedi
Documentum Scanner: for the DQL query to be accepted by the scanner it must conform to the following template: “select r_object_id from <dm_document|subtype of dm_document> (where …)”. Other data returned by the query or object types other than dm_document (or its subtypes) is not supported.
Documentum Scanner: the ExportVersions option needs to be checked for scanning Virtual Documents (i.e. if the ExportVirtualDocuments option is checked) even if the virtual documents themselves do not have multiple versions, otherwise the virtual documents export might produce unexpected results. This is because the VD parents may still reference child objects which are not current versions of those respective objects. This is not an actual product limitation, but rather an issue caused by this particular combination of Scanner options and Documentum’s VD features
Documentum Scanner: scanning dm_folder type objects using the DQL option is not supported currently.
Documentum Importer: the importer does not support importing multiple updates of the same object in the same run (or the base object and of its updates). Every update of an object must be imported in different runs (this is how it would happen during normal conditions anyway)
Update migration: Objects deleted from the source will not be detected and the corresponding target object will not be deleted (if already imported)
Update migration: whether a source object has been updated is determined by checking the i_vstamp and r_modify_date attributes; source objects changed by third party code/applications which do not touch these attributes might not be detected by mc
Client: the client application does not support multi-byte characters, such as characters encoded with Unicode. This does not affect the migration of such information, but merely limits the Client’s ability to display such values on screen; multi-byte characters are supported and processed accordingly by migration-center’s Database and Server components, which are the components involved in the actual data processingi
eRoom Scanner: scanning updates of eRoom objects is not supported currently; this also applies to newly added versions to a previously migrated object. Only newly created objects will be detected and migrated. This is due to the way eRoom handles object IDs internally, which prevents mc from correctly detecting changes to versioned objects. The full functionality may be implemented in a future release.
Filesystem Importer: does not import folders as standalone objects. Folders will be created as a result of the path information attached to the documents though, so folder structures are not lost. The full functionality may be implemented in a future release.
Database Scanner: the database adapter does not extract content from a database, only metadata. Content can be specified by the user during the transformation process via the mc_content_location system attribute. It may be necessary to extract the content to the filesystem first by other means before migration-center can process it. Content extraction functionality may be implemented in a future release.
Attributes: The maximum length of an attribute name is 100 bytesi
Attributes: The maximum length of an attribute value is 4000 bytesi
Attributes: The maximum length of a path for a file system object is 512 bytesi Note: all max supported string lengths are specified in bytes. This equals characters as long as the characters are single-byte characters (i.e. Latin characters). For multi-byte characters (as used by most languages and scripts having other than the basic Latin characters) it might result in less than the equivalent number of characters, depending on the number and byte length of multi-byte characters within the string (as used in UTF-8 encoding)
Documentum: If the group_permit, world_permit, owner_permit AND acl_domain, acl_name attributes are configured to be migrated together the *_permit attributes will override the permissions set by the acl_* attributes. This is due to Documentum’s inner workings and not migration-center. Also, Documentum will not throw an error in such a case, which makes it impossible for migration-center to tell that the acl_* attributes have been overridden and as such it will not report an error either, considering that all attributes have been set correctly. It is advised to use either the *_permit attributes OR the acl_* attributes in the same rule set in order to set permissions.
Transformation engine: Transformation Rules window/Associations page: if object types are added and no attributes are associated for these object types all objects matching the respective types will be migrated with no attribute values set (except for system attributes handled automatically by Documentum). Avoid adding object types without associating all required attributes for the respective types.
Client: on rare occasions, some windows or parts of a window will flicker or fail to refresh their contents. To work around issues like these, use the window’s Refresh button, scroll the window left/right, or close and re-open the affected window if nothing else helps.
Client: when editing an object type’s definition and trying to change an attribute’s type the drop-down list will not appear on Microsoft Windows 7 systems unless miglient.exe is configured to run with “Disable visual themes” (option can set on the Compatibility page in the executable’s properties)
Client: trying to import a mapping list from a file will not work on Microsoft Windows 7 systems because the context menu containing the command will not appear unless miglient.exe is configured to run in Windows XP compatibility mode (option can set on the Compatibility page in the executable’s properties)
Client: After using "Export to CSV" the folder where the CSV file has been saved is still in use by migration-center Client
Scheduler: the scheduler may report runs that finished with warnings during import as having finished with errors instead. Make sure to check any scheduler history entries listed as “Finished with errors” to determine whether the cause is an actual error condition or merely a warning, which is not a critical condition.
Installer: The migration-client installer does not work with User Account Control enabled in Windows 7. Please either disable UAC for the duration of the installation, or if installation needs to be performed using UAC enabled, manually grant full access permissions for the required users on the installation folders afterwards