The Microsoft Exchange Scanner is a new connector available since migration-center 3.2.6. The Exchange scanner can extract messages (emails) from Exchange mailboxes and use it as input into migration-center, from where it can be processed and migrated to other systems supported by the various mc importers.
The Microsoft Exchange Scanner currently supports Microsoft Exchange 2010 and the Exchange 365. It uses the Independentsoft JWebServices for Exchange Java API to access an Exchange mailbox and extract emails including attachments and properties.
To scan the online version of Exchange (Outlook 365), you need to generate an App-Only Client ID and Client Secret. Here are the steps:
Log into Azure Portal. If you don't have an account there yet, create it. You also have to set up a tenant that represents your company
If you administer more than one tenant, use Directories + subscriptions filter to select the tenant for whom to register an application
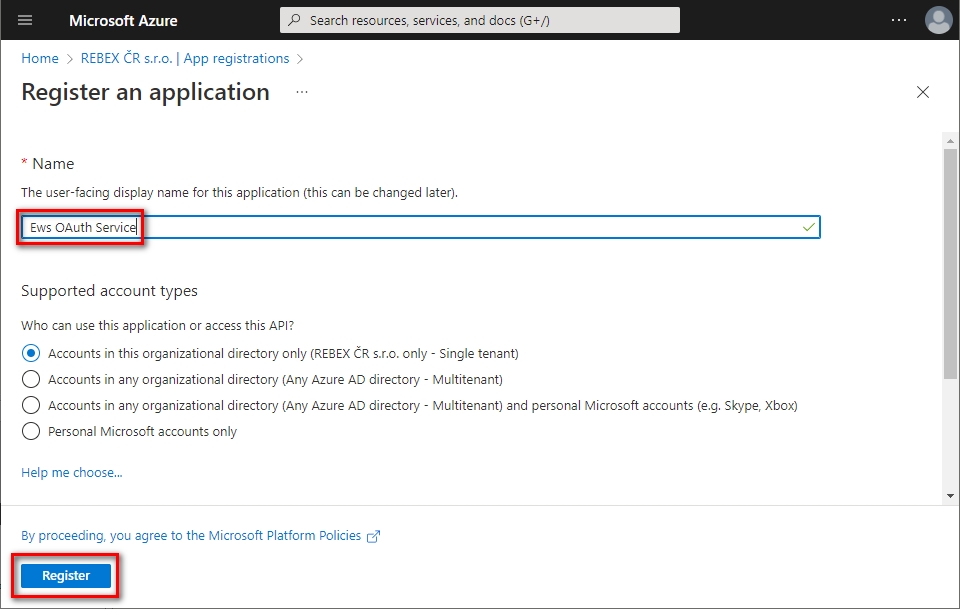
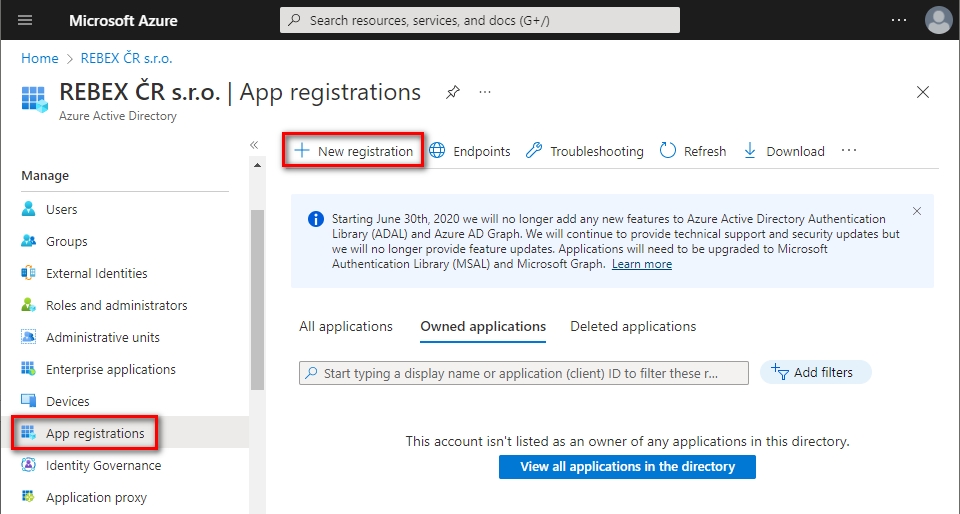
In Azure Portal ⇒ expand the left menu ⇒ select Azure Active Directory ⇒ select App registrations ⇒ click + New registration. (Azure Portal is constantly evolving, so if you cannot find this page, use the search bar)
Name your application, choose which kind of accounts are going to use it and click Register
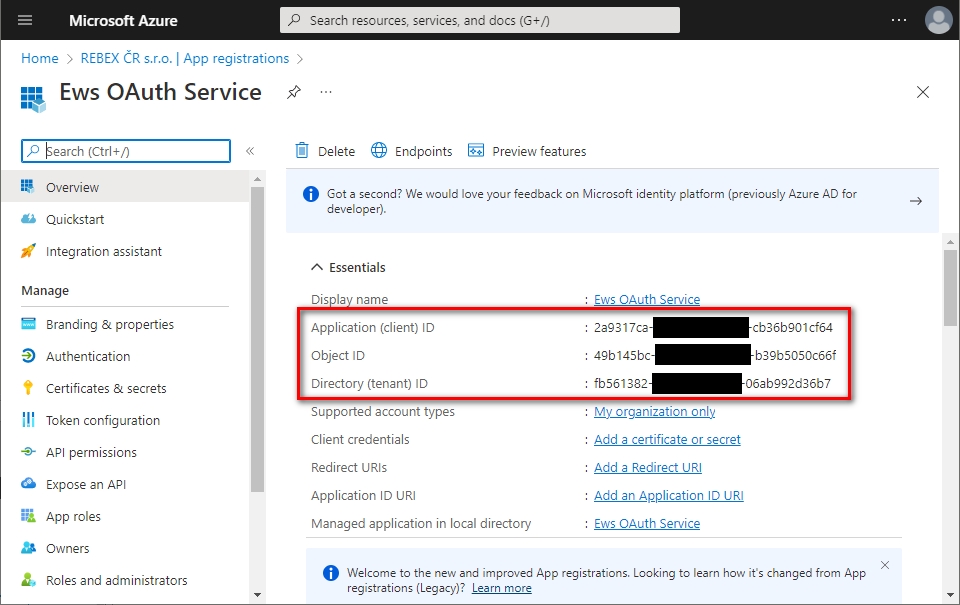
You successfully registered your application and you can view its associated IDs. Some of them will be needed later to obtain an OAuth 2.0 token
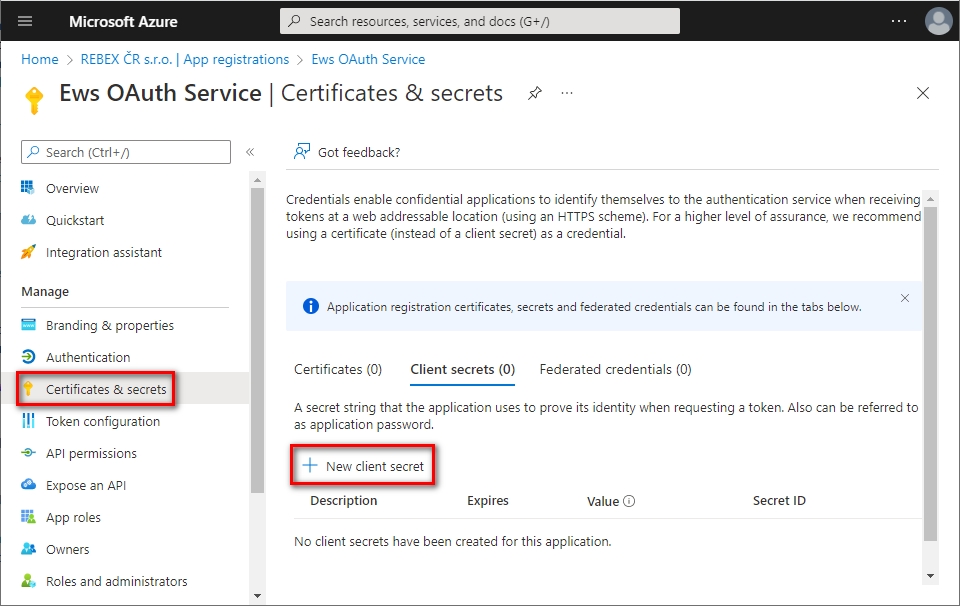
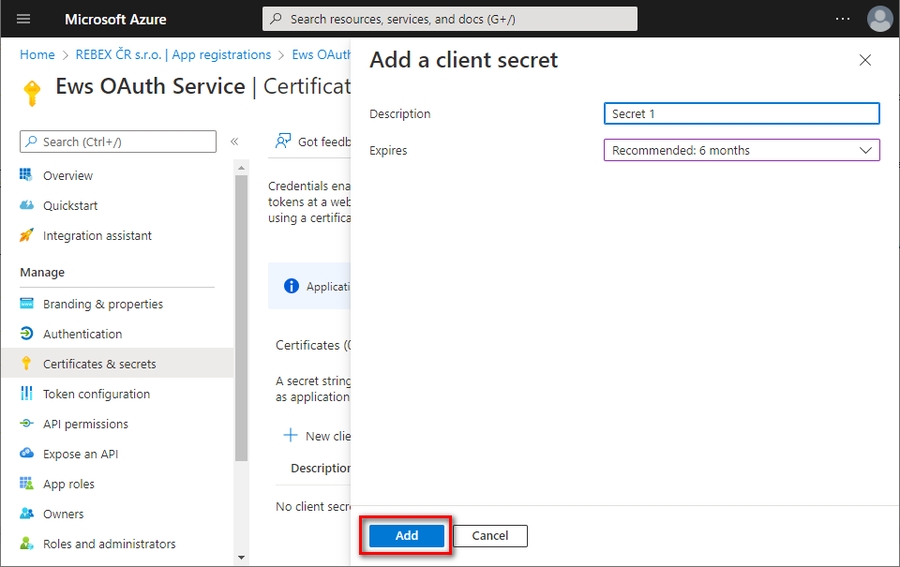
In the left menu, select Certificates & secrets ⇒ click + New client secret
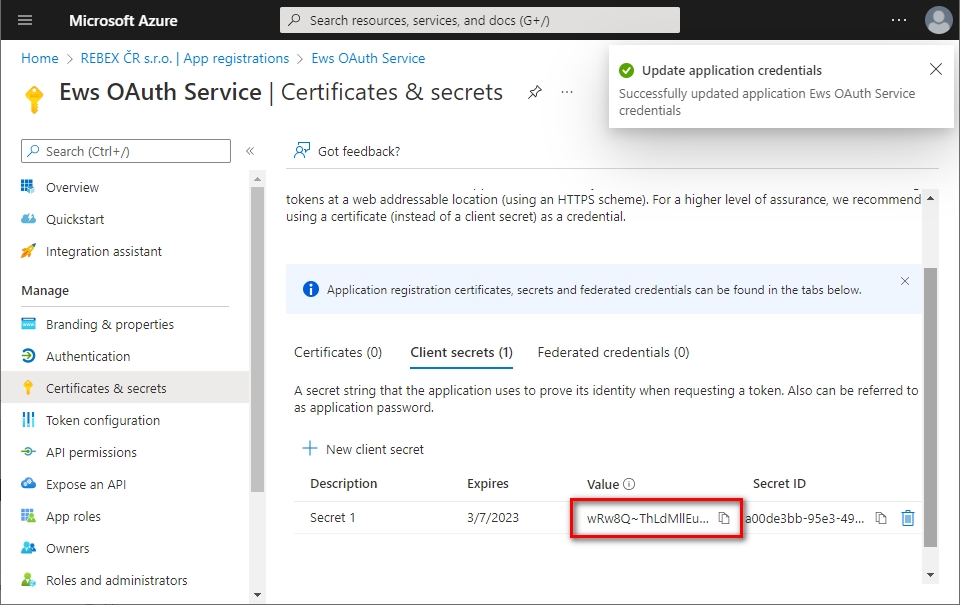
Provide some description for this secret, choose expiration period, and click Add
Immediately copy and save the newly created client secret's Value (not Secret ID). You will not be able to view the Value later anymore
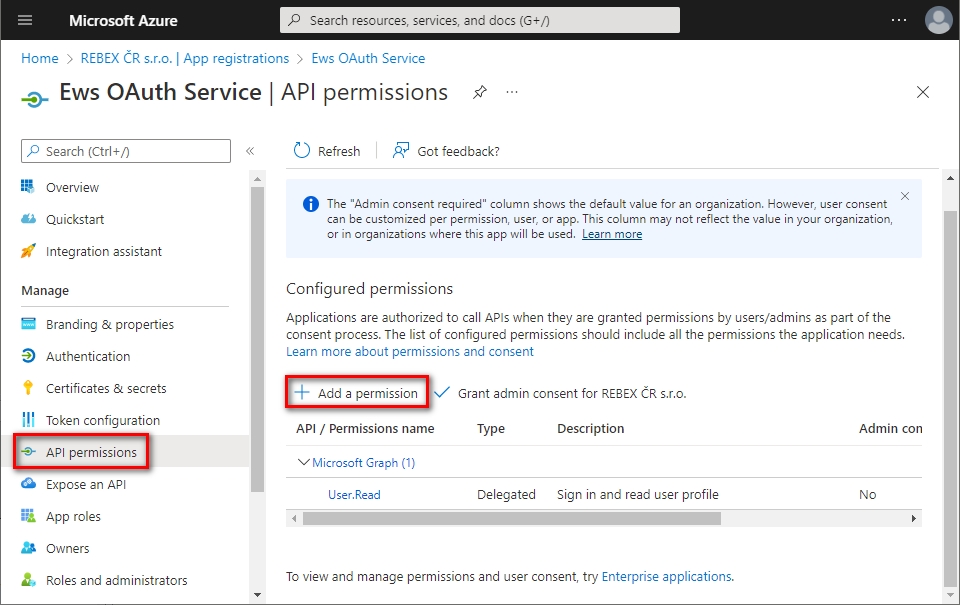
In the left menu, select API permissions ⇒ click + Add a permission
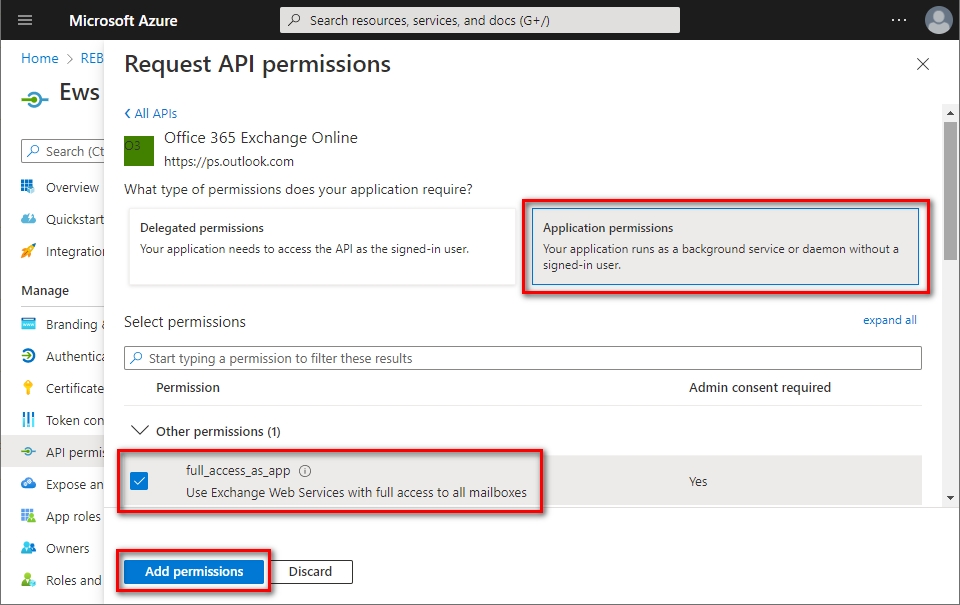
Click Application permissions ⇒ check full_access_as_app ⇒ click Add permissions.
Note: Mail.Read, Mail.ReadWrite, Mail.Send permissions are not suitable for EWS
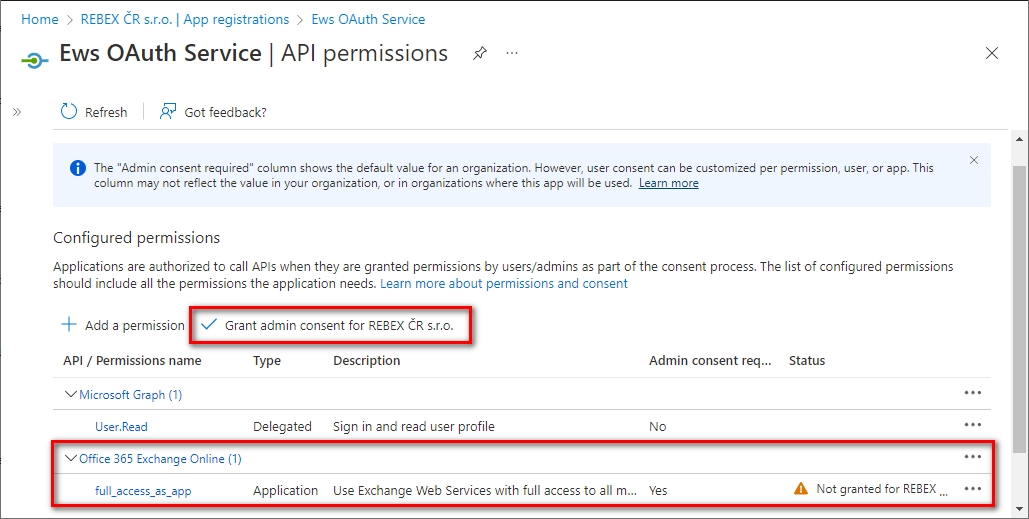
The newly-added full_access_as_app permission has to be approved by your organization's administrator. Ask them to grant consent to your application by clicking Grant admin consent for [organization]
Now that you have the application (client) ID (from step 5) and client secret (from step 8), you can use them in the scanner configuration to successfully connect to the Outlook 365.
Set the username to the inbox you want to scan.
Set the clientId to the one you generated.
Set the clientSecret to the one for that client id.
Set the exchangeServer to outlook.office365.com.
Check the useHttps parameter.
Now just set your desired scanFolders path stating with \Inbox and of course the exportLocation and run your scanner.
The Exchange scanner connects to the Exchange Server with a specified Exchange mail account and can extract messages from one (or multiple) folder(s) within the current user’s or other user’s mailboxes. The account used to connect to exchange must have delegate access permission to the other accounts from which mails will be scanned.
For Exchange 365, the scanner connets using a Client ID and Client Secret with access to all the emails on teh server, therefore delegate access is not needed. But the specific email that needs to be scanned must be entered on the
All subfolders of the specified folder(s) will automatically be processed as well; an option for excluding select subfolders from scanning is also available. See chapter Exchange scanner parameters below for more information about the features and configuration parameters available in the Exchange scanner.
In addition to the emails themselves, attachments and properties of the respective messages are also extracted. The messages and included attachments are stored as .eml files on disk, while the properties are written to the mc database, as is the standard with all migration-center scanners.
After a scan has completed, the newly scanned email messages and their properties are available for further processing in migration-center.
To create a new Exchange Scanner job, specify the respective adapter type in the Scanner Properties window – from the list of available connectors, “Exchange” must be selected. Once the adapter type has been selected, the Parameters list will be populated with the parameters specific to the selected adapter type, in this case the Exchange connector's parameters.
The Properties window of a scanner can be accessed by double-clicking a scanner in the list, or selecting the Properties button or entry from the toolbar or context menu.
The common adaptor parameters are described in Common Parameters.
The configuration parameters available for the Exchange Scanner are described below:
username* The username that will be used to connect to the Exchange server. This user should have delegate access to all accounts that will be scanned.
password* The password that will be used to connect to the exchange server. Do not set if you're connecting to Outlook 365.
clientId Client ID used to connect to the Exchange 365 Server.
clientSecret Client Secret used to connect to the Exchange 365 Server.
exchangeServer* The host name or IP address of the exchange server.
Use outlook.office365.com for online version.
domain The domain against which the user will be authenticated. Leave empty for authentication against exchange server domain.
useHttps Specify if the connection between Job Server and Exchange server will be established over a secure SSL channel.
scanInPlaceArchive Specify if the folder(s) to be scanned are located in an In-Place Archive
scanFolders* Exchange folder paths to scan.
The syntax is \\<accountname>[\folder path] or \folderPath. If only the account is given (ex: \\john.doe@vw.de) then the scan location will be considered to be the "Top of Information Store" folder of the user. If no account is specified, the path is considered to be in the account specified in the “username” property. Multiple paths can be entered by separating them with the “|” character.
Example:
\\user\Inbox would scan the Inbox of user (including subfolders)
\Inbox\sales is equivalent to \\“username”\Inbox\sales
excludeFolders Exchange folder paths to exclude from scanning. Follows the same syntax as scanFolderPaths above.
Example:
\\user\Inbox\Personal would exclude user’s personal mails stored in the Personal subfolder of the Inbox if used in conjunction with the above example for scanFolderPaths.
ignoredAttributesList A comma separated list of Exchange properties to be ignored by the scanner.
At least Body, HTMLBody, RTFBody, PermissionTemplateGuid should be always excluded as these significantly increase the size of the information retrieved from Exchange but don’t provide any information useful for migration purposes in return.
exportLocation* Folder path. The location where the exported object content should be temporary saved. It can be a local folder on the same machine with the Job Server or a shared folder on the network. This folder must exist prior to launching the scanner. The Jobserver must have write permissions for the folder. This path must be accessible by both scanner and importer so if they are running on different machines, it should be a shared folder.
exportMailAsMsg Boolean. If true, the emails will be exported as .msg files, otherwise they will be exported as .eml files.
numberOfThreads* Number. The number of concurrent threads that will be used for scanning the emails from the configured locations.
loggingLevel* See: Common Parameters.
Parameters marked with an asterisk (*) are mandatory.

