WebClient User Guide
Last updated
Last updated
The migration-center WebClient is a new component introduced in version 22.1.0 and serves to replace the Desktop Client in order to provide a better experience and add new features and improvements in the coming versions. It is delivered as a customized Tomcat that is installed as a windows service. The WebClient is currently compatible with Google Chrome and Microsoft Edge.
Scanner is the term used in migration-center for an input connector. It is used to read the data that needs processing into migration-center and is the first step in a migration project.
Importer is the term used for an output connector used as the last step of the migration process. It takes care of importing the objects processed in migration-center into the target system.
Scanners or importers have a unique name, a set of configuration parameters and an optional description. They work as a job that can be run at any time and can be executed repeatedly.
Scanners and importers are created, configured, started and monitored through migration-center WebClient but the corresponding processes are executed by migration-center Job Server.
For every run a detailed history and log file are created.
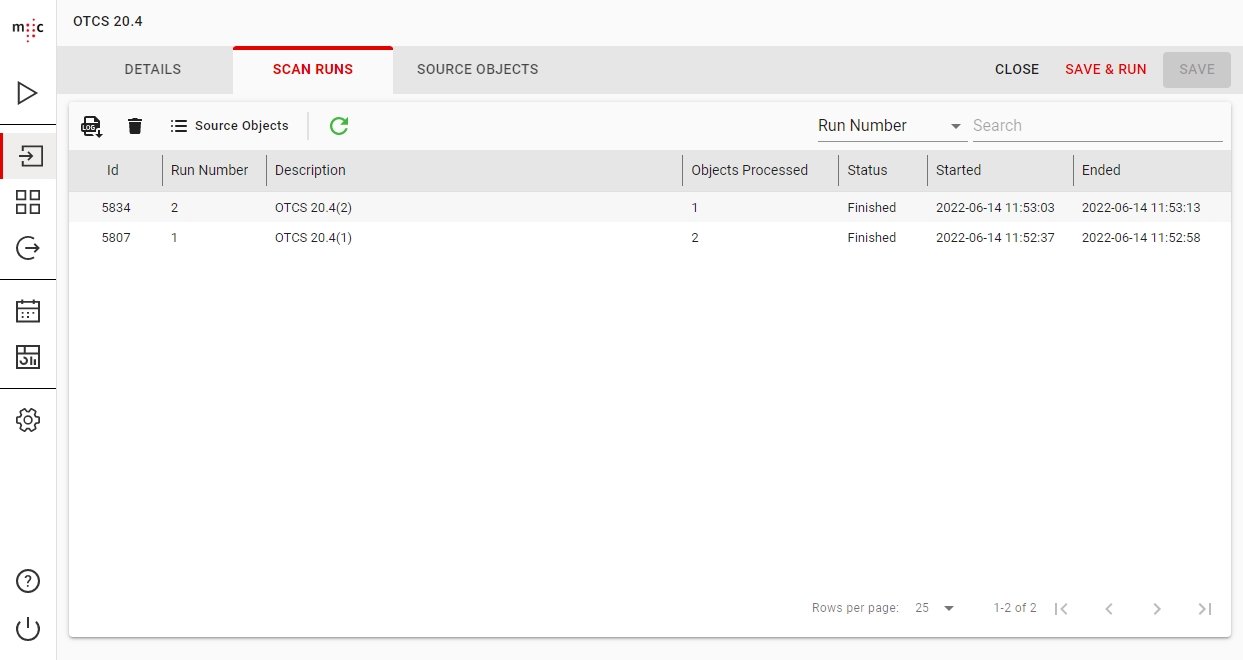
A complete history is available for any Scanner or Importer job from the Scan Runs / Import Runs window.
This section displays a list of all runs for the selected job together with additional information, such as the number of processed objects, the status, the start and ending time.
Version information of the migration-center Server Components the job was run with
The parameters the job was run with
Execution Summary that contains the total number of objects processed, the number of documents and folders scanned or imported, the count of warnings and errors that occurred during runtime.
The amount of information written to the log files depends on the setting specified in the ‘loggingLevel’ start parameter for the respective job.
The WebClient server is delivered with a self signed certificate for localhost. Because the certificate is self signed it is not recognized by the browser as a trusted certificate. Therefore, when accessing the WebClient on localhost the browser will show a disclaimer "Your connection is not private" so first time when accessing the webclient the user needs to confirm by clicking "Proceed to localhost(unsafe)".
To get rid of the "Not secure" warning in the browser any customer can generate a trusted certificate for the machine(s) where the WebClient. To publish the trusted certificate in the WebClient the following steps are required:
Copy the generated certificate (p12) in the conf folder.
Edit the conf\server.xml file with a text editor and change the keystoreFile and keystorePass to match the certificate file name and the certificate password.
3. Restart the WebClient service (Migration Center Web Client)
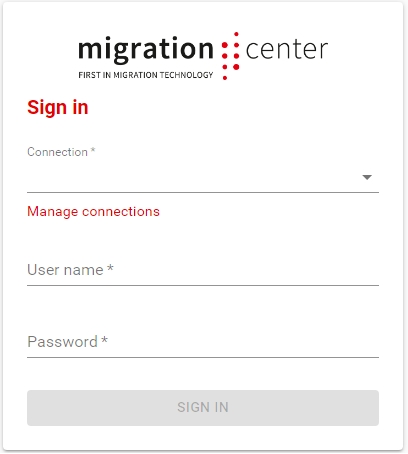
To connect to a migration-center database, open the WebClient URL address in the browser: https://<server-name>/mc-web-client/login
Connection Select one of the available connections to the server from the list. If no connections are available or if you want to modify an existing one, click Manage connections.
Manage connections You can create, modify and delete a connection and you can also refresh the list of existing connections.
To create a connection, click the Add Connection + button and then, in the New Database Connection dialog box, type your Connection Name, Database Type, Host, Port number and Service Name. When finished, click CREATE.
Return to the Sign in page either by double clicking the desired connection, by right-clicking the desired connection and selecting Log in using this connection or by clicking the Back < button on the buttons bar and then logging in.
User name Type your username (default fmemc).
Password Type your password (default migration123).
When finished, click SIGN IN.
If you are unable to sign in, a notification with the reason will be displayed in the bottom the the page.
You can easily navigate through the migration-center WebClient sections using the sidebar on the left, as follows:
Jobs
Start, stop or pause running jobs. This section also displays running scan and import jobs. Along with the description, the run number, start/end date.
Scanners
Create and configure scanners that connect to a source systems and extract documents and metadata as migration-center objects.
MigSets
Split the scanned objects into migration sets and define all the transformation rules and generate the target objects ready for import.
Importers
Create and configure importers that take migration sets with validated objects and imports them in a target system.
Schedulers
Create schedulers that run automated end to end migrations at regular intervals.
Dashboard
View graphs and analyze the status of the entire migration.
Configure
Create and manage Job Server definitions, Object Types and Mapping Lists. You can also renew your license and view information in the About section.
Help
Go to the documentation page relevant to the section you are currently in.
Log out
Disconnect from the current migration-center database.
To run a migration, first you need to create a Job Server definition. You can do so in the Jobservers section.
Then, you need to:
Additionally, you can:
If the Jobserver is restarted while a job is running or paused, the job run will still be marked as such in the database, but it will no longer exist in the Jobserver. To restart the job you just need to Stop it first and start it again from the WebClient.
You need to create, configure and run a scanner in order to connect to a source system.
You cannot delete a Scanner or a Scan Run if any objects belonging to it are assigned in a migset.
Deleting a Scanner will also delete and remove all its associated Source Objects from the migration-center database.
In the DETAILS tab, give your scanner a meaningful Name, then select the Type of connector from the list. Then, depending on the selected connector type, the Parameters section will be populated with the connector's specific configuration parameters.
Depending on the selected connector type, the actual parameters displayed will vary. For more information, consult the individual User Guide of the connector you are configuring.
Next, in the Location field, select the Job Server where your Scanner be executed when you run it. Optionally type a meaningful Description for your scanner.
When finished, click either:
SAVE - if you plan to run the scan later;
SAVE & RUN - to save and run the scanner immediately, in which case you will be prompted to enter a description for this run in the Enter Job Run Description dialog box. By default the run description is the name of the scanner and the number of which run it is.
To view the history of your scanner, click the SCAN RUNS tab of a scanner.
When you delete a scan run, all the objects belonging to that run will be deleted and removed from the migration-center database.
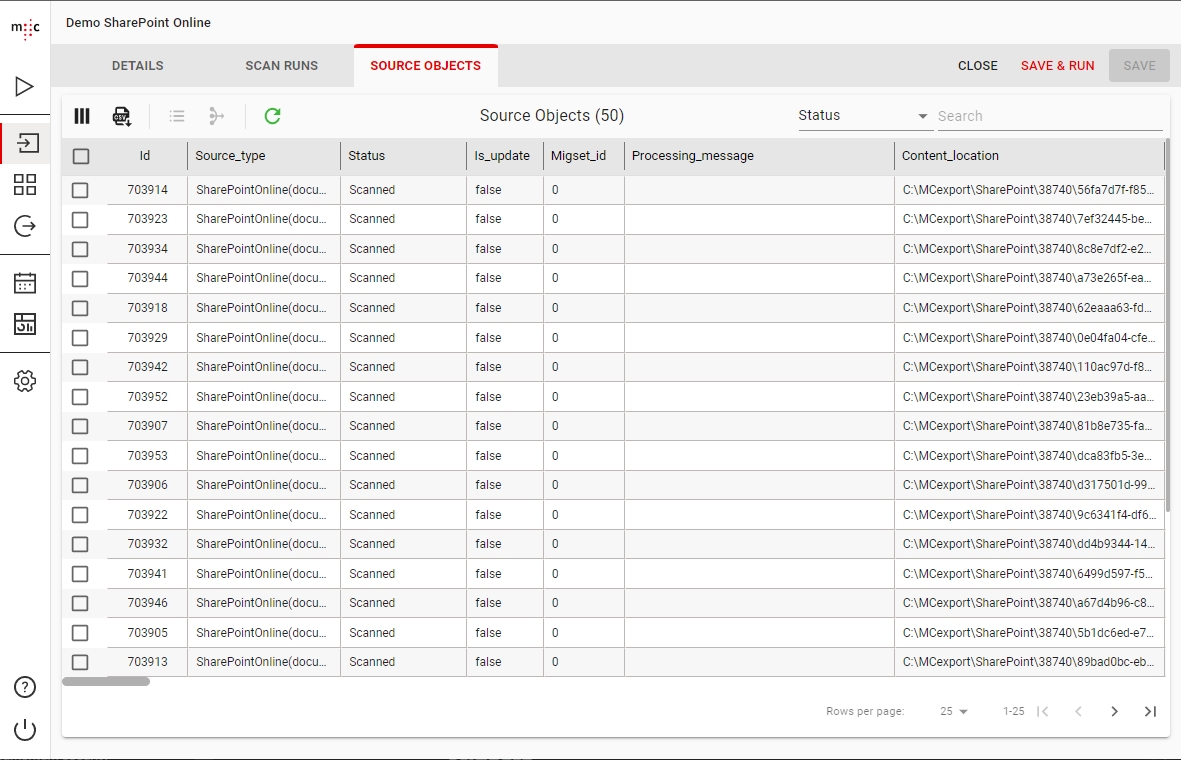
You can view the metadata of the extracted documents for the entire scanner by clicking the SOURCE OBJECTS tab.
The first columns from Id to Import date are internal migration-center columns and the rest represent an attribute from your source system.
You can change the number of rows on a page and navigate between pages using the bottom toolbar.
To Filter objects based on a specific attribute, use the dropdown to the right of the toolbar. This will enable you to select one of the attributes of your objects and then search for values in that attribute.
The Filter on the Object Tables is different than the ones in the main tables. Here the search is done in the database and it uses exact match.
You can use the following wildcards on the object table filters:
% (percent symbol) - match any number of characters
_ (underscore) - match a single character
A migration set, or migset for short, is a grouping of Source Objects on which a set of transformation rules are applied which generates Target Objects.
Source Object metadata is NOT modified during transformation. A copy of the objects is generate with the new metadata, called Target Objects.
Resetting imported objects will break the ability to do Delta Migrations for those objects in the future (scanning and importing updates to the already migrated objects).
Therefore this is NOT recommended unless you plan on deleting them from the Target System and re-importing them.
Transforming, Resetting and Splitting objects are processes triggered in the background and can take a longer time to complete, depending on the number and complexity of the transformation rules, the number of objects in the migset and the performance of the Database.
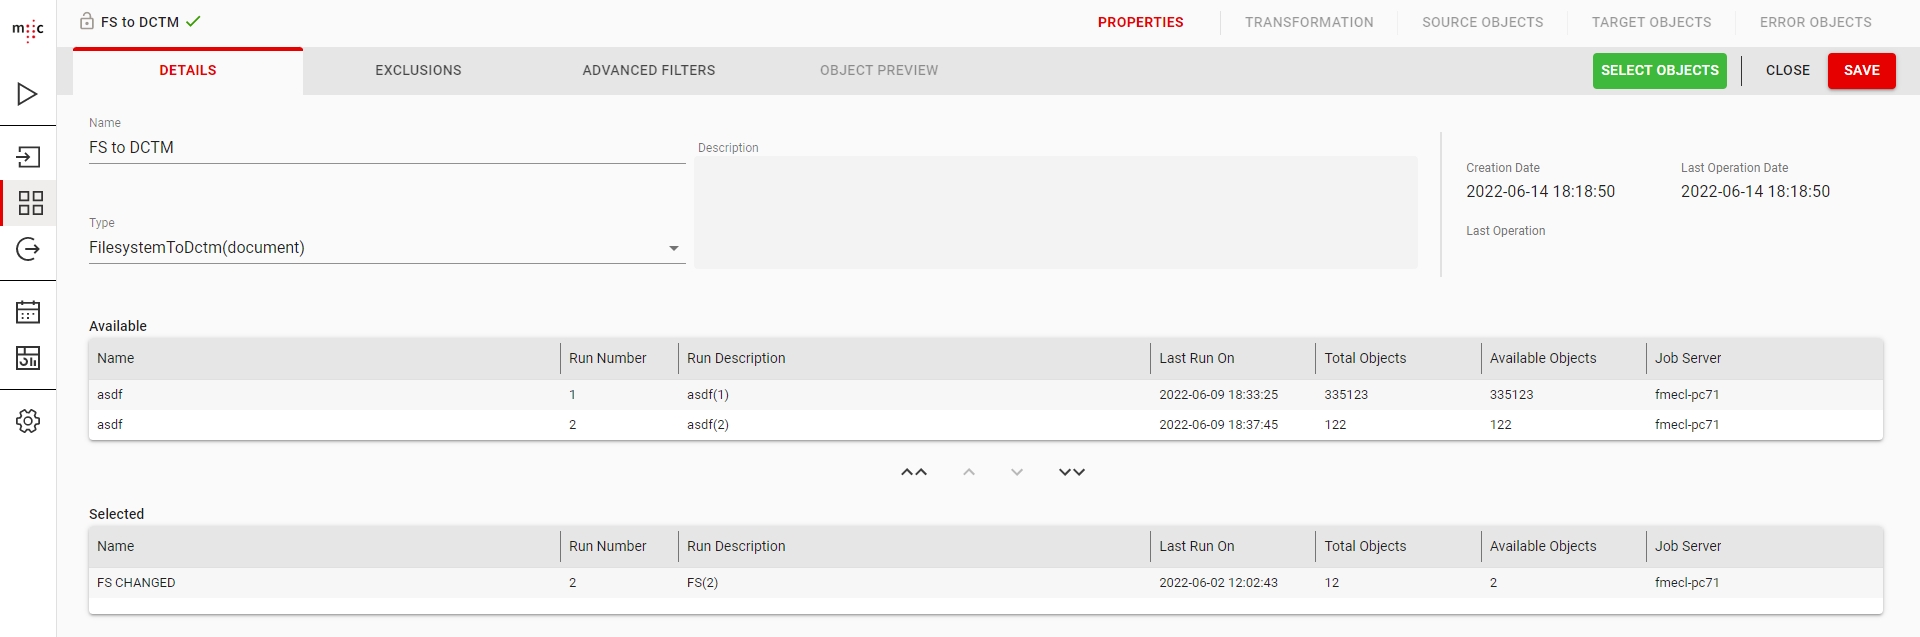
In the PROPERTIES tab, in the DETAILS subtab, give your MigSet a meaningful Name and optionally a Description.
In the Type dropdown, select the Source to Target system migset type (i.e. FileSystemToDCTM). Once selected, the list of all scan runs that match the Source part of the migset type are displayed under the Available list.
You can also filter which objects are included in the MigSet by using the EXCLUSIONS and the ADVANCED FILTERS subtabs.
You can only filter objects while objects are not currently selected in your migset.
In the EXCLUSIONS subtab, objects are excluded from your MigSet by choosing which attribute values should be excluded. To do so, select the desired attribute under Available attributes and use the < > arrow buttons to exclude the values.
In the ADVANCED FILTERS subtab, you can create rule based filters using operators. Select a Source Attribute, Operator, Values and Connector, the click on ADD to include them. You can also delete rule filters.
You can check your selection by going to the OBJECT PREVIEW subtab.
In the OBJECT PREVIEW subtab, you can see a preview of the filtered objects.
When finished, click the SELECT OBJECTS button to add the selected objects to your MigSet. This means that these objects will be locked in this migset and cannot be used in another one. Then, in the Confirm Object Selection dialog box, click Yes.
Object Selection is done in a background process and can take longer to complete depending on the number of objects being selected and the performance of the Database.
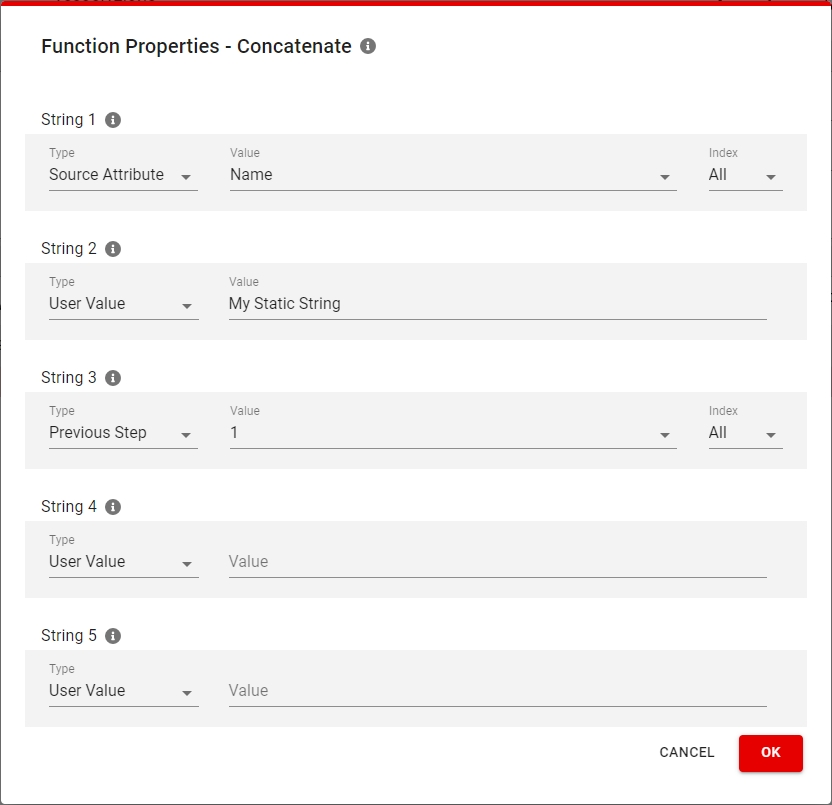
Transformation Rules define how metadata from Source Objects is used to generate new metadata for Target Objects by using Transformation Functions. A transformation rule is equivalent to a Target Attribute after transformation.
A transformation rule can have multiple transformation functions. They can take source attributes, static strings or even previous functions as the input value and provide an output value.
To add a Transformation Function:
Select the Transformation Rule you want to add a function to.
Under Transformation Methods, select the desired transformation Function you want to use and click on INSERT FUNCTION.
Fill the function parameters in the popup (the parameters vary depending on the function).
Click OK to insert the function or CANCEL to close the popup.
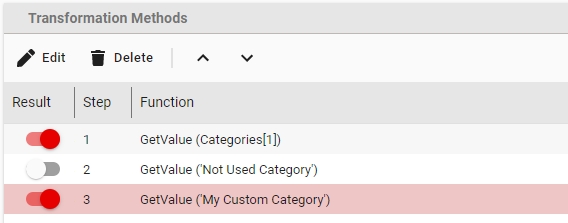
Multi-value Transformation Rules
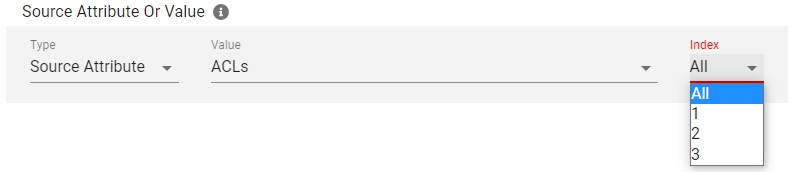
Attributes from a source object can be Single Value or Multi Value (Repeating). A Transformation Rule can process both these kinds of attributes, but if the rule itself is not marked as MultiValue using the checkbox in the Rule Properties it will return only the last processed value.
A transformation function can process All values or only the value at a specific index of a repeating attribute.
After making a Transformation Rule into a multi value one, you can also return multiple functions as separate repeating values using the Result toggle.
Generate Rules
Using the generate rules feature will delete any existing transformation rules and changes will be saved automatically after the confirmation dialog.
Other Features
Transformation functions reference
All standard transformation functions provided with migration-center are described below. Full context-sensitive information is also available in the WebClient when inserting or editing any transformation function.
Function
Description
CalculateNewDate
Computes a new date by adding Years, Months and Days to a valid source date. The Database’s Datetime pattern must be followed by the input value. Negative integer parameters are accepted.
Example: CalculateNewDate('01.01.2001 12:32:05', 1,2,3) returns '04.03.2002 12:32:05'
CalculateNewNumber
It adds or substract a number to another number. Decimal and negative numbers are allowed. If a provide value cannot be converted to a number then an error is reported during the transformation.
Ex: CalculateNewNumber(10, 5.2) returns 15.2
CalculateNewNumber(1000, -100) returns 900
Concatenate
Concatenate() concatenates up to three strings values into one and returns it as a single value Concatenate('AAA',' and ','BBB') returns "AAA and BBB".
IMPORTANT: The function returns only the first 4000 bytes of the resulted string since this is the maximum length allowed for an attribute value.
ConvertDateTimezones
Converts a given date from one timezone to another. The accepted timezones are the ones provided by Oracle, so you can see them with the following query:
SELECT DISTINCT tzname FROM v$timezone_names;
Count Values
Counts the number of values of a repeating attribute. If null or no values provided it returns 0.
GetDataFromSql
Map one or multiple source attributes with the data extracted from an external table. The external table must be located on the migration-center database in any schema that is accessible by FMEMC user.
The user FMEMC must have "select" permission on that table. The query must return a single column and must have at least one parameter and maximum 3 that will be replaced at runtime with the values of the parameter1, parameter2 and parameter3.
The parameter name in the query is any string the start with : (colon). The number of parameters in the query must match the number of parameters set in the function.
If the query returns multiple values the following behavior applies:
if the rule is single value only the first value returned by the query will be taken in consideration by the transformation engine.
if the rule is multivalue then all values returned by the query will be taken in consideration by the transformation engine. Nevertheless, to prevent loading millions of values in the database because of a wrong query, the number of values that can be returned by this function are limited to 10,000.
Example:
select user_id from mcextra.users_data where username = :username
Important Note: Since the SQL query is executed for each object in the migset, you should ensure that it is executed fast, i.e. the columns used in the where condition should be indexed.
GetDateFromString
GetDateFromString() extracts a date type expression from any string if it matches the date expression specified by the user.
Use this function to extract non-standard or partial dates from source attributes like a filename.
Example: GetDateFromString('filename 2007-Dec 14. 16:11','YYYY-
MON DD. HH24:MI') will identify and extract the non-standard date format contained within the input string
GetInternalAttributeValue
It is used to get the value of an internal attribute of the source objects. An internal attribute is a fix column, in the source objects view that is used internally by migration-center for different purposes. The available internal attributes that can be used with this function are: Id, Is_update, Content_location, Content_hash, Id_in_source_system, Parent_version_object_id, Level_in_version_tree, Scanned_date
The name of the internal attributes are not case sensitive.
If other internal attribute name is provided an error is reported during the transformation.
GetPathLevel
It can understand strings representing paths and can extract specific levels from that path. The path separator character, the path level to start from and the path level up to which the function should extract the subpath can be specified as input parameters. The function will also strip leading and ending path separators from the result.
Example: GetPathLevel('/this/is/the/folder/structure','/','2','4') will parse the input string looking for "/" as the path separator, and return path levels 2-4, i.e. "is/the/folder"
GetValue
It is used to migrate attributes where the attribute's value is not supposed to be changed or to generate and set user defined values which are not present in the source data and cannot or have not been generated by other transformation functions. The GetValue() function always returns the exact same value it gets as input without altering it in any way. Examples: GetValue('user') outputs the string value "user" for all objects to which the current rule applies GetValue(filename[1]) outputs the value of the source attribute filename for all objects to which the current rule applies. For each object, the value will vary according to the actual value from that objects' source attribute named filename.
GetValueAt
It gets the value at specific index from a multi-value attribute. Index counting starts with 1. If the provided index is out of range the function returns null.
Example: GetValuesAt('a,b,c', 2) reruns 'b' and GetValuesAt('a,b,c', 4) returns null.
GetValueIndex
Get the first index number of a given value for a multi-value attribute. If no value was found 0 is returned.
The parameter "ExactMatch" specifies if exact match will be used for comparing the values. Use '1' or 'T' for exact match and '0' or 'F' for "contains" search. In any case the search is case sensitive.
Example: GetValueIndex('abc,def,ghi', 'de', 'F') returns 0
GetValueIndex('abc,def,ghi', 'de', 'T') returns 2
GetValueIndex('abc,def,ghi', 'DE', 'T') returns 0
GetValueIndex('a,b,c,b','b' ', 'F') returns 2
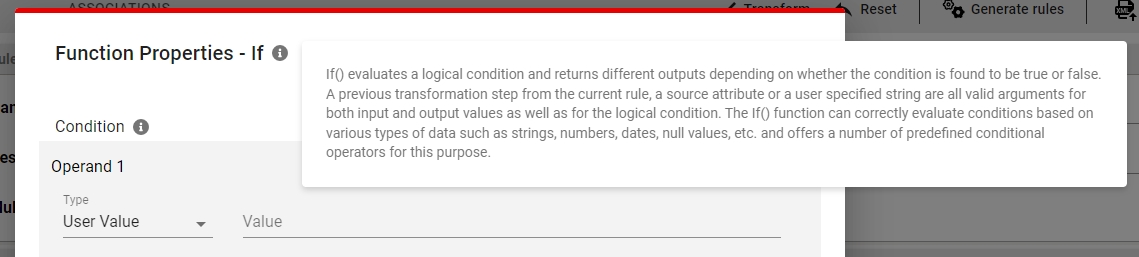
If
If() evaluates a logical condition and returns different outputs depending on whether the condition is found to be true or false.
A previous transformation step from the current rule, a source attribute or a user specified string are all valid arguments for both input and output values as well as for the logical condition.
The If() function can correctly evaluate conditions based on various types of data such as strings, numbers, dates, null values, etc. and offers a number of predefined conditional operators.
Length
Calculates the length of the string using Unicode characters.
Ltrim
The Ltrim function removes characters from the left of the given Source String, with all the leftmost characters that appear in the Characters to trim removed. The function begins scanning the Source String value from its first character and removes all characters that appear in the Characters to trim until reaching a character that is not in the trim expression and then returns the result. If second parameter is empty the leading spaces will be removed, i.e. Ltrim('babcde','ab') will remove the first 3 characters so the result will be 'cde'".
MapValue
MapValue() considers the input value a key, looks for a row with a matching key in a specified mapping list and returns the value corresponding to that key if a suitable match is found. Keys with no match can be reported as transformations errors (optional).
A mapping list must be defined before using a MapValue function. Mapping lists can be defined either on the Mapping lists tab in the Transformation Rules window of a migration set (case in which they would be available only to that particular migration set), or as a global mapping list (available to all migration sets) from the Manage menu in the main application window. Use the MapValue() function to define direct mappings of source attribute values to target attribute values based on simple key-value lists.
MultiColumnMapValue
MultiColumnMapValue() considers the input value a key, looks for a row with a matching key in a specified mapping list, and returns the value corresponding to that key if a match is found. Keys with no match will be assigned a null value, or they can be reported as transformations errors instead, forcing the user to take action with regard to such values. A mapping list must be defined before using a MultiColumnMapValue function. Mapping lists can be defined either on the Mapping lists tab in the Transformation Rules window of a migration set (case in which they would be available only to that particular migration set), or as a global mapping list (available to all migration sets) from the Manage menu in the main application window. Use the MultiColumnMapValue() functions to define direct mappings of source attribute values to target attribute values based on simple key-value lists.
Multivalue_RemoveDuplicates
Remove duplicates from a multivalue attribute. To use this function in a rule, the rule must be a multi-value rule. If the input values are a,b,b,c,a the result will be a,b,c.
MultiValue_ReplaceNulls
MultiValue_ReplaceNulls() can replace null values in a multi-value attribute with another, user defined value. The function can also remove null values from a multi-value attribute if no replacement string is defined. To use this function in a rule, the rule must be a multi-value rule. Examples: MultiValue_ReplaceNulls(multi_value_input[all],'default') will replace all null values from the multi-value source attribute named "multi_value_input" with "default" MultiValue_ReplaceNulls(multi_value_input[all],'') will remove all null values from the multi-value source_attribute named "multi_value_input", thereby reducing the total number of values for the multi-value attribute.
RemoveDuplicates
Provided for removing duplicates from a given string.
Example:
RemoveDuplicates('DE|RO|IT|DE|P','|') will remove duplicates form the first string by using the delimiter ‘|’ so it will return "DE|RO|IT|P.
The function can be used in combination with RepeatingToSingleValue and SingleToRepeatingValues for removing duplicated values from a repeating source attribute.
Example:
#1 RepeatingToSingleValue (countries[all], ‘|’)
#2 RemoveDuplicates(#1, ‘|’)
#3 SingleToRepeatingValues(#2,’|’)
RepeatingToSingleValue
RepeatingToSingleValue() concatenates all values of the source string value into one single string.
Optional parameters include the delimiter to be used (can be zero, one or multiple characters), the range of values which should be concatenated and a replacement string to be used in place of any NULL values the source may contain.
It is recommended to use a multi-value (repeating) attribute or previous step as source for this function
Example:
SingleToRepeatingValues(keywords[all],'|') will return value1|value2|value3.
SingleToRepeatingValues(keywords[all],'|', 2, 3) will return value2|value3.
IMPORTANT: The function returns only the first 4000 bytes of the resulted string since this is the maximum length allowed for an attribute value.
ReplaceStringRegex
ReplaceStringRegex() Replaces the parts of the input value that match the regular expression specified by the user with a user defined value Example: ReplaceStringRegex('AAAAA-CX-9234-BBBBB','\w{2}-\d{4}','AB-0000') will parse the input string looking for a match; according to the regex this would be a sequence of 2 letters followed by a dash and four numbers. Since the input does contain a matching part, it will be replaced with "AB-0000", and the final output of the function will be "AAAAA-AB-0000-BBBBB"
Rtrim
The Rtrim function removes characters from the right of the given Source String, with all the rightmost characters that appear in the Characters to trim removed. The function begins scanning the Source String value from its last character and removes all characters that appear in the Characters to trim until reaching a character that is not in the trim expression and then returns the result. If second parameter is empty the trailing spaces will be removed, i.e. Rtrim('cdebab','ab') will remove the last 3 characters so the result will be 'cde'.
SingleToRepeatingValues
SingleToRepeatingValues() separates a string value based on a user specified separator character and returns all resulting values as a multi-value result Use this function to transform a string of comma separated values into a multi-value attribute with multiple individual values. To use this function in a rule, the rule must be a multi-value rule Example: SingleToRepeatingValues(comma_separated[all],',') will parse the source attribute named "comma_separated" looking for commas (","), strip the commas and create a multi-value list from the resulting values.
SplitStringRegex
SplitStringRegex() is an advanced function for splitting up a string value by specifying the separator as a regular expression rather than a single character (the regex can represent a single character as well). Depending on the number of matches for the specified separator, multiple substrings can result from the function; which one of the resulting substrings the function should return can also be specified by the user.
Example: SplitStringRegex('one-(two)-three','(-\()|(\)-)','2') will split the string into substrings based on the separators described by the regex and return the second substring which is "two"
SubStringRegex
SubstringRegex() is an advanced transformation function for extracting a substring from the input value. A regular expression can be used to extract a complex substring from the input string, such as a particular name, a formatted number sequence, a custom date expression, an email address, etc. SubstringRegex('0123abc 4567 ',' \d{4} ') will return " 4567 " according to the regex defining the substring.
Substring
Substring() returns part of the input string. Which part of the string should be returned can be specified as a number of characters starting from a given index within the input string.
Example: Substring('teststring','3','5') returns 5 characters starting with the 3rd character, which is "ststr"
Sysdate
Sysdate() outputs the current system date as a value. Use this function to track the date when a document underwent transformation in migration-center. This function does not have any properties.
ToLowerCase
ToLowercase() transforms all characters from the input string value to lowercase characters
ToUpperCase
ToUpperCase() transforms all characters from the input string value to uppercase characters
Other Features
You can also Transform or Reset the objects of this migset without returning to the list of migsets.
Kown issue: If you import new rules into a Migset that already has transformed objects, the attribute names and values will not be displayed correctly in the Objects views.
You need to reset and transform the objects again to get the new metadata displayed correctly.
The migset mapping lists function in the same way as regular mapping lists except they are usable only in the migset they belong to.
Fore more details please see the main Mapping Lists section.
Transformation Rules are not automatically used when importing an object. They need to be associated to a Target Attribute of an Object Type in the Associations subtab of the migset.
See Object Types for more information.
Each Migset has a target type system rule that determines to which type an object will be associated with. This rule differs depending on the migset type. For example for any ...ToDCTM migset the rule is r_object_type.
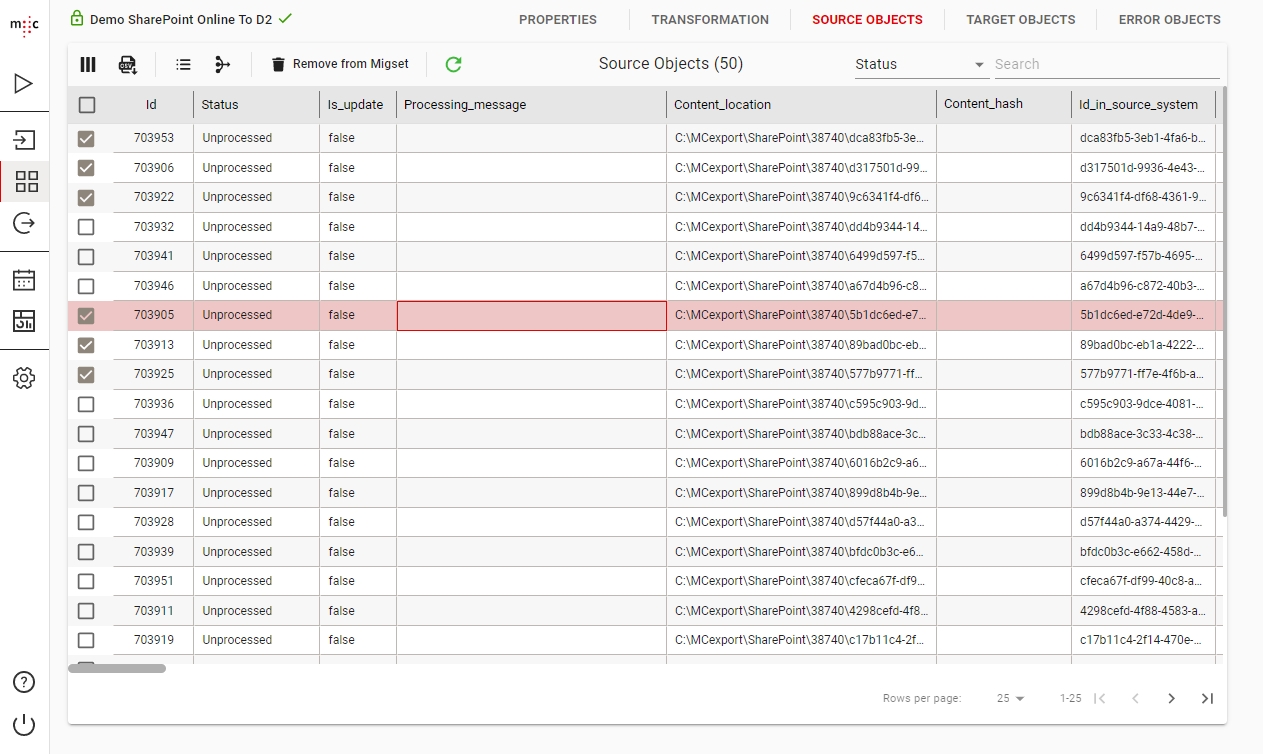
You can view the source attributes of the objects in the MigSet by clicking the SOURCE OBJECTS tab.
The first columns from Id to Import date are internal migration-center columns and the rest represent an attribute from your source system.
You can change the number of rows on a page and navigate between pages using the bottom toolbar.
To Filter objects based on a specific attribute, use the dropdown to the right of the toolbar. This will enable you to select one of the attributes of your objects and then search for values in that attribute.
The Filter on the Object Tables is different than the ones in the main tables. Here the search is done in the database and it uses exact match.
You can use the following wildcards on the object table filters:
% (percent symbol) - match any number of characters
_ (underscore) - match a single character
Objects removed from a MigSet are still present in their Scanner and can be selected in other MigSets.
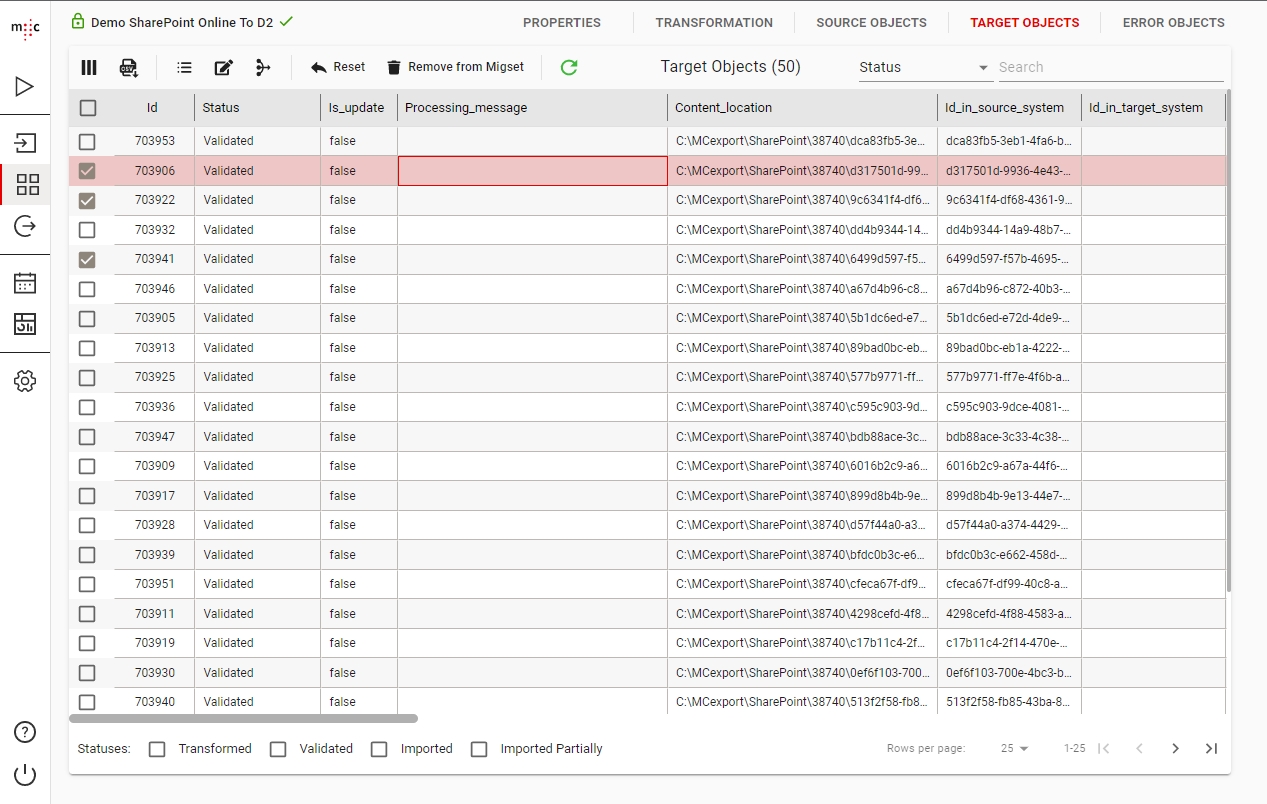
You can view the attributes generated by the transformation rules of the objects in the Migset by clicking the TARGET OBJECTS tab.
Please see the Source Objects section for features common to all Objects Views, including Target Objects.
After manually editing an object, the object will be set to the Transformed state. In order to have the object Validated you need to run transformation again on the MigSet. This will not affect your manual changes and will validate the edited objects.
To Filter objects based on their status, use the Statuses checkboxes in the bottom toolbar.
You can view the objects that encountered errors during the Transform, Validate or Import phases in the MigSet by clicking the ERROR OBJECTS tab.
The Error Objects tab has features present in the Source Objects and Target Objects tab.
Importers will connect to the Target System, take the selected MigSet with Validated Objects and import them. You can monitor the progress in the Importer run history or directly in the MigSets view.
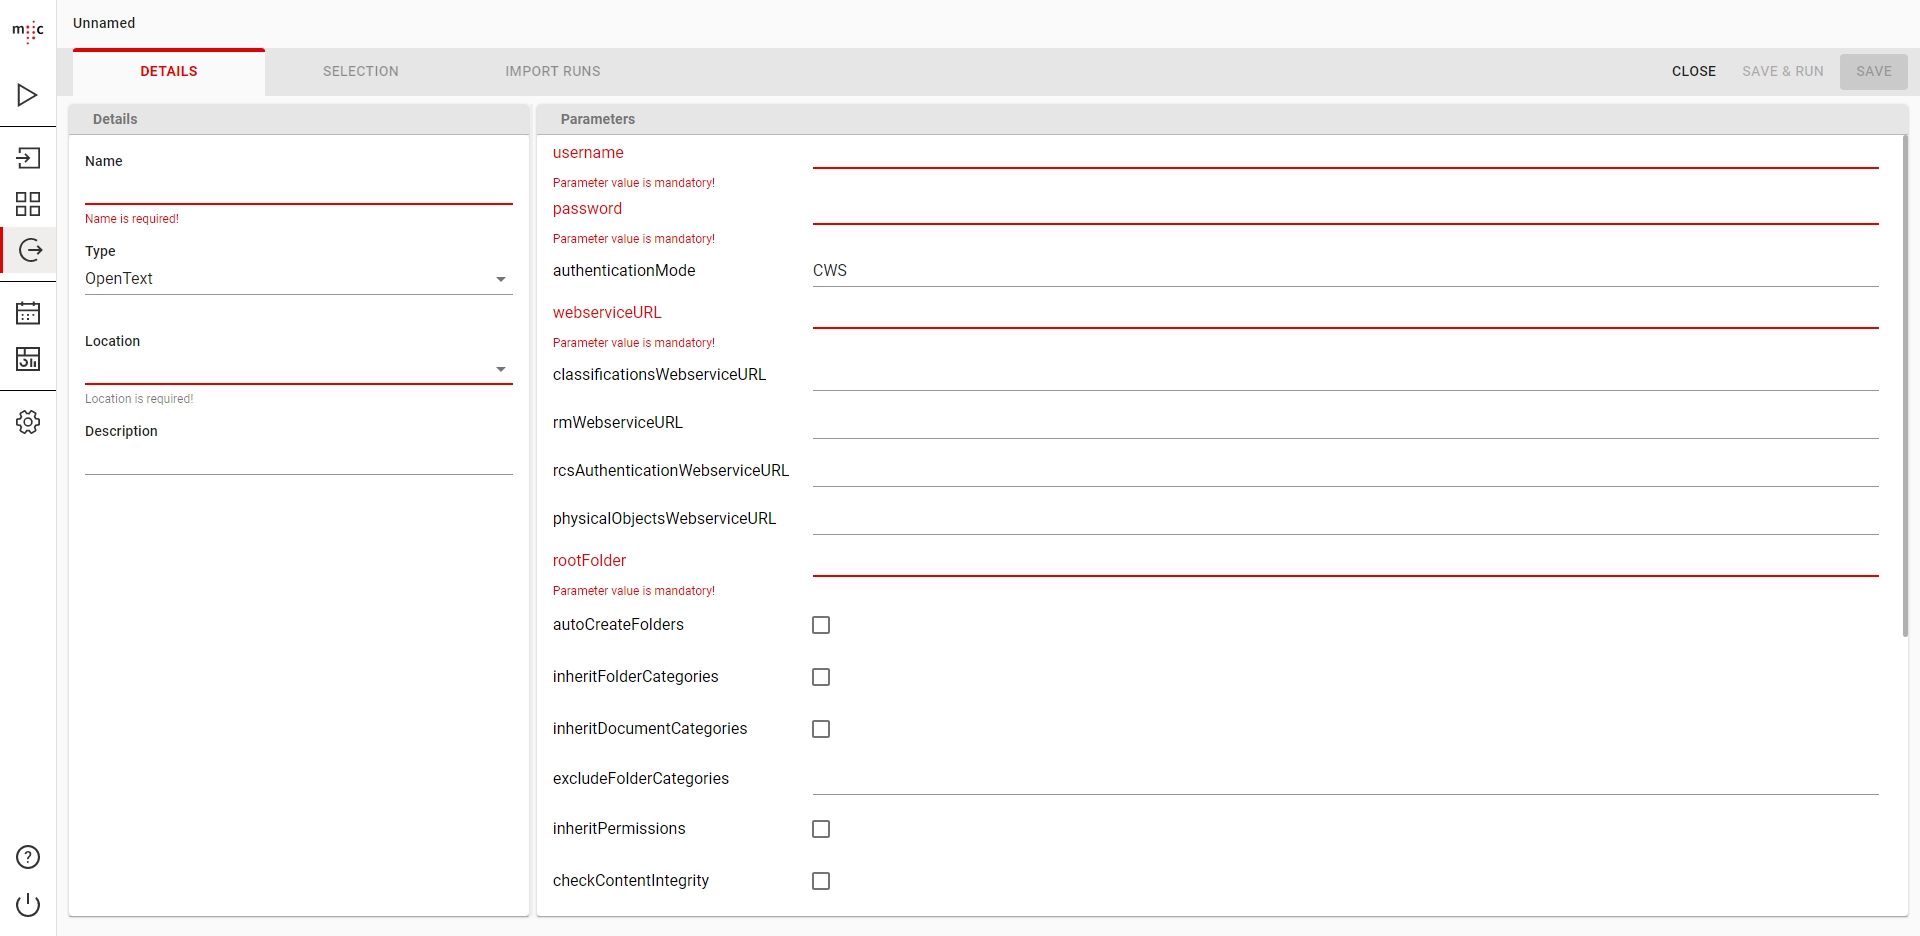
In the DETAILS tab, give your Importer a meaningful Name, type or select the Importer Type from the list and complete the needed Parameters.
Depending on the selected importer type, the actual parameters displayed will vary. For more information, consult the individual User Guide of the connector you are configuring
Next, in the Location field, select the Job Server where your Importer be executed when you run it. Optionally type a meaningful Description for your scanner.
In the SELECTION tab, under AVAILABLE MIGSETS you can see MigSets with validated objects that match your target destination: for example, for an OpenText importer, only MigSets with the type ...ToOpenText will be displayed. Double-click the desired MigSet to add it to the ASSIGNED MIGSETS list to be migrated. Note that only validated objects or error objects that previously failed an import will be processed.
When finished, click either:
SAVE - if you plan to run the import later;
SAVE & RUN - to save and run the import immediately, in which case you will be prompted to enter a description for this run in the Enter Job Run Description dialog box. By default the run description is the name of the importer and the number of which run it is.
To view the history of your importer, click the IMPORT RUNS tab of an importer.
Delta Migration is a feature of migration-center that allows you to migrate updates made to documents that have already been scanned and newly created documents that were not scanned yet.
This feature is possible using most available connectors.
Check the user guide for your connector to confirm if it is capable of delta migration and to see if there are any pre-requisites or limitations.
You need to have the initial batch of objects scanned, transformed and imported successfully. In the target system the imported objects need to be present.
The original MigSet/s must not be changed by resetting or deselecting the objects or by deleting the MigSet. If this happens, update objects cannot be imported.
You can start a delta migration by running either the same original scanner or any scanner that will pick up already scanned objects. If these objects have been modified since the original scan, they will be scanned again as an update object, otherwise they will be ignored. New objects, that were not scanned before will be scanned normally.
Update objects can be identified by having the is_update attribute value set to 1 or True.
Please check the configuration for your scanner for any update specific options
Since the original MigSet needs to be left untouched with all objects intact, and the delta migset needs the same rules, the best way to do this is to create a copy of the original migset.
Transform the migset used for the Delta Migration, as you would normally.
The Delta MigSet can be selected in the same Importer used for the original import, or in any other importer as required.
The Delta Import will create all new objects normally and it will locate already imported objects in the target system and update their metadata and content as needed.
The Scheduler feature only works with migration-center running on an Oracle database.
A Scheduler is used to automate an end to end migration and is useful when needing to make regular delta scans and imports for a Source System that changes often.
The workflow of a Scheduler is as follows:
It will run the selected Scanner
If there are objects in the Scan Run, it will create a copy of the selected Migset, assign the Scan Run to it and Transform the objects
If there are Validated Objects after the transformation, it will assign the migset to the Importer and run it.
If Email Report is set it will send the email as configured, when the import ends.
To run a Scheduler the Database Server also needs to access the Jobserver configured for the Scanner and Importer on the selected Port. The reason being that the Oracle Database will start the jobs directly.
In the CONFIGURATION tab, configure the Details of your scanner, such as Name, Description and whether you want to set the scheduler to Active.
Next, select the Scanner, MigSet and Importer by clicking the respective buttons. The list of Migsets will be filtered to match the selected Scanner type and the list of Importers will be filtered to match the selected Migset type.
In the FREQUENCY tab, configure the Start Date when this scheduler will be running from and either the End Date or the number of runs after which it will stop.
In the Interval section configure a timeslot and the Frequency at which the Scheduler will start.
In the Email Report section you can set an Email Address where the scheduler will send reports and whether you want the report send in case of Success or in case of Error. You also need to have an SMTP Server to use for sending the email reports.
In the IMPORTED OBJECTS tab, you can see the list of objects imported by your scheduler.
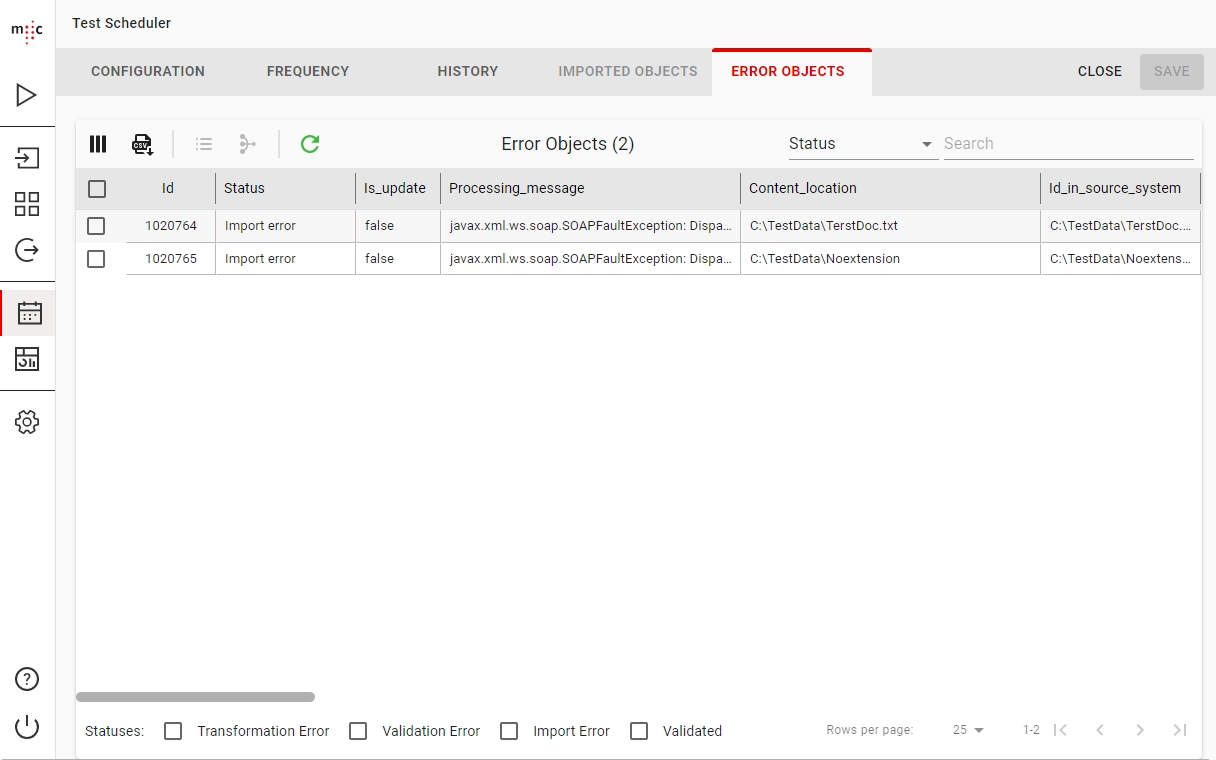
In the ERROR OBJECTS tab, you can see the list of errors that may have occurred during the scheduled migration. When finished, click Save on the top right corner.
In the HISTORY tab, you can see all the runs of the selected Scheduler.
To view the Imported Objects or Error Objects, select a run and click on their respective icons.
Here you can view the list of Imported Objects for the selected Scheduler Run.
The Imported Objects view features are common among the other Object Views. Please see Source Objects for details.
Here you can view the list of Error Objects for the selected Scheduler Run.
The Error Objects view features are common among the other Object Views. Please see Source Objects for details.
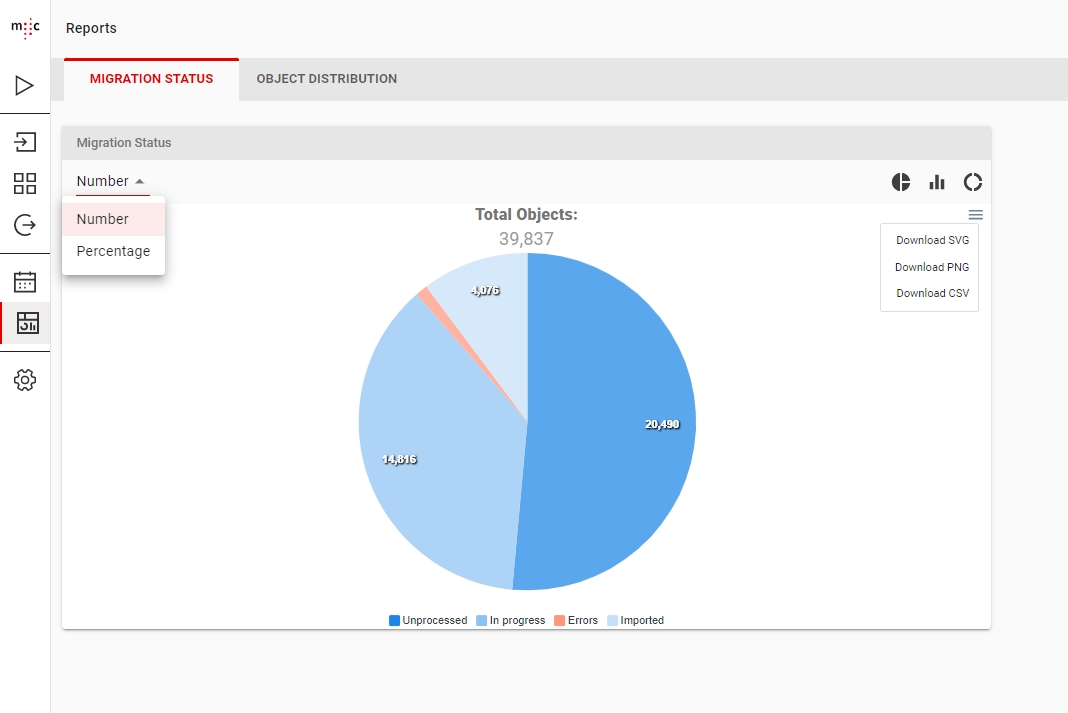
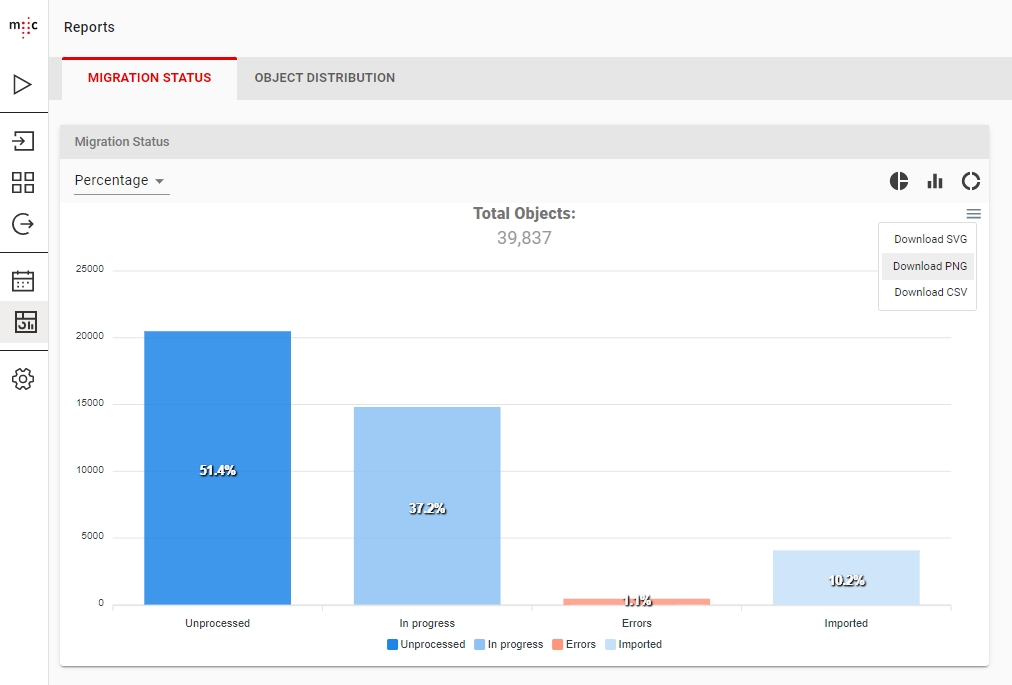
The Migration Status tab of the Dashboard presents the total number of objects in your Database, divided between the 4 states: Unprocessed, In Progress, Errors and Imported.
From the dropdown menu on the left you can chose to display Numbers or Percentages on your graph.
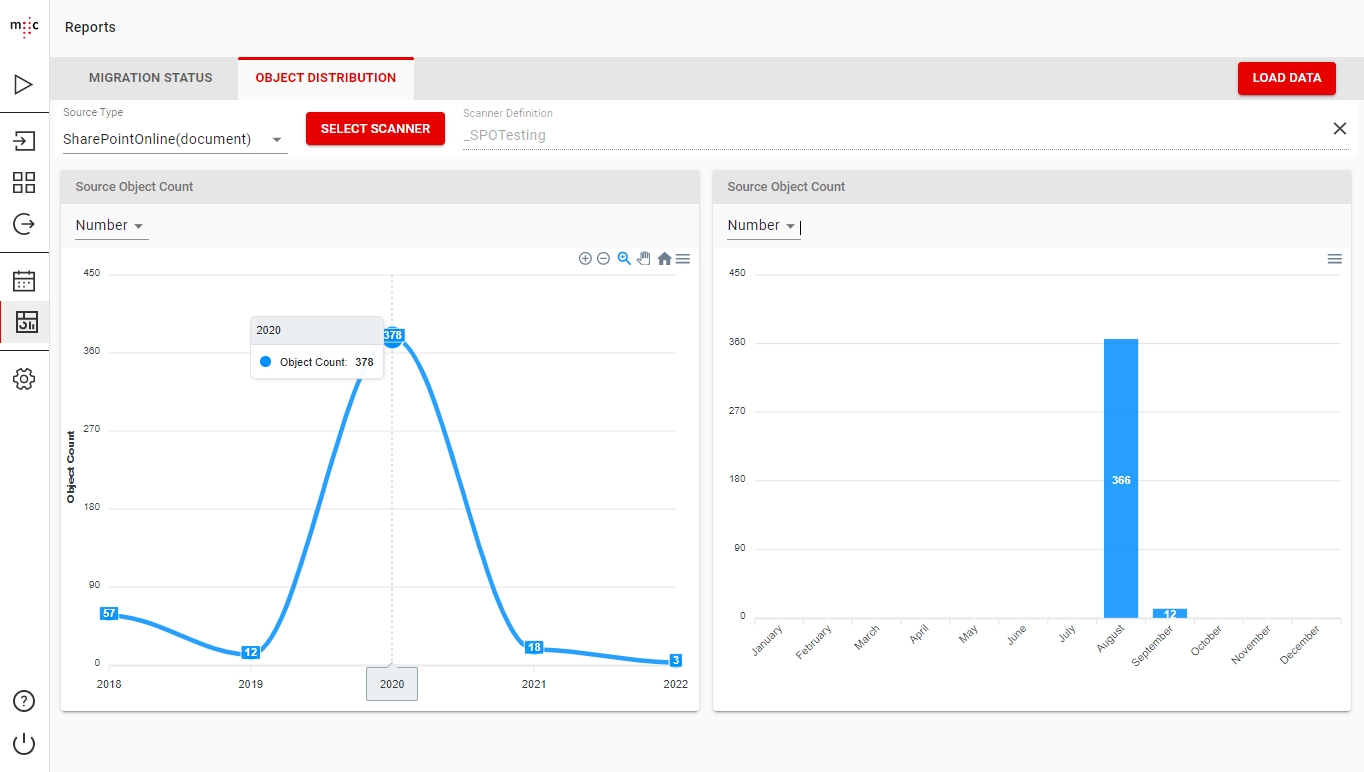
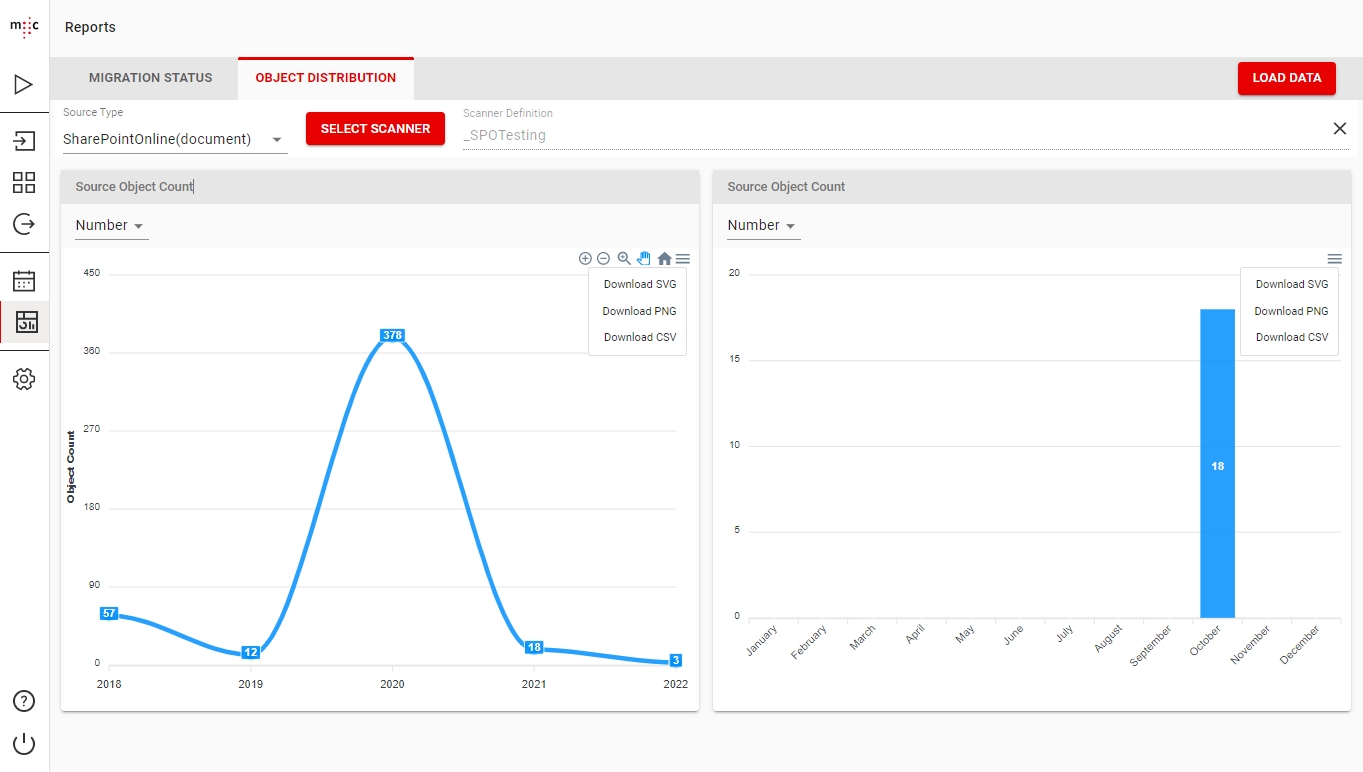
The Object Distribution tab provides more detailed reporting for specific source object types or specific Scanners.
The chart on the left shows the scanned object distribution yearly, while the chart on the right shows the scanned objects distribution monthly for a selected year.
To load all data of a source object type, first selected the required type from the Source Type dropdown and then press Load Data.
To load the data of a specific scanner, after selecting the required Source Type, press the Select Scanner button.
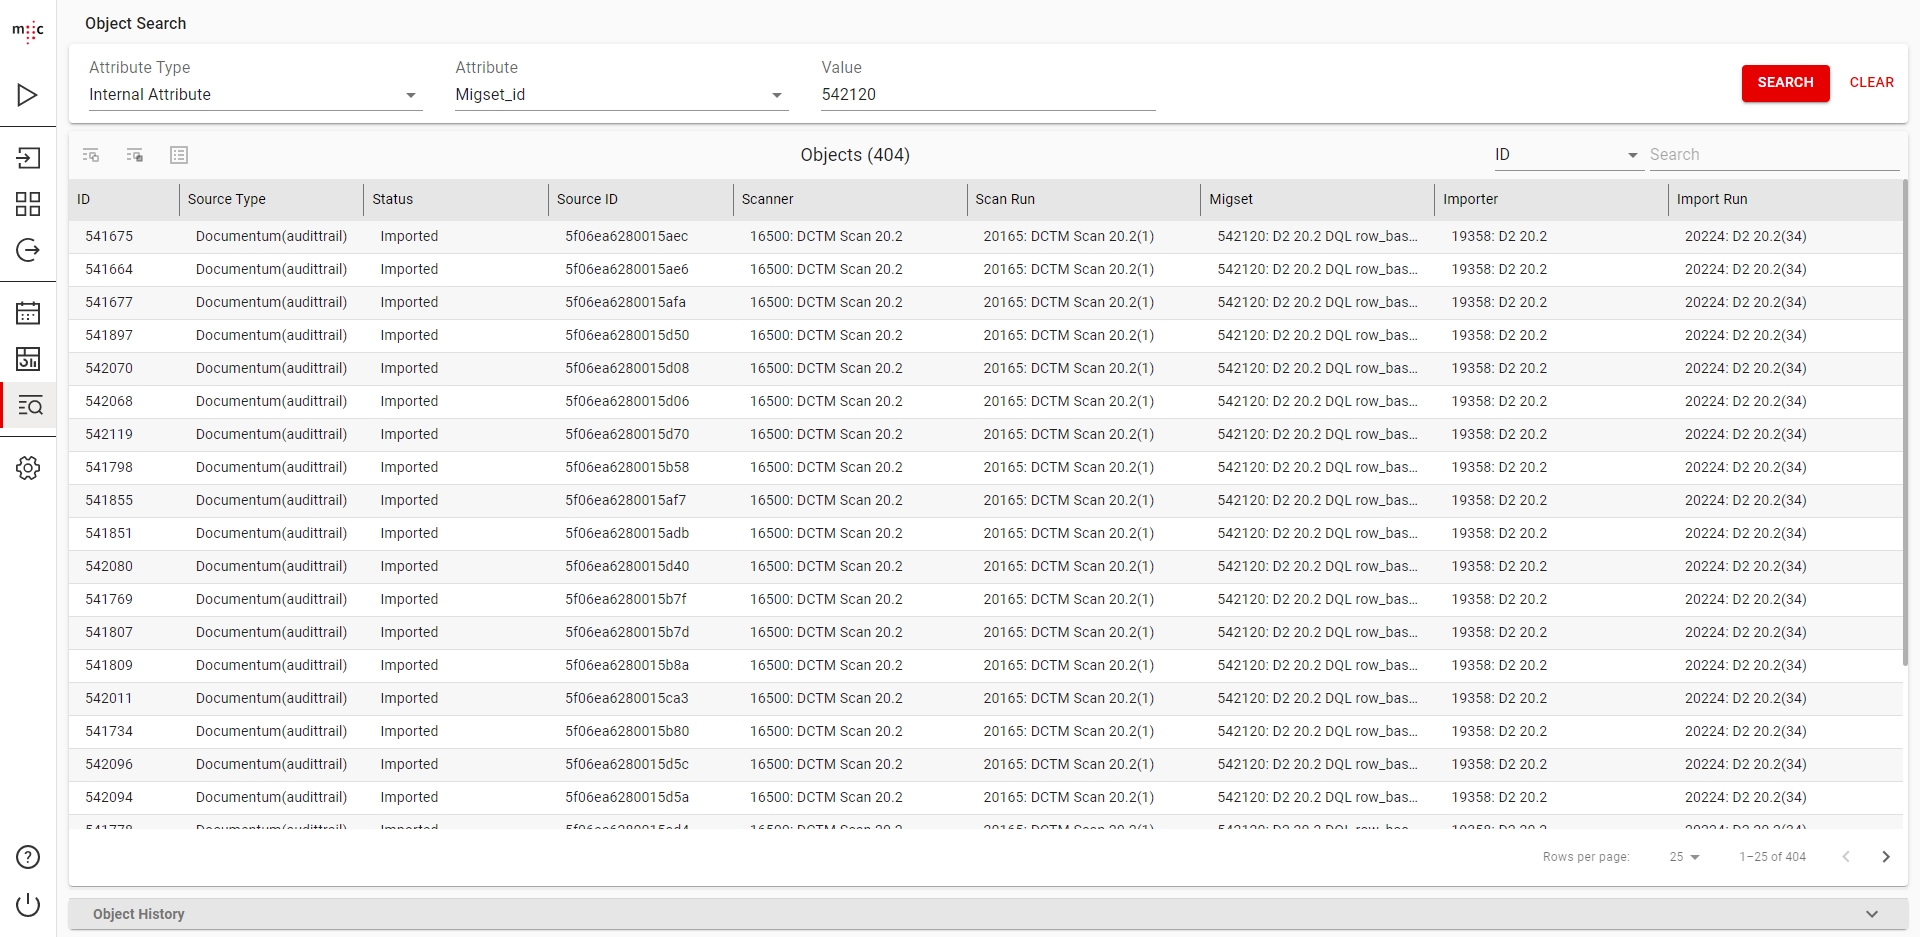
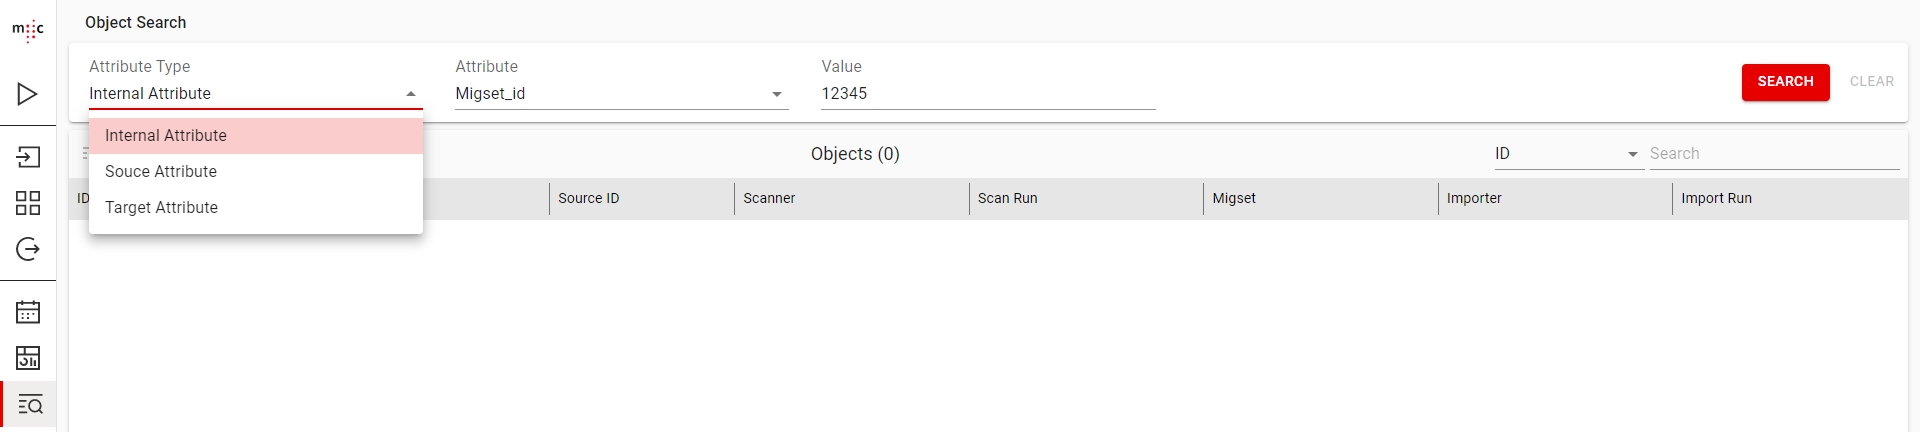
You can search for any Source / Target Object in the Object Search section using values of Internal, Source or Target attributes.
When searching by Internal Attributes, you can select the Attribute name from a dropdown of predefined attributes. Afterwards enter the Value by which you want to search.
When searching by either Source Attributes or Target Attribtues you have to manually enter the Attribute Name. Afterwards enter the Value by which you want to search.
When searching by Target Attributes, you can only use the Target Object Type Name that a rule is associated to. You cannot seach by rules that are not associated to any target object.
Start the search by clicking the Search button.
Stop the search by clicking the Cancel button that appears when a search is in progress.
All searches are run in the background. You can leave the Object Search section after starting a search and return to at a later time to check if it's finished.
When a search query finishes, results start loading in the Objects table.
You can nagivate to each of the Scanner, Scan Run, Migset, Importer and Import Run configurations that the object is contained in, by clicking on the ID value in the row of the object.
When viewing Target Attributes, only the ones that are associated to a Target Object Type will show up. To view all migset target attributes, go to the migset the object is in.
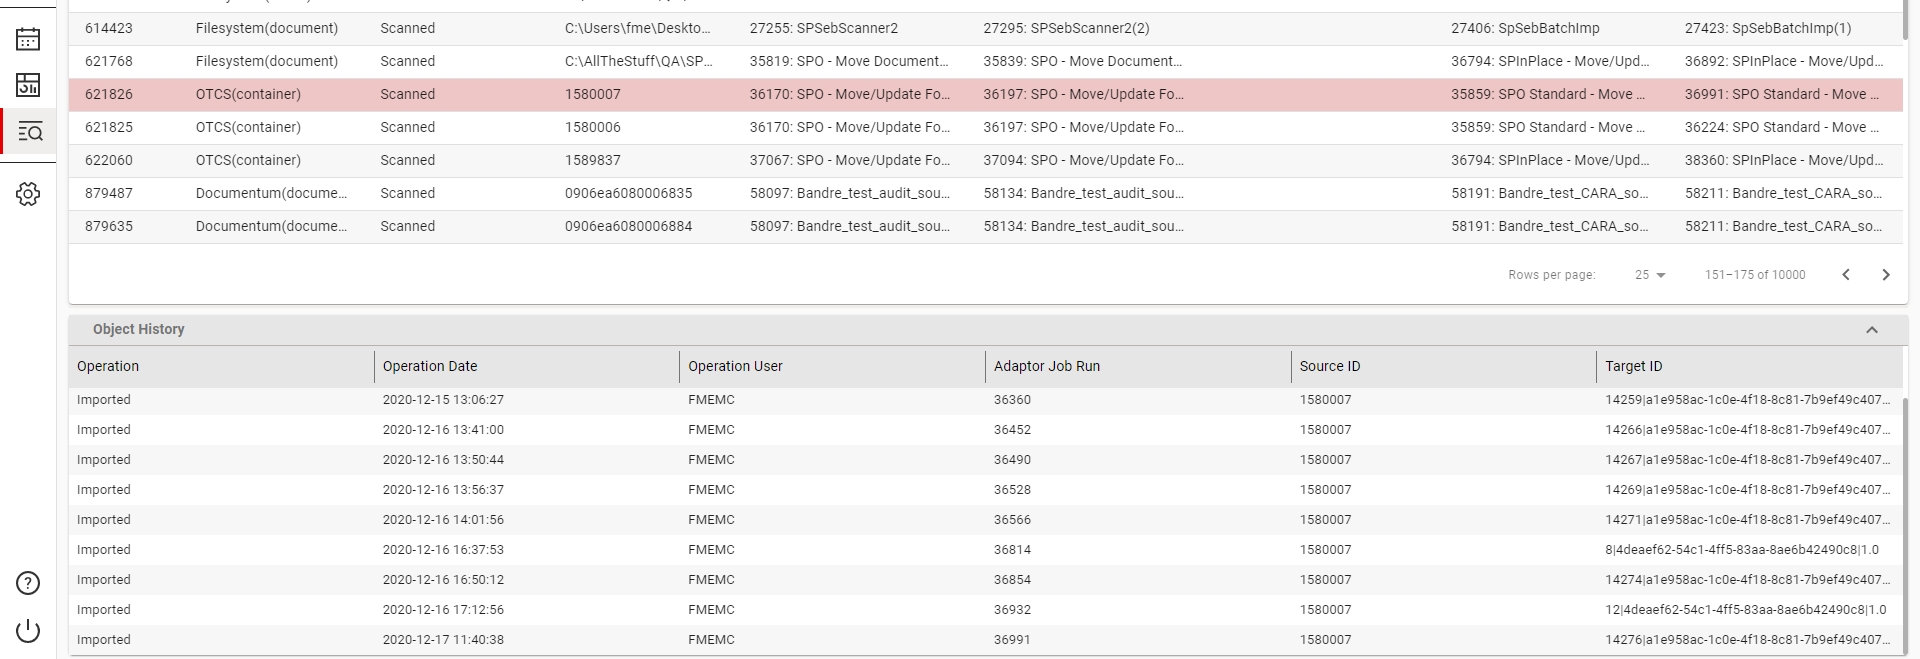
The Object History view is a list of all Scan or Import operations that an object has gone through, along with the the Job Run ID, Source ID and Target ID.
To open the view click on the collapsed header on the bottom of the screen. You can also resize it by dragging the space between the two tables.
To load the history of a specific object just select it in the results table.
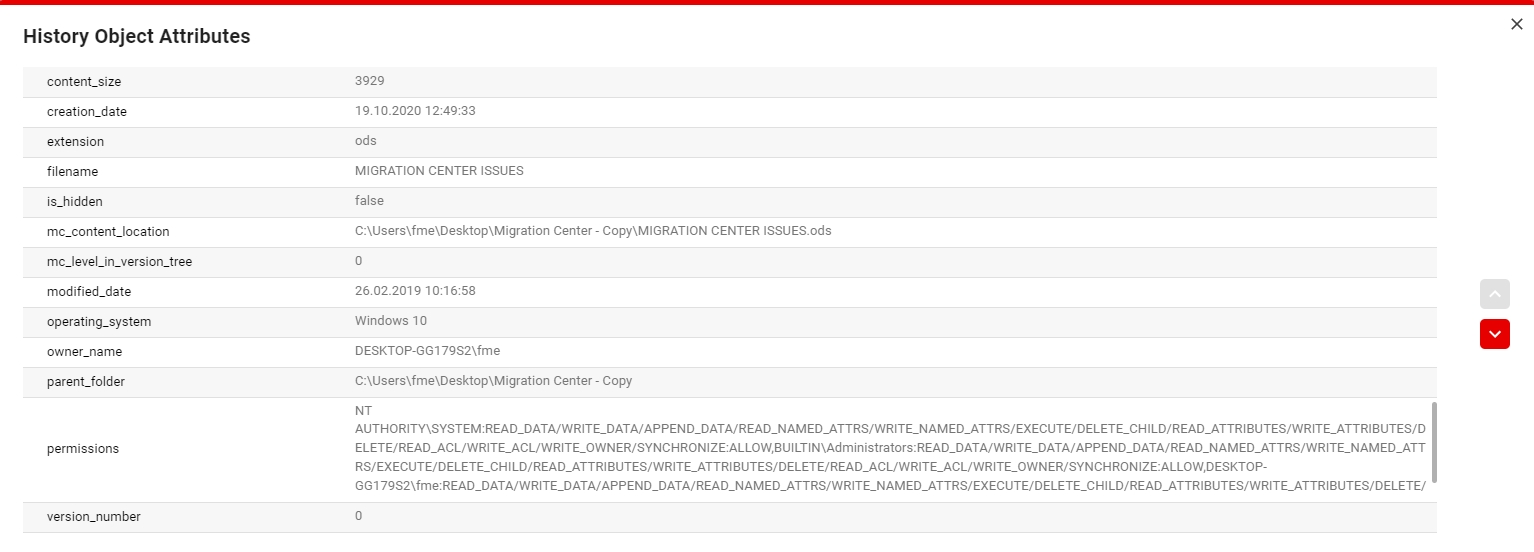
To view the History Attributes of a specific operation right click it and select the View History Attributes entry in the context menu. These attributes will be either Source or Target depending on the type of the operation.
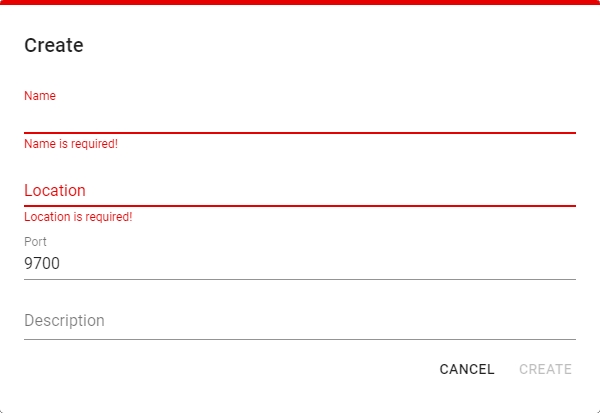
A Job Server definition is needed to run jobs like scanning or importing documents.
Enter a Name, Location (where a Job Server is installed), Port (9700 by default) and a Description (optional) for your Job Server definition. When finished, click CREATE.
Object Types in migration-center are a representation of a document or other objects in a Target System where you are importing. They are used in the Associations section of a migset and any object needs to be associated to at lest one Object Type to be able to Transform, Validate and Import it.
Object Types currently used in MigSets cannot be deleted.
Only CSV files using comma "," as separator are supported. See the CSV "RFC 4180" specification.
The attributes of an object type need to match the attributes or fields in the target system in Name and Type. If the attributes do not accurately represent the target system this can result in object values passing validation and causing errors during the Import phase.
A Mapping List is a collection of key - value pairs that can be used in Transformation Rules using the MapValue() function.
Checking Exact Match makes the mapping list match key values only if they are exactly the same.
Using Exact Match unchecked will result in the mapValue and mutliColumnMapValue functions to match source strings that contain the key in the mapping list as a substring.
i.e. source string "My key here" in a mapValue function will match a key in the mapping list with the value "key".
Partial matches do not work the other way around. A source string "sample" in a mapValue function will not match a mapping list key with the value "Test sample 1".
Checking Case Sensitive makes the mapping list match key values only if the case matches. Otherwise matches will be made regardless of case.
Only CSV files using comma "," as separator are supported. See the CSV "RFC 4180" specification.
The Multi Column Mapping List is a new feature usable only with the migration-center WebClient.
To use a regular Mapping List, in the transformation rule select the MapValue() function. Set the value to be matched with the values in the Key column, select the Mapping List you want to use and whether or not you want the function to report a transformation error when a value is not matched.
To use a Multi Column Mapping List, in the transformation rule select the MultiColumnMapValue() function. Set the first parameters as you would for a regular mapping list and also specify the name of which Value column you want the function to return when finding a match.
Here you can enter a new License key for the migration-center database installation you are currently connected to.
After upgrading the migration-center database to a newer version, changing the license key is not mandatory.
Entering a license key with different migration paths, will NOT update the list of available Connector or Migset types.
The About section provide information on your current installation as follows:
Version of migration-center components: UI version, API version and Database version.
The Java version that is running the WebClient Apache Tomcat.
The Oracle version of the migration-center Database that you are currently connected to.
Licence Information: Licensed to and Licence validity.
Double clicking an entry or clicking the Logs icon on the toolbar opens the log file created by that run. The log file contains more information about the run of the selected job:
To modify an existing connection, select the desired connection, click the Edit Connection button and modify the Connection Name, Database Type, Host, Port number and Service Name accordingly. When finished, click Save.
To delete a connection, select the desired connection, click the Delete Connection button and then, in the confirmation message, click DELETE.
To log out of migration-center WebClient, click Log Out on the sidebar.
To monitor running migration jobs, click the Jobs icon on the sidebar.
Here you can select a job and Pause , Start or Stop it using the buttons in the toolbar. You can also filter the list using the Column Selector and Search field in the top right of the page.
To create a scanner, click the Scanners icon on the sidebar, click the Add Scanner + icon on the toolbar and then configure the parameters.
To modify a scanner, select the desired Scanner and either right-click it and then select Edit Scanner on the context menu, or click the Edit icon on the toolbar.
To copy a scanner, select the desired Scanner and either right-click it and then select Copy Scanner on the context menu, or click on the Copy icon on the toolbar. When finished, click SAVE.
To delete an existing Scanner, select the desired Scanner and either right-click it and click Delete Scanner on the context menu, or click the Delete icon on the toolbar. Then, in the Confirm Delete dialog box, click DELETE.
To view a Scan Run Log select the desired scan run and either right-click it and select Download Scan Run Logs, or on the Log icon in the toolbar or by double clicking the entry.
To view the Scanned Objects of a Scan Run select the desired scan run and either right-click and select Show Scan Run Objects or click the Source Objects icon in the toolbar.
To delete a Scan Run select the desired scan run and either right-click it and select Delete Scan Run or click the Delete icon in the toolbar.
You can also do this by selecting your scanner in the Scanners view and either right-click and select Source Objects or click the Source Objects icon in the toolbar.
To Customize the displayed columns, click on the Customize Columns button in the toolbar. You will be presented with a list of all existing columns from which you can choose which will be displayed. By default, all columns are displayed.
To Export objects as CSV, click on the Export objects as CSV button in the toolbar. This will export all the object metadata present in the Scanner as a CSV file.
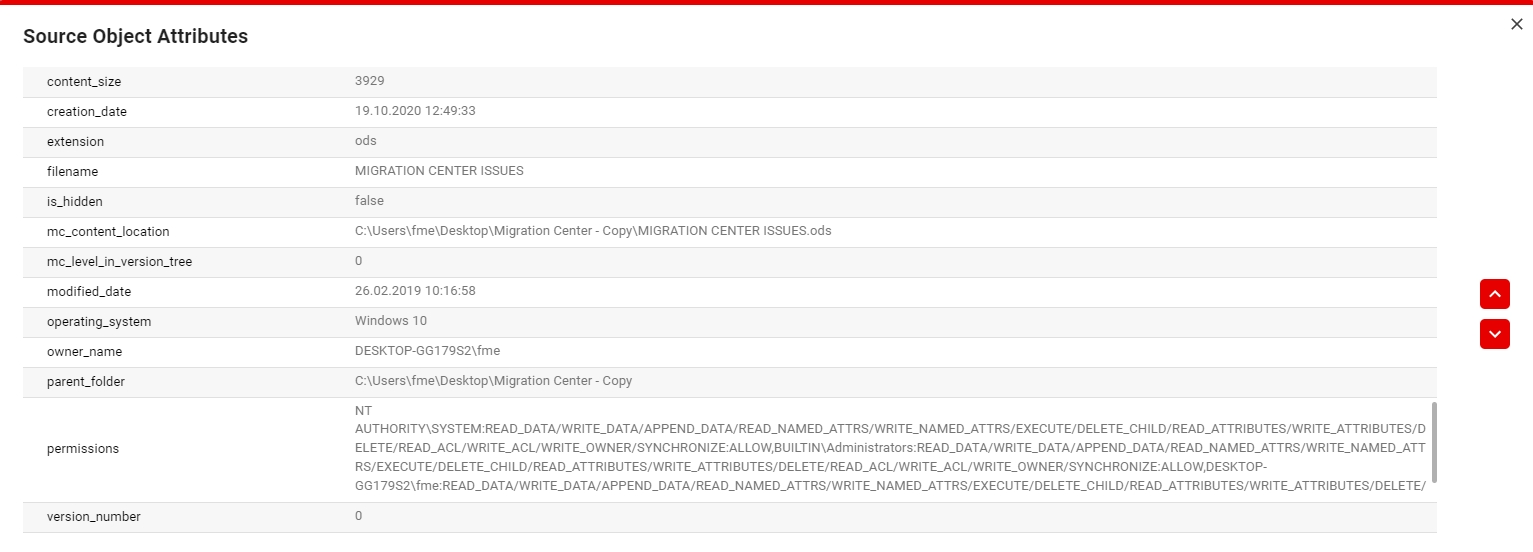
To view the Attributes of an object, click on the object and then on the View Attributes button in the toolbar. This will open a view that contains all the attributes of that specific object.
To view the Relations of an object, click on the object and then on the View Relations button in the toolbar. This will open a view that contains all the relations and their details for a specific object.
To refresh the objects list, click on the Refresh Objects button in the toolbar.
To create a Migset, click on the Migsets icon in the sidebar and on the buttons bar click the Add MigSet + button.
To modify a Migset, select the desired Migset and either right-click it and then select Edit Migset on the context menu, or click the Edit icon on the toolbar. When finished, click SAVE.
To copy a Migset, select the desired Migset and either right-click it and then select Copy Migset on the context menu, or click on the Copy icon on the toolbar. When finished, click SAVE.
To delete a Migset, select the desired Migset and either right-click it and click Delete Migset on the context menu, or click the Delete icon the toolbar. Then, in the Confirm Delete dialog box, click DELETE.
To Apply Transformation on a migset you can use the Transform button . This will start a background process of processing all Transformation Rules on each Source Object in order to generate the new metadata on the Target Objects.
To Reset Transformation on a migset you can use the Reset button . In the confirmation dialog you have a checkbox if you want to Reset Imported Objects (by default only objects in status Transformed, Validated and Error are reset).
Splitting a migset is a new feature added in the new migration-center WebClient. It allows you to create copies of the selected migset and split its objects equally among them. After clicking on the Split Migset button you can select the number of migsets to split it in. An approximation of the number of objects per migset after the split is displayed. Click on the SPLIT button and confirm to start the process.
To select objects in a migset, double-click an entry in the list of Available scan runs or select one and use the down arrow button to add it to the list of Selected scan runs.
To add a Transformation Rule click on the Plus icon then set a Name and optionally a Description.
To copy a Transformation Rule select the rules and click on the Copy icon .
To delete a Transformation Rule select the rules and click on the Delete icon .
To copy rules between migsets select the rules and click on the Copy to Clipboard icon . Then open the Rules section of the migset where you want to paste the rules and click on the Paste from Clipboard icon .
To get a description of the function or its parameters you can hover your mouse over the info icon .
For migrations where a simple transformation rule is needed for each or most source attributes you can use the Generate Rules feature by clicking on the button. This will create a Transformation Rule for each Source Attribute with the same name and with a GetValue() function for each specific attribute in it. This is very useful in migrations where the Source and Target systems are of the same type.
You can Export the entire migset configuration using the Export to XML icon .
You can Import previously exported migset configurations using the Import from XML icon .
To add an Object Type, select one from the dropdown list and click the Add button .
To add an Association, select the object type, then the transformation rule and target attribute you want to associate, and click on the green Add button .
Alternatively you can Auto Associate transformation rules and target attributes that have the same name, by using the button. This is the recommended way.
To Customize the displayed columns, click on the Customize Columns button in the toolbar. You will be presented with a list of all existing columns from which you can choose which will be displayed. By default, all columns are displayed.
To Export objects as CSV, click on the Export objects as CSV button in the toolbar. This will export all the object metadata as a CSV file.
To view the Attributes of an object, click on the object and then on the View Attributes button in the toolbar. This will open a view that contains all the attributes of that specific object.
To view the Relations of an object, click on the object and then on the View Relations button in the toolbar. This will open a view that contains all the relations and their details for a specific object.
To refresh the objects list, click on the Refresh Objects button in the toolbar.
To Remove objects from the migset, you can select one or multiple objects using the checkboxes to the left of the table. Once you have your selection, press the Remove from Migset button in the toolbar or in the context menu.
To manually edit the attributes of an object, press the Edit Attributes button in the toolbar or in the context menu. This will open a view that will allow you to edit individual object attributes.
To Reset Transformation for one or more objects, select the required object/s and press the Reset button in the toolbar or in the context menu. The object will be reset to its Unprocessed state.
To create an importer, click the Importers icon on the sidebar and then click the Add icon on the buttons bar and then configure the parameters.
To modify an importer, select the desired Importer and either right-click it and then select Edit Importer on the context menu, or click the Edit icon on the toolbar.
To copy an importer, select the desired Importer and either right-click it and then select Copy Importer on the context menu, or click on the Copy icon on the toolbar. When finished, click SAVE.
To delete an existing importer, select the desired Importer and either right-click it and click Delete Importer on the context menu, or click the Delete icon on the toolbar. Then, in the Confirm Delete dialog box, click DELETE.
To view an Import Run Log select the desired import run and either right-click it and select Download Import Run Logs, or on the Log icon in the toolbar or by double clicking the entry.
To delete an Import Run select the desired import run and either right-click it and select Delete Import Run or click the Delete icon in the toolbar.
To create a Scheduler click on the Schedulers icon in the sidebar and on the Add icon . See the following instructions on how to configure the rest of the Scheduler configuration.
To modify a Scheduler, select it and either right-click it and then select Edit Scheduler on the context menu, or click the Edit button on the toolbar. When finished, click SAVE.
To delete an Scheduler, select it and either right-click it and click Delete Scheduler on the context menu, or click the Delete button on the toolbar. Then, in the confirmation dialog box, click DELETE.
To delete a Scheduler Run select it and click on the Delete icon . Click on DELETE if you want to also delete the scan run, migset and import run along with all the imported objects. Or click on JUST THE RUN to delete only the Scheduler Run from history.
The Dashboard is a new feature added to the WebClient which provides reports on the objects present in your migration-center Database.
The toolbar to the right allows you to change the type of the chart, offering a Pie Chart , Bar Chart and Donut Chart .
The chart of your choosing can then be exported as a SVG, PNG or CSV file using the drop down menu to the right.
To select the required year period, from the toolbar of the first chart, press Zoom In or Zoom Out or press Selection Zoom to drag-select the needed years.
To return the chart to its default state press the Reset Zoom button.
To export the charts, press the Export to SVG, PNG or CSV for the respective chart.
You can view the Source Attributes and Target Attribtues (if they exist) of each object by selecting an object and clicking on the following icons in the toolbar or by right clicking an object and selecting the View Source Attributes or View Target Attributes entries in the context menu.
To create a Job Server definition, click the Configure button on the sidebar, in the JOB SERVERS tab click the Add icon on the buttons bar and then configure the Job Server parameters in the Create dialog box.
To modify an existing Job Server, select the desired Job Server and either right-click it and then select Edit Job Server on the context menu, or click the Edit button on the buttons bar. Then, in the Edit dialog box, configure the parameters accordingly. When finished, click SAVE.
To delete an existing Job Server, select the desired Job Server and either right-click it and click Delete Job Server on the context menu, or click the Delete button on the buttons bar. Then, in the Confirm Delete dialog box, click DELETE.
To create an Object Type click the Configure button on the sidebar, in the OBJECT TYPES tab and click on the Add icon . Enter a Name and an optional Description, then click on the SAVE button.
To delete an Object Type select the Object Type and click on the Delete icon . Confirm the action in the confirmation dialog.
To export an Object Type to CSV select the Object Type and click on the Export icon .
To import an Object Type from CSV click on the Import icon and select the CSV file. Set the desired Name of the newly imported Object Type and click on the OK button.
To add a new Attribute select the Object Type, then click on the Add Attribute button. Set the attribute Name, Type (String, Number, Date or Boolean), Minimum and Maximum length allowed for the values of this attribute, if it allows Repeating values or not and if it is Required (mandatory to have a value). You can also set a Regular Expression to determine specific formats that the values are allowed to have.
To delete an Attribute select the Object Type and click on the Red X icon of the attribute you want to delete. When finished click on SAVE.
To create a Mapping List click the Configure button on the sidebar, in the MAPPING LIST tab and click on the Add icon . Enter a Name and click on the SAVE button.
To copy a Mapping List select the desired mapping list and click on the Copy icon in the toolbar.
To delete a Mapping List select the desired mapping list and click on the Delete icon in the toolbar.
To add a new entry manually click on the Add Value button , enter the values for the Key and the Value columns. When finished click on SAVE.
To paste entries first copy values either from an Excel table or from a text file that has the values tab separated, then click on the Paste Values icon . When finished click on SAVE.
To export entries to a CSV select the mapping list and click on the Export to CSV icon .
To import entries from CSV create or select a mapping list, click on the Import to CSV icon , Drag and Drop the CSV file, check the Overwrite existing entries option if you want existing entries with the same key as an imported one to be replaced, then click on Upload. After the import is finished you will receive a message with the number of successfully imported entries and a list of any error entries, if there are any. If the number of errors exceeds 1000, the import is canceled.
To delete an entry select the mapping list and click on the Red X icon of the entry you want to delete. When finished click on SAVE.
To make a mapping list Multi Column create or select a mapping list, click on the Customize Columns iconand add up to 10 Value Columns. Afterwards enter or import your entries as you would normally. When finished click on SAVE.